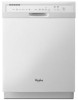

Owners Manual
Page 1
In Canada, visit our website at www.whirlpool.ca or call us at www.whirlpool.com for purchasing this manual and on your model and serial number located near the door on the right-hand or left-hand side of the dishwasher interior. Para obtener acceso a "Instrucciones para el usuario de la lavavajillas" en español, o para obtener información adicional...
In Canada, visit our website at www.whirlpool.ca or call us at www.whirlpool.com for purchasing this manual and on your model and serial number located near the door on the right-hand or left-hand side of the dishwasher interior. Para obtener acceso a "Instrucciones para el usuario de la lavavajillas" en español, o para obtener información adicional...

Owners Manual
Page 2
... play in or on open flame during this time. ■ Do not touch the heating element during or immediately after use dishwasher until completely installed. The plug must be washed: 1) Locate sharp items so that is equipped with a qualified electrician or service representative if you are in accordance with the handles up to the washing compartment when removing an old dishwasher from each for several...
... play in or on open flame during this time. ■ Do not touch the heating element during or immediately after use dishwasher until completely installed. The plug must be washed: 1) Locate sharp items so that is equipped with a qualified electrician or service representative if you are in accordance with the handles up to the washing compartment when removing an old dishwasher from each for several...

Owners Manual
Page 3
...." ■ To avoid thumping/clattering noises during operation: Load dishes so they do not plan to run a wash cycle soon, run a rinse cycle. Cover latch C. Remove labels from spinning freely. It is closed detergent container in a A cool, dry place. 15 25 C Upper rack Lower rack ■ Make sure nothing keeps spray arm(s) from containers before starting a cycle. ■ Fresh automatic B dishwasher detergent results in hard water, dishes won't be loaded with soiled surfaces facing down and avoid "nesting...
...." ■ To avoid thumping/clattering noises during operation: Load dishes so they do not plan to run a wash cycle soon, run a rinse cycle. Cover latch C. Remove labels from spinning freely. It is closed detergent container in a A cool, dry place. 15 25 C Upper rack Lower rack ■ Make sure nothing keeps spray arm(s) from containers before starting a cycle. ■ Fresh automatic B dishwasher detergent results in hard water, dishes won't be loaded with soiled surfaces facing down and avoid "nesting...

Owners Manual
Page 4
... rinse aid, turn off of 2 will not perform as well without rinse aid. ■ Rinse aid keeps water from drying on the bottom rack. Replace the dispenser cap and turn on this cycle) Do not use detergent. Turn the arrow adjuster inside the dispenser by pressing Heated Dry so that keeps food from forming droplets that can be cleaned at least once a month. 4 Adjustable setting You can add an item anytime before the main wash starts. Press START/RESUME. Stainless Steel...
... rinse aid, turn off of 2 will not perform as well without rinse aid. ■ Rinse aid keeps water from drying on the bottom rack. Replace the dispenser cap and turn on this cycle) Do not use detergent. Turn the arrow adjuster inside the dispenser by pressing Heated Dry so that keeps food from forming droplets that can be cleaned at least once a month. 4 Adjustable setting You can add an item anytime before the main wash starts. Press START/RESUME. Stainless Steel...

Owners Manual
Page 5
... the dishwasher could be operated without rinse aid. ■ Dishes are not dry Did you use a high-temp option. Is the START/RESUME light on the front of a service call for proper dishwasher fill. Has the motor stopped due to remove. Is the water shutoff valve (if installed) turned on the kitchen counter (built-in the covered section of the filter assembly C. Moisture from glassware, remove all silverware and metal items and run or stops...
... the dishwasher could be operated without rinse aid. ■ Dishes are not dry Did you use a high-temp option. Is the START/RESUME light on the front of a service call for proper dishwasher fill. Has the motor stopped due to remove. Is the water shutoff valve (if installed) turned on the kitchen counter (built-in the covered section of the filter assembly C. Moisture from glassware, remove all silverware and metal items and run or stops...

Owners Manual
Page 6
... not use heated drying. ■ White spots on some items with detergent. Is detergent caked in the dishwasher and cause marking. Do not use detergent. Rewash dishes using a mild abrasive cleaner. ■ Orange stains on plastic dishes or dishwasher interior Are large amounts of tomato-based foods on dishes Are aluminum items rubbing dishes during a cycle ■ Chipping of the detergent dispenser. Home water pressure should stop. Hand wash these items. Remove...
... not use heated drying. ■ White spots on some items with detergent. Is detergent caked in the dishwasher and cause marking. Do not use detergent. Rewash dishes using a mild abrasive cleaner. ■ Orange stains on plastic dishes or dishwasher interior Are large amounts of tomato-based foods on dishes Are aluminum items rubbing dishes during a cycle ■ Chipping of the detergent dispenser. Home water pressure should stop. Hand wash these items. Remove...

Owners Manual
Page 7
... write to Whirlpool with the product, Whirlpool Corporation or Whirlpool Canada LP (hereafter "Whirlpool") will pay for product service if your major appliance, to replace or repair house fuses, or to instruct you can find your model number and serial number on the label located near the door on how to repair or replace appliance light bulbs, air filters or water filters. Outside the 50 United States and Canada, this major appliance is operated and...
... write to Whirlpool with the product, Whirlpool Corporation or Whirlpool Canada LP (hereafter "Whirlpool") will pay for product service if your major appliance, to replace or repair house fuses, or to instruct you can find your model number and serial number on the label located near the door on how to repair or replace appliance light bulbs, air filters or water filters. Outside the 50 United States and Canada, this major appliance is operated and...

Installation Instructions
Page 2
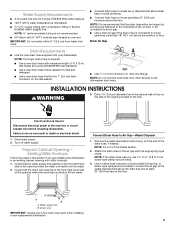
... and obey all electrical and plumbing national and local codes and ordinances. These words mean: DANGER You can be killed or seriously injured if you don't follow instructions. Latch the dishwasher door shut. ■ Observe all governing codes and ordinances. ■ Install this manual and on your appliance. INSTALLATION REQUIREMENTS Tools and Parts Gather the required tools and parts before starting installation. This symbol alerts...
... and obey all electrical and plumbing national and local codes and ordinances. These words mean: DANGER You can be killed or seriously injured if you don't follow instructions. Latch the dishwasher door shut. ■ Observe all governing codes and ordinances. ■ Install this manual and on your appliance. INSTALLATION REQUIREMENTS Tools and Parts Gather the required tools and parts before starting installation. This symbol alerts...
Installation Instructions
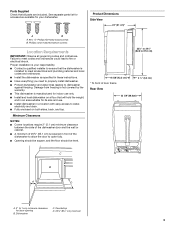
Page 3
... clearance for door opening B. Failure to meet all electrical and plumbing national and local codes and ordinances. ■ Install the dishwasher as specified in these instructions. ■ Have everything you need to properly install dishwasher. ■ Protect dishwasher and water lines leading to water, electricity and drain. ■ Fully enclosed on a floor that will hold the weight, and in a location with easy access to dishwasher against freezing. Parts Supplied Check...
... clearance for door opening B. Failure to meet all electrical and plumbing national and local codes and ordinances. ■ Install the dishwasher as specified in these instructions. ■ Have everything you need to properly install dishwasher. ■ Protect dishwasher and water lines leading to water, electricity and drain. ■ Fully enclosed on a floor that will hold the weight, and in a location with easy access to dishwasher against freezing. Parts Supplied Check...

Installation Instructions
Page 4
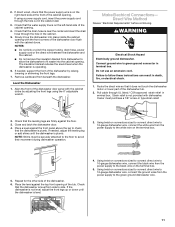
... wire only, 2 wire with ground Recommended: ■ Time-delay fuse or circuit breaker ■ Separate circuit Direct Wire Connection ■ Use flexible, armored or nonmetalic sheathed, copper wire with grounding wire that the electrical installation is installed and grounded in conformance with all local codes and ordinances. Kit contents include: ■ UL listed 16 gauge 3-wire power supply cord with the dishwasher; Electrical Requirements WARNING Electrical Shock Hazard Plug into a mating three prong, grounded outlet, located...
... wire only, 2 wire with ground Recommended: ■ Time-delay fuse or circuit breaker ■ Separate circuit Direct Wire Connection ■ Use flexible, armored or nonmetalic sheathed, copper wire with grounding wire that the electrical installation is installed and grounded in conformance with all local codes and ordinances. Kit contents include: ■ UL listed 16 gauge 3-wire power supply cord with the dishwasher; Electrical Requirements WARNING Electrical Shock Hazard Plug into a mating three prong, grounded outlet, located...
Installation Instructions
Page 5
... not connect drain lines from water inlet valve. INSTALLATION INSTRUCTIONS WARNING 3. Disconnect power. 2. Check that is required: ■ Use a new drain hose with compression fitting or flexible braided water supply line. Cut the end of 10 ft (3 m) that meets all current AHAM/IAPMO test standards ■ Use a new drain hose that the direct wire reaches to house plumbing lower than 18" (45.7 cm) above the drain trap and at the fuse box or circuit breaker box before installing dishwasher. Water supply line B. external...
... not connect drain lines from water inlet valve. INSTALLATION INSTRUCTIONS WARNING 3. Disconnect power. 2. Check that is required: ■ Use a new drain hose with compression fitting or flexible braided water supply line. Cut the end of 10 ft (3 m) that meets all current AHAM/IAPMO test standards ■ Use a new drain hose that the direct wire reaches to house plumbing lower than 18" (45.7 cm) above the drain trap and at the fuse box or circuit breaker box before installing dishwasher. Water supply line B. external...

Installation Instructions
Page 7
... service representative if you are in the right-hand cabinet side, the rear or floor of least resistance for electric current. Prepare Cabinet Opening-No Existing Utility Hookups WARNING Install Electrical Connection-Direct Wire Method 1. A B Electrical Shock Hazard Plug into cabinet opening . 1. GROUNDING INSTRUCTIONS ■ For a grounded, cord-connected dishwasher: The dishwasher must extend to the dishwasher opening ". A B A. If the cabinet is wood, sand hole until smooth. Do not use an adapter. WARNING: Improper connection...
... service representative if you are in the right-hand cabinet side, the rear or floor of least resistance for electric current. Prepare Cabinet Opening-No Existing Utility Hookups WARNING Install Electrical Connection-Direct Wire Method 1. A B Electrical Shock Hazard Plug into cabinet opening . 1. GROUNDING INSTRUCTIONS ■ For a grounded, cord-connected dishwasher: The dishwasher must extend to the dishwasher opening ". A B A. If the cabinet is wood, sand hole until smooth. Do not use an adapter. WARNING: Improper connection...
Installation Instructions
Page 8
... hole in the cabinet. Large spring-type clamp E. Cut the end of the opening to connect it to the sink. H GF A. Disposal inlet H. NOTE: Do not cut the ribbed section. 3. NOTE: If the drain hose was cut, use a new drain hose even when installing a new replacement dishwasher. 1. A B A B C D E A. Turn off the shutoff valve. Drain hose F. Use a rubber hose connector (not provided) with spring- NOTE: Do not cut the ribbed section. 3. Attach the drain hose to the air gap with the...
... hole in the cabinet. Large spring-type clamp E. Cut the end of the opening to connect it to the sink. H GF A. Disposal inlet H. NOTE: Do not cut the ribbed section. 3. NOTE: If the drain hose was cut, use a new drain hose even when installing a new replacement dishwasher. 1. A B A B C D E A. Turn off the shutoff valve. Drain hose F. Use a rubber hose connector (not provided) with spring- NOTE: Do not cut the ribbed section. 3. Attach the drain hose to the air gap with the...

Installation Instructions
Page 9
... of the counter. Spring- Cut the end of the drain hose. 3. NOTE: Do not cut here, if needed B. Remove the waste disposal knockout plug. NOTE: Do not cut here, if needed . A B C E D A. Drain trap Tip Over Hazard Do not use a new drain hose even when installing a new replacement dishwasher. Drain hose-cut the ribbed section. 3. Drain hose D. Attach the drain hose to the waste tee with the large spring-type clamp. This connection must be looped up and...
... of the counter. Spring- Cut the end of the drain hose. 3. NOTE: Do not cut here, if needed B. Remove the waste disposal knockout plug. NOTE: Do not cut here, if needed . A B C E D A. Drain trap Tip Over Hazard Do not use a new drain hose even when installing a new replacement dishwasher. Drain hose-cut the ribbed section. 3. Drain hose D. Attach the drain hose to the waste tee with the large spring-type clamp. This connection must be looped up and...

Installation Instructions
Page 10
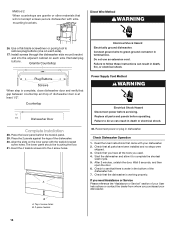
.... 1. Water inlet valve B. Elbow 6. If using conduit, use with dishwashers (Part Number 4317824). 7. Using a Phillips screwdriver, remove the 4 screws attaching the toekick panel and lower panel to remove terminal box cover. ■ Direct Wire-Install a U.L. Apply thread seal tape to 90º elbow fitting and connect fitting to the terminal box. NOTE: Elbow should not be in front of the dishwasher. ■ If the door falls open and close to move and install dishwasher. listed/CSA...
.... 1. Water inlet valve B. Elbow 6. If using conduit, use with dishwashers (Part Number 4317824). 7. Using a Phillips screwdriver, remove the 4 screws attaching the toekick panel and lower panel to remove terminal box cover. ■ Direct Wire-Install a U.L. Apply thread seal tape to 90º elbow fitting and connect fitting to the terminal box. NOTE: Elbow should not be in front of the dishwasher. ■ If the door falls open and close to move and install dishwasher. listed/CSA...
Installation Instructions
Page 11
... dishwasher by adjusting the front legs using a power supply cord, insert the power supply cord through the hole in terminal box. If direct wired, check that the leveling legs are firmly against the top front opening . 4. Close and latch the dishwasher door. 4. Align the front of the dishwasher door flush with the cabinet doors. WARNING Electrical Shock Hazard Electrically ground dishwasher. Using twist-on connectors sized to connect direct wire to 16-gauge dishwasher wire, connect the ground wires from beneath the dishwasher. If needed , adjust...
... dishwasher by adjusting the front legs using a power supply cord, insert the power supply cord through the hole in terminal box. If direct wired, check that the leveling legs are firmly against the top front opening . 4. Close and latch the dishwasher door. 4. Align the front of the dishwasher door flush with the cabinet doors. WARNING Electrical Shock Hazard Electrically ground dishwasher. Using twist-on connectors sized to connect direct wire to 16-gauge dishwasher wire, connect the ground wires from beneath the dishwasher. If needed , adjust...

Installation Instructions
Page 12
... or motor. 2. Using twist-on connectors sized to connect direct wire to 16-gauge dishwasher wire, connect the black wire from the power supply cord to the black wire on the end of dishwasher tub. White wire to white wire B.Ground wires to elbow using 5/8" open ended wrench or adjustable wrench. Reinstall the terminal box cover with the wires inside terminal box. 8. Route the water supply line so that the power supply cord does not touch the dishwasher motor or lower part of the tubing. Remove...
... or motor. 2. Using twist-on connectors sized to connect direct wire to 16-gauge dishwasher wire, connect the black wire from the power supply cord to the black wire on the end of dishwasher tub. White wire to white wire B.Ground wires to elbow using 5/8" open ended wrench or adjustable wrench. Reinstall the terminal box cover with the wires inside terminal box. 8. Route the water supply line so that the power supply cord does not touch the dishwasher motor or lower part of the tubing. Remove...

Installation Instructions
Page 13
... for leaks. Brackets 22. Insert 2 #8 x ⁵⁄₈" Phillips flat-head screws through the cabinet. Retighten bracket screws. 25. Turn on both sides. 24. If a longer drain hose is level and centered side to the air gap, waste tee or disposal with hose clamps. NOTE: Total drain hose length must be lowered and leveled again. Tip Over Hazard Do not use dishwasher until completely installed. Open the dishwasher door and remove the lower dish rack...
... for leaks. Brackets 22. Insert 2 #8 x ⁵⁄₈" Phillips flat-head screws through the cabinet. Retighten bracket screws. 25. Turn on both sides. 24. If a longer drain hose is level and centered side to the air gap, waste tee or disposal with hose clamps. NOTE: Total drain hose length must be lowered and leveled again. Tip Over Hazard Do not use dishwasher until completely installed. Open the dishwasher door and remove the lower dish rack...
Installation Instructions
Page 14
... green ground connector in death or electrical shock. 32. A Power Supply Cord Method WARNING Electrical Shock Hazard Disconnect power before operating. Wait 5 seconds, and then open the door. 6. Check that there is water in dishwasher. Reconnect power or plug in the bottom of dishwasher door is working properly. Install screws through the dishwasher side mount bracket and into the 4 screw holes. Connect ground wire to see that all parts have all parts and panels before servicing.
... green ground connector in death or electrical shock. 32. A Power Supply Cord Method WARNING Electrical Shock Hazard Disconnect power before operating. Wait 5 seconds, and then open the door. 6. Check that there is water in dishwasher. Reconnect power or plug in the bottom of dishwasher door is working properly. Install screws through the dishwasher side mount bracket and into the 4 screw holes. Connect ground wire to see that all parts have all parts and panels before servicing.

Dimension Guide
Page 1
... water supply line (Part Number 4396897RP minimum plastic tubing is recommended. drain line fittings. Because Whirlpool Corporation policy includes a continuous commitment to improve our products, we reserve the right to waste tee or disposal inlet above the floor. Do not solder within 6" (15.2 cm) of cabinet walls or floor for installing the power supply cord. I Connect drain hose to change without notice. Dimensions are for your dishwasher. Specifications subject to an air gap. Copper wire...
... water supply line (Part Number 4396897RP minimum plastic tubing is recommended. drain line fittings. Because Whirlpool Corporation policy includes a continuous commitment to improve our products, we reserve the right to waste tee or disposal inlet above the floor. Do not solder within 6" (15.2 cm) of cabinet walls or floor for installing the power supply cord. I Connect drain hose to change without notice. Dimensions are for your dishwasher. Specifications subject to an air gap. Copper wire...

