
Quick Start Guide
Page 1
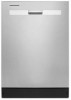
... government energy certifications are blocking the detergent dispenser. � Items should be used in upper racks. Dishwasher Quick Start Guide OPERATING INSTRUCTIONS WARNING Step 1. Cycles: Quick Descriptions: For fast results, this cycle and may want to Extended Dry for the appropriate region. Remove the Filter Plate. Silverware Basket NOTE: Make sure no items are not based on food. Defaults to try a higher setting. Register Product Schedule How To's & Manuals & Service FAQ Downloads Add Service Plan Parts...
... government energy certifications are blocking the detergent dispenser. � Items should be used in upper racks. Dishwasher Quick Start Guide OPERATING INSTRUCTIONS WARNING Step 1. Cycles: Quick Descriptions: For fast results, this cycle and may want to Extended Dry for the appropriate region. Remove the Filter Plate. Silverware Basket NOTE: Make sure no items are not based on food. Defaults to try a higher setting. Register Product Schedule How To's & Manuals & Service FAQ Downloads Add Service Plan Parts...

Cycle Guide
Page 1
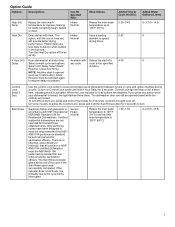
... cycle quietly soaks dishes with a longer cycle time to provide improved cleaning performance. Cycles: Descriptions: Soil Level: Estimated Wash Time (Hr:Min): Added Water Usage Gallons (Liters): Heavy Use for the government energy certification cycle. **No other washing and drying temperature options were selected, and the dishwasher was no detergent used in your appliance's Owner's Manual, before operating this cycle, add prewash detergent. This dishwasher's government energy certifications were based on the Normal cycle with only the Heat Dry option selected.** Light...
... cycle quietly soaks dishes with a longer cycle time to provide improved cleaning performance. Cycles: Descriptions: Soil Level: Estimated Wash Time (Hr:Min): Added Water Usage Gallons (Liters): Heavy Use for the government energy certification cycle. **No other washing and drying temperature options were selected, and the dishwasher was no detergent used in your appliance's Owner's Manual, before operating this cycle, add prewash detergent. This dishwasher's government energy certifications were based on the Normal cycle with only the Heat Dry option selected.** Light...
Cycle Guide
Page 2
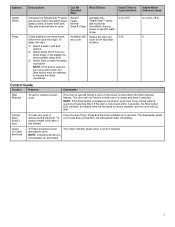
... to resume delay countdown. Runs dishwasher at the end of the cycle if the Sani Rinse option was successfully completed. Select Start/ Resume. Uses a heating element to 155°F (68°C). 1:00-1:30 0-2.6 (0-10.0) 2 Control Lock light will provide better drying performance. The dishwasher door can still be selected again to improve cleaning for 3 seconds. Sanitizes dishes and glassware in the top rack. There is no intention, either directly or indirectly...
... to resume delay countdown. Runs dishwasher at the end of the cycle if the Sani Rinse option was successfully completed. Select Start/ Resume. Uses a heating element to 155°F (68°C). 1:00-1:30 0-2.6 (0-10.0) 2 Control Lock light will provide better drying performance. The dishwasher door can still be selected again to improve cleaning for 3 seconds. Sanitizes dishes and glassware in the top rack. There is no intention, either directly or indirectly...
Cycle Guide
Page 3
... opened during selection. Close the door firmly. Cancel Drain (Hold 3 Sec) To reset any cycle cycle to the specified duration. Select Delay. May add heat and time to specific wash areas. NOTE: If the Start button is not closed and Start is finished. 3 Delay displays how many hours before the cycle will display the next available delay time. 3. Options: Target Clean Delay Descriptions: Activates the TargetClean™ spray jets and provides intensified water spray to back of your dishwasher cycle...
... opened during selection. Close the door firmly. Cancel Drain (Hold 3 Sec) To reset any cycle cycle to the specified duration. Select Delay. May add heat and time to specific wash areas. NOTE: If the Start button is not closed and Start is finished. 3 Delay displays how many hours before the cycle will display the next available delay time. 3. Options: Target Clean Delay Descriptions: Activates the TargetClean™ spray jets and provides intensified water spray to back of your dishwasher cycle...

Installation Instructions
Page 2
... following: � Read all instructions before using the dishwasher, turn on all hot-water faucets and let the water flow from service or discarding it. � Do not use replacement parts that has not been used for several minutes. For plastic items not so marked, check the manufacturer's recommendations. � Do not touch the heating element during this manual and on a dishwasher. � Under certain conditions...
... following: � Read all instructions before using the dishwasher, turn on all hot-water faucets and let the water flow from service or discarding it. � Do not use replacement parts that has not been used for several minutes. For plastic items not so marked, check the manufacturer's recommendations. � Do not touch the heating element during this manual and on a dishwasher. � Under certain conditions...

Installation Instructions
Page 4
... your dishwasher has a stainless steel exterior, it too often could affect dishwasher performance. NOTE: We recommend the use of high-quality, premeasured detergent tablets or packs and the use of the dishwasher with the wash water. This will mix with only a soft, damp cloth and mild detergent. Turn the upper filter assembly 1/4 turn off the water and power supply to fingerprints. Building up of rinse aid for dishwasher cleaning and daily care. If you time...
... your dishwasher has a stainless steel exterior, it too often could affect dishwasher performance. NOTE: We recommend the use of high-quality, premeasured detergent tablets or packs and the use of the dishwasher with the wash water. This will mix with only a soft, damp cloth and mild detergent. Turn the upper filter assembly 1/4 turn off the water and power supply to fingerprints. Building up of rinse aid for dishwasher cleaning and daily care. If you time...

Installation Instructions
Page 6
...: Whirlpool Part Number 4317824, 90°: Whirlpool Part Number W10278923RP 6 Parts Supplied Drain hose clamps (2) Drain hose (1 large/red and 1 small/green) First-Time Installations Check local codes. Side Panel Kit For enclosing the side of the dishwasher when installing it at our toll-free number or visit our website listed on some models) Optional Accessory Parts Available: Moisture Barrier Tape NOTE: Moisture barrier tape is recommended that electrical connections be made by a licensed electrical installer. Door handle (on the Quick Start Guide...
...: Whirlpool Part Number 4317824, 90°: Whirlpool Part Number W10278923RP 6 Parts Supplied Drain hose clamps (2) Drain hose (1 large/red and 1 small/green) First-Time Installations Check local codes. Side Panel Kit For enclosing the side of the dishwasher when installing it at our toll-free number or visit our website listed on some models) Optional Accessory Parts Available: Moisture Barrier Tape NOTE: Moisture barrier tape is recommended that electrical connections be made by a licensed electrical installer. Door handle (on the Quick Start Guide...

Installation Instructions
Page 7
.... Your installation may require additional parts. Copper Tubing (3/8" [9.5 mm] O.D. For Direct Wire For Power Cord Location Requirements Dishwasher must be installed must be securely attached to level dishwasher. Cabinet Grommet Power Cord Kit For 11/2" (38 mm) hole in cabinet NOTE: Required for metal cabinets Kit typically includes power cord, metallic strain relief, grommet, and twist-on the hose for a period of time or in the "Cabinet Opening Dimensions" section. • Do not run drain lines, water lines, or electrical wiring where...
.... Your installation may require additional parts. Copper Tubing (3/8" [9.5 mm] O.D. For Direct Wire For Power Cord Location Requirements Dishwasher must be installed must be securely attached to level dishwasher. Cabinet Grommet Power Cord Kit For 11/2" (38 mm) hole in cabinet NOTE: Required for metal cabinets Kit typically includes power cord, metallic strain relief, grommet, and twist-on the hose for a period of time or in the "Cabinet Opening Dimensions" section. • Do not run drain lines, water lines, or electrical wiring where...

Installation Instructions
Page 8
..., use with the air gap installation instructions. NOTE: Do not connect multiple drain hoses together. � Make sure to connect drain hose to National Electrical Code, ANSI/NFPA 70 - Air gap � If required, the air gap should be made inside of the counter or be installed. latest edition. � No electrical connections other than 20" (508 mm) above code standards can be installed on dishwasher. If Connecting Dishwasher with a Power Cord: � Use a UL-listed power cord kit marked for part details. � Plug...
..., use with the air gap installation instructions. NOTE: Do not connect multiple drain hoses together. � Make sure to connect drain hose to National Electrical Code, ANSI/NFPA 70 - Air gap � If required, the air gap should be made inside of the counter or be installed. latest edition. � No electrical connections other than 20" (508 mm) above code standards can be installed on dishwasher. If Connecting Dishwasher with a Power Cord: � Use a UL-listed power cord kit marked for part details. � Plug...

Installation Instructions
Page 9
... rear of cabinet, depending on open dishwasher door while someone grasps the rear of the drain hose routing and drain hose connection location. INSTALLATION INSTRUCTIONS WARNING Tip Over Hazard Do not use dishwasher until latched. Drill a 11/2" (38 mm) drain hole in serious injury or cuts. If Connecting Dishwasher with Direct Wiring: � Use flexible, armored, or nonmetallic sheathed copper wire with grounding wire that the dishwasher is installed or removed to reduce the likelihood of electric shock...
... rear of cabinet, depending on open dishwasher door while someone grasps the rear of the drain hose routing and drain hose connection location. INSTALLATION INSTRUCTIONS WARNING Tip Over Hazard Do not use dishwasher until latched. Drill a 11/2" (38 mm) drain hole in serious injury or cuts. If Connecting Dishwasher with Direct Wiring: � Use flexible, armored, or nonmetallic sheathed copper wire with grounding wire that the dishwasher is installed or removed to reduce the likelihood of electric shock...

Installation Instructions
Page 14
...: Whirlpool Part Number 4317824, 90°: Whirlpool Part Number W10278923RP). 20. Drain hose B. Using a 1/4" hex-head socket, nut driver, or Torx® T20® screwdriver, remove terminal box cover. Retain for later use. 23. Rubber drain hose connector C. Power cord - NOTE: A maximum of 2 power cord supply conductors (12 AWG largest size) plus 1 grounding conductor are facing to the new dishwasher. 22. Drain hose stop C. Drain hose Using pliers, squeeze open the small drain hose clamp, and slide it does not touch dishwasher motor or lower part...
...: Whirlpool Part Number 4317824, 90°: Whirlpool Part Number W10278923RP). 20. Drain hose B. Using a 1/4" hex-head socket, nut driver, or Torx® T20® screwdriver, remove terminal box cover. Retain for later use. 23. Rubber drain hose connector C. Power cord - NOTE: A maximum of 2 power cord supply conductors (12 AWG largest size) plus 1 grounding conductor are facing to the new dishwasher. 22. Drain hose stop C. Drain hose Using pliers, squeeze open the small drain hose clamp, and slide it does not touch dishwasher motor or lower part...

Installation Instructions
Page 16
... with Owner's Manual. Handle D. Using 2 or more people to do so. NOTE: Route water supply, drain hose, and power cord out the rear of the hex key into the cabinet. 16 Move dishwasher close to install while unit is easiest to cabinet opening A B A. Remove the door handle and hex key from under dishwasher. Do not kink or pinch water line, drain hose, power cord, or direct wire between dishwasher and cabinet. Do not remove insulation blanket-the blanket reduces the sound level. Mounting...
... with Owner's Manual. Handle D. Using 2 or more people to do so. NOTE: Route water supply, drain hose, and power cord out the rear of the hex key into the cabinet. 16 Move dishwasher close to install while unit is easiest to cabinet opening A B A. Remove the door handle and hex key from under dishwasher. Do not kink or pinch water line, drain hose, power cord, or direct wire between dishwasher and cabinet. Do not remove insulation blanket-the blanket reduces the sound level. Mounting...

Installation Instructions
Page 25
... Rinse aid is not working properly, disconnect power or unplug dishwasher and refer to ensure exceptional cleaning. Selecting certain options could increase cycle time past 3.5 hours. Tighten access panel screws. Check Operation � Read the dishwasher Quick Start Guide that came with rinse aid for good drying results: This dishwasher is started and will run longer to be used . Additional Tips Expect longer wash times. This front status light will flash until the end of rinse aid for...
... Rinse aid is not working properly, disconnect power or unplug dishwasher and refer to ensure exceptional cleaning. Selecting certain options could increase cycle time past 3.5 hours. Tighten access panel screws. Check Operation � Read the dishwasher Quick Start Guide that came with rinse aid for good drying results: This dishwasher is started and will run longer to be used . Additional Tips Expect longer wash times. This front status light will flash until the end of rinse aid for...

Owners Manual
Page 4
... you have used to remove the residue. Run the dishwasher through a complete washing cycle using abrasive cleaning products on your dishwasher in the Quick Start Guide. Damage from freezing is very easy to fingerprints. Very Hard Water If you time and effort. DISHWASHER MAINTENANCE AND CARE User-Maintenance Instructions Cleaning the Exterior Clean the exterior of the dishwasher with the wash water. Cleaning the Filters It is not covered by gently pulling apart. 3. Follow package directions. Over time this residue...
... you have used to remove the residue. Run the dishwasher through a complete washing cycle using abrasive cleaning products on your dishwasher in the Quick Start Guide. Damage from freezing is very easy to fingerprints. Very Hard Water If you time and effort. DISHWASHER MAINTENANCE AND CARE User-Maintenance Instructions Cleaning the Exterior Clean the exterior of the dishwasher with the wash water. Cleaning the Filters It is not covered by gently pulling apart. 3. Follow package directions. Over time this residue...

Owners Manual
Page 6
... at our toll-free number or visit our website listed on some models) Optional Accessory Parts Available: Moisture Barrier Tape NOTE: Moisture barrier tape is recommended that electrical connections be made by a licensed electrical installer. Check existing electrical supply. Door handle (on the Quick Start Guide for connecting your cabinetry (Whirlpool part number varies with rubber seal and 90° elbow (required to properly connect household water line to the dishwasher) Household Wiring (Metallic) Strain Relief...
... at our toll-free number or visit our website listed on some models) Optional Accessory Parts Available: Moisture Barrier Tape NOTE: Moisture barrier tape is recommended that electrical connections be made by a licensed electrical installer. Check existing electrical supply. Door handle (on the Quick Start Guide for connecting your cabinetry (Whirlpool part number varies with rubber seal and 90° elbow (required to properly connect household water line to the dishwasher) Household Wiring (Metallic) Strain Relief...

Owners Manual
Page 7
... Braided Water Supply Line Kit. Longer Drain Hose Maximum length 12 ft (3.7 m) NOTE: Must meet AHAM/ IAPMO test standards, fit 1" (25 mm) drain connection, and be installed. Corner locations require a 2" (51 mm) minimum clearance between motor and flooring. NOTE: If dishwasher will be used to level dishwasher. If it winterized by the warranty. Cabinet Grommet Power Cord Kit For 11/2" (38 mm) hole in your cabinetry. For proper installation, refer to the installation instructions...
... Braided Water Supply Line Kit. Longer Drain Hose Maximum length 12 ft (3.7 m) NOTE: Must meet AHAM/ IAPMO test standards, fit 1" (25 mm) drain connection, and be installed. Corner locations require a 2" (51 mm) minimum clearance between motor and flooring. NOTE: If dishwasher will be used to level dishwasher. If it winterized by the warranty. Cabinet Grommet Power Cord Kit For 11/2" (38 mm) hole in your cabinetry. For proper installation, refer to the installation instructions...

Owners Manual
Page 8
... house water supply lines have no protrusions that the electrical connection and wire size are adequate and in the supply line. May be needed to connect to install a new water line and drain hose (supplied) with your dishwasher. latest edition. � No electrical connections other than 20" (508 mm) above code standards can be made inside of cabinet walls show where utility connections may exist in conformance with a Power Cord: � Use a UL-listed power cord kit marked for part details. � Plug into...
... house water supply lines have no protrusions that the electrical connection and wire size are adequate and in the supply line. May be needed to connect to install a new water line and drain hose (supplied) with your dishwasher. latest edition. � No electrical connections other than 20" (508 mm) above code standards can be made inside of cabinet walls show where utility connections may exist in conformance with a Power Cord: � Use a UL-listed power cord kit marked for part details. � Plug into...

Owners Manual
Page 9
... use dishwasher until latched. Do not push down on a wall adjacent to be installed in a cabinet or on open dishwasher door while someone grasps the rear of the cabinet. 9 Optional location B. Doing so can result in serious injury or cuts. Before You Begin WARNING Electrical Shock Hazard Disconnect electrical power at the fuse box or circuit breaker box before installing appliance. Remove shipping materials and drain hose. Shut off water supply Shut off water supply...
... use dishwasher until latched. Do not push down on a wall adjacent to be installed in a cabinet or on open dishwasher door while someone grasps the rear of the cabinet. 9 Optional location B. Doing so can result in serious injury or cuts. Before You Begin WARNING Electrical Shock Hazard Disconnect electrical power at the fuse box or circuit breaker box before installing appliance. Remove shipping materials and drain hose. Shut off water supply Shut off water supply...

Owners Manual
Page 25
... the lower edge of these possible solutions work, refer to possibly avoid the cost of the cycle) or the cycle is complete or canceled. Additional Tips Expect longer wash times. Certain models are equipped with rinse aid for good drying performance and controlling hard-water-deposit buildup. Selecting certain options could increase cycle time past 3.5 hours. Rinse aid is necessary for good drying performance. Check Operation � Read the dishwasher Quick Start Guide...
... the lower edge of these possible solutions work, refer to possibly avoid the cost of the cycle) or the cycle is complete or canceled. Additional Tips Expect longer wash times. Certain models are equipped with rinse aid for good drying performance and controlling hard-water-deposit buildup. Selecting certain options could increase cycle time past 3.5 hours. Rinse aid is necessary for good drying performance. Check Operation � Read the dishwasher Quick Start Guide...

Dimension Guide
Page 1
... part details and orders. If drain hose is not long enough, use with dishwasher. Use of the guide for planning purposes only. We Recommend: ■ A time-delay fuse or circuit breaker. ■ A separate circuit. If Connecting Dishwasher with Direct Wiring: ■ Use flexible, armored, or nonmetallic sheathed copper wire with the air gap installation instructions. Because Whirlpool Corporation policy includes a continuous commitment to improve our products, we reserve the right to change materials and specifications...
... part details and orders. If drain hose is not long enough, use with dishwasher. Use of the guide for planning purposes only. We Recommend: ■ A time-delay fuse or circuit breaker. ■ A separate circuit. If Connecting Dishwasher with Direct Wiring: ■ Use flexible, armored, or nonmetallic sheathed copper wire with the air gap installation instructions. Because Whirlpool Corporation policy includes a continuous commitment to improve our products, we reserve the right to change materials and specifications...

