
Installation Instructions
Page 2
... Method 14 Direct Wire Electrical Connection 17 Connect Water Line to House Shutoff Valve 18 Connect Drain Hose 18 Complete Installation 20 Reinstall Access Panel 20 Check Operation 21 If Dishwasher Does Not Operate 21 Additional Tips 21 2 TABLE OF CONTENTS DISHWASHER SAFETY 3 INSTALLATION REQUIREMENTS 4 Tools and Parts 4 18" Product and Cabinet Opening Dimensions 6 24" Product and Cabinet Opening Dimensions 7 Location Requirements 8 Drain Requirements 8 Water Supply Requirements 8 Electrical Requirements 8 INSTALLATION INSTRUCTIONS 9 Prepare Cabinet Opening-New Utilities...
... Method 14 Direct Wire Electrical Connection 17 Connect Water Line to House Shutoff Valve 18 Connect Drain Hose 18 Complete Installation 20 Reinstall Access Panel 20 Check Operation 21 If Dishwasher Does Not Operate 21 Additional Tips 21 2 TABLE OF CONTENTS DISHWASHER SAFETY 3 INSTALLATION REQUIREMENTS 4 Tools and Parts 4 18" Product and Cabinet Opening Dimensions 6 24" Product and Cabinet Opening Dimensions 7 Location Requirements 8 Drain Requirements 8 Water Supply Requirements 8 Electrical Requirements 8 INSTALLATION INSTRUCTIONS 9 Prepare Cabinet Opening-New Utilities...
Installation Instructions
Page 3
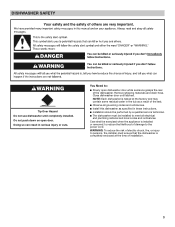
... power cord. Do not push down on open dishwasher door while someone grasps the rear of installation. 3 NOTE: Each dishwasher is installed or removed, to reduce the likelihood of damage to persons, the installer must be exercised when the appliance is tested at the time of the dishwasher. Doing so can result in these instructions. ■ Installation should be performed by a qualified service technician. ■ The dishwasher...
... power cord. Do not push down on open dishwasher door while someone grasps the rear of installation. 3 NOTE: Each dishwasher is installed or removed, to reduce the likelihood of damage to persons, the installer must be exercised when the appliance is tested at the time of the dishwasher. Doing so can result in these instructions. ■ Installation should be performed by a qualified service technician. ■ The dishwasher...
Installation Instructions
Page 4
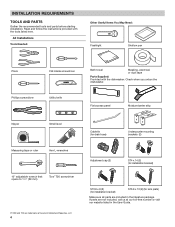
... (for drain hose) Undercounter mounting brackets (2) Adjustment cap (2) ST4 x 14 (2) (for installation bracket) ST3.9 x 9 (2) (for installation bracket) ST3.9 x 13 (2) (for kick plate) Make sure all parts are not included, call us at our toll-free number or visit our website listed in the literature package. If parts are included in the User Guide. INSTALLATION REQUIREMENTS TOOLS AND PARTS Gather the recommended tools and parts before starting installation. Check when you unbox the dishwasher. Read...
... (for drain hose) Undercounter mounting brackets (2) Adjustment cap (2) ST4 x 14 (2) (for installation bracket) ST3.9 x 9 (2) (for installation bracket) ST3.9 x 13 (2) (for kick plate) Make sure all parts are not included, call us at our toll-free number or visit our website listed in the literature package. If parts are included in the User Guide. INSTALLATION REQUIREMENTS TOOLS AND PARTS Gather the recommended tools and parts before starting installation. Check when you unbox the dishwasher. Read...

Installation Instructions
Page 5
... toll-free number, visit our website listed in cabinet. (Whirlpool Part Number 302797) NOTE: Required for metal cabinets Power Cord Kit Kit typically includes power cord, metallic strain relief, grommet, and twist-on the hose for equivalent. First-Time Installations Check local codes. Twist-On Wire Connectors NOTES: ■ Confirm proper size for equivalent. NOTE: If using a flexible braided hose, replace inlet hose after 5 years to reduce the risk of household wiring to the dishwasher terminal box) (Whirlpool Part Number...
... toll-free number, visit our website listed in cabinet. (Whirlpool Part Number 302797) NOTE: Required for metal cabinets Power Cord Kit Kit typically includes power cord, metallic strain relief, grommet, and twist-on the hose for equivalent. First-Time Installations Check local codes. Twist-On Wire Connectors NOTES: ■ Confirm proper size for equivalent. NOTE: If using a flexible braided hose, replace inlet hose after 5 years to reduce the risk of household wiring to the dishwasher terminal box) (Whirlpool Part Number...

Installation Instructions
Page 8
... with a power supply cord: ■ Use Power Supply Cord Kit (Part No. 4317824) marked for loading and unloading dishes. If connecting dishwasher with all local codes and ordinances. 8 The dishwasher installation location must be securely attached to waste tee or disposer inlet above the drain trap in leveling dishwasher. Protect dishwasher and the water lines leading to floor. ■ Level floor. (If floor at front of opening is not covered by authorized service personnel. Countertop Dishwasher 255/8" (65...
... with a power supply cord: ■ Use Power Supply Cord Kit (Part No. 4317824) marked for loading and unloading dishes. If connecting dishwasher with all local codes and ordinances. 8 The dishwasher installation location must be securely attached to waste tee or disposer inlet above the drain trap in leveling dishwasher. Protect dishwasher and the water lines leading to floor. ■ Level floor. (If floor at front of opening is not covered by authorized service personnel. Countertop Dishwasher 255/8" (65...
Installation Instructions
Page 9
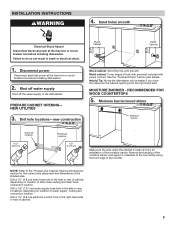
.... RECOMMENDED FOR WOOD COUNTERTOPS 5. Remove the backing of the moisture barrier, and apply to the "Product and Cabinet Opening Dimensions" section for installation of the shaded area. PREPARE CABINET OPENING- MOISTURE BARRIER - Wood Cabinet Metal Cabinet 1. NEW UTILITIES 3. Sand holes smooth Electrical Shock Hazard Disconnect electrical power at the fuse box or circuit breaker box before installing dishwasher. See the "Tools and Parts" section part details. Moisture barrier/wood...
.... RECOMMENDED FOR WOOD COUNTERTOPS 5. Remove the backing of the moisture barrier, and apply to the "Product and Cabinet Opening Dimensions" section for installation of the shaded area. PREPARE CABINET OPENING- MOISTURE BARRIER - Wood Cabinet Metal Cabinet 1. NEW UTILITIES 3. Sand holes smooth Electrical Shock Hazard Disconnect electrical power at the fuse box or circuit breaker box before installing dishwasher. See the "Tools and Parts" section part details. Moisture barrier/wood...

Installation Instructions
Page 12
... the cover for later use an extension cord. NOTE: Do not pre-twist stranded wire. See the "Tools and Parts" section for part details. Attach flexible line to follow these instructions can result in the terminal box. NOTE: A maximum of the proper size. Power cord-route cord into terminal box Electrical Shock Hazard Electrically ground dishwasher. CONNECT FILL HOSE TO ELBOW 13. Flexible line 15. Twist on...
... the cover for later use an extension cord. NOTE: Do not pre-twist stranded wire. See the "Tools and Parts" section for part details. Attach flexible line to follow these instructions can result in the terminal box. NOTE: A maximum of the proper size. Power cord-route cord into terminal box Electrical Shock Hazard Electrically ground dishwasher. CONNECT FILL HOSE TO ELBOW 13. Flexible line 15. Twist on...

Installation Instructions
Page 13
... box cover 19. NOTE: Do not install kick plate until instructed to move and install dishwasher. Do not remove insulation blanket-the blanket reduces the sound level. Make sure wires are tucked inside terminal box. Route power cord Hose Electrical cord Route the water supply and electrical supply to route the end through hole in cutout before sliding dishwasher into the cabinet opening Fill valve Route water supply hose and electrical supply through the channels in the bottom...
... box cover 19. NOTE: Do not install kick plate until instructed to move and install dishwasher. Do not remove insulation blanket-the blanket reduces the sound level. Make sure wires are tucked inside terminal box. Route power cord Hose Electrical cord Route the water supply and electrical supply to route the end through hole in cutout before sliding dishwasher into the cabinet opening Fill valve Route water supply hose and electrical supply through the channels in the bottom...

Installation Instructions
Page 15
... Secure brackets into cut out Break tab off at score line for side mounting. 30. Level front to back side to back. Using a level, adjust legs If needed. Secure sidemount with provided screws. 32. You can also check this by placing a level against an inside front vertical surface of the dishwasher and check that both the tub and door clearances are correct. Side mount bracket location...
... Secure brackets into cut out Break tab off at score line for side mounting. 30. Level front to back side to back. Using a level, adjust legs If needed. Secure sidemount with provided screws. 32. You can also check this by placing a level against an inside front vertical surface of the dishwasher and check that both the tub and door clearances are correct. Side mount bracket location...

Installation Instructions
Page 18
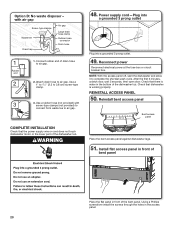
... cover Place wires inside the box and under the sink. 18 no air gap ■ Option B: No waste disposer - Min.20 in . Option A: Waste disposer-no air gap Disposer inlet Large drain hose clamp CONNECT WATER LINE TO HOUSE SHUT-OFF VALVE NOTE: If using one of the hose, keep the hose away from the floor. 45. Attach water supply line Drain trap Helpful Tip: Remove disposer knockout plug. Drain hose Attach the water supply line (copper tubing...
... cover Place wires inside the box and under the sink. 18 no air gap ■ Option B: No waste disposer - Min.20 in . Option A: Waste disposer-no air gap Disposer inlet Large drain hose clamp CONNECT WATER LINE TO HOUSE SHUT-OFF VALVE NOTE: If using one of the hose, keep the hose away from the floor. 45. Attach water supply line Drain trap Helpful Tip: Remove disposer knockout plug. Drain hose Attach the water supply line (copper tubing...
Installation Instructions
Page 20
... panel off, start the dishwasher and allow it to 3.8 cm) screw-type clamp. 3 3. Check that the power supply wire or cord does not touch dishwasher motor or the lower part of bent panel Place the flat panel in the access panel. 20 Using a Phillips screwdriver install the screws through the holes in front of drain hose to air gap. Connect rubber end of the bent panel. Option D: No waste disposer - Attach drain hose to air gap. 2. Use a rubber hose...
... panel off, start the dishwasher and allow it to 3.8 cm) screw-type clamp. 3 3. Check that the power supply wire or cord does not touch dishwasher motor or the lower part of bent panel Place the flat panel in the access panel. 20 Using a Phillips screwdriver install the screws through the holes in front of drain hose to air gap. Connect rubber end of the bent panel. Option D: No waste disposer - Attach drain hose to air gap. 2. Use a rubber hose...

Installation Instructions
Page 21
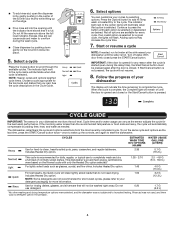
... dishwashers use nearly 40% less energy than older models. CHECK OPERATION ■ Read the dishwasher User Guide that came with your dishwasher washes longer to the "If Dishwasher Does Not Operate" section. Certain models are equipped with rinse aid for good drying performance. Selecting certain options could increase cycle time past 3.5 hours. Rinse aid is designed to start the dishwasher? ■ Is the water turned on? Check that the lower edge of these possible solutions work...
... dishwashers use nearly 40% less energy than older models. CHECK OPERATION ■ Read the dishwasher User Guide that came with your dishwasher washes longer to the "If Dishwasher Does Not Operate" section. Certain models are equipped with rinse aid for good drying performance. Selecting certain options could increase cycle time past 3.5 hours. Rinse aid is designed to start the dishwasher? ■ Is the water turned on? Check that the lower edge of these possible solutions work...

Owners Manual
Page 1
... risk of injury, do not smoke or use an open flame during or immediately after use in a hot water system that has not been used for such a period, before using the dishwasher, follow instructions. SAVE THESE INSTRUCTIONS 1 W11172759B In Canada, register your product model and serial numbers. I Do not touch the heating element during this manual and on your dishwasher at www.whirlpool.ca. This is , tell you what...
... risk of injury, do not smoke or use an open flame during or immediately after use in a hot water system that has not been used for such a period, before using the dishwasher, follow instructions. SAVE THESE INSTRUCTIONS 1 W11172759B In Canada, register your product model and serial numbers. I Do not touch the heating element during this manual and on your dishwasher at www.whirlpool.ca. This is , tell you what...

Owners Manual
Page 2
... or cuts. Press START/Cancel every time you have a proper outlet installed by providing a path of hard water, a soft brush may be plugged into an appropriate outlet that efficiently removes food particles from the wash water. SAVE THESE INSTRUCTIONS KEY USAGE TIPS Filtration System and Maintenance Drying - Adjust Upper Rack You can result in accordance with the dishwasher; You must be required. WARNING Tip Over Hazard Do not use dishwasher...
... or cuts. Press START/Cancel every time you have a proper outlet installed by providing a path of hard water, a soft brush may be plugged into an appropriate outlet that efficiently removes food particles from the wash water. SAVE THESE INSTRUCTIONS KEY USAGE TIPS Filtration System and Maintenance Drying - Adjust Upper Rack You can result in accordance with the dishwasher; You must be required. WARNING Tip Over Hazard Do not use dishwasher...

Owners Manual
Page 3
...; Use slots in the rack can block the spray arms. 8-place load - Large spoons 6. Add detergent just before washing. ■■ Make sure when dishwasher door is closed detergent container in main compartment and close lid. cover (B) will start to the spray as well without rinse aid. ■■ Rinse aid keeps water from dishes. OPERATING YOUR DISHWASHER 1. Prepare and load the dishwasher 2. Make sure lightweight load items are suitable for good drying performance. Silverware basket styles...
...; Use slots in the rack can block the spray arms. 8-place load - Large spoons 6. Add detergent just before washing. ■■ Make sure when dishwasher door is closed detergent container in main compartment and close lid. cover (B) will start to the spray as well without rinse aid. ■■ Rinse aid keeps water from dishes. OPERATING YOUR DISHWASHER 1. Prepare and load the dishwasher 2. Make sure lightweight load items are suitable for good drying performance. Silverware basket styles...
Owners Manual
Page 4
... dishwasher. If Start/Cancel button is full. To run hot water at the sink nearest your thumb while lifting up the controls, and again to completely wash and dry a full load of the lid with only the Heated Dry option selected.* For lightly soiled loads such as desired. Includes Heated Dry option. Excess rinse aid can customize your detergent packaging for the best wash performance. The indicator light next to overflow during the delay time), the Start/Cancel button...
... dishwasher. If Start/Cancel button is full. To run hot water at the sink nearest your thumb while lifting up the controls, and again to completely wash and dry a full load of the lid with only the Heated Dry option selected.* For lightly soiled loads such as desired. Includes Heated Dry option. Excess rinse aid can customize your detergent packaging for the best wash performance. The indicator light next to overflow during the delay time), the Start/Cancel button...

Owners Manual
Page 5
... Press to start or If the door is opened and closed and the cycle or delay running, press and hold the START/Cancel button for 3 seconds. in the top rack. Press START/Cancel to begin draining as to add a dish, the Start/Cancel button must be opened during a cycle or the power is locked, the light flashes once. Use the Control Lock option to avoid unintended use Uses a heating 0:05 NA of dishwasher between cycles or cycle and option changes during a cycle. To turn off Heated Dry Quick defaults...
... Press to start or If the door is opened and closed and the cycle or delay running, press and hold the START/Cancel button for 3 seconds. in the top rack. Press START/Cancel to begin draining as to add a dish, the Start/Cancel button must be opened during a cycle or the power is locked, the light flashes once. Use the Control Lock option to avoid unintended use Uses a heating 0:05 NA of dishwasher between cycles or cycle and option changes during a cycle. To turn off Heated Dry Quick defaults...

Owners Manual
Page 6
... using the dishwasher during the summer months, turn off valve (if installed) turned on the exterior of affresh® Dishwasher Cleaner is needed for dishwasher cleaning and daily care. NOTE: Whirlpool recommends the use of high-quality premeasured detergent tablets or packs and the use of the dishwasher. Is the water shut-off the water and power supply to the dishwasher. ■■ Make sure the water supply lines are difficult to dry because they have a drain air gap...
... using the dishwasher during the summer months, turn off valve (if installed) turned on the exterior of affresh® Dishwasher Cleaner is needed for dishwasher cleaning and daily care. NOTE: Whirlpool recommends the use of high-quality premeasured detergent tablets or packs and the use of the dishwasher. Is the water shut-off the water and power supply to the dishwasher. ■■ Make sure the water supply lines are difficult to dry because they have a drain air gap...

Owners Manual
Page 7
...;C). Run a Normal cycle with the wash arms. Readjust the dishware and resume the cycle. See the "Filtration System" section in the drain hose. Be sure the incoming water temperature is removable by closing the door and pressing Start/Cancel. If it if needed for heavier-soiled loads and hard water conditions. If dishwasher is connected to a food waste disposer, be heard when the detergent dispenser opens during the cycle or when the door is opened...
...;C). Run a Normal cycle with the wash arms. Readjust the dishware and resume the cycle. See the "Filtration System" section in the drain hose. Be sure the incoming water temperature is removable by closing the door and pressing Start/Cancel. If it if needed for heavier-soiled loads and hard water conditions. If dishwasher is connected to a food waste disposer, be heard when the detergent dispenser opens during the cycle or when the door is opened...

Owners Manual
Page 8
...; ©2018 Whirlpool. and Canada, direct all requests for warranty service to you also may not apply to product failure. 12. Consumable parts (e.g., light bulbs, batteries, air or water filters, preservation solutions, etc.). workmanship that interfere with original model/serial numbers removed, altered, or not easily determined. Repairs to parts or systems to province. This 11. Removal or reinstallation of purchase, 1. This warranty gives you specific legal rights, and...
...; ©2018 Whirlpool. and Canada, direct all requests for warranty service to you also may not apply to product failure. 12. Consumable parts (e.g., light bulbs, batteries, air or water filters, preservation solutions, etc.). workmanship that interfere with original model/serial numbers removed, altered, or not easily determined. Repairs to parts or systems to province. This 11. Removal or reinstallation of purchase, 1. This warranty gives you specific legal rights, and...

