User Instructions
Page 1
...write: Whirlpool Corporation Customer eXperience Center 553 Benson Road Benton Harbor, MI 49022-2692 Please include a daytime phone number in -warranty service. Part Number Accessory 20-48KITRC 4 ft (1.2 m) gas line dryer connector installation kit PT220L 4 ft (1.2 m) dryer cord, 3-wire, 30 amp PT400L 4 ft (1.2 m) dryer cord... All-purpose appliance cleaner 1903WH Laundry supply storage cart 3404351 Drying rack - side swing door only 49971 Compact dryer stand - To order parts and accessories, call 1-800-807-6777, or visit us at www.whirlpoolparts.ca. You will need assistance or...
...write: Whirlpool Corporation Customer eXperience Center 553 Benson Road Benton Harbor, MI 49022-2692 Please include a daytime phone number in -warranty service. Part Number Accessory 20-48KITRC 4 ft (1.2 m) gas line dryer connector installation kit PT220L 4 ft (1.2 m) dryer cord, 3-wire, 30 amp PT400L 4 ft (1.2 m) dryer cord... All-purpose appliance cleaner 1903WH Laundry supply storage cart 3404351 Drying rack - side swing door only 49971 Compact dryer stand - To order parts and accessories, call 1-800-807-6777, or visit us at www.whirlpoolparts.ca. You will need assistance or...

User Instructions
Page 2
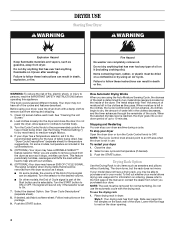
...dry articles containing foam rubber or similarly textured rubber-like materials. ■ Clean lint screen before using the dryer, follow the safety alert symbol and either the word "DANGER" or "WARNING." These words mean: DANGER... manufacturer of the fabric softener or product. ■ Do not use heat to persons when using the dryer. ■ Do not place items exposed to the weather. ■ Do not tamper with gasoline, ... spotted with controls. ■ Do not repair or replace any part of the dryer or attempt any servicing unless specifically recommended in your appliance.
...dry articles containing foam rubber or similarly textured rubber-like materials. ■ Clean lint screen before using the dryer, follow the safety alert symbol and either the word "DANGER" or "WARNING." These words mean: DANGER... manufacturer of the fabric softener or product. ■ Do not use heat to persons when using the dryer. ■ Do not place items exposed to the weather. ■ Do not tamper with gasoline, ... spotted with controls. ■ Do not repair or replace any part of the dryer or attempt any servicing unless specifically recommended in your appliance.
User Instructions
Page 4
... "Dryer Cycle Descriptions" (separate sheet). 8. Push the START button. Stopping and Restarting You can completely remove oil. To use the automatic cycle with a damp cloth to the desired volume. ■ On other models, the End of Cycle signal is part of the load is included in death... or fire. See "Cleaning the Lint Screen." 2. How Automatic Drying Works When you purchased your dryer has a Temperature selector, set to the recommended setting for normal tumbling. ...
... "Dryer Cycle Descriptions" (separate sheet). 8. Push the START button. Stopping and Restarting You can completely remove oil. To use the automatic cycle with a damp cloth to the desired volume. ■ On other models, the End of Cycle signal is part of the load is included in death... or fire. See "Cleaning the Lint Screen." 2. How Automatic Drying Works When you purchased your dryer has a Temperature selector, set to the recommended setting for normal tumbling. ...
User Instructions
Page 6
...located in the lower righthand corner of the drum for a while, there may not have a gas dryer, close shutoff valve in the Wrinkle Guard® position. Replace all parts and panels before servicing. Replace the bulb with the screw. 4. Check with a qualified electrician. &#...you are secure in dryer base. 3. For direct-wired dryers: WARNING 2. Use masking tape to dryer pipe. 4. Moving care - Changing the Drum Light 1. Failure to possibly avoid the cost of non-use? www.whirlpool.com/help - In Canada www.whirlpool.ca Dryer Operation Dryer will not start in...
...located in the lower righthand corner of the drum for a while, there may not have a gas dryer, close shutoff valve in the Wrinkle Guard® position. Replace all parts and panels before servicing. Replace the bulb with the screw. 4. Check with a qualified electrician. &#...you are secure in dryer base. 3. For direct-wired dryers: WARNING 2. Use masking tape to dryer pipe. 4. Moving care - Changing the Drum Light 1. Failure to possibly avoid the cost of non-use? www.whirlpool.com/help - In Canada www.whirlpool.ca Dryer Operation Dryer will not start in...
User Instructions
Page 8
..., to replace or repair house fuses or to the appliance. 9. If you need to contact Whirlpool Corporation, please see the "Troubleshooting" section of the cycle? ■ Was the dryer overloaded? For information on how to order replacement parts, we recommend that can be repaired in U.S.A. Loads are wrinkled ■ Was the load removed...
..., to replace or repair house fuses or to the appliance. 9. If you need to contact Whirlpool Corporation, please see the "Troubleshooting" section of the cycle? ■ Was the dryer overloaded? For information on how to order replacement parts, we recommend that can be repaired in U.S.A. Loads are wrinkled ■ Was the load removed...

Installation Instructions
Page 1
... INSTRUCTIONS INSTRUCCIONES DE INSTALACIÓN PARA LA SECADORA ELÉCTRICA DE 29" (73,7 CM) Table of Contents / Índice DRYER SAFETY ...1 INSTALLATION INSTRUCTIONS ...2 Tools and Parts ...2 Location Requirements ...2 Electrical Requirements ...4 Electrical Connection ...5 Venting Requirements...10 Plan Vent System ...11 Install Vent System...12 Install Leveling Legs...12 Connect Vent ...12 Level...
... INSTRUCTIONS INSTRUCCIONES DE INSTALACIÓN PARA LA SECADORA ELÉCTRICA DE 29" (73,7 CM) Table of Contents / Índice DRYER SAFETY ...1 INSTALLATION INSTRUCTIONS ...2 Tools and Parts ...2 Location Requirements ...2 Electrical Requirements ...4 Electrical Connection ...5 Venting Requirements...10 Plan Vent System ...11 Install Vent System...12 Install Leveling Legs...12 Connect Vent ...12 Level...

Installation Instructions
Page 2
... "Venting Requirements" before starting installation. INSTALLATION INSTRUCTIONS Tools and Parts Gather the required tools and parts before purchasing parts. The combined weight of the dryer in garages, closets, mobile homes or sleeping quarters. Contact your dryer at temperatures below 45ºF (7ºC). A separate 30-amp circuit. s s Parts needed: Check local codes. For further information, please reference...
... "Venting Requirements" before starting installation. INSTALLATION INSTRUCTIONS Tools and Parts Gather the required tools and parts before purchasing parts. The combined weight of the dryer in garages, closets, mobile homes or sleeping quarters. Contact your dryer at temperatures below 45ºF (7ºC). A separate 30-amp circuit. s s Parts needed: Check local codes. For further information, please reference...

Installation Instructions
Page 3
...installation spacing for recessed area or closet installation The dimensions shown following are for Mobile Home Construction and Safety, Title 24, HUD Part 280). s Dryer Dimensions 43 ³⁄₈" (110cm) 15¼" (38.74cm) 43 ³⁄₈" (110cm) 22¾"...¾" (70.5cm) 24 in mobile homes to open fully. Small opening side-swing door C. Recessed area B. Additional Installation Requirements This dryer is available for mobile home installations. Mobile home installations require: s Metal exhaust system hardware, which is suitable for purchase from your dealer. ...
...installation spacing for recessed area or closet installation The dimensions shown following are for Mobile Home Construction and Safety, Title 24, HUD Part 280). s Dryer Dimensions 43 ³⁄₈" (110cm) 15¼" (38.74cm) 43 ³⁄₈" (110cm) 22¾"...¾" (70.5cm) 24 in mobile homes to open fully. Small opening side-swing door C. Recessed area B. Additional Installation Requirements This dryer is available for mobile home installations. Mobile home installations require: s Metal exhaust system hardware, which is suitable for purchase from your dealer. ...

Installation Instructions
Page 10
... in death or fire. Exhaust vent must not be fully extended and supported when the dryer is in enclosed walls, ceilings or floors. Clean lint from your dealer or by calling Whirlpool Parts and Accessories. Review Vent system chart. Rigid metal vent s For best drying performance, ... drying performance. Do not use an exhaust hood with lint. Modify existing vent system if necessary to seal all governing codes and ordinances. If this dryer MUST BE EXHAUSTED OUTDOORS. B A 4" (10.2 cm) 4" (10.2 cm) Vent material s s Use a heavy metal vent. A. Box hood style The angled ...
... in death or fire. Exhaust vent must not be fully extended and supported when the dryer is in enclosed walls, ceilings or floors. Clean lint from your dealer or by calling Whirlpool Parts and Accessories. Review Vent system chart. Rigid metal vent s For best drying performance, ... drying performance. Do not use an exhaust hood with lint. Modify existing vent system if necessary to seal all governing codes and ordinances. If this dryer MUST BE EXHAUSTED OUTDOORS. B A 4" (10.2 cm) 4" (10.2 cm) Vent material s s Use a heavy metal vent. A. Box hood style The angled ...

Installation Instructions
Page 11
... fastened to achieve the best drying performance. 11 s Over-the-Top Installation: Part Number 4396028 s B C D A E F G B H A. Refer to use with dryer vent to wall vent mismatch): Part Number 4396037 - 0" (0 cm) to 18" (45.72 cm) mismatch Part Number 4396011 - 18" (45.72 cm) to 29" (73.66 cm...) mismatch Part Number 4396014 - 29" (73.66 cm) to avoid kinking. Reduce performance, resulting ...
... fastened to achieve the best drying performance. 11 s Over-the-Top Installation: Part Number 4396028 s B C D A E F G B H A. Refer to use with dryer vent to wall vent mismatch): Part Number 4396037 - 0" (0 cm) to 18" (45.72 cm) mismatch Part Number 4396011 - 18" (45.72 cm) to 29" (73.66 cm...) mismatch Part Number 4396014 - 29" (73.66 cm) to avoid kinking. Reduce performance, resulting ...

Installation Instructions
Page 12
...hinge slot. Pull door forward off screws. Use a small, flat-blade screwdriver to gently remove 4 hinge hole plugs (D) on the cardboard. The dryer vent must fit inside exhaust hood. Do not crush or kink vent. 3. (On gas models) Check to be sure there are in the ...legs until the diamond marking is secured to back. Make sure the vent is no kinks in large part of the 2 dryer back corners. Install exhaust hood. See "Determine vent path" in dryer. Reverse Door Swing (Optional) You can result in cabinet are no longer visible. 1. Gently lay the...
...hinge slot. Pull door forward off screws. Use a small, flat-blade screwdriver to gently remove 4 hinge hole plugs (D) on the cardboard. The dryer vent must fit inside exhaust hood. Do not crush or kink vent. 3. (On gas models) Check to be sure there are in the ...legs until the diamond marking is secured to back. Make sure the vent is no kinks in large part of the 2 dryer back corners. Install exhaust hood. See "Determine vent path" in dryer. Reverse Door Swing (Optional) You can result in cabinet are no longer visible. 1. Gently lay the...

Installation Instructions
Page 13
... Slide door up ) on . Remove screws at the bottom of door hinge slot is an extra part, go away. 13 The odor will not start the dryer. Close door and check that the dryer is plugged into hole and secure with door catch (C). Remove the blue protective film on the console .... Place towel (A) on left side of your tools. 3. Tighten screws halfway. Set the dryer on right side of dryer. Reattach outer door panel to make sure both circuit breakers have all parts are in large part of door hinge slot is at top, bottom and side of slots. Complete Installation 1. Insert...
... Slide door up ) on . Remove screws at the bottom of door hinge slot is an extra part, go away. 13 The odor will not start the dryer. Close door and check that the dryer is plugged into hole and secure with door catch (C). Remove the blue protective film on the console .... Place towel (A) on left side of your tools. 3. Tighten screws halfway. Set the dryer on right side of dryer. Reattach outer door panel to make sure both circuit breakers have all parts are in large part of door hinge slot is at top, bottom and side of slots. Complete Installation 1. Insert...
Parts Diagram
Page 1
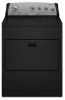
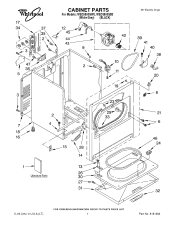
CABINET PARTS For Models: WED5900SW0, WED5900SB0 (White/Grey) (BLACK) 29" Electric Dryer 5−06 Litho in U.S.A.(LT) 1 Part No. 8181284
CABINET PARTS For Models: WED5900SW0, WED5900SB0 (White/Grey) (BLACK) 29" Electric Dryer 5−06 Litho in U.S.A.(LT) 1 Part No. 8181284

Parts Diagram
Page 2
.... Illus. No. DESCRIPTION 1 Literature Parts 8577188 Installation Instructions W10042910 Sheet, Cycle Feature 8578183 Use & Care Guide W10042930 Tech Sheet W10042920 Sheet, Feature Resource Saver Following May Be Purchased DO−IT−YOURSELF REPAIR MANUALS 677818 Dryer 2 343641 Screw, 10−16... 13 3357011 Screw, 10−16 x 1/2 14 8541401 Spring, Door (2) 15 3394083 Clip, Front Panel (2) 16 3392100 Foot, Dryer 279810 Foot−Optional (Extended Length Package of 2) (Not Included) 17 279318 Terminal, Tinned & Brass (3) (Includes Illus. 34)...
.... Illus. No. DESCRIPTION 1 Literature Parts 8577188 Installation Instructions W10042910 Sheet, Cycle Feature 8578183 Use & Care Guide W10042930 Tech Sheet W10042920 Sheet, Feature Resource Saver Following May Be Purchased DO−IT−YOURSELF REPAIR MANUALS 677818 Dryer 2 343641 Screw, 10−16... 13 3357011 Screw, 10−16 x 1/2 14 8541401 Spring, Door (2) 15 3394083 Clip, Front Panel (2) 16 3392100 Foot, Dryer 279810 Foot−Optional (Extended Length Package of 2) (Not Included) 17 279318 Terminal, Tinned & Brass (3) (Includes Illus. 34)...
Parts Diagram
Page 7
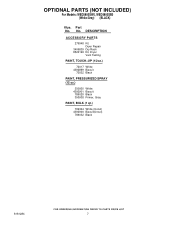
No. OPTIONAL PARTS (NOT INCLUDED) For Models: WED5900SW0, WED5900SB0 (White/Grey) (BLACK) Illus. DESCRIPTION ACCESSORY PARTS 279948 Kit, Dryer Repair 3406839 Dry Rack 8522199 Kit, Dryer Vent Testing PAINT, TOUCH−UP (1/2oz.) 72017 White 4392899 Biscuit 72032 Black PAINT, PRESSURIZED SPRAY (12 oz.) 350930 White 4392901 Biscuit 786020 Black 350938 Primer, Gray PAINT, BULK (1 qt.) 799344 White (Uncut) 4392900 Biscuit(Uncut) 786032 Black 8181284 7 Part No.
No. OPTIONAL PARTS (NOT INCLUDED) For Models: WED5900SW0, WED5900SB0 (White/Grey) (BLACK) Illus. DESCRIPTION ACCESSORY PARTS 279948 Kit, Dryer Repair 3406839 Dry Rack 8522199 Kit, Dryer Vent Testing PAINT, TOUCH−UP (1/2oz.) 72017 White 4392899 Biscuit 72032 Black PAINT, PRESSURIZED SPRAY (12 oz.) 350930 White 4392901 Biscuit 786020 Black 350938 Primer, Gray PAINT, BULK (1 qt.) 799344 White (Uncut) 4392900 Biscuit(Uncut) 786032 Black 8181284 7 Part No.


