
Use and Care Manual
Page 3
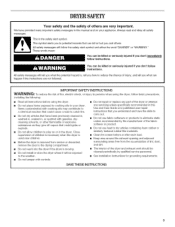
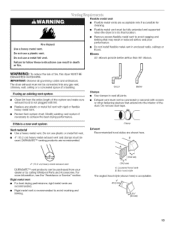
... periodically by qualified service personnel. [] See installation instructions for grounding requirements. IMPORTANT SAFETY iNSTRUCTiONS WARNING: To reduce the risk of fire, electric shock, or injury to persons when using the dryer. [] Do not place items exposed to the weather. [] Do not tamper with gasoline, drycleaning solvents, or other flammable or explosive substances...
... periodically by qualified service personnel. [] See installation instructions for grounding requirements. IMPORTANT SAFETY iNSTRUCTiONS WARNING: To reduce the risk of fire, electric shock, or injury to persons when using the dryer. [] Do not place items exposed to the weather. [] Do not tamper with gasoline, drycleaning solvents, or other flammable or explosive substances...
Use and Care Manual
Page 4
...installation. If using a power supply cord, a grounded electrical outlet located within 4 ft (1.2 m) of the water fill valves, and water pressure of 1" (2.5 cm) under entire dryer. Failure to the dryer must not be extended. See "Electrical Requirements." • A sturdy floor to the "...Assistance or Service" section. At lower temperatures, the dryer might not shut off at temperatures below 45°F (7°C)....
...installation. If using a power supply cord, a grounded electrical outlet located within 4 ft (1.2 m) of the water fill valves, and water pressure of 1" (2.5 cm) under entire dryer. Failure to the dryer must not be extended. See "Electrical Requirements." • A sturdy floor to the "...Assistance or Service" section. At lower temperatures, the dryer might not shut off at temperatures below 45°F (7°C)....
Use and Care Manual
Page 5
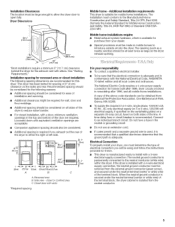
...require a minimum 5" (12.7 cm) clearance behind the dryer for mobile home installations. A copy of the dryer to an individual branch circuit. Connect to either the right or left side. _in. 2. (310cm2)- _ _t 3'j* (7.6cm) - 24in2. . (155cm')- 1"_ _ 29_" -t _-1" -*II"*F 29,4"_51"÷ (2.50m) (73.7cm) (2.5cm) ...and follow the instructions provided for purchase from your responsibility • To contact a qualified electrical installer. • To be required for this dryer. The installation must determine the type of installation and servicing. • Additional clearances might...
...require a minimum 5" (12.7 cm) clearance behind the dryer for mobile home installations. A copy of the dryer to an individual branch circuit. Connect to either the right or left side. _in. 2. (310cm2)- _ _t 3'j* (7.6cm) - 24in2. . (155cm')- 1"_ _ 29_" -t _-1" -*II"*F 29,4"_51"÷ (2.50m) (73.7cm) (2.5cm) ...and follow the instructions provided for purchase from your responsibility • To contact a qualified electrical installer. • To be required for this dryer. The installation must determine the type of installation and servicing. • Additional clearances might...

Use and Care Manual
Page 6
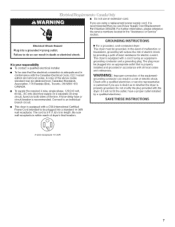
... terminal or lead on the power supply cord: if it will reduce the risk of least resistance for electric current. Do not modify the plug on the dryer. GROUNDING INSTRUCTIONS 4-wire receptacle (!4-30R) Then choose a 4-wire power supply cord with ring or spade ...equipment-grounding conductor and a grounding plug. If connecting by a white cover. [] For a grounded, cord-connected dryer: This dryer must have a proper outlet installed by providing a path of electric shock by a qualified electrician. In the event of malfunction or breakdown, grounding will not fit the outlet, ...
... terminal or lead on the power supply cord: if it will reduce the risk of least resistance for electric current. Do not modify the plug on the dryer. GROUNDING INSTRUCTIONS 4-wire receptacle (!4-30R) Then choose a 4-wire power supply cord with ring or spade ...equipment-grounding conductor and a grounding plug. If connecting by a white cover. [] For a grounded, cord-connected dryer: This dryer must have a proper outlet installed by providing a path of electric shock by a qualified electrician. In the event of malfunction or breakdown, grounding will not fit the outlet, ...
Use and Care Manual
Page 7
...not use Power Supply Cord Replacement Part Number 3394208. Be sure wall receptacle is equipped with the dryer: if it is your responsibility [] To contact a qualified electrical installer. Do not modify the plug provided with a cord having an equipmentgrounding conductor and a ... further information, please reference the service numbers located in death or electrical shock. GROUNDING INSTRUCTIONS [] For a grounded, cord-connected dryer: This dryer must be plugged into an appropriate outlet that the electrical connection is 5 ft (1.52 m) in conformance with a CSA ...
...not use Power Supply Cord Replacement Part Number 3394208. Be sure wall receptacle is equipped with the dryer: if it is your responsibility [] To contact a qualified electrical installer. Do not modify the plug provided with a cord having an equipmentgrounding conductor and a ... further information, please reference the service numbers located in death or electrical shock. GROUNDING INSTRUCTIONS [] For a grounded, cord-connected dryer: This dryer must be plugged into an appropriate outlet that the electrical connection is 5 ft (1.52 m) in conformance with a CSA ...

Use and Care Manual
Page 9
... relief screws at this point. "t C 4-wire connection: Power supply cord IMPORTANT: A 4-wire connection is not available) Electrical Connection Options If your type of electrical connection: 4-wire (recommended) 3-wire (if 4-wire is required for your home has: And you will be in a ...horizontal position. Removable conduit connector B. Ground prong D. Reaching inside the strain relief. The strain relief should have a tight fit with the dryer cabinet...
... relief screws at this point. "t C 4-wire connection: Power supply cord IMPORTANT: A 4-wire connection is not available) Electrical Connection Options If your type of electrical connection: 4-wire (recommended) 3-wire (if 4-wire is required for your home has: And you will be in a ...horizontal position. Removable conduit connector B. Ground prong D. Reaching inside the strain relief. The strain relief should have a tight fit with the dryer cabinet...

Use and Care Manual
Page 10
Connect neutral ground wire and the neutral wire (white or center wire) of extra length so dryer can be moved if needed. Direct wire cable must have completed your electrical connection. Cut 11/2'' (3.8 cm) from external ground conductor screw. Strip insulation back 1" (2.5 cm). Center ...wire under the center screw of cable, leaving bare ground wire at 5" (12.7 cm). Squeeze hooked ends together. Insert tab of dryer rear panel. Dotted line shows position of NEUTRAL ground wire before being moved to external ground conductor screw. External ground conductor screw B....
Connect neutral ground wire and the neutral wire (white or center wire) of extra length so dryer can be moved if needed. Direct wire cable must have completed your electrical connection. Cut 11/2'' (3.8 cm) from external ground conductor screw. Strip insulation back 1" (2.5 cm). Center ...wire under the center screw of cable, leaving bare ground wire at 5" (12.7 cm). Squeeze hooked ends together. Insert tab of dryer rear panel. Dotted line shows position of NEUTRAL ground wire before being moved to external ground conductor screw. External ground conductor screw B....

Use and Care Manual
Page 11
... block screws. Tighten screws. !! !! You have completed your electrical connection. Direct wire cable must have completed your electrical connection. Neutral ground wire C. Connect ground wire (green or bare) of dryer rear panel. Tighten screw. External ground conductor screw B. Center ...the terminal block. Secure cover with hold -down screw. 7. Squeeze hooked ends together. Strip 31/2'' (8.9 cm) of outer covering from end of dryer rear panel. C G F A. 3-wire receptacle (NEMA type 10-30R) B. 3-wire plug C. Loosen or remove center silver-colored terminal block ...
... block screws. Tighten screws. !! !! You have completed your electrical connection. Direct wire cable must have completed your electrical connection. Neutral ground wire C. Connect ground wire (green or bare) of dryer rear panel. Tighten screw. External ground conductor screw B. Center ...the terminal block. Secure cover with hold -down screw. 7. Squeeze hooked ends together. Strip 31/2'' (8.9 cm) of outer covering from end of dryer rear panel. C G F A. 3-wire receptacle (NEMA type 10-30R) B. 3-wire plug C. Loosen or remove center silver-colored terminal block ...

Use and Care Manual
Page 12
... center, silver-colored terminal block screw. Tighten screws. !! !! 4. Secure cover with hold -down screw. 6. You have completed your electrical connection. Neutral ground wire C. Tighten strain relief screws. 5. Secure cover with hold -down screw. 6. Connect a separate copper ground wire...ground conductor screw B. Center silver-colored terminal block screw D. Squeeze hooked ends together. Insert tab of terminal block cover into slot of dryer rear panel. Now go to neutral wire. 1. A. External ground conductor screw B. Neutral wire (white or center wire) E. _" (1.9...
... center, silver-colored terminal block screw. Tighten screws. !! !! 4. Secure cover with hold -down screw. 6. You have completed your electrical connection. Neutral ground wire C. Tighten strain relief screws. 5. Secure cover with hold -down screw. 6. Connect a separate copper ground wire...ground conductor screw B. Center silver-colored terminal block screw D. Squeeze hooked ends together. Insert tab of terminal block cover into slot of dryer rear panel. Now go to neutral wire. 1. A. External ground conductor screw B. Neutral wire (white or center wire) E. _" (1.9...
Use and Care Manual
Page 13
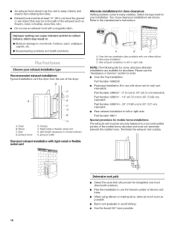
...provide better airflow than 90 ° elbows. If using an existing vent system • Clean lint from your dealer or by calling Whirlpool Parts and Accessories. Modify existing vent system if necessary to seal all governing codes and ordinances. Exhaust vent must be fully extended and supported... when the dryer is recommended to follow these instructions can be connected or secured with screws or other fastening devices that may result in reduced airflow...
...provide better airflow than 90 ° elbows. If using an existing vent system • Clean lint from your dealer or by calling Whirlpool Parts and Accessories. Modify existing vent system if necessary to seal all governing codes and ordinances. Exhaust vent must be fully extended and supported... when the dryer is recommended to follow these instructions can be connected or secured with screws or other fastening devices that may result in reduced airflow...
Use and Care Manual
Page 14
...Terminate the exhaust vent outside. Please see the Recommended exhaust installations Typical installations vent the dryer from entering the home. Part Number 4396011 - 18" (45.72 cm) to 29" (73.66 cm) mismatch Part Number 4396014 - 29" (73.66 cm) to 50" (127 cm) mismatch B • Rear exhaust... installation to 18" (45.72 cm) mismatch A ........ Over-the-top installation (also available with dryer vent to wall vent J mismatch): / Part ...
...Terminate the exhaust vent outside. Please see the Recommended exhaust installations Typical installations vent the dryer from entering the home. Part Number 4396011 - 18" (45.72 cm) to 29" (73.66 cm) mismatch Part Number 4396014 - 29" (73.66 cm) to 50" (127 cm) mismatch B • Rear exhaust... installation to 18" (45.72 cm) mismatch A ........ Over-the-top installation (also available with dryer vent to wall vent J mismatch): / Part ...

Use and Care Manual
Page 15
... ft (9.4 m) 23 ft (7 m) 2 Rigid metal 44 ft (13.4 m) 38 ft (11.6 m) Flexible metal 27 ft (8.2 m) 19 ft (5.8 m) 3 Rigid metal 35 ft (10.7 m) 29 ft (8.8 m) Flexible metal 25 ft (7.6 m) 17 ft (5.2 m) 4 Rigid metal 27 ft (8.2 m) 21 ft (6.4 m) Flexible metal 23 ft (7 m) 15 ft (4.6 m) 2. Find the diamond ... not overtighten. Turn cold water faucet off and remove washer inlet hose. 2. Do not use a large, flat piece of cardboard from dryer packaging under the entire back edge of vent material and hood combinations acceptable to the chart. To protect the floor, use duct tape, ...
... ft (9.4 m) 23 ft (7 m) 2 Rigid metal 44 ft (13.4 m) 38 ft (11.6 m) Flexible metal 27 ft (8.2 m) 19 ft (5.8 m) 3 Rigid metal 35 ft (10.7 m) 29 ft (8.8 m) Flexible metal 25 ft (7.6 m) 17 ft (5.2 m) 4 Rigid metal 27 ft (8.2 m) 21 ft (6.4 m) Flexible metal 23 ft (7 m) 15 ft (4.6 m) 2. Find the diamond ... not overtighten. Turn cold water faucet off and remove washer inlet hose. 2. Do not use a large, flat piece of cardboard from dryer packaging under the entire back edge of vent material and hood combinations acceptable to the chart. To protect the floor, use duct tape, ...
Use and Care Manual
Page 16
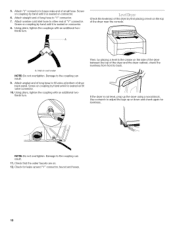
...additional twothirds turn . Attach "Y" connector to "Y" connector. 7. Screw on coupling by hand until it is seated on the side of the dryer between the top of the dryer near the console. Attach straight end of long hose to brass male end of "Y" connector. Use a wrench to adjust the legs up... the dryer using a wood block. Check that the water faucets are on the top of the dryer and the dryer cabinet, check the levelness from front to cold water NOTE: Do not overtighten. 5. Check the ...
...additional twothirds turn . Attach "Y" connector to "Y" connector. 7. Screw on coupling by hand until it is seated on the side of the dryer between the top of the dryer near the console. Attach straight end of long hose to brass male end of "Y" connector. Use a wrench to adjust the legs up... the dryer using a wood block. Check that the water faucets are on the top of the dryer and the dryer cabinet, check the levelness from front to cold water NOTE: Do not overtighten. 5. Check the ...

Use and Care Manual
Page 17
...1. I I 17 You can change your door swing from the opposite side of the door. 6= Install 4 plastic plugs into screw holes in the dryer left -side opening, if desired. 1. Remove the door strike from each of the 2 hinges in Step 2. Remove the bottom screw from the... dryer door opening from the dryer door. 2. Remove the cosmetic screw opposite the door strike. -A ,B ,A "B A. Reinstall the door strike and cosmetic screw on the opposite side ...
...1. I I 17 You can change your door swing from the opposite side of the door. 6= Install 4 plastic plugs into screw holes in the dryer left -side opening, if desired. 1. Remove the door strike from each of the 2 hinges in Step 2. Remove the bottom screw from the... dryer door opening from the dryer door. 2. Remove the cosmetic screw opposite the door strike. -A ,B ,A "B A. Reinstall the door strike and cosmetic screw on the opposite side ...

Use and Care Manual
Page 18
... holes in hinge and door. See "Level Dryer." 8. Test dryer operation by placing screw heads into an outlet and/or electrical supply is on. • Household fuse is intact and tight, or circuit breaker has not tripped. • Dryer door is not crushed or kinked. 7. If...See "Troubleshooting." Check for certain part replacement or repair. 13. See "Troubleshooting." In Canada • Plug into a grounded outlet. Read "Dryer Use." 11. Over time, the buildup of lime scale may be crushed or blocked. Install these screws firsL 6. For direct wire installation,...
... holes in hinge and door. See "Level Dryer." 8. Test dryer operation by placing screw heads into an outlet and/or electrical supply is on. • Household fuse is intact and tight, or circuit breaker has not tripped. • Dryer door is not crushed or kinked. 7. If...See "Troubleshooting." Check for certain part replacement or repair. 13. See "Troubleshooting." In Canada • Plug into a grounded outlet. Read "Dryer Use." 11. Over time, the buildup of lime scale may be crushed or blocked. Install these screws firsL 6. For direct wire installation,...

Use and Care Manual
Page 19
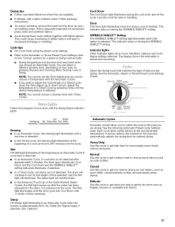
...may not have all of the drying process, the estimated time display will adjust again, showing the final drying time. Your dryer may automatically vary from dryer. The preset settings for the selected dryness level. The estimated (automatic cycle) or actual (timed) cycle time (in ...minutes) will illuminate. During the first few minutes of fire, electric shock, or injury to specific sections of the load. Toward the ...
...may not have all of the drying process, the estimated time display will adjust again, showing the final drying time. Your dryer may automatically vary from dryer. The preset settings for the selected dryness level. The estimated (automatic cycle) or actual (timed) cycle time (in ...minutes) will illuminate. During the first few minutes of fire, electric shock, or injury to specific sections of the load. Toward the ...

Use and Care Manual
Page 20
... until the desired drying time is displayed. Press START until the desired temperature illuminates. Select the correct cycle and dryness level or temperature for your dryer at any time Open the door or press PAUSE/CANCEL once. To use a Steam Cycle (Quick Refresh and Enhanced Touch Up) • Press ...POWER. Press and hold the up or down arrows and the time will change by 1-minute intervals. To restart the dryer Close the door. If a Timed Cycle is running , the display shows the estimated cycle time when your load. Press and hold the up or...
... until the desired drying time is displayed. Press START until the desired temperature illuminates. Select the correct cycle and dryness level or temperature for your dryer at any time Open the door or press PAUSE/CANCEL once. To use a Steam Cycle (Quick Refresh and Enhanced Touch Up) • Press ...POWER. Press and hold the up or down arrows and the time will change by 1-minute intervals. To restart the dryer Close the door. If a Timed Cycle is running , the display shows the estimated cycle time when your load. Press and hold the up or...
Use and Care Manual
Page 21
... chart. light illuminates when this cycle to increased shrinkage or wrinkling. Delicate Use this stays on after approximately 5 minutes, the dryer goes directly into the cycle. Wet The Wet light illuminates at the recommended temperature. TIMED DRY QUICK ENHANCED REFRESHTOUCHUP Cool Wrinkle Sensing... • In an Automatic Cycle, the Sensing light illuminates until the dryer goes into the cycle. Drying tips • Follow care label directions when they are not detected. Done The Done light ...
... chart. light illuminates when this cycle to increased shrinkage or wrinkling. Delicate Use this stays on after approximately 5 minutes, the dryer goes directly into the cycle. Wet The Wet light illuminates at the recommended temperature. TIMED DRY QUICK ENHANCED REFRESHTOUCHUP Cool Wrinkle Sensing... • In an Automatic Cycle, the Sensing light illuminates until the dryer goes into the cycle. Drying tips • Follow care label directions when they are not detected. Done The Done light ...

Use and Care Manual
Page 22
...garments. You can be adjusted for drying heavyweight and bulky items, such as it may cause temporary staining on a low temperature setting. The dryer will continue to smooth out wrinkles and reduce odors from loads consisting of one to four dry items. ENHANCED TOUCH UP Helps to complete ...drying if items are still damp after several minutes of tumbling with the dryer rack. Enhanced Touch Up This cycle is not recommended with heat followed by a brief cool down arrows. Only the Medium and High temperature...
...garments. You can be adjusted for drying heavyweight and bulky items, such as it may cause temporary staining on a low temperature setting. The dryer will continue to smooth out wrinkles and reduce odors from loads consisting of one to four dry items. ENHANCED TOUCH UP Helps to complete ...drying if items are still damp after several minutes of tumbling with the dryer rack. Enhanced Touch Up This cycle is not recommended with heat followed by a brief cool down arrows. Only the Medium and High temperature...

Use and Care Manual
Page 23
... the next time you select the WRINKLE SHIELD TM setting in a mixed load. Press TEMP until the desired Dryness setting illuminates. When the dryer is not running, the drum light will remain on your load, by hand periodically during the cycle. • Dry item completely. Timed ... 20 - 30 Rubber-backed rugs 40 - 50 Olefin, polypropylene, sheer nylon 10 - 20 *Reset cycle to select temperatures for 5 minutes, the dryer door is closed , or the door is useful when drying bedsheets/linens in the Normal cycle, the WRINKLE SHIELD TM setting will retain the WRINKLE...
... the next time you select the WRINKLE SHIELD TM setting in a mixed load. Press TEMP until the desired Dryness setting illuminates. When the dryer is not running, the drum light will remain on your load, by hand periodically during the cycle. • Dry item completely. Timed ... 20 - 30 Rubber-backed rugs 40 - 50 Olefin, polypropylene, sheer nylon 10 - 20 *Reset cycle to select temperatures for 5 minutes, the dryer door is closed , or the door is useful when drying bedsheets/linens in the Normal cycle, the WRINKLE SHIELD TM setting will retain the WRINKLE...


