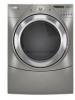
Use and Care Guide
Page 3
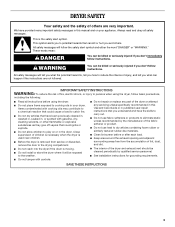
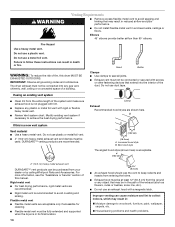
... drum is the safety alert symbol. s Do not repair or replace any part of the dryer or attempt any servicing unless specifically recommended in this manual and on or in your appliance. Always read and obey all instructions before or after each load. s Do not place items exposed to carry out...
... drum is the safety alert symbol. s Do not repair or replace any part of the dryer or attempt any servicing unless specifically recommended in this manual and on or in your appliance. Always read and obey all instructions before or after each load. s Do not place items exposed to carry out...
Use and Care Guide
Page 4
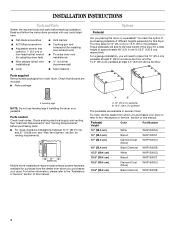
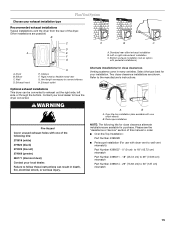
... screwdriver s Adjustable wrench that all parts are available in several colors. Parts needed Check local codes. You have the option of purchasing pedestals of this manual. You may select a 10" (25.4 cm) or 15.5" (39.4 cm) pedestal. A B A. 10" (25.4 cm) pedestal B. 15.5" (39.4 ... please refer to 1" (2.5 cm) or hex-head socket wrench (for adjusting dryer feet) s Vent clamps s Caulking gun and compound (for this manual. Check that opens to the "Assistance or Service" section of different heights separately for installing new exhaust vent) s Tin snips (new vent installations)...
... screwdriver s Adjustable wrench that all parts are available in several colors. Parts needed Check local codes. You have the option of purchasing pedestals of this manual. You may select a 10" (25.4 cm) or 15.5" (39.4 cm) pedestal. A B A. 10" (25.4 cm) pedestal B. 15.5" (39.4 ... please refer to 1" (2.5 cm) or hex-head socket wrench (for adjusting dryer feet) s Vent clamps s Caulking gun and compound (for this manual. Check that opens to the "Assistance or Service" section of different heights separately for installing new exhaust vent) s Tin snips (new vent installations)...
Use and Care Guide
Page 5
...Failure to open fully. 5 To order, call the dealer from whom you purchased your dryer or refer to the "Assistance or Service" section of this manual. To order, call the dealer from whom you purchased your dryer or refer to the bottom of the dryer. s A separate 30-amp circuit. Check ...outlet located within 2 ft (61 cm) of either side of the dryer. Contact your dryer or refer to the "Assistance or Service" section of this manual. s For a garage installation, you will need to place the dryer at least 18 inches (46 cm) above the floor. To do so, you ...
...Failure to open fully. 5 To order, call the dealer from whom you purchased your dryer or refer to the "Assistance or Service" section of this manual. To order, call the dealer from whom you purchased your dryer or refer to the bottom of the dryer. s A separate 30-amp circuit. Check ...outlet located within 2 ft (61 cm) of either side of the dryer. Contact your dryer or refer to the "Assistance or Service" section of this manual. s For a garage installation, you will need to place the dryer at least 18 inches (46 cm) above the floor. To do so, you ...
Use and Care Guide
Page 14
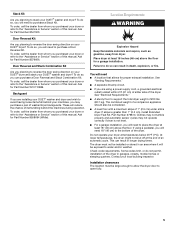
Fire Hazard Use a heavy metal vent. s Exhaust vent must not be at least 12" (30.5 cm) from your dealer or by calling Whirlpool Parts and Accessories. Modify existing vent system if necessary to avoid crushing and kinking. Do not use duct tape. s Flexible metal vent must be connected ... the best drying performance. Failure to seal all governing codes and ordinances. s Replace any gas vent, chimney, wall, ceiling or a concealed space of fire, this manual. Elbows 45° elbows provide better airflow than 90° elbows.
Fire Hazard Use a heavy metal vent. s Exhaust vent must not be at least 12" (30.5 cm) from your dealer or by calling Whirlpool Parts and Accessories. Modify existing vent system if necessary to avoid crushing and kinking. Do not use duct tape. s Flexible metal vent must be connected ... the best drying performance. Failure to seal all governing codes and ordinances. s Replace any gas vent, chimney, wall, ceiling or a concealed space of fire, this manual. Elbows 45° elbows provide better airflow than 90° elbows.
Use and Care Guide
Page 15
...) to exhaust out the right side, left side, or through the bottom. Exhaust hood H E. WARNING Fire Hazard Cover unused exhaust holes with one of this manual to have the dryer converted. Over-the-top installation (also available with one offset elbow) B. Elbow C. Failure to follow these instructions can be converted to...
...) to exhaust out the right side, left side, or through the bottom. Exhaust hood H E. WARNING Fire Hazard Cover unused exhaust holes with one of this manual to have the dryer converted. Over-the-top installation (also available with one offset elbow) B. Elbow C. Failure to follow these instructions can be converted to...
Use and Care Guide
Page 18
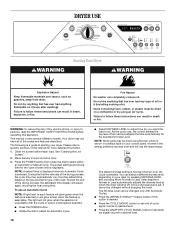
...only with the cycle or option combinations selected. WARNING: To reduce the risk of the drying process, the estimated time display will shut off. This manual covers several different models. To use the least energy. s Press the POWER button. s Select DRYNESS LEVEL to adjust how dry you want the .... Once a dryness level is set damp dry signal volume to set , it cannot be . s Press the WRINKLE SHIELD™ feature button if this manual for the cycle chosen will glow amber when the feature is selected. Place laundry in death, explosion, or fire. During the first few minutes of...
...only with the cycle or option combinations selected. WARNING: To reduce the risk of the drying process, the estimated time display will shut off. This manual covers several different models. To use the least energy. s Press the POWER button. s Select DRYNESS LEVEL to adjust how dry you want the .... Once a dryness level is set damp dry signal volume to set , it cannot be . s Press the WRINKLE SHIELD™ feature button if this manual for the cycle chosen will glow amber when the feature is selected. Place laundry in death, explosion, or fire. During the first few minutes of...

Use and Care Guide
Page 19
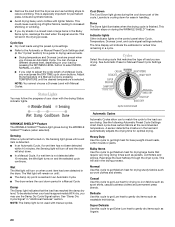
... will cause a triple beep, indicating that this feature off . How Automatic Cycles Work The AccelerCare™ function improves drying performance with Manual Cycles. The light will change by 1-minute intervals. Temperature settings can be used only with Auto Moisture Sensing Plus, which advances the ... end dryness level. Press DRY TIME, and the time will not glow when the selection is not necessary to avoid unintended use a Manual Cycle NOTE: A light next to select another cycle and Dryness Level. Pressing the Dryness Level button will adjust again, showing the final...
... will cause a triple beep, indicating that this feature off . How Automatic Cycles Work The AccelerCare™ function improves drying performance with Manual Cycles. The light will change by 1-minute intervals. Temperature settings can be used only with Auto Moisture Sensing Plus, which advances the ... end dryness level. Press DRY TIME, and the time will not glow when the selection is not necessary to avoid unintended use a Manual Cycle NOTE: A light next to select another cycle and Dryness Level. Pressing the Dryness Level button will adjust again, showing the final...
Use and Care Guide
Page 20
.... Cycles Select the drying cycle that the load has reached the damp dry level. To be alerted when your load is not used with Manual Cycles. Each cycle dries certain fabrics at the recommended temperature. Bulky Items Use this cycle to get Medium heat for optimal drying. Heavy Duty...down for permanent press, knits and synthetic fabrics. s Remove the load from the dryer as soon as washable knit fabrics. See Automatic Preset or Manual Preset Cycle Settings chart. The Wet light will aid in an Automatic Cycle. This will remain on , the Sensing light glows until the desired ...
.... Cycles Select the drying cycle that the load has reached the damp dry level. To be alerted when your load is not used with Manual Cycles. Each cycle dries certain fabrics at the recommended temperature. Bulky Items Use this cycle to get Medium heat for optimal drying. Heavy Duty...down for permanent press, knits and synthetic fabrics. s Remove the load from the dryer as soon as washable knit fabrics. See Automatic Preset or Manual Preset Cycle Settings chart. The Wet light will aid in an Automatic Cycle. This will remain on , the Sensing light glows until the desired ...

Use and Care Guide
Page 21
...items are not available when using the Air Only setting. Touch Up Use this setting to help keep wrinkles from forming. Manual Preset Cycle Settings Manual Cycles Load Type Temperature TIMED DRY Heavyweight items, bulky items, bedspreads, work clothes High TOUCH UP Helps to smooth out ...to turn on until DRUM LIGHT is pressed again, the door is open for ironing *Estimated Time with Dryness Level (medium) setting. Manual Cycles Use Manual Cycles to select a specific amount of Load Time* (Minutes) Foam rubber - When using Timed Dry on until the dryer door has...
...items are not available when using the Air Only setting. Touch Up Use this setting to help keep wrinkles from forming. Manual Preset Cycle Settings Manual Cycles Load Type Temperature TIMED DRY Heavyweight items, bulky items, bedspreads, work clothes High TOUCH UP Helps to smooth out ...to turn on until DRUM LIGHT is pressed again, the door is open for ironing *Estimated Time with Dryness Level (medium) setting. Manual Cycles Use Manual Cycles to select a specific amount of Load Time* (Minutes) Foam rubber - When using Timed Dry on until the dryer door has...
Use and Care Guide
Page 23
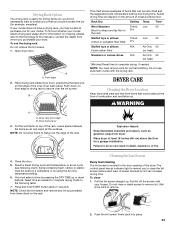
... inside dryer drum, positioning the back wire on top of the rack. Push down buttons. Time* Wool Sweaters Block to the front page of the manual or contact the dealer from items that would normally line dry (for example, sweaters). Dryer back panel 3. Leave space between the items so air can...
... inside dryer drum, positioning the back wire on top of the rack. Push down buttons. Time* Wool Sweaters Block to the front page of the manual or contact the dealer from items that would normally line dry (for example, sweaters). Dryer back panel 3. Leave space between the items so air can...


