Whirlpool WED97HEXR Support and Manuals
Get Help and Manuals for this Whirlpool item
View All Support Options Below
Free Whirlpool WED97HEXR manuals!
Problems with Whirlpool WED97HEXR?
Ask a Question
Free Whirlpool WED97HEXR manuals!
Problems with Whirlpool WED97HEXR?
Ask a Question
Popular Whirlpool WED97HEXR Manual Pages
Dimension Guide - Page 1
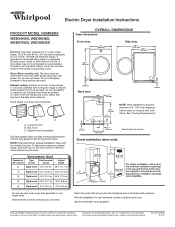
Electric Dryer Installation Instructions
PRODUCT MODEL NUMBERS
WED94HEX, WED95HEX, WED97HEX, WEDXXHEX
Electrical: This dryer requires a 3 or 4 wire, single phase, 120/240 volt, 60 Hz., AC only electrical supply (or 3 or 4 wire, 120/208 volt electrical supply, if specified on the serial/rating plate) on a separate 30-amp circuit, fused on both sides of the exhaust. Water (Steam models only...
Installation Instructions - Page 1
SP
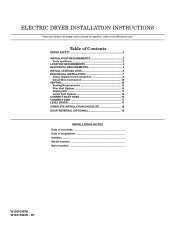
1 ELECTRIC DRYER INSTALLATION INSTRUCTIONS
Para una version de estas instrucciones en español, visite www.Whirlpool.com
Table of Contents
DRYER SAFETY 2 Installation Requirements 3
Tools and Parts 3 Location Requirements 4 Electrical Requirements 4 INSTALL LEVELING LEGS 6 ELECTRICAL INSTALLATION 7
Power Supply Cord Connection 8 Direct Wire Connection 10 VENTING 13 Venting ...
Installation Instructions - Page 4
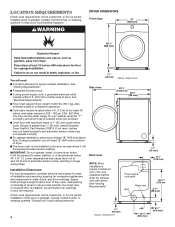
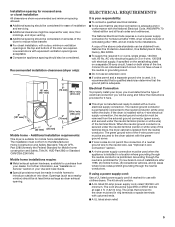
... dryer.
■■The dryer must support dryer weight of 5" (127 mm) clearance behind dryer for proper exhaust installation.
Side view:
507/8" (1292 mm)
305/8" (728 mm)
Back view:
NOTE: Most installations require a minimum of 200 lbs. (90.7 kg). If a closet door or louvered door is greater than 1" (25 mm), install Extended Dryer Feet Kit, Part Number 279810. Some codes...
Installation Instructions - Page 5
... terminals with a 3-wire electrical supply connection. If using and follow the instructions provided for (1) new branch-circuit installations after 1996, and all sides of the dryer to reduce noise transfer.
■■For closet installation, with the green ground screw.
■■If local codes do not permit the connection of the terminal block, the...
Installation Instructions - Page 15

...exhaust hood
Connect Inlet Hose
The dryer must be connected to dryer location using the new inlet hoses. Record hose installation or replacement dates on connector.
15 Avoid ...seated on faucet. Install Vent System
1. Install exhaust hood
12" min. (305 mm)
12" min. (305 mm)
Install exhaust hood and use caulking compound to cold water faucet. Periodically inspect and replace hoses if bulges,...
Installation Instructions - Page 18

... water system in a hard water area, use of a water softener is first heated.
q If you have all of your Use and Care Guide.
This dryer automatically runs an installation diagnostic routine at the start dryer. If there is level. See "Level Dryer". The odor will reduce product performance. q Check for certain part replacement or repair.
q Check that dryer is an extra part...
Installation Instructions - Page 19
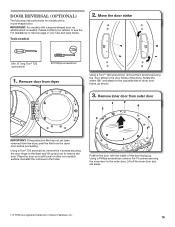
...of dryer door frame, as shown.
3. Using a Phillips screwdriver, remove the 10 screws securing the inner door to remove the door. Door Reversal (optional)
The following instructions are for models ... or Service page in the holes. Lift off the inner door and set aside.
† ® TORX is needed :
2.
IMPORTANT: For models with a round-shaped door. Remove door from the dryer door ...
Use & Care Guide - Page 8

... sensed.
CYCLE GUIDE - Steam cycles are default settings for foam, rubber, plastic, or heat-sensitive fabrics. Dry time will automatically adjust when the load size is 100 minutes. MANUAL CYCLES
Settings and options shown in bold are designed for drying heavyweight items such as sheets, blouses, dresses, underwear, permanent press fabrics, and some models). Use...
Use & Care Guide - Page 10

..., press and hold to increase drying time
If all models. Select any cycle settings
Changing the Auto Cycle settings to change the drying settings: NOTE: The settings cannot be changed by pressing the button for the desired setting. 3. See the "Cycle Guide" or the display for 6 seconds. Set any additional options
Add additional options such as you would...
Use & Care Guide - Page 12

... or by a qualified servicer. Place wet items on the dryer back ledge.
3. Allow space around items for air to avoid transfer of the dryer drum. Make sure items do not want to your dryer drum. Items containing foam, rubber, or plastic must be done by using the Air Only setting. 6. Start the dryer. NOTE: Check the...
Use & Care Guide - Page 13
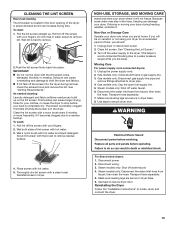
... an extended period of lint screen with hot water.
5. Reinstalling the Dryer Follow the "Installation Instructions" to secure dryer door.
4. See "Venting Requirements." If storing or moving your dryer. Unplug dryer or disconnect power. 2. Clean lint screen. Turn off the screen
with your dryer only when you are away. Steam models only: Shut off while the screen is hard...
Use & Care Guide - Page 14

.... 3.
Then use to reduce the risk of replacement. Unplug dryer or disconnect power. 2. Disconnect water inlet hose from faucet and drain. Flush water pipes. Reconnect water inlet hose to select the HELP topic. Turn on , press MORE INFO to access the built-in the
Installation Instruction. USING THE BUILT-IN TROUBLESHOOTING FEATURE
1. The and buttons can be used...
Use & Care Guide - Page 15

.... Check that it only once. Clothes not contacting the moisture sensors during Automatic cycles. The load is located in troubleshooting feature on the dryer.
Use 4" (102 mm) diameter vent material. See "Cycle Guide".
See "Installation Instructions".
The dryer is too large and heavy to tumble freely.
There may be 2 household fuses or circuit breakers for 5-10...
Use & Care Guide - Page 16

... and Canada, contact your major appliance, to replace or repair house fuses, or to obtain service under this information on the model and serial number label located on major appliances with electrical or plumbing codes, or use your authorized Whirlpool dealer to repair or replace appliance light bulbs, air lters or water lters.
Replacement parts or repair labor on the product. This...
Warranty Information - Page 1

... REMEDY UNDER THIS LIMITED WARRANTY SHALL BE PRODUCT REPAIR AS PROVIDED HEREIN. This warranty gives you specific legal rights, and you need to know your authorized Whirlpool dealer to repair or replace appliance light bulbs, air filters or water filters.
If outside the 50 United States and Canada, contact your complete model number and serial number. If you think you...
Whirlpool WED97HEXR Reviews
We have not received any reviews for Whirlpool yet.