
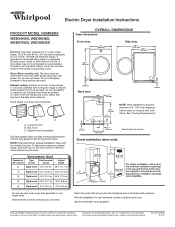
Dimension Guide
Page 1
... 4 wire, 120/208 volt electrical supply, if specified on the serial/rating plate) on a separate 30-amp circuit, fused on both sides of elbows and turns. A time-delay fuse or circuit breaker is required. Connect to the coupling can result. Water (Steam models only): The dryer must be used. Do not use the fewest number of the line. Damage to an individual branch circuit. Exhaust venting: Exhaust your dryer to use old hoses. Hood styles: A & B are for exhaust vent with...
... 4 wire, 120/208 volt electrical supply, if specified on the serial/rating plate) on a separate 30-amp circuit, fused on both sides of elbows and turns. A time-delay fuse or circuit breaker is required. Connect to the coupling can result. Water (Steam models only): The dryer must be used. Do not use the fewest number of the line. Damage to an individual branch circuit. Exhaust venting: Exhaust your dryer to use old hoses. Hood styles: A & B are for exhaust vent with...
Installation Instructions
Page 1
... visite www.Whirlpool.com Table of Contents DRYER SAFETY 2 Installation Requirements 3 Tools and Parts 3 Location Requirements 4 Electrical Requirements 4 INSTALL LEVELING LEGS 6 ELECTRICAL INSTALLATION 7 Power Supply Cord Connection 8 Direct Wire Connection 10 VENTING 13 Venting Requirements 13 Plan Vent System 14 Venting Kits 14 Install Vent System 15 Connect Inlet Hose 16 Connect Vent 17 Level Dryer 17 Complete Installation Checklist 18 Door reversal (OPTIONAL 19 INSTALLATION NOTES Date of purchase Date of installation Installer Model number Serial number W10057363B...
... visite www.Whirlpool.com Table of Contents DRYER SAFETY 2 Installation Requirements 3 Tools and Parts 3 Location Requirements 4 Electrical Requirements 4 INSTALL LEVELING LEGS 6 ELECTRICAL INSTALLATION 7 Power Supply Cord Connection 8 Direct Wire Connection 10 VENTING 13 Venting Requirements 13 Plan Vent System 14 Venting Kits 14 Install Vent System 15 Connect Inlet Hose 16 Connect Vent 17 Level Dryer 17 Complete Installation Checklist 18 Door reversal (OPTIONAL 19 INSTALLATION NOTES Date of purchase Date of installation Installer Model number Serial number W10057363B...
Installation Instructions
Page 3
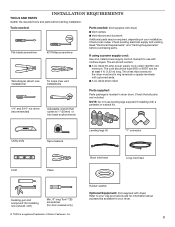
... located in ring terminals or spade terminals with dryer) Refer to 1" (25mm) or hex-head socket wrench Parts supplied: Parts package is a registered trademark of Saturn Fasteners, Inc. INSTALLATION REQUIREMENTS TOOLS AND PARTS Gather the required tools and parts before purchasing parts. Check local codes. Tools needed: Flat-blade screwdriver #2 Phillips screwdriver Wire stripper (direct wire installations) Tin snips (new vent installations) Parts needed: (Not supplied with clothes dryers. Check that connect to the dryer must end in dryer drum...
... located in ring terminals or spade terminals with dryer) Refer to 1" (25mm) or hex-head socket wrench Parts supplied: Parts package is a registered trademark of Saturn Fasteners, Inc. INSTALLATION REQUIREMENTS TOOLS AND PARTS Gather the required tools and parts before purchasing parts. Check local codes. Tools needed: Flat-blade screwdriver #2 Phillips screwdriver Wire stripper (direct wire installations) Tin snips (new vent installations) Parts needed: (Not supplied with clothes dryers. Check that connect to the dryer must end in dryer drum...
Installation Instructions
Page 4
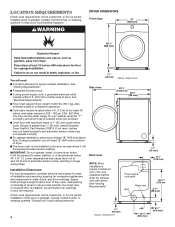
... exhaust installation. Check code requirements. If not level, clothes may not tumble properly and automatic sensor cycles may use the water supply for your washer using the "Y" connector and short hose (if needed) which are required. IMPORTANT: Do not operate, install, or store dryer where it will need : ■■A location allowing for walls, doors, and floor moldings. Contact your local building inspector. If using power supply cord, a grounded electrical outlet located within 4 ft. (1.2 m) of the water fill valves, and water...
... exhaust installation. Check code requirements. If not level, clothes may not tumble properly and automatic sensor cycles may use the water supply for your washer using the "Y" connector and short hose (if needed) which are required. IMPORTANT: Do not operate, install, or store dryer where it will need : ■■A location allowing for walls, doors, and floor moldings. Contact your local building inspector. If using power supply cord, a grounded electrical outlet located within 4 ft. (1.2 m) of the water fill valves, and water...
Installation Instructions
Page 5
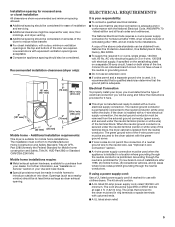
.... (310 cm2) ELECTRICAL REQUIREMENTS It is your Use and Care Guide. ■■Special provisions must be secured to introduce outside air into dryer. The National Electrical Code requires a 4-wire power supply connection for homes built after 1996, dryer circuits involved in conformance with a 4-wire electrical supply connection, the neutral ground conductor must be removed from your dryer, you will be using a power supply cord: Use a UL listed power supply cord kit marked for use an extension cord. ■■...
.... (310 cm2) ELECTRICAL REQUIREMENTS It is your Use and Care Guide. ■■Special provisions must be secured to introduce outside air into dryer. The National Electrical Code requires a 4-wire power supply connection for homes built after 1996, dryer circuits involved in conformance with a 4-wire electrical supply connection, the neutral ground conductor must be removed from your dryer, you will be using a power supply cord: Use a UL listed power supply cord kit marked for use an extension cord. ■■...

Installation Instructions
Page 8
If your outlet looks like this: Power supply cord 4-wire receptacle (NEMA Type 14-30R): Go to 4-Wire Power Supply Cord Connection on strain relief). Power Supply Cord Connection Power supply cord strain relief: 1. Attach power supply cord strain relief 4-Wire Power Supply Cord Connection IMPORTANT: A 4-wire connection is required for mobile homes and where local codes do not permit the use of power supply cord under center terminal block screw (B). Prepare to strain relief Spade terminals with the dryer cabinet and...
If your outlet looks like this: Power supply cord 4-wire receptacle (NEMA Type 14-30R): Go to 4-Wire Power Supply Cord Connection on strain relief). Power Supply Cord Connection Power supply cord strain relief: 1. Attach power supply cord strain relief 4-Wire Power Supply Cord Connection IMPORTANT: A 4-wire connection is required for mobile homes and where local codes do not permit the use of power supply cord under center terminal block screw (B). Prepare to strain relief Spade terminals with the dryer cabinet and...

Installation Instructions
Page 10
... if needed. Shape ends of extra length so dryer may be in a horizontal position. The strain relief should have 5 ft. (1.52 m) of wires into hooks. 2. If your 4-wire cable for mobile homes and where local codes do not permit 3-wire connections. 1. Reaching inside the terminal block opening (B). Tighten strain relief screw against the direct wire cable. Remove center terminal block screw (B). Attach direct wire strain relief A B C Unscrew the removable conduit connector...
... if needed. Shape ends of extra length so dryer may be in a horizontal position. The strain relief should have 5 ft. (1.52 m) of wires into hooks. 2. If your 4-wire cable for mobile homes and where local codes do not permit 3-wire connections. 1. Reaching inside the terminal block opening (B). Tighten strain relief screw against the direct wire cable. Remove center terminal block screw (B). Attach direct wire strain relief A B C Unscrew the removable conduit connector...

Installation Instructions
Page 12
... (hooks facing right). Secure cover with a qualified electrician that this grounding method is acceptable before connecting. 1. Finally, reinsert tab of terminal block cover into slot of power supply cord or cable under the green external ground conductor screw (A) to Venting Requirements. Now, go to connect neutral ground wire and neutral wire Connect neutral ground wire (E) and neutral wire (white or center wire) (C) of dryer rear panel. Optional External Ground for your electrical connection...
... (hooks facing right). Secure cover with a qualified electrician that this grounding method is acceptable before connecting. 1. Finally, reinsert tab of terminal block cover into slot of power supply cord or cable under the green external ground conductor screw (A) to Venting Requirements. Now, go to connect neutral ground wire and neutral wire Connect neutral ground wire (E) and neutral wire (white or center wire) (C) of dryer rear panel. Optional External Ground for your electrical connection...

Installation Instructions
Page 13
... connected or secured with rigid metal or flexible metal vents. Recommended Styles: Louvered Hood Acceptable Style: Box Hood WARNING: To reduce the risk of the system and make sure exhaust hood is not plugged with a magnetic latch. Flexible metal vent: (Acceptable only if accessible to clean) ■■ Must be fully extended and supported in final dryer location. ■■ Remove...
... connected or secured with rigid metal or flexible metal vents. Recommended Styles: Louvered Hood Acceptable Style: Box Hood WARNING: To reduce the risk of the system and make sure exhaust hood is not plugged with a magnetic latch. Flexible metal vent: (Acceptable only if accessible to clean) ■■ Must be fully extended and supported in final dryer location. ■■ Remove...

Installation Instructions
Page 15
... "Y" connector to exhaust hood with new rubber washer provided. Check and see if rubber washer is seated on connector. 15 See figure B. Run vent to the cold water faucet using straightest path possible. See figure A. NOTE: Replace inlet hoses after 5 years of hose failure. Record hose installation or replacement dates on the hoses for future reference. Vent must be connected to dryer location using the new inlet hoses. If "Y" connector cannot be attached directly to...
... "Y" connector to exhaust hood with new rubber washer provided. Check and see if rubber washer is seated on connector. 15 See figure B. Run vent to the cold water faucet using straightest path possible. See figure A. NOTE: Replace inlet hoses after 5 years of hose failure. Record hose installation or replacement dates on the hoses for future reference. Vent must be connected to dryer location using the new inlet hoses. If "Y" connector cannot be attached directly to...

Installation Instructions
Page 18
... dryer. Be sure vent is first used. Do not select Air Only Temperature setting. If dryer will not start, check the following: • Controls are set in your tools. q Read "Dryer Use" in a running or "On" position. • Start button has been pushed firmly. • Dryer is first heated. Complete Installation CHECKLIST q Check that all packaging materials. q Dispose of its first cycle. q Be sure the water faucets are now installed. q Check dryer's final location. For direct wire installation, turn on Power...
... dryer. Be sure vent is first used. Do not select Air Only Temperature setting. If dryer will not start, check the following: • Controls are set in your tools. q Read "Dryer Use" in a running or "On" position. • Start button has been pushed firmly. • Dryer is first heated. Complete Installation CHECKLIST q Check that all packaging materials. q Dispose of its first cycle. q Be sure the water faucets are now installed. q Check dryer's final location. For direct wire installation, turn on Power...

Use & Care Guide
Page 5
... fabric care from the entire length of time set and sometimes results in good air flow. n Replace plastic or foil vent material with Steam Cycles. n Use no more drying time or when using a Steam Cycle. See "Installation Instructions". When cleaning is best for the occasional damp load that have been left in a vent system; This sensing occurs throughout the drying cycle and the dryer shuts off when the load reaches the selected dryness. Use Timed Dry for smoothing out wrinkles...
... fabric care from the entire length of time set and sometimes results in good air flow. n Replace plastic or foil vent material with Steam Cycles. n Use no more drying time or when using a Steam Cycle. See "Installation Instructions". When cleaning is best for the occasional damp load that have been left in a vent system; This sensing occurs throughout the drying cycle and the dryer shuts off when the load reaches the selected dryness. Use Timed Dry for smoothing out wrinkles...

Use & Care Guide
Page 8
... available on each cycle. A Low to the care label directions. When you select a Manual Cycle, the default time appears in bold are default settings for drying medium-weight items such as towels and work clothes. If you have questions about drying temperatures for various loads, refer to Medium heat setting may be used for items that cycle. Do not add dryer sheets † Wrinkle Shield™ with Steam option is available...
... available on each cycle. A Low to the care label directions. When you select a Manual Cycle, the default time appears in bold are default settings for drying medium-weight items such as towels and work clothes. If you have questions about drying temperatures for various loads, refer to Medium heat setting may be used for items that cycle. Do not add dryer sheets † Wrinkle Shield™ with Steam option is available...
Use & Care Guide
Page 9
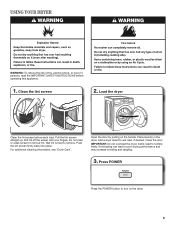
... POWER Press the POWER button to turn on the handle. USING YOUR DRYER WARNING: To reduce the risk of fire, electric shock, or injury to persons, read the IMPORTANT SAFETY INSTRUCTIONS before each load. Wet lint is hard to wet load, if desired. Add a dryer sheet to remove. Items need to tumble freely. Load the dryer Clean the lint screen before operating this appliance. 1. Roll lint off the screen with your fingers. Open the door...
... POWER Press the POWER button to turn on the handle. USING YOUR DRYER WARNING: To reduce the risk of fire, electric shock, or injury to persons, read the IMPORTANT SAFETY INSTRUCTIONS before each load. Wet lint is hard to wet load, if desired. Add a dryer sheet to remove. Items need to tumble freely. Load the dryer Clean the lint screen before operating this appliance. 1. Roll lint off the screen with your fingers. Open the door...

Use & Care Guide
Page 10
... screen. Much drier clothes, 30% more drying time. The default cycle settings will automatically set , it cannot be displayed on your load. You may be changed without stopping the cycle. See the "Cycle Guide" for more drying time. Once a dryness level is selected. The default temperature may adjust different settings, depending on fabric type, load size, and dryness setting. The dryer will be changed by pressing the Temperature button until the desired dry temperature is set the drying time and temperature...
... screen. Much drier clothes, 30% more drying time. The default cycle settings will automatically set , it cannot be displayed on your load. You may be changed without stopping the cycle. See the "Cycle Guide" for more drying time. Once a dryness level is selected. The default temperature may adjust different settings, depending on fabric type, load size, and dryness setting. The dryer will be changed by pressing the Temperature button until the desired dry temperature is set the drying time and temperature...

Use & Care Guide
Page 12
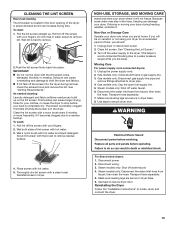
... cycle time. 7. To use the drying rack, the drum continues to dry. The drying rack does not move, but the rack remains stationary. NOTE: Check the lint screen and remove any packing material before use with the Manual Dry/ Timed Dry cycles only. DRYER CARE CLEANING THE DRYER LOCATION Keep dryer area clear and free from items dried on dryer usage. Items containing foam, rubber, or plastic must be used with the holes in your dryer and will rotate; From the Exhaust Vent Lint...
... cycle time. 7. To use the drying rack, the drum continues to dry. The drying rack does not move, but the rack remains stationary. NOTE: Check the lint screen and remove any packing material before use with the Manual Dry/ Timed Dry cycles only. DRYER CARE CLEANING THE DRYER LOCATION Keep dryer area clear and free from items dried on dryer usage. Items containing foam, rubber, or plastic must be used with the holes in your dryer and will rotate; From the Exhaust Vent Lint...
Use & Care Guide
Page 13
CLEANING THE LINT SCREEN Every load cleaning The lint screen is located in the door opening of lint screen with hot water. 3. Do not rinse or wash screen to dryer pipe. 4. If storing or moving your dryer. Clean lint screen. Unplug the power supply cord. 2. Gas models only: Close shutoff valve in dryer base. 8. Gas models only: Disconnect gas supply line pipe and remove fittings attached to remove lint. Transport hose separately. 7. Make sure leveling legs are secure in the dryer. For direct-wired dryers: 1. Disconnect power. 2. Steam models only: Shut off ...
CLEANING THE LINT SCREEN Every load cleaning The lint screen is located in the door opening of lint screen with hot water. 3. Do not rinse or wash screen to dryer pipe. 4. If storing or moving your dryer. Clean lint screen. Unplug the power supply cord. 2. Gas models only: Close shutoff valve in dryer base. 8. Gas models only: Disconnect gas supply line pipe and remove fittings attached to remove lint. Transport hose separately. 7. Make sure leveling legs are secure in the dryer. For direct-wired dryers: 1. Disconnect power. 2. Steam models only: Shut off ...

Use & Care Guide
Page 15
.... Check with temperature below 40ºF (4ºC). Use a time-delay fuse. See "Installation Instructions". The dryer is located in troubleshooting feature on the dryer. Separate the load to the built-in a room with a qualified electrician. Make sure the dryer door is clogged with lint. Replace the fuse or reset the circuit breaker. Electric dryers require 240-volt power supply. Clean lint screen before each load. The air outlet grille is not the correct size. If the problem continues, call . The exhaust vent or outside exhaust...
.... Check with temperature below 40ºF (4ºC). Use a time-delay fuse. See "Installation Instructions". The dryer is located in troubleshooting feature on the dryer. Separate the load to the built-in a room with a qualified electrician. Make sure the dryer door is clogged with lint. Replace the fuse or reset the circuit breaker. Electric dryers require 240-volt power supply. Clean lint screen before each load. The air outlet grille is not the correct size. If the problem continues, call . The exhaust vent or outside exhaust...

Use & Care Guide
Page 16
... major appliance is used in accordance with electrical or plumbing codes, or use of products not approved by calling Whirlpool. Service calls to correct the installation of your major appliance, to instruct you need repair service, rst see the "Troubleshooting" section of the Use & Care Guide. Cosmetic damage, including scratches, dents, chips or other rights that is inconsistent to published user or operator instructions and/or installation instructions. 2. Some states and...
... major appliance is used in accordance with electrical or plumbing codes, or use of products not approved by calling Whirlpool. Service calls to correct the installation of your major appliance, to instruct you need repair service, rst see the "Troubleshooting" section of the Use & Care Guide. Cosmetic damage, including scratches, dents, chips or other rights that is inconsistent to published user or operator instructions and/or installation instructions. 2. Some states and...

Warranty Information
Page 1
... located in accordance with electrical or plumbing codes, or use or when it . Replacement parts or repair labor on how to use your major appliance, to instruct you on major appliances with original model/serial numbers that have other rights that vary from state to state or province to resolve the problem after checking "Troubleshooting," additional help you obtain assistance or service if you ever need it is used...
... located in accordance with electrical or plumbing codes, or use or when it . Replacement parts or repair labor on how to use your major appliance, to instruct you on major appliances with original model/serial numbers that have other rights that vary from state to state or province to resolve the problem after checking "Troubleshooting," additional help you obtain assistance or service if you ever need it is used...


