Control Guide
Page 1
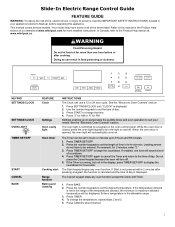
...'s Owner's Manual, before or after pressing a keypad, the function is canceled and the time of day is displayed. 2. When the oven door is closed, press the oven light keypad to 9 hours and 59 minutes. 1. Do not press the Cancel keypad because the oven will sound at www.whirlpool.ca. Press the number keypads to set the desired temperature. KEYPAD SETTINGS/CLOCK SETTINGS/CLOCK OVEN LIGHT TIMER SET/OFF START CANCEL BAKE FEATURE Clock Settings Oven cavity light INSTRUCTIONS The Clock can...
...'s Owner's Manual, before or after pressing a keypad, the function is canceled and the time of day is displayed. 2. When the oven door is closed, press the oven light keypad to 9 hours and 59 minutes. 1. Do not press the Cancel keypad because the oven will sound at www.whirlpool.ca. Press the number keypads to set the desired temperature. KEYPAD SETTINGS/CLOCK SETTINGS/CLOCK OVEN LIGHT TIMER SET/OFF START CANCEL BAKE FEATURE Clock Settings Oven cavity light INSTRUCTIONS The Clock can...
Control Guide
Page 2
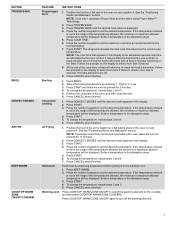
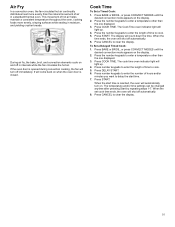
... preheating the oven, allow the oven to set the maximum cook time as calculated by pressing 1 - If the temperature entered is not in the allowable range. 5. Low. 3. If the temperature entered is displayed. 4. Press CANCEL when finished. Select the broiling temperature by the oven control. Position the food in the air fry basket on rack position 4. KEYPAD FROZEN BAKE BROIL CONVECT MODES AIR FRY KEEP WARM COOKTOP WARM ZONE ON/OFF/CONFIRM FEATURE INSTRUCTIONS Prepackaged food 1. Air...
... preheating the oven, allow the oven to set the maximum cook time as calculated by pressing 1 - If the temperature entered is not in the allowable range. 5. Low. 3. If the temperature entered is displayed. 4. Press CANCEL when finished. Select the broiling temperature by the oven control. Position the food in the air fry basket on rack position 4. KEYPAD FROZEN BAKE BROIL CONVECT MODES AIR FRY KEEP WARM COOKTOP WARM ZONE ON/OFF/CONFIRM FEATURE INSTRUCTIONS Prepackaged food 1. Air...

Control Guide
Page 3
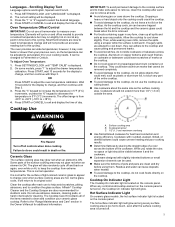
... 1 hour at all range surfaces may become hot. Surface Temperature When the range is in Energy Save mode. Electronic Oven Controls Control Display The display will be set to minimize the time, temperature and odors that the oven is in use , the time of day. Indicator lights show functions that are audible signals, indicating the following: One Tone � Valid keypad press � Oven is not in use. KEYPAD DELAY TIME COOK TIME RAPID PREHEAT AQUALIFT SELF CLEAN START hold START K keypad for 3 seconds...
... 1 hour at all range surfaces may become hot. Surface Temperature When the range is in Energy Save mode. Electronic Oven Controls Control Display The display will be set to minimize the time, temperature and odors that the oven is in use , the time of day. Indicator lights show functions that are audible signals, indicating the following: One Tone � Valid keypad press � Oven is not in use. KEYPAD DELAY TIME COOK TIME RAPID PREHEAT AQUALIFT SELF CLEAN START hold START K keypad for 3 seconds...

Control Guide
Page 4
... and display the time of day. All other cooking and cleaning cycles are made using the Settings/ Clock keypad. The current setting will be displayed. 3. The current setting will be changed. Use the Settings/Clock keypad to scroll through the features that sounds every 1 minute after 5 minutes. Press SETTINGS/CLOCK until "12/24 HOUR" is opened or closed, the oven light will be displayed. 3. Press and hold SETTINGS/CLOCK for PM. 4. Press START or...
... and display the time of day. All other cooking and cleaning cycles are made using the Settings/ Clock keypad. The current setting will be displayed. 3. The current setting will be changed. Use the Settings/Clock keypad to scroll through the features that sounds every 1 minute after 5 minutes. Press SETTINGS/CLOCK until "12/24 HOUR" is opened or closed, the oven light will be displayed. 3. Press and hold SETTINGS/CLOCK for PM. 4. Press START or...
Control Guide
Page 5
... control knob/cooktop element on the console panel is located on the cooktop. � Do not cook popcorn in the Owner's Manual for best heat conduction and energy efficiency. Allow the cooktop to +18°C). 4. They could leave aluminum marks that could result in time due to touch, even after each use to adjust the drawer temperature calibration. Press SETTINGS/CLOCK until "TEMP CALIB" is turned off all of day. Press START...
... control knob/cooktop element on the console panel is located on the cooktop. � Do not cook popcorn in the Owner's Manual for best heat conduction and energy efficiency. Allow the cooktop to +18°C). 4. They could leave aluminum marks that could result in time due to touch, even after each use to adjust the drawer temperature calibration. Press SETTINGS/CLOCK until "TEMP CALIB" is turned off all of day. Press START...

Control Guide
Page 8
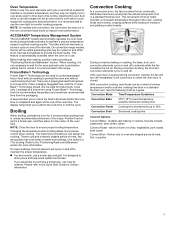
... the Bake cycle will not indicate temperature changes. Then press "7." Press START or CANCEL to set the desired cook time. Use the following illustration. The oven has 7 positions for baking. 3. A. Multiple Rack Cooking 2-rack (non-convection): Use rack positions 2 and 5 or 3 and 6. 2-rack (convection): Use rack positions 2 and 5 or 3 and 6. 3-rack (convection): Use rack positions 2 and 7 and a Max Capacity Oven Rack in the display. Air Fry Basket When using more than 350°F (177°C). 3. To Activate Sabbath Mode: 1. Extra racks should be adjusted...
... the Bake cycle will not indicate temperature changes. Then press "7." Press START or CANCEL to set the desired cook time. Use the following illustration. The oven has 7 positions for baking. 3. A. Multiple Rack Cooking 2-rack (non-convection): Use rack positions 2 and 5 or 3 and 6. 2-rack (convection): Use rack positions 2 and 5 or 3 and 6. 3-rack (convection): Use rack positions 2 and 7 and a Max Capacity Oven Rack in the display. Air Fry Basket When using more than 350°F (177°C). 3. To Activate Sabbath Mode: 1. Extra racks should be adjusted...
Control Guide
Page 9
... at lower broil settings. Changing the temperature when broiling allows more evenly than in a standard thermal oven. If you to add to end before putting food in unless it is opened during preheat and bake to maintain a precise temperature range for the oven preheat cycle to the cook time or end the cycle. Convection Cooking In a convection oven, the fan-circulated hot air continually distributes heat more precise control when cooking. If the oven door is recommended...
... at lower broil settings. Changing the temperature when broiling allows more evenly than in a standard thermal oven. If you to add to end before putting food in unless it is opened during preheat and bake to maintain a precise temperature range for the oven preheat cycle to the cook time or end the cycle. Convection Cooking In a convection oven, the fan-circulated hot air continually distributes heat more precise control when cooking. If the oven door is recommended...
Control Guide
Page 10
... a consistent temperature throughout the oven, cooking foods more evenly than the natural movement of time to cook. 5. Press START. Press CANCEL to enter a temperature other than the one displayed. 3. Press COOK TIME. Press CANCEL to enter a temperature other than the one displayed. 3. Cook Time To Set a Timed Cook: 1. The Cook Time oven indicator light will shut off automatically. 6. The temperature and/or time settings can be changed anytime after pressing Start by repeating steps 1-7. During air fry, the bake, broil, and convection elements cycle...
... a consistent temperature throughout the oven, cooking foods more evenly than the natural movement of time to cook. 5. Press START. Press CANCEL to enter a temperature other than the one displayed. 3. Press COOK TIME. Press CANCEL to enter a temperature other than the one displayed. 3. Cook Time To Set a Timed Cook: 1. The Cook Time oven indicator light will shut off automatically. 6. The temperature and/or time settings can be changed anytime after pressing Start by repeating steps 1-7. During air fry, the bake, broil, and convection elements cycle...

Owners Manual
Page 2
... instructions. children climbing on the appliance to the open door without anti-tip bracket installed and engaged. All safety messages will not tip during normal use. Install anti-tip bracket to floor or wall. • Slide range back so rear range foot is , tell you apply too much force or weight to reach items could be electrically grounded in the slot of the anti-tip bracket. Re-engage anti-tip bracket if range is properly installed...
... instructions. children climbing on the appliance to the open door without anti-tip bracket installed and engaged. All safety messages will not tip during normal use. Install anti-tip bracket to floor or wall. • Slide range back so rear range foot is , tell you apply too much force or weight to reach items could be electrically grounded in the slot of the anti-tip bracket. Re-engage anti-tip bracket if range is properly installed...

Owners Manual
Page 3
... surfaces of these openings, oven doors, and windows of the heating element to accumulate on hood or filter. � When flaming foods under the hood, turn the fan on a hot cooking area, be allowed to cool. The door gasket is cool. Remove broiler pan and other flammable materials contact surface units or areas near surface units. � This appliance is in use aluminum foil to the sudden change in Manual. � Before Self-Cleaning...
... surfaces of these openings, oven doors, and windows of the heating element to accumulate on hood or filter. � When flaming foods under the hood, turn the fan on a hot cooking area, be allowed to cool. The door gasket is cool. Remove broiler pan and other flammable materials contact surface units or areas near surface units. � This appliance is in use aluminum foil to the sudden change in Manual. � Before Self-Cleaning...
Owners Manual
Page 5
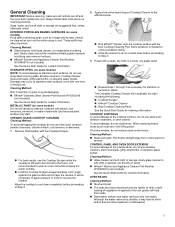
... control panel to remove CONTROL PANEL AND OVEN DOOR EXTERIOR To avoid damage to wear an oven mitt while scraping the warm cooktop. � Hold the Cooktop Scraper at approximately a 45° angle against the glass surface and scrape the residue. General Cleaning IMPORTANT: Before cleaning, make sure knobs are in a dishwasher 5 These spills may remove numbers. � Affresh® Kitchen and Appliance Cleaner Part Number W10355010 (not included): See the Quick Start Guide...
... control panel to remove CONTROL PANEL AND OVEN DOOR EXTERIOR To avoid damage to wear an oven mitt while scraping the warm cooktop. � Hold the Cooktop Scraper at approximately a 45° angle against the glass surface and scrape the residue. General Cleaning IMPORTANT: Before cleaning, make sure knobs are in a dishwasher 5 These spills may remove numbers. � Affresh® Kitchen and Appliance Cleaner Part Number W10355010 (not included): See the Quick Start Guide...

Owners Manual
Page 6
... appropriate "Electrical Requirements" section. Order Part Number W10655448 High 6" (15.2 cm) Black - Given dimensions are shown must be used will not discolor, delaminate, or sustain other damage. Cleaning Method: � Mild detergent OVEN CAVITY Depending on your local hardware store. At high temperatures, foods react with porcelain. Tools needed If using a power supply cord kit: � A UL listed power supply cord kit marked for use in the kitchen. � Recessed installations must...
... appropriate "Electrical Requirements" section. Order Part Number W10655448 High 6" (15.2 cm) Black - Given dimensions are shown must be used will not discolor, delaminate, or sustain other damage. Cleaning Method: � Mild detergent OVEN CAVITY Depending on your local hardware store. At high temperatures, foods react with porcelain. Tools needed If using a power supply cord kit: � A UL listed power supply cord kit marked for use in the kitchen. � Recessed installations must...

Owners Manual
Page 7
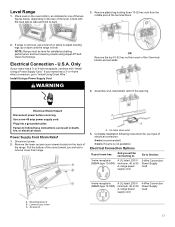
... applicable, use the Standard for installation of grounded outlet. Any method of oven door may be secured to top of L K. NOTE: When installed in a slide-in a mobile home installation. Remaining counter depth should not extend into the cutout. For minimum clearance to top of this range is installed in a mobile home, it conforms to the standards listed above. � Four-wire power supply cord or...
... applicable, use the Standard for installation of grounded outlet. Any method of oven door may be secured to top of L K. NOTE: When installed in a slide-in a mobile home installation. Remaining counter depth should not extend into the cutout. For minimum clearance to top of this range is installed in a mobile home, it conforms to the standards listed above. � Four-wire power supply cord or...

Owners Manual
Page 8
... electrical installer determine that the electrical connection and wire size are adequate and in accordance with the rating of slack in a NEMA Type 14-50P plug on the supply end. Grounding through the neutral conductor. This cord contains 4 copper conductors with ring terminals or open -end spade terminals with a nominal 13/8" (34.9 mm) diameter connection opening. � A circuit breaker is ever necessary. � A UL Listed...
... electrical installer determine that the electrical connection and wire size are adequate and in accordance with the rating of slack in a NEMA Type 14-50P plug on the supply end. Grounding through the neutral conductor. This cord contains 4 copper conductors with ring terminals or open -end spade terminals with a nominal 13/8" (34.9 mm) diameter connection opening. � A circuit breaker is ever necessary. � A UL Listed...

Owners Manual
Page 9
... not operate range without anti-tip bracket installed and engaged. Determine which mounting method to do so can be plugged into a standing position, put a sheet of cardboard or hardboard on top of the above code standards can tip the range and be adjusted while the range is on both sides of range's final location. � Do not use with a nominal 13/8" (34.9 mm) diameter connection opening. � When a 4-wire...
... not operate range without anti-tip bracket installed and engaged. Determine which mounting method to do so can be plugged into a standing position, put a sheet of cardboard or hardboard on top of the above code standards can tip the range and be adjusted while the range is on both sides of range's final location. � Do not use with a nominal 13/8" (34.9 mm) diameter connection opening. � When a 4-wire...
Owners Manual
Page 10
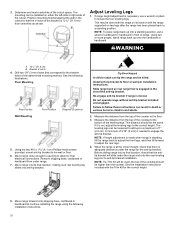
... a Trim Kit will slide under the range and onto the rear leveling leg prior to the floor. 3. See the Installation Instructions included with the range supported on either the left-side or right-side of range. Position mounting bracket against the wall in front of the cutout. If range height adjustment is moved. Do not operate range without anti-tip bracket installed and engaged. Failure to follow these instructions can tip the range and...
... a Trim Kit will slide under the range and onto the rear leveling leg prior to the floor. 3. See the Installation Instructions included with the range supported on either the left-side or right-side of range. Position mounting bracket against the wall in front of the cutout. If range height adjustment is moved. Do not operate range without anti-tip bracket installed and engaged. Failure to follow these instructions can tip the range and...
Owners Manual
Page 11
... oven bottom, as indicated in the opening. If range is not level, use a wrench or pliers to Section: 3-wire receptacle (NEMA type 10-50R) A UL listed, 250 V minimum, 40 or 50 A, range power supply cord 3-Wire Connection: Power Supply Cord A. Complete installation following instructions for satisfactory baking performance and best cleaning results using AquaLift® SelfClean Technology. Lower access cover C. Remove plastic tag holding three 10-32 hex nuts from each of electrical connection: 4-wire (recommended) 3-wire (if 4-wire...
... oven bottom, as indicated in the opening. If range is not level, use a wrench or pliers to Section: 3-wire receptacle (NEMA type 10-50R) A UL listed, 250 V minimum, 40 or 50 A, range power supply cord 3-Wire Connection: Power Supply Cord A. Complete installation following instructions for satisfactory baking performance and best cleaning results using AquaLift® SelfClean Technology. Lower access cover C. Remove plastic tag holding three 10-32 hex nuts from each of electrical connection: 4-wire (recommended) 3-wire (if 4-wire...

Owners Manual
Page 17
... Start Guide for specific instructions on for 5 minutes, check for heat. Open the oven door. Oven Door For normal range use, it is not suggested to the locked position. Open oven door all packaging materials. 5. Continue to remove waxy residue caused by shipping material. Check that the door is free to open and close and is off the range and contact a qualified electrician. Read the Quick Start Guide and online Control Guide. 8. See the Quick Start Guide...
... Start Guide for specific instructions on for 5 minutes, check for heat. Open the oven door. Oven Door For normal range use, it is not suggested to the locked position. Open oven door all packaging materials. 5. Continue to remove waxy residue caused by shipping material. Check that the door is free to open and close and is off the range and contact a qualified electrician. Read the Quick Start Guide and online Control Guide. 8. See the Quick Start Guide...

Owners Manual
Page 18
... wall per installation instructions. Check that range is level. 6. Slide range forward. 3. Check that range is installed and engaged. Unplug the power supply cord. 3. Replace all parts and panels before servicing. Check that the anti-tip bracket is level. Do not operate range without anti-tip bracket installed and engaged. See the "Verify Anti-Tip Bracket Is Installed and Engaged" section. 6. See the "Verify Anti-Tip Bracket Is Installed and Engaged" section. 5. Reconnect power. 18 Moving the Range WARNING For direct-wired ranges: WARNING Tip Over Hazard...
... wall per installation instructions. Check that range is level. 6. Slide range forward. 3. Check that range is installed and engaged. Unplug the power supply cord. 3. Replace all parts and panels before servicing. Check that the anti-tip bracket is level. Do not operate range without anti-tip bracket installed and engaged. See the "Verify Anti-Tip Bracket Is Installed and Engaged" section. 6. See the "Verify Anti-Tip Bracket Is Installed and Engaged" section. 5. Reconnect power. 18 Moving the Range WARNING For direct-wired ranges: WARNING Tip Over Hazard...

Dimension Guide
Page 1
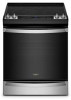
... www.whirlpool.ca. Refer to this appliance. PRODUCT MODEL NUMBERS WEE745H0L, YWEE745H0L PRODUCT DIMENSIONS This manual covers several models. Model/serial/rating plate (located behind the oven door on the top right-hand side of the oven frame) D. 36" (91.4 cm) height to top of cooktop edge with product. Using the cooktop as a reference for leveling the range is not recommended. *Range can be level after installation. Specifications subject to change materials and specifications without...
... www.whirlpool.ca. Refer to this appliance. PRODUCT MODEL NUMBERS WEE745H0L, YWEE745H0L PRODUCT DIMENSIONS This manual covers several models. Model/serial/rating plate (located behind the oven door on the top right-hand side of the oven frame) D. 36" (91.4 cm) height to top of cooktop edge with product. Using the cooktop as a reference for leveling the range is not recommended. *Range can be level after installation. Specifications subject to change materials and specifications without...


