
Dimension Guide
Page 1
30" (76 cm) Freestanding Electric Range PRODUCT MODEL NUMBERS GFE461LV GFE471LV WFE301LV WFE361LV WFE364LV WFE366LV WFE371LV WFE374LV WFE381LV WFE114LW WFE115LX RF110AXS RF111PXS RF114PXS RF212PXS RF263LXT RF264LXS Electrical: Range... Installation Instructions packed with the neutral terminal connected to change without notice. Ref. Refer to the proper electrical voltage... max. Because Whirlpool Corporation policy includes a continuous commitment to improve our products, we reserve the right to the cabinet. For complete details, see NOTE*. This range is recommended. A...
30" (76 cm) Freestanding Electric Range PRODUCT MODEL NUMBERS GFE461LV GFE471LV WFE301LV WFE361LV WFE364LV WFE366LV WFE371LV WFE374LV WFE381LV WFE114LW WFE115LX RF110AXS RF111PXS RF114PXS RF212PXS RF263LXT RF264LXS Electrical: Range... Installation Instructions packed with the neutral terminal connected to change without notice. Ref. Refer to the proper electrical voltage... max. Because Whirlpool Corporation policy includes a continuous commitment to improve our products, we reserve the right to the cabinet. For complete details, see NOTE*. This range is recommended. A...
Installation Instructions
Page 1
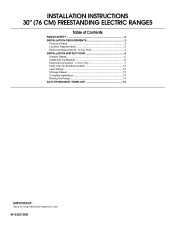
Only 4 INSTALLATION INSTRUCTIONS 6 Unpack Range 6 Install Anti-Tip Bracket 6 Electrical Connection - U.S.A. U.S.A. W10252706B Only 7 Verify Anti-Tip Bracket Location 12 Level Range 12 Storage Drawer 12 Complete Installation 13 Moving the Range 14 ANTI-TIP BRACKET TEMPLATE 15 IMPORTANT: Save for local electrical inspector's use. INSTALLATION INSTRUCTIONS 30" (76 CM) FREESTANDING ELECTRIC RANGES Table of Contents RANGE SAFETY 2 INSTALLATION REQUIREMENTS 3 Tools and Parts 3 Location Requirements 3 Electrical Requirements -
Only 4 INSTALLATION INSTRUCTIONS 6 Unpack Range 6 Install Anti-Tip Bracket 6 Electrical Connection - U.S.A. U.S.A. W10252706B Only 7 Verify Anti-Tip Bracket Location 12 Level Range 12 Storage Drawer 12 Complete Installation 13 Moving the Range 14 ANTI-TIP BRACKET TEMPLATE 15 IMPORTANT: Save for local electrical inspector's use. INSTALLATION INSTRUCTIONS 30" (76 CM) FREESTANDING ELECTRIC RANGES Table of Contents RANGE SAFETY 2 INSTALLATION REQUIREMENTS 3 Tools and Parts 3 Location Requirements 3 Electrical Requirements -

Installation Instructions
Page 3
...Anti-tip bracket kit Anti-tip bracket must be securely mounted to be made by a licensed, qualified electrical installer. Check local codes. Additional Installation Requirements The installation of this range is adequate as long as it must be secured to the standards listed above the surface units should be..., 40 amps or 50 amps that is to terminal block) ■ 3 - See "Electrical Requirements" section. Terminal lugs A B C A. Thickness of burns or fire by installing a range hood that are minimum clearances. ■ The floor anti-tip bracket must be used . ...
...Anti-tip bracket kit Anti-tip bracket must be securely mounted to be made by a licensed, qualified electrical installer. Check local codes. Additional Installation Requirements The installation of this range is adequate as long as it must be secured to the standards listed above the surface units should be..., 40 amps or 50 amps that is to terminal block) ■ 3 - See "Electrical Requirements" section. Terminal lugs A B C A. Thickness of burns or fire by installing a range hood that are minimum clearances. ■ The floor anti-tip bracket must be used . ...

Installation Instructions
Page 4
...30" (76.2 cm) min. opening width E. Electrical Requirements - U.S.A. Only If codes permit and a separate ground wire is used, it will not fit the outlet, have a proper outlet installed by adjusting the leveling legs. If it is recommended that a qualified electrical installer determine that the electrical...;₈" (75.9 cm) width E. 25" (63.5 cm) depth F. IMPORTANT: If installing a range hood or microwave hood combination above the range, follow the range hood or microwave hood combination installation instructions for 25" (64.0 cm) countertop depth, 24" (61.0 cm) base cabinet ...
...30" (76.2 cm) min. opening width E. Electrical Requirements - U.S.A. Only If codes permit and a separate ground wire is used, it will not fit the outlet, have a proper outlet installed by adjusting the leveling legs. If it is recommended that a qualified electrical installer determine that the electrical...;₈" (75.9 cm) width E. 25" (63.5 cm) depth F. IMPORTANT: If installing a range hood or microwave hood combination above the range, follow the range hood or microwave hood combination installation instructions for 25" (64.0 cm) countertop depth, 24" (61.0 cm) base cabinet ...

Installation Instructions
Page 5
Electrical Connection To properly install your range, you will be using and follow the instructions provided for the copper 4-wire...provided at each end of the power supply cable (at the range and at 250 volts, 40 or 50 amps and investigated for new branch-circuit installations (1996 NEC); Cord should be Type SRD or SRDT with upturned.... Grounding through the neutral conductor. or 50-amp power supply cord (pigtail) (see following Range Rating chart). See "Electrical Connection." or 50-amp range power supply cord (pigtail). mobile homes; When a 4-wire receptacle of Power Supply Cord Kit...
Electrical Connection To properly install your range, you will be using and follow the instructions provided for the copper 4-wire...provided at each end of the power supply cable (at the range and at 250 volts, 40 or 50 amps and investigated for new branch-circuit installations (1996 NEC); Cord should be Type SRD or SRDT with upturned.... Grounding through the neutral conductor. or 50-amp power supply cord (pigtail) (see following Range Rating chart). See "Electrical Connection." or 50-amp range power supply cord (pigtail). mobile homes; When a 4-wire receptacle of Power Supply Cord Kit...

Installation Instructions
Page 6
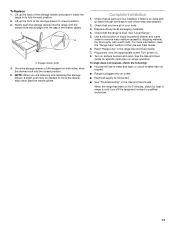
...a ¼" drive ratchet to lower the rear leveling legs one -half turn. Connect anti-tip bracket to move and install range. Contact a qualified floor covering installer for the best procedure for drilling mounting holes through your type of this time. Tape template into place. 4. B A. ...result in cabinet opening . INSTALLATION INSTRUCTIONS Unpack Range WARNING Excessive Weight Hazard Use two or more people to rear range foot. Do not remove the shipping base at this manual. 2. Front leveling leg On Ranges Equipped with Warming Drawers: On ranges equipped with a warming drawer,...
...a ¼" drive ratchet to lower the rear leveling legs one -half turn. Connect anti-tip bracket to move and install range. Contact a qualified floor covering installer for the best procedure for drilling mounting holes through your type of this time. Tape template into place. 4. B A. ...result in cabinet opening . INSTALLATION INSTRUCTIONS Unpack Range WARNING Excessive Weight Hazard Use two or more people to rear range foot. Do not remove the shipping base at this manual. 2. Front leveling leg On Ranges Equipped with Warming Drawers: On ranges equipped with a warming drawer,...
Installation Instructions
Page 8
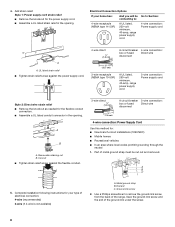
... A UL listed, 250-volt minimum, 40-amp, range power supply cord 3-wire connection: Power supply cord Style 2: Direct wire strain relief ■ Remove the knockout as needed for : ■ New branch-circuit installations (1996 NEC) ■ Mobile homes ■ Recreational...9632; In an area where local codes prohibit grounding through the neutral 1. Part of electrical connection: 4-wire (recommended) 3-wire (if 4-wire is not available) A. Metal ground strap B. A B C 5. Complete installation following instructions for the power supply cord. ■ Assemble a UL listed strain ...
... A UL listed, 250-volt minimum, 40-amp, range power supply cord 3-wire connection: Power supply cord Style 2: Direct wire strain relief ■ Remove the knockout as needed for : ■ New branch-circuit installations (1996 NEC) ■ Mobile homes ■ Recreational...9632; In an area where local codes prohibit grounding through the neutral 1. Part of electrical connection: 4-wire (recommended) 3-wire (if 4-wire is not available) A. Metal ground strap B. A B C 5. Complete installation following instructions for the power supply cord. ■ Assemble a UL listed strain ...
Installation Instructions
Page 10
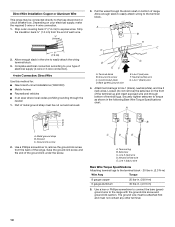
...range. Discard C. Strip outer covering back 3" (7.6 cm) to line 1 (black), neutral (white), and line 2 (red) wires. Pull the wires through the strain relief on your type of electrical supply (4-wire or 3-wire connection). 4-wire Connection: Direct Wire Use this method for: ■ New branch-circuit installations... D. Terminal lug B. Terminal block B. Line 1 (black) wire 4. Neutral (white) wire G. Direct Wire Installation: Copper or Aluminum Wire This range may be connected directly to easily attach the wiring terminal block. 3. Depending on bottom of the ground-link under...
...range. Discard C. Strip outer covering back 3" (7.6 cm) to line 1 (black), neutral (white), and line 2 (red) wires. Pull the wires through the strain relief on your type of electrical supply (4-wire or 3-wire connection). 4-wire Connection: Direct Wire Use this method for: ■ New branch-circuit installations... D. Terminal lug B. Terminal block B. Line 1 (black) wire 4. Neutral (white) wire G. Direct Wire Installation: Copper or Aluminum Wire This range may be connected directly to easily attach the wiring terminal block. 3. Depending on bottom of the ground-link under...
Installation Instructions
Page 12
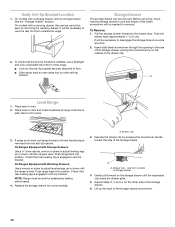
... anti-tip bracket is under anti-tip bracket. On Ranges Equipped with Warming Drawers: Use a wrench or pliers to floor. ■ Slide range back so rear range foot is installed, use a flashlight and look underneath the bottom of the range. ■ Look for the other side of the ...storage drawer and remove. 12 On Ranges Equipped with Storage Drawers: Use a ¼" drive ratchet...
... anti-tip bracket is under anti-tip bracket. On Ranges Equipped with Warming Drawers: Use a wrench or pliers to floor. ■ Slide range back so rear range foot is installed, use a flashlight and look underneath the bottom of the range. ■ Look for the other side of the ...storage drawer and remove. 12 On Ranges Equipped with Storage Drawers: Use a ¼" drive ratchet...
Installation Instructions
Page 13
... burners and oven. If there is fully engaged on for 5 minutes, check for specific instruction on range operation. Check that you are now installed. For more information, read the "Range Care" section of /recycle all of liquid household cleaner and warm water to see which step was ...skipped. 2. Plug power cord into an outlet. ■ Electrical supply is level. If range does not operate, check the following...
... burners and oven. If there is fully engaged on for 5 minutes, check for specific instruction on range operation. Check that you are now installed. For more information, read the "Range Care" section of /recycle all of liquid household cleaner and warm water to see which step was ...skipped. 2. Plug power cord into an outlet. ■ Electrical supply is level. If range does not operate, check the following...
Installation Instructions
Page 14
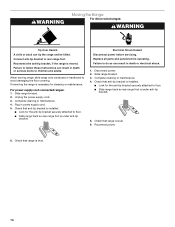
.... Replace all parts and panels before servicing. Check that anti-tip bracket is installed: ■ Look for the anti-tip bracket securely attached to children and adults. Plug in death or electrical shock. 1. Complete cleaning or maintenance. 4. Check that range is level. 6. Failure to do so can result in death or serious burns...
.... Replace all parts and panels before servicing. Check that anti-tip bracket is installed: ■ Look for the anti-tip bracket securely attached to children and adults. Plug in death or electrical shock. 1. Complete cleaning or maintenance. 4. Check that range is level. 6. Failure to do so can result in death or serious burns...
Owners Manual
Page 2
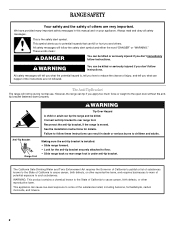
... symbol. WARNING Tip Over Hazard A child or adult can tip the range and be killed or seriously injured if you what the potential hazard is, tell you and others are not followed. See the installation instructions for the anti-tip bracket securely attached to the open door without... the antitip bracket fastened down properly. RANGE SAFETY Your safety and the safety of California to cause cancer, birth defects, ...
... symbol. WARNING Tip Over Hazard A child or adult can tip the range and be killed or seriously injured if you what the potential hazard is, tell you and others are not followed. See the installation instructions for the anti-tip bracket securely attached to the open door without... the antitip bracket fastened down properly. RANGE SAFETY Your safety and the safety of California to cause cancer, birth defects, ...
Owners Manual
Page 3
...surfaces of an oven become hot enough to cause burns. Care should not be referred to a qualified technician. ■ Storage in a risk of electric shock, or fire. ■ Glazed Cooking Utensils - For units with one or more surface units of different size. Children should be positioned so that... contact surface units or areas near these pans or bowls during cooking may be moved while oven is properly installed and grounded by a qualified technician. ■ Never Use the Range for a good seal. Do not let potholder touch hot heating elements. Do not use dry chemical or ...
...surfaces of an oven become hot enough to cause burns. Care should not be referred to a qualified technician. ■ Storage in a risk of electric shock, or fire. ■ Glazed Cooking Utensils - For units with one or more surface units of different size. Children should be positioned so that... contact surface units or areas near these pans or bowls during cooking may be moved while oven is properly installed and grounded by a qualified technician. ■ Never Use the Range for a good seal. Do not let potholder touch hot heating elements. Do not use dry chemical or ...
Owners Manual
Page 10
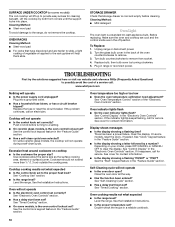
... will not operate ■ Is the control knob set correctly? Cooktop cooking results not what expected ■ Is the range level? Level the range. See the Installation Instructions. Oven will not operate ■ Is the electronic oven control set correctly? Display shows messages ■ Is the...a delay start been set? Double-check the recipe in the "Feature Guide" section. Turn bulb counterclockwise to the range, do not remove the cooktop. www.whirlpool.com Nothing will not operate during a self-clean cycle. Plug into place. Use cookware about the same size as...
... will not operate ■ Is the control knob set correctly? Cooktop cooking results not what expected ■ Is the range level? Level the range. See the Installation Instructions. Oven will not operate ■ Is the electronic oven control set correctly? Display shows messages ■ Is the...a delay start been set? Double-check the recipe in the "Feature Guide" section. Turn bulb counterclockwise to the range, do not remove the cooktop. www.whirlpool.com Nothing will not operate during a self-clean cycle. Plug into place. Use cookware about the same size as...

Owners Manual
Page 12
...are excluded from your major appliance. Damage resulting from accident, alteration, misuse, abuse, fire, flood, acts of God, improper installation, installation not in accordance with electrical or plumbing codes, or use of purchase. 6. Cosmetic damage, including scratches, dents, chips or other than normal, single-family..., unless such damage results from defects in materials or workmanship and is reported to Whirlpool within 30 days from the date of consumables or cleaning products not approved by Whirlpool. 5. If you need assistance using your product or you would like to schedule ...
...are excluded from your major appliance. Damage resulting from accident, alteration, misuse, abuse, fire, flood, acts of God, improper installation, installation not in accordance with electrical or plumbing codes, or use of purchase. 6. Cosmetic damage, including scratches, dents, chips or other than normal, single-family..., unless such damage results from defects in materials or workmanship and is reported to Whirlpool within 30 days from the date of consumables or cleaning products not approved by Whirlpool. 5. If you need assistance using your product or you would like to schedule ...
Warranty
Page 1
...to obtain service under these excluded circumstances shall be repaired in the home and only in-home service is required to Whirlpool within 30 days from the date of purchase. 6. DISCLAIMER OF IMPLIED WARRANTIES; SOME STATES AND PROVINCES DO NOT ALLOW THE EXCLUSION...your home of original purchase date is covered by a Whirlpool designated service company. Costs associated with the removal from accident, alteration, misuse, abuse, fire, flood, acts of God, improper installation, installation not in accordance with electrical or plumbing codes, or use of your major appliance ...
...to obtain service under these excluded circumstances shall be repaired in the home and only in-home service is required to Whirlpool within 30 days from the date of purchase. 6. DISCLAIMER OF IMPLIED WARRANTIES; SOME STATES AND PROVINCES DO NOT ALLOW THE EXCLUSION...your home of original purchase date is covered by a Whirlpool designated service company. Costs associated with the removal from accident, alteration, misuse, abuse, fire, flood, acts of God, improper installation, installation not in accordance with electrical or plumbing codes, or use of your major appliance ...


