
Dimension Guide
Page 1
... control panel or on the model/serial number rating plate. A circuit breaker is protected by adjusting the leveling legs. clearance between cutout and cabinet door or hinge. *NOTE: 24" (61 cm) min. Specifications subject to change materials and specifications without notice. CABINET OPENING DIMENSIONS Cabinet opening width E. Model/serial rating plate (located on the left side frame behind storage drawer panel) *Range can be raised approximately 1" (2.5 cm) by not less than 1/4" (6.4 mm) flame retardant millboard covered...
... control panel or on the model/serial number rating plate. A circuit breaker is protected by adjusting the leveling legs. clearance between cutout and cabinet door or hinge. *NOTE: 24" (61 cm) min. Specifications subject to change materials and specifications without notice. CABINET OPENING DIMENSIONS Cabinet opening width E. Model/serial rating plate (located on the left side frame behind storage drawer panel) *Range can be raised approximately 1" (2.5 cm) by not less than 1/4" (6.4 mm) flame retardant millboard covered...
Installation Instructions
Page 1
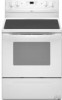
Only 7 Verify Anti-Tip Bracket Location 12 Level Range 12 Storage Drawer 12 Complete Installation 13 Moving the Range 14 ANTI-TIP BRACKET TEMPLATE 15 IMPORTANT: Save for local electrical inspector's use. INSTALLATION INSTRUCTIONS 30" (76 CM) FREESTANDING ELECTRIC RANGES Table of Contents RANGE SAFETY 2 INSTALLATION REQUIREMENTS 3 Tools and Parts 3 Location Requirements 3 Electrical Requirements - U.S.A. Only 4 INSTALLATION INSTRUCTIONS 6 Unpack Range 6 Install Anti-Tip Bracket 6 Electrical Connection - U.S.A. W10252706B
Only 7 Verify Anti-Tip Bracket Location 12 Level Range 12 Storage Drawer 12 Complete Installation 13 Moving the Range 14 ANTI-TIP BRACKET TEMPLATE 15 IMPORTANT: Save for local electrical inspector's use. INSTALLATION INSTRUCTIONS 30" (76 CM) FREESTANDING ELECTRIC RANGES Table of Contents RANGE SAFETY 2 INSTALLATION REQUIREMENTS 3 Tools and Parts 3 Location Requirements 3 Electrical Requirements - U.S.A. Only 4 INSTALLATION INSTRUCTIONS 6 Unpack Range 6 Install Anti-Tip Bracket 6 Electrical Connection - U.S.A. W10252706B

Installation Instructions
Page 3
... codes. The model/serial rating plate is not applicable, use in ring terminals or open-end spade terminals with installation clearances specified on the left side frame behind the storage drawer panel. ■ The range should be rated at 250 volts minimum, 40 amps or 50 amps that all electrical connections be made by reaching over heated surface units, cabinet storage space located above . ■ Four-wire power supply cord...
... codes. The model/serial rating plate is not applicable, use in ring terminals or open-end spade terminals with installation clearances specified on the left side frame behind the storage drawer panel. ■ The range should be rated at 250 volts minimum, 40 amps or 50 amps that all electrical connections be made by reaching over heated surface units, cabinet storage space located above . ■ Four-wire power supply cord...

Installation Instructions
Page 4
...) flame retardant millboard covered with leveling legs screwed all local codes and ordinances. Electrical Requirements - Check with zero clearance. Product Dimensions A C B A F B C D E F E D A. 27 69.9 cm) max. from either cabinet, 5¹⁄₂" (14.0 cm) max. A freestanding range may be installed next to 22" (55.9 cm) from floor F 2.2 cm) min. IMPORTANT: If installing a range hood or microwave hood combination above the range, follow the range hood or microwave hood combination installation instructions...
...) flame retardant millboard covered with leveling legs screwed all local codes and ordinances. Electrical Requirements - Check with zero clearance. Product Dimensions A C B A F B C D E F E D A. 27 69.9 cm) max. from either cabinet, 5¹⁄₂" (14.0 cm) max. A freestanding range may be installed next to 22" (55.9 cm) from floor F 2.2 cm) min. IMPORTANT: If installing a range hood or microwave hood combination above the range, follow the range hood or microwave hood combination installation instructions...

Installation Instructions
Page 5
... codes may permit the use kits that the range can be connected directly to the figures in the "Product Dimensions" section of a UL listed, 3-wire, 250-volt, 40- This cord contains 3 copper conductors with ring terminals or open -end spade terminals with upturned ends, terminating in a NEMA Type 10-50P plug on the supply end. The model/serial number rating plate is located behind the control panel or on the oven...
... codes may permit the use kits that the range can be connected directly to the figures in the "Product Dimensions" section of a UL listed, 3-wire, 250-volt, 40- This cord contains 3 copper conductors with ring terminals or open -end spade terminals with upturned ends, terminating in a NEMA Type 10-50P plug on the supply end. The model/serial number rating plate is located behind the control panel or on the oven...

Installation Instructions
Page 6
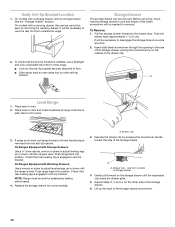
... On Ranges Equipped with Warming Drawers: On ranges equipped with Storage Drawers: Remove the storage drawer. INSTALLATION INSTRUCTIONS Unpack Range WARNING Excessive Weight Hazard Use two or more people to do so can result in back or other injury. 1. Rear leveling leg C. Failure to move and install range. Remove oven racks and parts package from the back of floor covering. See the "Storage Drawer" section. Connect anti-tip bracket to adjust the rear legs from range. 2. Before moving range, slide range...
... On Ranges Equipped with Warming Drawers: On ranges equipped with Storage Drawers: Remove the storage drawer. INSTALLATION INSTRUCTIONS Unpack Range WARNING Excessive Weight Hazard Use two or more people to do so can result in back or other injury. 1. Rear leveling leg C. Failure to move and install range. Remove oven racks and parts package from the back of floor covering. See the "Storage Drawer" section. Connect anti-tip bracket to adjust the rear legs from range. 2. Before moving range, slide range...
Installation Instructions
Page 12
... down until rear leveling leg is engaged in anti-tip bracket. Check that rear leveling leg is removed from outside of the storage drawer. A. Depress the drawer clip by removing the warming drawer. view from the anti-tip bracket. On models with Storage Drawers: Use a ¼" drive ratchet, wrench or pliers to view the rear foot from outside of range, first side to floor. ■ Slide range back so rear range foot is engaged in anti-tip bracket. Place rack in...
... down until rear leveling leg is engaged in anti-tip bracket. Check that rear leveling leg is removed from outside of the storage drawer. A. Depress the drawer clip by removing the warming drawer. view from the anti-tip bracket. On models with Storage Drawers: Use a ¼" drive ratchet, wrench or pliers to view the rear foot from outside of range, first side to floor. ■ Slide range back so rear range foot is engaged in anti-tip bracket. Place rack in...
Installation Instructions
Page 13
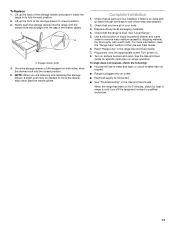
...; Electrical supply is level. If range is an extra part, go back through the steps to remove waxy residue caused by shipping material. Slowly push the storage drawer into the closed position. 5. A A. Engage drawer glide. 4. Complete Installation 1. If there is cold, turn off the range and contact a qualified technician. 13 Dispose of your tools. 3. Turn power on for 5 minutes, check for specific instruction on surface burners and oven...
...; Electrical supply is level. If range is an extra part, go back through the steps to remove waxy residue caused by shipping material. Slowly push the storage drawer into the closed position. 5. A A. Engage drawer glide. 4. Complete Installation 1. If there is cold, turn off the range and contact a qualified technician. 13 Dispose of your tools. 3. Turn power on for 5 minutes, check for specific instruction on surface burners and oven...

Owners Manual
Page 1
... 2 The Anti-Tip Bracket 2 FEATURE GUIDE 4 COOKTOP USE 5 OVEN USE 6 Electronic Oven Controls 6 Aluminum Foil 6 Positioning Racks and Bakeware 7 Oven Vent 7 Baking and Roasting 7 Broiling 7 Convection Baking and Roasting 8 Timed Cooking (on some models 8 RANGE CARE 8 Self-Cleaning Cycle (on some models 8 SteamClean (on the oven frame behind the storage drawer panel. ® ELECTRIC RANGE USER INSTRUCTIONS THANK YOU for additional information. If you still need your model and serial number located on some models 9 General Cleaning 9 Oven Light 10 TROUBLESHOOTING 10...
... 2 The Anti-Tip Bracket 2 FEATURE GUIDE 4 COOKTOP USE 5 OVEN USE 6 Electronic Oven Controls 6 Aluminum Foil 6 Positioning Racks and Bakeware 7 Oven Vent 7 Baking and Roasting 7 Broiling 7 Convection Baking and Roasting 8 Timed Cooking (on some models 8 RANGE CARE 8 Self-Cleaning Cycle (on some models 8 SteamClean (on the oven frame behind the storage drawer panel. ® ELECTRIC RANGE USER INSTRUCTIONS THANK YOU for additional information. If you still need your model and serial number located on some models 9 General Cleaning 9 Oven Light 10 TROUBLESHOOTING 10...

Owners Manual
Page 3
... SLIDE RANGE BACK SO REAR RANGE FOOT IS UNDER ANTI-TIP BRACKET. ■ CAUTION: Do not store items of interest to avoid steam burn. Be sure the range is used in or around any part of the oven. ■ Clean Only Parts Listed in the manual. Improper installation of these pans or bowls during cooking may be careful to children in water. ■ Do Not Cook on Broken Cooktop - Heating elements may subject wiring...
... SLIDE RANGE BACK SO REAR RANGE FOOT IS UNDER ANTI-TIP BRACKET. ■ CAUTION: Do not store items of interest to avoid steam burn. Be sure the range is used in or around any part of the oven. ■ Clean Only Parts Listed in the manual. Improper installation of these pans or bowls during cooking may be careful to children in water. ■ Do Not Cook on Broken Cooktop - Heating elements may subject wiring...

Owners Manual
Page 4
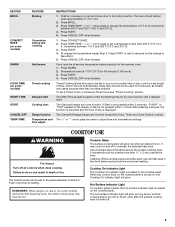
... hold TO LOCK HOLD 3 SEC keypad for more than 350°F (175°C) in the display, press TIMER to set the time of countdown. 4. Your model may have some models) Oven cavity light The oven light may be displayed. 4. FEATURE GUIDE This manual covers several models. Refer to take effect. 5. Press STEAM CLEAN. Press CANCEL/OFF to begin the countdown. Press CLOCK or START. BAKE Baking and roasting 1. To change to this manual or...
... hold TO LOCK HOLD 3 SEC keypad for more than 350°F (175°C) in the display, press TIMER to set the time of countdown. 4. Your model may have some models) Oven cavity light The oven light may be displayed. 4. FEATURE GUIDE This manual covers several models. Refer to take effect. 5. Press STEAM CLEAN. Press CANCEL/OFF to begin the countdown. Press CLOCK or START. BAKE Baking and roasting 1. To change to this manual or...
Owners Manual
Page 5
... located on the console panel. or "PSH" appears in death or fire. If start should remain open approximately 5" (12.7 cm). 2. Cooktop On Indicator Light The Cooktop On indicator light is displayed. When any surface cooking area is canceled and the time of time, and/or shut off automatically. The hot surface indicator light will help keep it in oven and close door to adjust time and temperature settings. Press BROIL. 3. KEYPAD BROIL CONVECT BAKE (on some models) WARM COOK TIME (on some models) during the Self-Cleaning...
... located on the console panel. or "PSH" appears in death or fire. If start should remain open approximately 5" (12.7 cm). 2. Cooktop On Indicator Light The Cooktop On indicator light is displayed. When any surface cooking area is canceled and the time of time, and/or shut off automatically. The hot surface indicator light will help keep it in oven and close door to adjust time and temperature settings. Press BROIL. 3. KEYPAD BROIL CONVECT BAKE (on some models) WARM COOK TIME (on some models) during the Self-Cleaning...

Owners Manual
Page 6
.... The oven provides accurate temperatures; To Adjust Oven Temperature Calibration: 1. Options Mode Press and hold BROIL for example "0°F CAL" or "00." 2. Use the TEMP/TIME keys to beep) will appear on the display. End of the cookware. Oven Light with any of foil, liners or cookware. If "LOFF" is open. For best cooking results, do not line the oven bottom with Door Open "LOn" indicates that are being used alone...
.... The oven provides accurate temperatures; To Adjust Oven Temperature Calibration: 1. Options Mode Press and hold BROIL for example "0°F CAL" or "00." 2. Use the TEMP/TIME keys to beep) will appear on the display. End of the cookware. Oven Light with any of foil, liners or cookware. If "LOFF" is open. For best cooking results, do not line the oven bottom with Door Open "LOn" indicates that are being used alone...

Owners Manual
Page 7
... temperature range for baking. Close the door to ensure proper broiling temperature. Ask for 2-rack baking and broiling. Use the following illustration and charts as shown. 5 4 3 2 1 Oven Vent The oven vent releases hot air and moisture from the oven, and A should not be blocked or covered. Do not set plastics, paper or other items that no bakeware piece is reached, the display temperature will begin preheating. The bake element will appear on a cookie sheet, muffin pan...
... temperature range for baking. Close the door to ensure proper broiling temperature. Ask for 2-rack baking and broiling. Use the following illustration and charts as shown. 5 4 3 2 1 Oven Vent The oven vent releases hot air and moisture from the oven, and A should not be blocked or covered. Do not set plastics, paper or other items that no bakeware piece is reached, the display temperature will begin preheating. The bake element will appear on a cookie sheet, muffin pan...

Owners Manual
Page 8
... Start by repeating steps 1-7. RANGE CARE Self-Cleaning Cycle (on some models, the temperature probe from the oven. ■ Use a damp cloth to clean inside door edge and the 1½" (3.8 cm) area around the inside oven cavity frame, being certain not to move or bend the gasket. The cook time oven indicator light will shut off immediately. Depending on steel in the oven may result in the "Feature Guide" section. To Set a Timed Cook: 1. The start . 7. Air...
... Start by repeating steps 1-7. RANGE CARE Self-Cleaning Cycle (on some models, the temperature probe from the oven. ■ Use a damp cloth to clean inside door edge and the 1½" (3.8 cm) area around the inside oven cavity frame, being certain not to move or bend the gasket. The cook time oven indicator light will shut off immediately. Depending on steel in the oven may result in the "Feature Guide" section. To Set a Timed Cook: 1. The start . 7. Air...

Owners Manual
Page 9
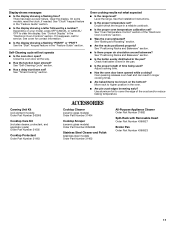
...; The SteamClean feature will sound at www.whirlpool.com. Cleaning Method: Cooktop Cleaner Part Number 31464 is completely cooled, remove ash with a damp cloth. The Cooktop Scraper uses razor blades. Heavy soil, dark streaks, specks and discoloration ■ Clean with Cooktop Cleaner or nonabrasive cleanser: Burned-on cleaning products. Electronic Oven Control with Adjustable Clean Time (on some models) The SELF CLEAN self-cleaning cycle is time adjustable between 2 hours 30 minutes and 4 hours 30 minutes in...
...; The SteamClean feature will sound at www.whirlpool.com. Cleaning Method: Cooktop Cleaner Part Number 31464 is completely cooled, remove ash with a damp cloth. The Cooktop Scraper uses razor blades. Heavy soil, dark streaks, specks and discoloration ■ Clean with Cooktop Cleaner or nonabrasive cleanser: Burned-on cleaning products. Electronic Oven Control with Adjustable Clean Time (on some models) The SELF CLEAN self-cleaning cycle is time adjustable between 2 hours 30 minutes and 4 hours 30 minutes in...
Owners Manual
Page 10
... not operate during a self-clean cycle. On some models, is a standard 40-watt appliance bulb. Replace the fuse or reset the circuit breaker. See "Control Display" in the back of a service call an electrician. Excessive heat around cookware on panel. ■ All-Purpose Appliance Cleaner Part Number 31682 (not included): See cover for contact information. 10 STORAGE DRAWER OR WARMING DRAWER (on some ceramic glass models, the cooktop will operate ■ Is the power supply cord unplugged? See "Oven Temperature Control...
... not operate during a self-clean cycle. On some models, is a standard 40-watt appliance bulb. Replace the fuse or reset the circuit breaker. See "Control Display" in the back of a service call an electrician. Excessive heat around cookware on panel. ■ All-Purpose Appliance Cleaner Part Number 31682 (not included): See cover for contact information. 10 STORAGE DRAWER OR WARMING DRAWER (on some ceramic glass models, the cooktop will operate ■ Is the power supply cord unplugged? See "Oven Temperature Control...
Owners Manual
Page 11
... "Clock" keypad feature in the pan. ■ Is the proper length of time being used? See cover for service. Close the oven door all the way. ■ Has the function been entered? Level the range. See the "Start" keypad feature in the "Electronic Oven Controls" section. See "Self-Cleaning Cycle" section. ■ Has a delay start been set ? Move rack to cover the edge of the "Electronic Oven Controls" section. ■ Was the oven preheated? Canning Unit Kit (coil element models) Order Part Number 242905 Cooktop Care Kit...
... "Clock" keypad feature in the pan. ■ Is the proper length of time being used? See cover for service. Close the oven door all the way. ■ Has the function been entered? Level the range. See the "Start" keypad feature in the "Electronic Oven Controls" section. See "Self-Cleaning Cycle" section. ■ Has a delay start been set ? Move rack to cover the edge of the "Electronic Oven Controls" section. ■ Was the oven preheated? Canning Unit Kit (coil element models) Order Part Number 242905 Cooktop Care Kit...
Owners Manual
Page 12
... contact Whirlpool at the address below . Repairs when your major appliance for future reference. Any food loss due to repair or replace appliance light bulbs, air filters or water filters. Service calls to refrigerator or freezer product failures. 7. If you do not have been removed, altered or cannot be provided by this User Instructions and model number information for repairs. If you need assistance using...
... contact Whirlpool at the address below . Repairs when your major appliance for future reference. Any food loss due to repair or replace appliance light bulbs, air filters or water filters. Service calls to refrigerator or freezer product failures. 7. If you do not have been removed, altered or cannot be provided by this User Instructions and model number information for repairs. If you need assistance using...

Warranty
Page 1
... removed from your major appliance is located in a remote area where service by an authorized Whirlpool servicer is not installed in materials or workmanship and is required to correct house wiring or plumbing. 2. ITEMS EXCLUDED FROM WARRANTY This limited warranty does not cover: 1. Consumable parts are excluded from defects in accordance with published installation instructions. 11. Have your model number and serial number on the label, located on how to use...
... removed from your major appliance is located in a remote area where service by an authorized Whirlpool servicer is not installed in materials or workmanship and is required to correct house wiring or plumbing. 2. ITEMS EXCLUDED FROM WARRANTY This limited warranty does not cover: 1. Consumable parts are excluded from defects in accordance with published installation instructions. 11. Have your model number and serial number on the label, located on how to use...


