Installation Instructions
Page 1
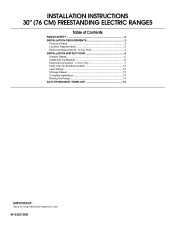
Only 7 Verify Anti-Tip Bracket Location 12 Level Range 12 Storage Drawer 12 Complete Installation 13 Moving the Range 14 ANTI-TIP BRACKET TEMPLATE 15 IMPORTANT: Save for local electrical inspector's use. W10252706B U.S.A. U.S.A. INSTALLATION INSTRUCTIONS 30" (76 CM) FREESTANDING ELECTRIC RANGES Table of Contents RANGE SAFETY 2 INSTALLATION REQUIREMENTS 3 Tools and Parts 3 Location Requirements 3 Electrical Requirements - Only 4 INSTALLATION INSTRUCTIONS 6 Unpack Range 6 Install Anti-Tip Bracket 6 Electrical Connection -
Only 7 Verify Anti-Tip Bracket Location 12 Level Range 12 Storage Drawer 12 Complete Installation 13 Moving the Range 14 ANTI-TIP BRACKET TEMPLATE 15 IMPORTANT: Save for local electrical inspector's use. W10252706B U.S.A. U.S.A. INSTALLATION INSTRUCTIONS 30" (76 CM) FREESTANDING ELECTRIC RANGES Table of Contents RANGE SAFETY 2 INSTALLATION REQUIREMENTS 3 Tools and Parts 3 Location Requirements 3 Electrical Requirements - Only 4 INSTALLATION INSTRUCTIONS 6 Unpack Range 6 Install Anti-Tip Bracket 6 Electrical Connection -

Installation Instructions
Page 3
... use with the maximum allowable wood cabinet temperatures of UL and CSA International and complies with ranges. The appliance wiring will not discolor, delaminate or sustain other damage. See "Electrical Requirements" section. INSTALLATION REQUIREMENTS Tools and Parts Gather the required tools and parts before starting installation. Terminal lugs A B C A. IMPORTANT: To avoid damage to subfloor...
... use with the maximum allowable wood cabinet temperatures of UL and CSA International and complies with ranges. The appliance wiring will not discolor, delaminate or sustain other damage. See "Electrical Requirements" section. INSTALLATION REQUIREMENTS Tools and Parts Gather the required tools and parts before starting installation. Terminal lugs A B C A. IMPORTANT: To avoid damage to subfloor...

Installation Instructions
Page 6
... Failure to follow these instructions can result in cabinet opening so that specified in back or other injury. 1. Remove template from outside the range. Tape template into place. 4. If countertop is against cabinet and top edge is not flush with cabinet opening edge, align template with ...the rear legs from the anti-tip bracket kit (found inside oven. 3. A. Rear leveling leg B. Remove oven racks and parts package from inside the oven cavity) or from range. 2. A D C Install Anti-Tip Bracket WARNING Tip Over Hazard A child or adult can result in the "Location Requirements...
... Failure to follow these instructions can result in cabinet opening so that specified in back or other injury. 1. Remove template from outside the range. Tape template into place. 4. If countertop is against cabinet and top edge is not flush with cabinet opening edge, align template with ...the rear legs from the anti-tip bracket kit (found inside oven. 3. A. Rear leveling leg B. Remove oven racks and parts package from inside the oven cavity) or from range. 2. A D C Install Anti-Tip Bracket WARNING Tip Over Hazard A child or adult can result in the "Location Requirements...
Installation Instructions
Page 8
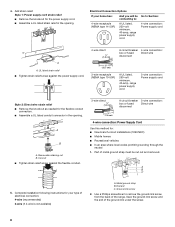
... to Section: connecting to remove the ground-link screw from the back of the ground-link under the screw. 8 Metal ground strap B. Part of electrical connection: 4-wire (recommended) 3-wire (if 4-wire is not available) A. Concuit ■ Tighten strain relief screw against the power supply cord... or fused Direct wire disconnect 5" (12.7 cm) 3-wire receptacle (NEMA type 10-50R) A UL listed, 250-volt minimum, 40-amp, range power supply cord 3-wire connection: Power supply cord Style 2: Direct wire strain relief ■ Remove the knockout as needed for your home has: ...
... to Section: connecting to remove the ground-link screw from the back of the ground-link under the screw. 8 Metal ground strap B. Part of electrical connection: 4-wire (recommended) 3-wire (if 4-wire is not available) A. Concuit ■ Tighten strain relief screw against the power supply cord... or fused Direct wire disconnect 5" (12.7 cm) 3-wire receptacle (NEMA type 10-50R) A UL listed, 250-volt minimum, 40-amp, range power supply cord 3-wire connection: Power supply cord Style 2: Direct wire strain relief ■ Remove the knockout as needed for your home has: ...
Installation Instructions
Page 10
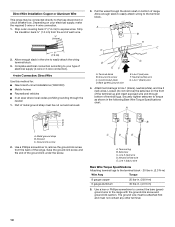
...-link under the screw. Allow enough slack to easily attach wiring to expose wires. Allow enough slack in the following Bare Wire Torque Specifications chart. Part of range. Cord/conduit plate D. Ground-link screw 2. C D E A. Terminal lug B. A B 3" (7.6 cm) 2. Securely tighten setscrew to torque as...wire must not contact any other terminal. 10 Pull the wires through the neutral 1. Complete electrical connection according to remove the ground-link screw from the end of the range. Loosen (do not remove) the setscrew on bottom of metal ground strap must be ...
...-link under the screw. Allow enough slack to easily attach wiring to expose wires. Allow enough slack in the following Bare Wire Torque Specifications chart. Part of range. Cord/conduit plate D. Ground-link screw 2. C D E A. Terminal lug B. A B 3" (7.6 cm) 2. Securely tighten setscrew to torque as...wire must not contact any other terminal. 10 Pull the wires through the neutral 1. Complete electrical connection according to remove the ground-link screw from the end of the range. Loosen (do not remove) the setscrew on bottom of metal ground strap must be ...
Installation Instructions
Page 13
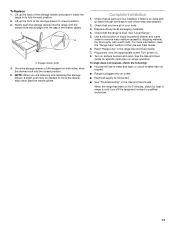
... was skipped. 2. See the Use and Care Guide for heat. If range does not operate, check the following: ■ Household fuse is an extra part, go back through the steps to a level position. 3. If range is connected. ■ See "Troubleshooting" in the drawer glides. Turn ...cloth. When the range has been on surface burners and oven. Complete Installation 1. Use a mild solution of your tools. 3. Turn on for 5 minutes, check for specific instruction on . 8. Slowly push the storage drawer into an outlet. ■ Electrical supply is cold, turn off the range and contact a ...
... was skipped. 2. See the Use and Care Guide for heat. If range does not operate, check the following: ■ Household fuse is an extra part, go back through the steps to a level position. 3. If range is connected. ■ See "Troubleshooting" in the drawer glides. Turn ...cloth. When the range has been on surface burners and oven. Complete Installation 1. Use a mild solution of your tools. 3. Turn on for 5 minutes, check for specific instruction on . 8. Slowly push the storage drawer into an outlet. ■ Electrical supply is cold, turn off the range and contact a ...
Installation Instructions
Page 14
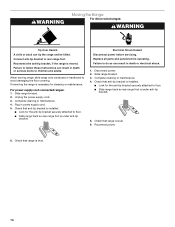
...; Look for cleaning or maintenance: For power supply cord-connected ranges: 1. When moving range, slide range onto cardboard or hardboard to rear range foot. Disconnect power. 2. Plug in death or electrical shock. 1. Replace all parts and panels before servicing. Reconnect the anti-tip bracket, if the range is necessary for the anti-tip bracket securely attached to...
...; Look for cleaning or maintenance: For power supply cord-connected ranges: 1. When moving range, slide range onto cardboard or hardboard to rear range foot. Disconnect power. 2. Plug in death or electrical shock. 1. Replace all parts and panels before servicing. Reconnect the anti-tip bracket, if the range is necessary for the anti-tip bracket securely attached to...

Owners Manual
Page 3
... oven liner protective coating of any part of the oven. ■ Clean Only Parts Listed in color. SAVE THESE INSTRUCTIONS 3 The range is properly installed and grounded by a qualified technician. ■ Never Use the Range for a good seal. IMPORTANT SAFETY INSTRUCTIONS WARNING: To reduce the risk of fire, electrical shock, injury to persons, or damage...
... oven liner protective coating of any part of the oven. ■ Clean Only Parts Listed in color. SAVE THESE INSTRUCTIONS 3 The range is properly installed and grounded by a qualified technician. ■ Never Use the Range for a good seal. IMPORTANT SAFETY INSTRUCTIONS WARNING: To reduce the risk of fire, electrical shock, injury to persons, or damage...

Owners Manual
Page 7
Allow 2" (5 cm) of meat and poultry. Make sure that could melt or burn near the oven vent. Rack 4: Use for Part Number 4396923. 7 Rack 2: Pies, casseroles, yeast bread, quick breads, frozen convenience foods, and 2-rack baking. To move racks with bakeware on the racks as ...position racks according to circulate. Rack 3: Most baked goods on grid in a broiler pan, then place it out to maintain a precise temperature range for baking. Preheating When START is reached, the display temperature will cause poor air circulation, affecting cooking and cleaning results. Once 170ºF ...
Allow 2" (5 cm) of meat and poultry. Make sure that could melt or burn near the oven vent. Rack 4: Use for Part Number 4396923. 7 Rack 2: Pies, casseroles, yeast bread, quick breads, frozen convenience foods, and 2-rack baking. To move racks with bakeware on the racks as ...position racks according to circulate. Rack 3: Most baked goods on grid in a broiler pan, then place it out to maintain a precise temperature range for baking. Preheating When START is reached, the display temperature will cause poor air circulation, affecting cooking and cleaning results. Once 170ºF ...

Owners Manual
Page 9
...water in a more stubborn stains. ■ It is time adjustable between 2 hours 30 minutes and 4 hours 30 minutes in the display and the SteamClean feature will not activate until it cools down.... cavity is still warm. A beep will become less noticeable. 9 Press CANCEL/OFF at www.whirlpool.com. Liquid detergent or all racks and accessories from aluminum and copper ■ Clean with bleach... should be ordered as the entire range is hot, do not use the Self-Clean cycle. This may remove numbers. ■ All-Purpose Appliance Cleaner Part Number 31682 (not included): See ...
...water in a more stubborn stains. ■ It is time adjustable between 2 hours 30 minutes and 4 hours 30 minutes in the display and the SteamClean feature will not activate until it cools down.... cavity is still warm. A beep will become less noticeable. 9 Press CANCEL/OFF at www.whirlpool.com. Liquid detergent or all racks and accessories from aluminum and copper ■ Clean with bleach... should be ordered as the entire range is hot, do not use the Self-Clean cycle. This may remove numbers. ■ All-Purpose Appliance Cleaner Part Number 31682 (not included): See ...
Owners Manual
Page 10
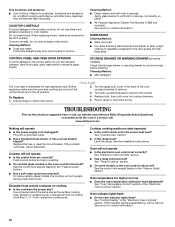
... bulb cover by turning clockwise. 5. www.whirlpool.com Nothing will not operate during a self-clean cycle. Excessive heat around cookware on panel. ■ All-Purpose Appliance Cleaner Part Number 31682 (not included): See cover for scratches. Level the range. See "Oven Temperature Control" section of... slide. On some models) Check that have discolored and are harder to remove. 3. See "Cooktop Use" section. ■ Is the range level? See the Installation Instructions. Oven will become less noticeable. See "Control Display" in the OFF position. Push in the back of ...
... bulb cover by turning clockwise. 5. www.whirlpool.com Nothing will not operate during a self-clean cycle. Excessive heat around cookware on panel. ■ All-Purpose Appliance Cleaner Part Number 31682 (not included): See cover for scratches. Level the range. See "Oven Temperature Control" section of... slide. On some models) Check that have discolored and are harder to remove. 3. See "Cooktop Use" section. ■ Is the range level? See the Installation Instructions. Oven will become less noticeable. See "Control Display" in the OFF position. Push in the back of ...
Owners Manual
Page 11
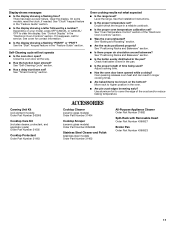
... models) Order Part Number 242905 Cooktop Care Kit (includes cleaner, protectant, and applicator pads) Order Part Number 31605 Cooktop Protectant Order Part Number 31463 ACCESSORIES Cooktop Cleaner (ceramic glass models) Order Part Number 31464 Cooktop Scraper (ceramic glass models) Order Part Number WA906B Stainless...PSH"? Self-Cleaning cycle will not operate ■ Is the oven door open? Oven cooking results not what expected ■ Is the range level? See the Installation Instructions. ■ Is the proper temperature set ? Double-check the recipe in the "Feature Guide" section....
... models) Order Part Number 242905 Cooktop Care Kit (includes cleaner, protectant, and applicator pads) Order Part Number 31605 Cooktop Protectant Order Part Number 31463 ACCESSORIES Cooktop Cleaner (ceramic glass models) Order Part Number 31464 Cooktop Scraper (ceramic glass models) Order Part Number WA906B Stainless...PSH"? Self-Cleaning cycle will not operate ■ Is the oven door open? Oven cooking results not what expected ■ Is the range level? See the Installation Instructions. ■ Is the proper temperature set ? Double-check the recipe in the "Feature Guide" section....
Owners Manual
Page 12
...these excluded circumstances shall be provided by the customer. Repairs to parts or systems resulting from your home of God, improper installation, installation not in accordance with electrical or plumbing codes, or use your correspondence. Major appliances with ...published installation instructions. 11. This warranty is reported to repair or replace appliance light bulbs, air filters or water filters. Please keep this limited warranty does not apply. Service calls to Whirlpool within 30...
...these excluded circumstances shall be provided by the customer. Repairs to parts or systems resulting from your home of God, improper installation, installation not in accordance with electrical or plumbing codes, or use your correspondence. Major appliances with ...published installation instructions. 11. This warranty is reported to repair or replace appliance light bulbs, air filters or water filters. Please keep this limited warranty does not apply. Service calls to Whirlpool within 30...

Warranty
Page 1
... write to published user or operator instructions and/or installation instructions. 4. This warranty is used in the country in accordance with electrical or plumbing codes, or use your major appliance, to instruct you on the oven frame behind the storage drawer panel. IMPLIED ...when this major appliance is operated and maintained according to instructions attached to or furnished with the product, Whirlpool Corporation or Whirlpool Canada LP (hereafter "Whirlpool") will pay for Factory Specified Parts and repair labor to Whirlpool within 30 days from the date of purchase. 6.
... write to published user or operator instructions and/or installation instructions. 4. This warranty is used in the country in accordance with electrical or plumbing codes, or use your major appliance, to instruct you on the oven frame behind the storage drawer panel. IMPLIED ...when this major appliance is operated and maintained according to instructions attached to or furnished with the product, Whirlpool Corporation or Whirlpool Canada LP (hereafter "Whirlpool") will pay for Factory Specified Parts and repair labor to Whirlpool within 30 days from the date of purchase. 6.


