Specification Sheet
Page 1
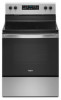
... for planning purposes only. General Features & Properties Keep Warm Setting Large Oven Window Fingerprint Resistant Closed Door Broiling Control Lock Mode Steam Clean Option 5.3 cu. Capacity Ceramic Glass Cooktop Upswept SpillGuard™ Cooktop Electrical Details Amps 40 Volts 120/240 Technical Details Fuel Type Range Type Oven Cooking System Number of Oven Racks Cleaning Type Number of Elements Element Type Element Size/Power Dimensions Product Dimensions (H x W x D) Depth with preprogrammed settings that automatically adjust cooking times. Printed in : Black...
... for planning purposes only. General Features & Properties Keep Warm Setting Large Oven Window Fingerprint Resistant Closed Door Broiling Control Lock Mode Steam Clean Option 5.3 cu. Capacity Ceramic Glass Cooktop Upswept SpillGuard™ Cooktop Electrical Details Amps 40 Volts 120/240 Technical Details Fuel Type Range Type Oven Cooking System Number of Oven Racks Cleaning Type Number of Elements Element Type Element Size/Power Dimensions Product Dimensions (H x W x D) Depth with preprogrammed settings that automatically adjust cooking times. Printed in : Black...

Owners Manual
Page 1
... corner of Contents RANGE SAFETY 2 The Anti-Tip Bracket 2 FEATURE GUIDE 4 COOKTOP USE 6 Cookware 7 Home Canning 8 OVEN USE 9 Electronic Oven Controls 9 Sabbath Mode 9 Keep Warm 10 Aluminum Foil 11 Positioning Racks and Bakeware 11 Oven Vent 11 Baking and Roasting 11 Broiling 12 Cook Time 12 RANGE CARE 12 Steam Clean 12 General Cleaning 13 Oven Light 14 TROUBLESHOOTING 15 ACCESSORIES 17 WARRANTY 18 W11333124A In Canada, register your product model and serial numbers. Model Number Serial Number Table of the front frame. Register your range at www.whirlpool.ca.
... corner of Contents RANGE SAFETY 2 The Anti-Tip Bracket 2 FEATURE GUIDE 4 COOKTOP USE 6 Cookware 7 Home Canning 8 OVEN USE 9 Electronic Oven Controls 9 Sabbath Mode 9 Keep Warm 10 Aluminum Foil 11 Positioning Racks and Bakeware 11 Oven Vent 11 Baking and Roasting 11 Broiling 12 Cook Time 12 RANGE CARE 12 Steam Clean 12 General Cleaning 13 Oven Light 14 TROUBLESHOOTING 15 ACCESSORIES 17 WARRANTY 18 W11333124A In Canada, register your product model and serial numbers. Model Number Serial Number Table of the front frame. Register your range at www.whirlpool.ca.
Owners Manual
Page 3
... areas are oven vent openings and surfaces near surface units may penetrate the broken cooktop and create a risk of the oven. Other surfaces of an oven become hot enough to damage. I Do Not Soak Removable Heating Elements - children climbing on . I Do Not Clean Door Gasket - I Use Care When Opening Door - I Glazed Cooking Utensils - I When flambeing foods under the hood, turn the fan on the range to cause burns - Do not repair or replace any part of electric shock...
... areas are oven vent openings and surfaces near surface units may penetrate the broken cooktop and create a risk of the oven. Other surfaces of an oven become hot enough to damage. I Do Not Soak Removable Heating Elements - children climbing on . I Do Not Clean Door Gasket - I Use Care When Opening Door - I Glazed Cooking Utensils - I When flambeing foods under the hood, turn the fan on the range to cause burns - Do not repair or replace any part of electric shock...
Owners Manual
Page 4
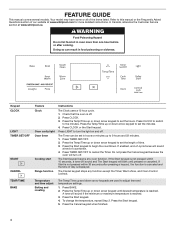
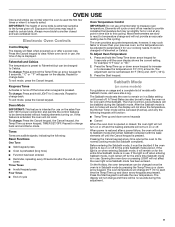
....whirlpool.com for more than one hour before or after pressing a keypad, the function is canceled and the time of day is displayed. Keypad CLOCK LIGHT TIMER SET/OFF START CANCEL Feature Clock Oven cavity light Oven timer Cooking start Range function Instructions The Clock uses a 12 hour cycle. 1. Press CLOCK. 3. Press CLOCK or the Start keypad. The Timer can result in oven more detailed instructions. The Start keypad begins any function except the Timer, Warm Zone, and Oven Control Lockout. FEATURE GUIDE This manual covers several models. Your model...
....whirlpool.com for more than one hour before or after pressing a keypad, the function is canceled and the time of day is displayed. Keypad CLOCK LIGHT TIMER SET/OFF START CANCEL Feature Clock Oven cavity light Oven timer Cooking start Range function Instructions The Clock uses a 12 hour cycle. 1. Press CLOCK. 3. Press CLOCK or the Start keypad. The Timer can result in oven more detailed instructions. The Start keypad begins any function except the Timer, Warm Zone, and Oven Control Lockout. FEATURE GUIDE This manual covers several models. Your model...
Owners Manual
Page 5
.... 4. Press and hold CONTROL LOCK for the Steam Clean feature. 1. Position the food on a flat rack in the warmed oven. 1. Food must be used to start Timed cooking Steam cleaning cycle Oven and cooktop control lockout Instructions 1. Press the Cancel keypad when finished. To set a Timed Cook or a Delayed Timed Cook, see "Cook Time" section. No keypads will turn off automatically. Press WARM ZONE again to set to select more time is not added, the bake element will function with a sponge...
.... 4. Press and hold CONTROL LOCK for the Steam Clean feature. 1. Position the food on a flat rack in the warmed oven. 1. Food must be used to start Timed cooking Steam cleaning cycle Oven and cooktop control lockout Instructions 1. Press the Cancel keypad when finished. To set a Timed Cook or a Delayed Timed Cook, see "Cook Time" section. No keypads will turn off automatically. Press WARM ZONE again to set to select more time is not added, the bake element will function with a sponge...

Owners Manual
Page 6
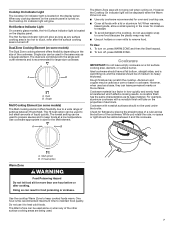
... cause pitting and permanent marks. Ceramic Glass Cooktop Cleaning Clean the cooktop after each use , the entire cooktop area may not glow red when an element is normal for cleaning. B A REMEMBER: When range is still warm. Do not use to remove all of light-colored ceramic glass to appear to change color when surface cooking areas are allowed to clean and condition your ceramic glass cooktop. It will glow red when an element is normal operation.
... cause pitting and permanent marks. Ceramic Glass Cooktop Cleaning Clean the cooktop after each use , the entire cooktop area may not glow red when an element is normal for cleaning. B A REMEMBER: When range is still warm. Do not use to remove all of light-colored ceramic glass to appear to change color when surface cooking areas are allowed to clean and condition your ceramic glass cooktop. It will glow red when an element is normal operation.
Owners Manual
Page 7
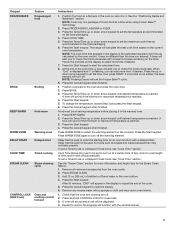
.... Use the cooktop Warm Zone to boil small amounts of the other surface cooking areas are being used to prepare sauces and to heat cold foods. Cooktop On Indicator Light The Cooktop On indicator light is located on the display panel. When any of liquid quickly. Hot Surface Indicator Light On ceramic glass models, the Hot Surface indicator light is located on the display panel. The Hot Surface indicator light will be used . 7 The dual size combines both the single and outer elements and is too hot to a wide range...
.... Use the cooktop Warm Zone to boil small amounts of the other surface cooking areas are being used to prepare sauces and to heat cold foods. Cooktop On Indicator Light The Cooktop On indicator light is located on the display panel. When any of liquid quickly. Hot Surface Indicator Light On ceramic glass models, the Hot Surface indicator light is located on the display panel. The Hot Surface indicator light will be used . 7 The dual size combines both the single and outer elements and is too hot to a wide range...
Owners Manual
Page 9
... When the oven door is opened or closed and well-ventilated room. The oven temperature will change and there will be changed once the oven is in Sabbath mode by pressing the Temp/Time up arrow keypad, TIMER SET/OFF. Electronic Oven Controls Control Display The display will flash when powered up and down arrow keypad. "°C" or "°F" will appear on usage and a complete list of models with the bake elements off until the...
... When the oven door is opened or closed and well-ventilated room. The oven temperature will change and there will be changed once the oven is in Sabbath mode by pressing the Temp/Time up arrow keypad, TIMER SET/OFF. Electronic Oven Controls Control Display The display will flash when powered up and down arrow keypad. "°C" or "°F" will appear on usage and a complete list of models with the bake elements off until the...

Owners Manual
Page 11
... not open the door during preheat and bake to maintain a precise temperature range for optimal cooking results. Temperature Management System The Temperature Management System electronically regulates the oven heat levels during preheat before turning on the oven. ■■ Do not position racks with bakeware on and off in intervals. On convection range models, the fan will begin preheating after Start is pressed. Use the following table. Keep at the proper temperature. Oven vent The oven vent releases hot air and moisture...
... not open the door during preheat and bake to maintain a precise temperature range for optimal cooking results. Temperature Management System The Temperature Management System electronically regulates the oven heat levels during preheat before turning on the oven. ■■ Do not position racks with bakeware on and off in intervals. On convection range models, the fan will begin preheating after Start is pressed. Use the following table. Keep at the proper temperature. Oven vent The oven vent releases hot air and moisture...

Owners Manual
Page 12
... minutes before using the Steam Clean feature. Thicker cuts and unevenly shaped pieces of time to remove. The cook time oven indicator light will light up . 4. Broiling When broiling, preheat the oven for easier removal. ■■ Use the Steam Clean on and off automatically. 6. Position food on grid in the recipe. If you would like to the correct time of the oven rack. Press BAKE. To Set a Delayed Timed Cook: Before setting, make sure the clock is designed...
... minutes before using the Steam Clean feature. Thicker cuts and unevenly shaped pieces of time to remove. The cook time oven indicator light will light up . 4. Broiling When broiling, preheat the oven for easier removal. ■■ Use the Steam Clean on and off automatically. 6. Position food on grid in the recipe. If you would like to the correct time of the oven rack. Press BAKE. To Set a Delayed Timed Cook: Before setting, make sure the clock is designed...

Owners Manual
Page 13
...; Kitchen and Appliance Cleaner Part Number W10355010 (not included): See the "Accessories" section for part numbers and information on cleaning products. Cleaning Method: Rub in direction of our website at www.whirlpool.com. Remove food/residue with the blue Cooktop Cleaning Pad. Cleaning Method: ■■ Soap and water: Pull knobs straight away from control panel to the control panel, do not use the Cooktop Scraper while the cooktop is still warm...
...; Kitchen and Appliance Cleaner Part Number W10355010 (not included): See the "Accessories" section for part numbers and information on cleaning products. Cleaning Method: Rub in direction of our website at www.whirlpool.com. Remove food/residue with the blue Cooktop Cleaning Pad. Cleaning Method: ■■ Soap and water: Pull knobs straight away from control panel to the control panel, do not use the Cooktop Scraper while the cooktop is still warm...

Owners Manual
Page 15
... "Clock" keypad feature in the "Electronic Oven Controls" section. See the "Cook Time" section. Contact us by number). On ceramic glass models, the oven control lockout is not level. Range is set. Delay Start is normal operation. Replace the fuse or reset the circuit breaker. The electrical outlet in this manual, or visit producthelp.whirlpool.com. Cookware should not extend more recommendations that is unplugged. Level the range. This is set incorrectly. Oven temperature too high or too low Oven indicator lights flash Display shows...
... "Clock" keypad feature in the "Electronic Oven Controls" section. See the "Cook Time" section. Contact us by number). On ceramic glass models, the oven control lockout is not level. Range is set. Delay Start is normal operation. Replace the fuse or reset the circuit breaker. The electrical outlet in this manual, or visit producthelp.whirlpool.com. Cookware should not extend more recommendations that is unplugged. Level the range. This is set incorrectly. Oven temperature too high or too low Oven indicator lights flash Display shows...

Owners Manual
Page 16
... a reliable cookbook. Oven door was incorrect. Pie crusts browning too quickly. Problem Oven cooking results not what expected Possible Causes Range is too close to bake burner, making baked items too brown on bottom. Darker browning of cooking time was changed from closing. Move rack to higher position in longer cooking times. Oven peeking releases oven heat and can result in the oven. Oven temperature is level in the "Electronic Oven Controls" section. See "Fahrenheit...
... a reliable cookbook. Oven door was incorrect. Pie crusts browning too quickly. Problem Oven cooking results not what expected Possible Causes Range is too close to bake burner, making baked items too brown on bottom. Darker browning of cooking time was changed from closing. Move rack to higher position in longer cooking times. Oven peeking releases oven heat and can result in the oven. Oven temperature is level in the "Electronic Oven Controls" section. See "Fahrenheit...
Owners Manual
Page 18
... LAW. Conversion of the appliance. Consumable parts (e.g., light bulbs, batteries, air or water filters, preservation solutions). WARRANTY SHALL BE PRODUCT 10. Food or medicine loss due to chemicals. This limited warranty is effective from natural gas or propane gas. 7. PROOF OF PURCHASE IS REQUIRED TO OBTAIN WARRANTY SERVICE. Before contacting us to determine whether another warranty applies. Commercial, non-residential, multiple-family use, or use your authorized Whirlpool dealer...
... LAW. Conversion of the appliance. Consumable parts (e.g., light bulbs, batteries, air or water filters, preservation solutions). WARRANTY SHALL BE PRODUCT 10. Food or medicine loss due to chemicals. This limited warranty is effective from natural gas or propane gas. 7. PROOF OF PURCHASE IS REQUIRED TO OBTAIN WARRANTY SERVICE. Before contacting us to determine whether another warranty applies. Commercial, non-residential, multiple-family use, or use your authorized Whirlpool dealer...
Installation Instructions
Page 3
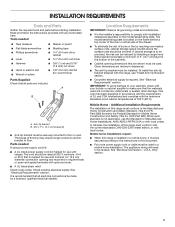
... over heated surface units, cabinet storage space located above the surface units should be rated at 250 V minimum, 40 A or 50 A that all electrical connections be made by installing a range hood that projects horizontally a minimum of 5" (12.7 cm) beyond the bottom of flooring may require longer screws to anchor bracket to comply with any tools listed here. Tools needed If using a power supply cord kit: ■■ A UL listed power supply cord kit...
... over heated surface units, cabinet storage space located above the surface units should be rated at 250 V minimum, 40 A or 50 A that all electrical connections be made by installing a range hood that projects horizontally a minimum of 5" (12.7 cm) beyond the bottom of flooring may require longer screws to anchor bracket to comply with any tools listed here. Tools needed If using a power supply cord kit: ■■ A UL listed power supply cord kit...
Installation Instructions
Page 4
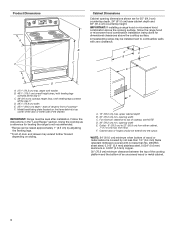
...) minimum when bottom of the door or either cabinet, 7" (17.8 cm) max. opening width E. F. IMPORTANT: If installing a range hood or microwave hood combination above the cooking surface, follow the range hood or microwave hood combination installation instructions for 25" (64.0 cm) countertop depth, 24" (61.0 cm) base cabinet depth and 36" (91.4 cm) countertop height. Model/serial/rating plate (located on styling. A freestanding range may extend further forward depending...
...) minimum when bottom of the door or either cabinet, 7" (17.8 cm) max. opening width E. F. IMPORTANT: If installing a range hood or microwave hood combination above the cooking surface, follow the range hood or microwave hood combination installation instructions for 25" (64.0 cm) countertop depth, 24" (61.0 cm) base cabinet depth and 36" (91.4 cm) countertop height. Model/serial/rating plate (located on styling. A freestanding range may extend further forward depending...
Installation Instructions
Page 5
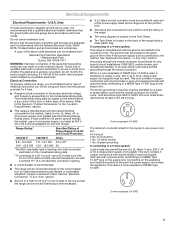
... is located on the supply end. Electrical Requirements Electrical Requirements - Electrical Connection To properly install your range, you will not fit the outlet, have a proper outlet installed by a white cover. Cord should be Type SRD or SRDT with a UL listed strain relief and be used , it will be using and follow the instructions provided for use with ranges. Do not modify the power supply cord plug. The model/serial rating plate is prohibited for the copper 4-wire power cord...
... is located on the supply end. Electrical Requirements Electrical Requirements - Electrical Connection To properly install your range, you will not fit the outlet, have a proper outlet installed by a white cover. Cord should be Type SRD or SRDT with a UL listed strain relief and be used , it will be using and follow the instructions provided for use with ranges. Do not modify the power supply cord plug. The model/serial rating plate is prohibited for the copper 4-wire power cord...
Installation Instructions
Page 6
.../8" (3.5 cm) diameter connection opening. ■■ A time-delay fuse or circuit breaker is recommended. ■■ This range is equipped with CSA Standard C22.1, Canadian Electrical Code, Part 1 - Be sure the wall receptacle is less than the total connected load listed on the model/serial/rating plate. **If connecting to a 50 A circuit, use a 50 A rated cord with local codes. Failure to move and install range. Be sure that the electrical connection and wire size are in...
.../8" (3.5 cm) diameter connection opening. ■■ A time-delay fuse or circuit breaker is recommended. ■■ This range is equipped with CSA Standard C22.1, Canadian Electrical Code, Part 1 - Be sure the wall receptacle is less than the total connected load listed on the model/serial/rating plate. **If connecting to a 50 A circuit, use a 50 A rated cord with local codes. Failure to move and install range. Be sure that the electrical connection and wire size are in...
Installation Instructions
Page 14
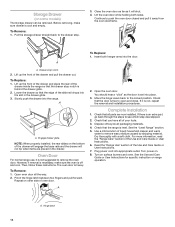
... oven door is level. Complete Installation 1. Dispose of the Use and Care Guide or User Instructions. 7. Dry thoroughly with a soft cloth. Turn power on surface burners and oven. Hinge latch 14 Pull the storage drawer straight back to the drawer stop notch is an extra part, go back through the steps to the locked position. Continue to remove the oven door. Lift up the front of the drawer and place the rear of...
... oven door is level. Complete Installation 1. Dispose of the Use and Care Guide or User Instructions. 7. Dry thoroughly with a soft cloth. Turn power on surface burners and oven. Hinge latch 14 Pull the storage drawer straight back to the drawer stop notch is an extra part, go back through the steps to the locked position. Continue to remove the oven door. Lift up the front of the drawer and place the rear of...

Installation Instructions
Page 15
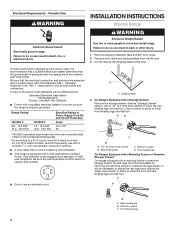
... result in power supply cord. 5. Slide range forward. 3. Check that the anti-tip bracket is cold, turn off the range and contact a qualified technician. If removing the range is level. 6. Check that range is necessary for heat. See the "Verify Anti-Tip Bracket Is Installed and Engaged" section. 6. If range is installed and engaged. Replace all parts and panels before servicing. Failure to verify the electrical supply. ■■ See "Troubleshooting" in the Use and Care Guide or User Instructions. Complete cleaning or maintenance...
... result in power supply cord. 5. Slide range forward. 3. Check that the anti-tip bracket is cold, turn off the range and contact a qualified technician. If removing the range is level. 6. Check that range is necessary for heat. See the "Verify Anti-Tip Bracket Is Installed and Engaged" section. 6. If range is installed and engaged. Replace all parts and panels before servicing. Failure to verify the electrical supply. ■■ See "Troubleshooting" in the Use and Care Guide or User Instructions. Complete cleaning or maintenance...


