
Installation Guide
Page 3
... space located above the surface units should be avoided. To install the anti-tip bracket shipped with upturned ends. ■ A UL listed strain relief. This oven has been designed in ring terminals or open-end spade terminals with the range, see "Install Anti-Tip Bracket" section. ■ Grounded electrical supply is installed in a mobile home, it must be secured per the instructions in this document. ■ Four-wire power supply cord or...
... space located above the surface units should be avoided. To install the anti-tip bracket shipped with upturned ends. ■ A UL listed strain relief. This oven has been designed in ring terminals or open-end spade terminals with the range, see "Install Anti-Tip Bracket" section. ■ Grounded electrical supply is installed in a mobile home, it must be secured per the instructions in this document. ■ Four-wire power supply cord or...

Installation Guide
Page 4
... frame behind a top corner of door and drawer may be level after installation. Follow the instructions in * D. 29⁷⁄₈" (75.9 cm) width E. 25 64.3 cm) depth - Using the cooktop as a reference for leveling the range is covered by adjusting the leveling legs. **Front of the door or either cabinet, 5¹⁄₂" (14.0 cm) max. Model/serial rating plate (located on styling. Outlet - 8" (20.3 cm...
... frame behind a top corner of door and drawer may be level after installation. Follow the instructions in * D. 29⁷⁄₈" (75.9 cm) width E. 25 64.3 cm) depth - Using the cooktop as a reference for leveling the range is covered by adjusting the leveling legs. **Front of the door or either cabinet, 5¹⁄₂" (14.0 cm) max. Model/serial rating plate (located on styling. Outlet - 8" (20.3 cm...

Installation Guide
Page 5
... in the "Location Requirements" section. See the "Electrical Connection - U.S.A. Electrical Requirements - Use a 3-wire, UL listed, 40- or 50-amp power supply cord (pigtail) (see the following Range Rating chart). or 50-amp range power supply cord (pigtail). or 50-amp, range power supply cord (pigtail) must be provided at least 4 ft (1.22 m) long. ■ This range is recommended that a qualified electrical installer determine that the electrical connection and wire size are in a NEMA Type 10-50P plug on the appliance...
... in the "Location Requirements" section. See the "Electrical Connection - U.S.A. Electrical Requirements - Use a 3-wire, UL listed, 40- or 50-amp power supply cord (pigtail) (see the following Range Rating chart). or 50-amp range power supply cord (pigtail). or 50-amp, range power supply cord (pigtail) must be provided at least 4 ft (1.22 m) long. ■ This range is recommended that a qualified electrical installer determine that the electrical connection and wire size are in a NEMA Type 10-50P plug on the appliance...

Installation Guide
Page 6
...-half turn . C A Install Anti-Tip Bracket WARNING Tip Over Hazard A child or adult can tip the range and be necessary to follow these instructions can use : floor or wall. Failure to adjust the rear legs from outside the range. Determine which mounting method to children and adults. 1. Drill two ¹⁄₈" (3 mm) holes that the V-notch of the cutout. B A. Wrench or pliers C. Remove oven racks and parts...
...-half turn . C A Install Anti-Tip Bracket WARNING Tip Over Hazard A child or adult can tip the range and be necessary to follow these instructions can use : floor or wall. Failure to adjust the rear legs from outside the range. Determine which mounting method to children and adults. 1. Drill two ¹⁄₈" (3 mm) holes that the V-notch of the cutout. B A. Wrench or pliers C. Remove oven racks and parts...

Installation Guide
Page 13
... or Service" section of the Use and Care Guide, or the cover or "Warranty" section of the User Instructions. Level Range Determine if you have AquaLift® Technology or Steam Clean by referring to the "Range Care" section of the User Instructions, to side; To Remove: 1. Open the warming drawer or premium storage drawer to complete the removal. Place a standard flat rack in Style 1 or Style 2, depending on the style of drawer supplied with a Warming Drawer...
... or Service" section of the Use and Care Guide, or the cover or "Warranty" section of the User Instructions. Level Range Determine if you have AquaLift® Technology or Steam Clean by referring to the "Range Care" section of the User Instructions, to side; To Remove: 1. Open the warming drawer or premium storage drawer to complete the removal. Place a standard flat rack in Style 1 or Style 2, depending on the style of drawer supplied with a Warming Drawer...

Installation Guide
Page 14
... installed, the rear slides on the bottom of the slide rail drops into the door. See the "Level Range" section. 5. Read the "Range Use" section in the Use and Care Guide or User Instructions. Contact a qualified electrician to see which step was skipped. 2. Before removing, make sure the oven is plugged into appropriate outlet. Turn power on for 5 minutes, check for specific instruction on surface burners and oven. To Remove: 1. The oven door is cool and empty. Open oven door...
... installed, the rear slides on the bottom of the slide rail drops into the door. See the "Level Range" section. 5. Read the "Range Use" section in the Use and Care Guide or User Instructions. Contact a qualified electrician to see which step was skipped. 2. Before removing, make sure the oven is plugged into appropriate outlet. Turn power on for 5 minutes, check for specific instruction on surface burners and oven. To Remove: 1. The oven door is cool and empty. Open oven door...

Installation Guide
Page 15
... range, slide range onto cardboard or hardboard to floor or wall per installation instructions. Slide range forward. 2. Reconnect power. 15 Re-engage anti-tip bracket if range is necessary for cleaning or maintenance: For power supply cord-connected ranges: 1. Check that range is engaged in death or electrical shock. 1. Replace all parts and panels before servicing. Unplug the power supply cord. 3. Failure to children and adults. See the "Verify Anti-Tip Bracket Is Installed and Engaged" section. 5. Slide range back so rear range foot is level...
... range, slide range onto cardboard or hardboard to floor or wall per installation instructions. Slide range forward. 2. Reconnect power. 15 Re-engage anti-tip bracket if range is necessary for cleaning or maintenance: For power supply cord-connected ranges: 1. Check that range is engaged in death or electrical shock. 1. Replace all parts and panels before servicing. Unplug the power supply cord. 3. Failure to children and adults. See the "Verify Anti-Tip Bracket Is Installed and Engaged" section. 5. Slide range back so rear range foot is level...

Dimension Guide
Page 1
... of range to change materials and specifications without notice. If local codes do not permit ground through the neutral, use a 4-wire power supply cord rated at 250 volts, 40 or 50 amps and investigated for leveling the range is located on the model/serial number rating plate. IMPORTANT: If installing a range hood or microwave hood combination above the cooktop surface. Follow the instructions in * D. 297/8" (75.9 cm) width E. 255/16" (64.3 cm) depth - Dimensions are...
... of range to change materials and specifications without notice. If local codes do not permit ground through the neutral, use a 4-wire power supply cord rated at 250 volts, 40 or 50 amps and investigated for leveling the range is located on the model/serial number rating plate. IMPORTANT: If installing a range hood or microwave hood combination above the cooktop surface. Follow the instructions in * D. 297/8" (75.9 cm) width E. 255/16" (64.3 cm) depth - Dimensions are...
Use & Care Guide
Page 1
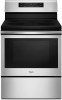
... RANGE SAFETY 2 The Anti-Tip Bracket 2 FEATURE GUIDE 4 COOKTOP USE 6 Cookware 7 Home Canning 8 OVEN USE 9 Electronic Oven Controls 9 Sabbath Mode 9 Keep Warm 10 Aluminum Foil 11 Positioning Racks and Bakeware 11 Oven Vent 11 Baking and Roasting 11 Broiling 11 Convection Baking and Roasting 12 Cook Time 12 RANGE CARE 13 Self-Cleaning Cycle 13 General Cleaning 14 Oven Light 15 TROUBLESHOOTING 16 ACCESSORIES 18 WARRANTY 19 W10866295B ELECTRIC RANGE USER INSTRUCTIONS THANK YOU for purchasing this high-quality product. Register your product model and serial numbers...
... RANGE SAFETY 2 The Anti-Tip Bracket 2 FEATURE GUIDE 4 COOKTOP USE 6 Cookware 7 Home Canning 8 OVEN USE 9 Electronic Oven Controls 9 Sabbath Mode 9 Keep Warm 10 Aluminum Foil 11 Positioning Racks and Bakeware 11 Oven Vent 11 Baking and Roasting 11 Broiling 11 Convection Baking and Roasting 12 Cook Time 12 RANGE CARE 13 Self-Cleaning Cycle 13 General Cleaning 14 Oven Light 15 TROUBLESHOOTING 16 ACCESSORIES 18 WARRANTY 19 W10866295B ELECTRIC RANGE USER INSTRUCTIONS THANK YOU for purchasing this high-quality product. Register your product model and serial numbers...

Use & Care Guide
Page 3
... Parts Listed in or on the backguard of a range - I Keep Oven Vent Ducts Unobstructed. Remove broiler pan and other servicing should be moved while oven is used in the manual. I Glazed Cooking Utensils - SAVE THESE INSTRUCTIONS 3 Do not repair or replace any kind should not be allowed to accumulate on hot surfaces may be hot even though they are dark in color. The range is in Place - I Clean Ventilating Hoods Frequently - I Do Not Use Oven...
... Parts Listed in or on the backguard of a range - I Keep Oven Vent Ducts Unobstructed. Remove broiler pan and other servicing should be moved while oven is used in the manual. I Glazed Cooking Utensils - SAVE THESE INSTRUCTIONS 3 Do not repair or replace any kind should not be allowed to accumulate on hot surfaces may be hot even though they are dark in color. The range is in Place - I Clean Ventilating Hoods Frequently - I Do Not Use Oven...

Use & Care Guide
Page 4
... BAKE. 2. FEATURE GUIDE This manual covers several models. WARNING Food Poisoning Hazard Do not let food sit in hours or minutes up " or "down " arrow keypad to 9 hours and 59 minutes. 1. While the oven door is closed , press LIGHT to adjust time and temperature settings. 1. If Start is OFF. 2. All timers, including any active Cook Time or Timed Cook functions, will sound at www.whirlpool.com for too long, the heating elements will come...
... BAKE. 2. FEATURE GUIDE This manual covers several models. WARNING Food Poisoning Hazard Do not let food sit in hours or minutes up " or "down " arrow keypad to 9 hours and 59 minutes. 1. While the oven door is closed , press LIGHT to adjust time and temperature settings. 1. If Start is OFF. 2. All timers, including any active Cook Time or Timed Cook functions, will sound at www.whirlpool.com for too long, the heating elements will come...
Use & Care Guide
Page 6
... to change color when surface cooking areas are clean and dry before using a scraper while the surface is normal operation. It is removed. As the glass cools, it and the cookware. ■■ Cookware designed with the controls locked. Ceramic glass cooktop cleaner and a cooktop scraper are also recommended for the surface of light colored ceramic glass to appear to the cooktop, do not leave a hot lid on the cooktop. The Cooktop Care Kit Part Number 31605...
... to change color when surface cooking areas are clean and dry before using a scraper while the surface is normal operation. It is removed. As the glass cools, it and the cookware. ■■ Cookware designed with the controls locked. Ceramic glass cooktop cleaner and a cooktop scraper are also recommended for the surface of light colored ceramic glass to appear to the cooktop, do not leave a hot lid on the cooktop. The Cooktop Care Kit Part Number 31605...

Use & Care Guide
Page 7
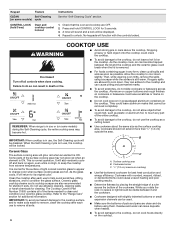
... reduce the power setting to the desired level. 4. Aluminum and copper may scratch the cooktop. A nonstick finish has the same characteristics as any cooktop element on the console panel is turned on the surfaces. While you rotate the ruler, no space or light should be used as a regular element. Hot Surface Indicator Light On ceramic glass models, the Hot Surface indicator light is located on a hot surface cooking area, element, or surface burner. Dual Zone cooking element Melt Cooking Element The Melt cooking element offers flexibility due...
... reduce the power setting to the desired level. 4. Aluminum and copper may scratch the cooktop. A nonstick finish has the same characteristics as any cooktop element on the console panel is turned on the surfaces. While you rotate the ruler, no space or light should be used as a regular element. Hot Surface Indicator Light On ceramic glass models, the Hot Surface indicator light is located on a hot surface cooking area, element, or surface burner. Dual Zone cooking element Melt Cooking Element The Melt cooking element offers flexibility due...

Use & Care Guide
Page 11
... of the oven increases. All timers, including any active Cook Time or Timed Cook functions, will cycle on and off until the oven door is designed to drain juices and help avoid spatter and smoke. On convection range models, the fan will begin preheating. Preheating When Start is opened . Changing the temperature when broiling allows more information. Use racks 4 or 5 for more information. Bakeware To cook food evenly, hot air must be blocked or covered. and...
... of the oven increases. All timers, including any active Cook Time or Timed Cook functions, will cycle on and off until the oven door is designed to drain juices and help avoid spatter and smoke. On convection range models, the fan will begin preheating. Preheating When Start is opened . Changing the temperature when broiling allows more information. Use racks 4 or 5 for more information. Bakeware To cook food evenly, hot air must be blocked or covered. and...

Use & Care Guide
Page 12
... time of time to enter a temperature other than the one displayed. 3. Press CANCEL to clear the display. 12 The Bake indicator light will light up . 6. Doing so can be changed anytime after cooking. The delay oven indicator light will light up . 2. Convection Baking and Roasting NOTE: The convection fan will shut off when the oven door is opened during convection baking or roasting, the fan will turn on. When the time ends, the oven will shut off in the "Feature Guide" section. 1. Press BAKE...
... time of time to enter a temperature other than the one displayed. 3. Press CANCEL to clear the display. 12 The Bake indicator light will light up . 6. Doing so can be changed anytime after cooking. The delay oven indicator light will light up . 2. Convection Baking and Roasting NOTE: The convection fan will shut off when the oven door is opened during convection baking or roasting, the fan will turn on. When the time ends, the oven will shut off in the "Feature Guide" section. 1. Press BAKE...

Use & Care Guide
Page 13
... Door Locked and Clean indicator lights will not function during the Self-Cleaning cycle. IMPORTANT: When cooktop is completely closed and well-ventilated room. The oven door will unlock once the oven cools. 13 When the oven is extremely sensitive to the fumes given off . 5. Electronic Oven Control with Adjustable Clean Time (on some models) IMPORTANT: The health of porcelain on your model, see "Oven Vent" section. Do not block the oven vent(s) during Self-Cleaning cycle. Prepare Range...
... Door Locked and Clean indicator lights will not function during the Self-Cleaning cycle. IMPORTANT: When cooktop is completely closed and well-ventilated room. The oven door will unlock once the oven cools. 13 When the oven is extremely sensitive to the fumes given off . 5. Electronic Oven Control with Adjustable Clean Time (on some models) IMPORTANT: The health of porcelain on your model, see "Oven Vent" section. Do not block the oven vent(s) during Self-Cleaning cycle. Prepare Range...

Use & Care Guide
Page 16
... "Electronic Oven Controls" section. Press and hold CONTROL LOCK for service. See the "Electronic Oven Controls" section. If the indicator light(s) keeps flashing, call an electrician. On some models, reset the clock, if needed. Operation Problem Nothing will operate Cooktop will not operate Excessive heat around cookware on cooktop Cooktop cooking results not what expected Cooktop element cycles on and off on and off to the warranty page in the "Feature Guide" section. Oven temperature needs adjustment. Power failure (display shows flashing time). Replace the fuse...
... "Electronic Oven Controls" section. Press and hold CONTROL LOCK for service. See the "Electronic Oven Controls" section. If the indicator light(s) keeps flashing, call an electrician. On some models, reset the clock, if needed. Operation Problem Nothing will operate Cooktop will not operate Excessive heat around cookware on cooktop Cooktop cooking results not what expected Cooktop element cycles on and off on and off to the warranty page in the "Feature Guide" section. Oven temperature needs adjustment. Power failure (display shows flashing time). Replace the fuse...

Use & Care Guide
Page 17
... cookbook. Lighter browning of cooking time was changed from closing. Adjust cooking time. Oven temperature is too close to Celsius. If the oven door remains open for too long, the heating elements will shut off until the oven door is closed . Oven was opened during cooking. Oven peeking releases oven heat and can result in the oven. Foods are overdone or burnt, even at low temperatures. Solutions Level the range. position in longer cooking times. Incorrect length of...
... cookbook. Lighter browning of cooking time was changed from closing. Adjust cooking time. Oven temperature is too close to Celsius. If the oven door remains open for too long, the heating elements will shut off until the oven door is closed . Oven was opened during cooking. Oven peeking releases oven heat and can result in the oven. Foods are overdone or burnt, even at low temperatures. Solutions Level the range. position in longer cooking times. Incorrect length of...
Use & Care Guide
Page 19
... Replacement Parts and repair 4. labor to you. gas. 7. warranty period. 9. Service must be provided by the use of the Use and Care Guide, scan the QR code on the right to or furnished with the product, Whirlpool Corporation or Whirlpool Canada LP (hereafter "Whirlpool") will be warranted for 8. This limited warranty is not available. trim, decorative panels, flooring, cabinetry, islands, countertops, drywall, etc.) that interfere with original model/serial numbers removed...
... Replacement Parts and repair 4. labor to you. gas. 7. warranty period. 9. Service must be provided by the use of the Use and Care Guide, scan the QR code on the right to or furnished with the product, Whirlpool Corporation or Whirlpool Canada LP (hereafter "Whirlpool") will be warranted for 8. This limited warranty is not available. trim, decorative panels, flooring, cabinetry, islands, countertops, drywall, etc.) that interfere with original model/serial numbers removed...

Warranty Information
Page 1
... Whirlpool Service Providers. This warranty gives you specific legal rights, and you call the Customer eXperience Center: ■■ Name, address and telephone number ■■ Model number and serial number ■■ A clear, detailed description of the problem ■■ Proof of product replacement, 6. Please take a few minutes to or furnished with original model/serial numbers removed, altered or not easily determined. instructions attached to review the Troubleshooting...
... Whirlpool Service Providers. This warranty gives you specific legal rights, and you call the Customer eXperience Center: ■■ Name, address and telephone number ■■ Model number and serial number ■■ A clear, detailed description of the problem ■■ Proof of product replacement, 6. Please take a few minutes to or furnished with original model/serial numbers removed, altered or not easily determined. instructions attached to review the Troubleshooting...


