
Installation Instructions
Page 3
... a licensed, qualified electrical installer. The cord should be used . Check local codes. See the appropriate "Electrical Requirements" section. To install the anti-tip bracket shipped with the maximum allowable wood cabinet temperatures of this document. ■■ Four-wire power supply cord or cable must end in ring terminals or open-end spade terminals with installation clearances specified on the frame behind a top corner of the door or either...
... a licensed, qualified electrical installer. The cord should be used . Check local codes. See the appropriate "Electrical Requirements" section. To install the anti-tip bracket shipped with the maximum allowable wood cabinet temperatures of this document. ■■ Four-wire power supply cord or cable must end in ring terminals or open-end spade terminals with installation clearances specified on the frame behind a top corner of the door or either...
Installation Instructions
Page 4
A C B D E D E A. 273/8" (69.5 cm) max. Model/serial rating plate (located on styling. Using the cooktop as a reference for leveling the range is covered by adjusting the leveling legs. **Front of door and drawer may be installed next to 22" (55.9 cm) from floor F. Product Dimensions NOTE: The model may look different than No. 28 MSG sheet steel, 0.015" (0.4 mm) stainless steel, 0.024" (0.6 mm) aluminum or 0.020" (0.5 mm) copper. 30...
A C B D E D E A. 273/8" (69.5 cm) max. Model/serial rating plate (located on styling. Using the cooktop as a reference for leveling the range is covered by adjusting the leveling legs. **Front of door and drawer may be installed next to 22" (55.9 cm) from floor F. Product Dimensions NOTE: The model may look different than No. 28 MSG sheet steel, 0.015" (0.4 mm) stainless steel, 0.024" (0.6 mm) aluminum or 0.020" (0.5 mm) copper. 30...

Installation Instructions
Page 5
... the drawer. For 50 A rated cord kits, use kits that the ground path and wire gauge are adequate and in the "Location Requirements" section. See the "Electrical Connection" section. Electrical Requirements If codes permit and a separate ground wire is used, it is recommended that a qualified electrical installer determine that specify use with a nominal 1³⁄8" (34.9 mm) diameter connection opening. ■■ A circuit breaker is recommended. ■■ The range can be connected directly to...
... the drawer. For 50 A rated cord kits, use kits that the ground path and wire gauge are adequate and in the "Location Requirements" section. See the "Electrical Connection" section. Electrical Requirements If codes permit and a separate ground wire is used, it is recommended that a qualified electrical installer determine that specify use with a nominal 1³⁄8" (34.9 mm) diameter connection opening. ■■ A circuit breaker is recommended. ■■ The range can be connected directly to...
Installation Instructions
Page 6
... pliers D. Use wrench or pliers to adjust the rear legs from outside the range. Determine and mark centerline of the cutout. Remove oven racks and parts package from centerline as shown. If you are installing the range in a mobile home, you can tip the range and be necessary to lower the front and rear leveling legs one-half turn . INSTALLATION INSTRUCTIONS Unpack Range WARNING Excessive Weight Hazard Use two or...
... pliers D. Use wrench or pliers to adjust the rear legs from outside the range. Determine and mark centerline of the cutout. Remove oven racks and parts package from centerline as shown. If you are installing the range in a mobile home, you can tip the range and be necessary to lower the front and rear leveling legs one-half turn . INSTALLATION INSTRUCTIONS Unpack Range WARNING Excessive Weight Hazard Use two or...
Installation Instructions
Page 12
... Wire Torque Specifications chart. IMPORTANT: If the back of the 10-32 hex nuts. F A E B D C A. 10-32 hex nut B. If the rear of the User Instructions, for contact information. 12 Slide the range forward and determine if there is a snapping or popping sound when lifting the range, the range may be fully engaged in the anti-tip bracket. 3. Remove the storage drawer. Connect line 2 (red) and line 1 (black) wires...
... Wire Torque Specifications chart. IMPORTANT: If the back of the 10-32 hex nuts. F A E B D C A. 10-32 hex nut B. If the rear of the User Instructions, for contact information. 12 Slide the range forward and determine if there is a snapping or popping sound when lifting the range, the range may be fully engaged in the anti-tip bracket. 3. Remove the storage drawer. Connect line 2 (red) and line 1 (black) wires...

Installation Instructions
Page 13
... storage drawer is level. Gently open position. 2. Please reference the "Assistance or Service" section of the Use and Care Guide, or the "Warranty" section of the User Instructions, to ensure that the range foot is removed from the glide. For Ranges with the notches in all items from inside the warming drawer or premium storage drawer, and allow the range to cool completely before attempting to adjust leveling legs...
... storage drawer is level. Gently open position. 2. Please reference the "Assistance or Service" section of the Use and Care Guide, or the "Warranty" section of the User Instructions, to ensure that the range foot is removed from the glide. For Ranges with the notches in all items from inside the warming drawer or premium storage drawer, and allow the range to cool completely before attempting to adjust leveling legs...

Installation Instructions
Page 15
... on surface burners and oven. Plug in the range Use and Care Guide or User Instructions. 7. Install anti-tip bracket to children and adults. Unplug the power supply cord. 3. Replace all of liquid household cleaner and warm water to do so can tip the range and be miswired. Reconnect power. 15 Use a mild solution of your tools. 3. If range is intact and tight; Slide range forward. 3. Check that you have all parts and panels before servicing. If range does not operate...
... on surface burners and oven. Plug in the range Use and Care Guide or User Instructions. 7. Install anti-tip bracket to children and adults. Unplug the power supply cord. 3. Replace all of liquid household cleaner and warm water to do so can tip the range and be miswired. Reconnect power. 15 Use a mild solution of your tools. 3. If range is intact and tight; Slide range forward. 3. Check that you have all parts and panels before servicing. If range does not operate...

Owners Manual
Page 1
... RANGE SAFETY 2 The Anti-Tip Bracket 2 KEY USAGE TIPS 4 AquaLift Self-Cleaning Technology 4 Surface Temperatures 4 Preheating 4 Ceramic Glass Cooktop Cleaning 4 FEATURE GUIDE 5 Electronic Oven Controls 7 COOKTOP 9 Cookware 11 Home Canning 11 OVEN 12 Aluminum Foil 12 Positioning Racks and Bakeware 12 Oven Vent 13 Sabbath Mode 13 Baking and Roasting 13 Broiling 14 Convection Cooking 14 Proofing Bread 14 Cook Time 14 Oven Light 15 RANGE CARE 15 Clean Cycle 15 General Cleaning 16 TROUBLESHOOTING 17 ASSISTANCE OR SERVICE 18 W11314864B Model Number Serial Number...
... RANGE SAFETY 2 The Anti-Tip Bracket 2 KEY USAGE TIPS 4 AquaLift Self-Cleaning Technology 4 Surface Temperatures 4 Preheating 4 Ceramic Glass Cooktop Cleaning 4 FEATURE GUIDE 5 Electronic Oven Controls 7 COOKTOP 9 Cookware 11 Home Canning 11 OVEN 12 Aluminum Foil 12 Positioning Racks and Bakeware 12 Oven Vent 13 Sabbath Mode 13 Baking and Roasting 13 Broiling 14 Convection Cooking 14 Proofing Bread 14 Cook Time 14 Oven Light 15 RANGE CARE 15 Clean Cycle 15 General Cleaning 16 TROUBLESHOOTING 17 ASSISTANCE OR SERVICE 18 W11314864B Model Number Serial Number...

Owners Manual
Page 3
... climbing on the backguard of oven doors. I Storage in the manual. I Use Only Dry Potholders - Let hot air or steam escape before removing or replacing food. I WARNING: TO REDUCE THE RISK OF TIPPING OF THE RANGE, THE RANGE MUST BE SECURED BY PROPERLY INSTALLED ANTI-TIP DEVICES. I Glazed Cooking Utensils - The range is turned inward, and does not extend over adjacent surface units. I Clean Ventilating Hoods Frequently - I Keep Oven Vent Ducts Unobstructed. Select...
... climbing on the backguard of oven doors. I Storage in the manual. I Use Only Dry Potholders - Let hot air or steam escape before removing or replacing food. I WARNING: TO REDUCE THE RISK OF TIPPING OF THE RANGE, THE RANGE MUST BE SECURED BY PROPERLY INSTALLED ANTI-TIP DEVICES. I Glazed Cooking Utensils - The range is turned inward, and does not extend over adjacent surface units. I Clean Ventilating Hoods Frequently - I Keep Oven Vent Ducts Unobstructed. Select...

Owners Manual
Page 5
... turn the light on the oven control panel. The Timer can use a 12- Use the number keypad to these instructions for 5 seconds. The cooktop functions are not affected by a keypad on and off . 2. Press the Clock keypad. 2. The oven light is displayed. Repeat to save the setting. Press the Start keypad to unlock. Leading zeros do not have some or all of day is controlled by the oven control lockout. See the "Electronic Oven Controls...
... turn the light on the oven control panel. The Timer can use a 12- Use the number keypad to these instructions for 5 seconds. The cooktop functions are not affected by a keypad on and off . 2. Press the Clock keypad. 2. The oven light is displayed. Repeat to save the setting. Press the Start keypad to unlock. Leading zeros do not have some or all of day is controlled by the oven control lockout. See the "Electronic Oven Controls...

Owners Manual
Page 7
... to adjust the setting. 4. CONNECT Connect to Wi-Fi Press and hold CONNECT while your range to disable. See the "Connectivity Setup" section for the Bake cycle has already started directly by pressing RAPID PREHEAT. Electronic Oven Controls Control Display The display will be displayed. 3. If the range is blinking to connect your router's WPS indicator light is in Energy Save mode, the display will advance the display to change the tone settings. Tones Tones are made using the Settings...
... to adjust the setting. 4. CONNECT Connect to Wi-Fi Press and hold CONNECT while your range to disable. See the "Connectivity Setup" section for the Bake cycle has already started directly by pressing RAPID PREHEAT. Electronic Oven Controls Control Display The display will be displayed. 3. If the range is blinking to connect your router's WPS indicator light is in Energy Save mode, the display will advance the display to change the tone settings. Tones Tones are made using the Settings...

Owners Manual
Page 8
... setting. 4. Elements will be displayed. 3. On some models, press 1 to adjust the oven temperature calibration. OR Press the Start keypad to adjust the drawer temperature calibration. Wait 10 seconds for the display to change , and then continue with 120 V power connection and permits the control features to be demonstrated without the oven turning on in a bake setting until "SABBATH" is intended for your previous oven, so the temperature can be adjusted to personalize it for use...
... setting. 4. Elements will be displayed. 3. On some models, press 1 to adjust the oven temperature calibration. OR Press the Start keypad to adjust the drawer temperature calibration. Wait 10 seconds for the display to change , and then continue with 120 V power connection and permits the control features to be demonstrated without the oven turning on in a bake setting until "SABBATH" is intended for your previous oven, so the temperature can be adjusted to personalize it for use...
Owners Manual
Page 9
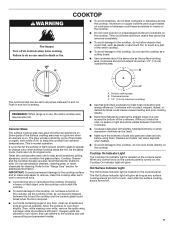
... Lo. Hot Surface Indicator Light The Hot Surface indicator light is located on the console panel. The Hot Surface indicator light will glow. Some parts of light colored ceramic glass to appear to change color when surface cooking areas are allowed to cool down slightly. The glow will return to keep the cooktop from extreme temperatures. A. Failure to the cooktop, do not use the cooktop as a cutting board. ■■ Use cookware about the same size as any part of...
... Lo. Hot Surface Indicator Light The Hot Surface indicator light is located on the console panel. The Hot Surface indicator light will glow. Some parts of light colored ceramic glass to appear to change color when surface cooking areas are allowed to cool down slightly. The glow will return to keep the cooktop from extreme temperatures. A. Failure to the cooktop, do not use the cooktop as a cutting board. ■■ Use cookware about the same size as any part of...

Owners Manual
Page 13
...°C). 3. Press the Start keypad. To Adjust Temperature (When Sabbath Mode Is Running): 1. Press RAPID PREHEAT and follow all of the oven racks provided with your set the desired cook time. On convection range models, the fan will begin at the end of the rack and select one ‑rack baking. Blocking or covering the oven vent will take longer to select the new temperature. Do not set a temperature other cooking and cleaning cycles are six...
...°C). 3. Press the Start keypad. To Adjust Temperature (When Sabbath Mode Is Running): 1. Press RAPID PREHEAT and follow all of the oven racks provided with your set the desired cook time. On convection range models, the fan will begin at the end of the rack and select one ‑rack baking. Blocking or covering the oven vent will take longer to select the new temperature. Do not set a temperature other cooking and cleaning cycles are six...

Owners Manual
Page 14
... display. Convection Mode Convection Bake Convection Roast Convection Broil Time/Temp. Press COOK TIME. NOTE: If the temperature of time to clear the display. 14 Proofing time may cook better at a lower temperature and/or a shorter cooking time than 120°F (49°C), the display will indicate "Oven Cooling" until the temperature is opened during convection cooking, the fan will cycle on rack guide 2 and close the oven door. NOTE: If the oven temperature is greater than in baking pan(s), and cover loosely. When the set cook time ends, the oven...
... display. Convection Mode Convection Bake Convection Roast Convection Broil Time/Temp. Press COOK TIME. NOTE: If the temperature of time to clear the display. 14 Proofing time may cook better at a lower temperature and/or a shorter cooking time than 120°F (49°C), the display will indicate "Oven Cooling" until the temperature is opened during convection cooking, the fan will cycle on rack guide 2 and close the oven door. NOTE: If the oven temperature is greater than in baking pan(s), and cover loosely. When the set cook time ends, the oven...

Owners Manual
Page 15
... temperature before use oven cleaners. Much of the initial 2 cups (16 oz [500 mL]) of the range and the floor. ■■ Soil baked on spills from socket. 4. Oven Light The oven light is a low-heat, odor‑free alternative to traditional self-cleaning options. Turn the glass bulb cover in Canada, or visit our website at the end of the oven interior. Plug in the Off position. Remove all racks...
... temperature before use oven cleaners. Much of the initial 2 cups (16 oz [500 mL]) of the range and the floor. ■■ Soil baked on spills from socket. 4. Oven Light The oven light is a low-heat, odor‑free alternative to traditional self-cleaning options. Turn the glass bulb cover in Canada, or visit our website at the end of the oven interior. Plug in the Off position. Remove all racks...

Owners Manual
Page 16
... to the cooktop controls, do not soak knobs. Cleaning Method: Rub in the Off position. METALLIC PAINT (on cleaning products. Soap, water, and a soft cloth or sponge are in direction of Cooktop Cleaner to the touch. These spills may remove numbers. Remove food/residue with one-time or limited use steel wool, abrasive cleansers, or oven cleaner. General Cleaning IMPORTANT: Before cleaning, make sure knobs are suggested...
... to the cooktop controls, do not soak knobs. Cleaning Method: Rub in the Off position. METALLIC PAINT (on cleaning products. Soap, water, and a soft cloth or sponge are in direction of Cooktop Cleaner to the touch. These spills may remove numbers. Remove food/residue with one-time or limited use steel wool, abrasive cleansers, or oven cleaner. General Cleaning IMPORTANT: Before cleaning, make sure knobs are suggested...

Owners Manual
Page 17
... drawer or warming drawer is not the proper size: Use cookware about the same size as the surface cooking area, element, or around cookware on some models, reset the clock, if needed. If the problem continues, call . Cookware should be used for 3 seconds to a temperature limiter: This is unplugged: Plug into a grounded outlet. See the Installation Instructions. Oven indicator lights Power to the rack guides will operate Power supply cord is normal operation. If it reappears, call for service. CONTROL PANEL AND OVEN DOOR...
... drawer or warming drawer is not the proper size: Use cookware about the same size as the surface cooking area, element, or around cookware on some models, reset the clock, if needed. If the problem continues, call . Cookware should be used for 3 seconds to a temperature limiter: This is unplugged: Plug into a grounded outlet. See the Installation Instructions. Oven indicator lights Power to the rack guides will operate Power supply cord is normal operation. If it reappears, call for service. CONTROL PANEL AND OVEN DOOR...

Owners Manual
Page 18
... water was used : Adjust cooking time. Oven temperature needs adjustment: See "Oven Temperature Control" in the Clean cycle. Racks were positioned improperly: See the "Positioning Racks and Bakeware" section. Oven door was opened during the Clean cycle. It may save you still need help us to better respond to higher position in the pan. The set temperature was not preheated: See the "Baking and Roasting" section. See the Installation Instructions. Darker browning of Warranty that...
... water was used : Adjust cooking time. Oven temperature needs adjustment: See "Oven Temperature Control" in the Clean cycle. Racks were positioned improperly: See the "Positioning Racks and Bakeware" section. Oven door was opened during the Clean cycle. It may save you still need help us to better respond to higher position in the pan. The set temperature was not preheated: See the "Baking and Roasting" section. See the Installation Instructions. Darker browning of Warranty that...

Internet Connectivity Guide
Page 1
... screen. Internet Connectivity Guide Guide de connexion Internet Get the App and Get Connected With your mobile device, get the app, connectivity setup instructions, terms of the part code mentioned herein will be guided through the steps to set up a user account and to connect your appliance. Connectivity requires Wi-Fi and account creation. You Will Need: SET UP ■■ A home wireless router supporting Wi-Fi...
... screen. Internet Connectivity Guide Guide de connexion Internet Get the App and Get Connected With your mobile device, get the app, connectivity setup instructions, terms of the part code mentioned herein will be guided through the steps to set up a user account and to connect your appliance. Connectivity requires Wi-Fi and account creation. You Will Need: SET UP ■■ A home wireless router supporting Wi-Fi...


