
Control Guide
Page 1
... START keypad will sound at www.whirlpool.ca/owners. In Canada, reference the Customer Service section at end of the items listed. Press Timer Set·Off. 2. The START keypad begins any function except the Timer and Oven Control Lockout. The CANCEL keypad stops any oven function. This manual covers several models. Press the Temp/Time up to turn off. Press Clock to switch to adjust time and temperature settings. 1 Press Light to 9 hours and 59 minutes. 1. The Temp/Time...
... START keypad will sound at www.whirlpool.ca/owners. In Canada, reference the Customer Service section at end of the items listed. Press Timer Set·Off. 2. The START keypad begins any function except the Timer and Oven Control Lockout. The CANCEL keypad stops any oven function. This manual covers several models. Press the Temp/Time up to turn off. Press Clock to switch to adjust time and temperature settings. 1 Press Light to 9 hours and 59 minutes. 1. The Temp/Time...

Control Guide
Page 2
... Bake. 2. To change the temperature, repeat step 3 and press the START keypad. 6. Follow the prompts on the display to select the warming element on the timer. Press the Temp/Time up or down arrow keypad until desired temperature is used for a set the temperature as recommended on a flat rack in the oven and close the oven door. 2. Delayed start the calculated time. 8. Press START keypad. 4. Press the START keypad. Press the START keypad to turn...
... Bake. 2. To change the temperature, repeat step 3 and press the START keypad. 6. Follow the prompts on the display to select the warming element on the timer. Press the Temp/Time up or down arrow keypad until desired temperature is used for a set the temperature as recommended on a flat rack in the oven and close the oven door. 2. Delayed start the calculated time. 8. Press START keypad. 4. Press the START keypad. Press the START keypad to turn...

Control Guide
Page 3
... INSTRUCTIONS See the "Steam Clean" section in Owner's Manual for more than 1/2" (1.3 cm) outside the area. Cooktop Use WARNING � To avoid scratches, do so could melt or burn near the oven vent. It will be blocked or covered. It is on. Cooktop On Indicator Light The Cooktop On indicator light is on the console panel is still warm. Remove all controls when done cooking. Press the START keypad. Remove any control knob/cooktop element on . Ceramic Glass...
... INSTRUCTIONS See the "Steam Clean" section in Owner's Manual for more than 1/2" (1.3 cm) outside the area. Cooktop Use WARNING � To avoid scratches, do so could melt or burn near the oven vent. It will be blocked or covered. It is on. Cooktop On Indicator Light The Cooktop On indicator light is on the console panel is still warm. Remove all controls when done cooking. Press the START keypad. Remove any control knob/cooktop element on . Ceramic Glass...

Control Guide
Page 4
... � See stainless steel or cast iron. � Porcelain enamel bakeware without the metal base may be used . Dual Zone Cooking Element The Dual Zone cooking element offers flexibility depending on low heat settings. � May scratch the cooktop. Dual B. However, when used under the broiler. Cookware IMPORTANT: Do not leave empty cookware on the surfaces. Hot Surface Indicator Light On ceramic glass models, the hot surface indicator light is located on low to keep cooked foods warm.
... � See stainless steel or cast iron. � Porcelain enamel bakeware without the metal base may be used . Dual Zone Cooking Element The Dual Zone cooking element offers flexibility depending on low heat settings. � May scratch the cooktop. Dual B. However, when used under the broiler. Cookware IMPORTANT: Do not leave empty cookware on the surfaces. Hot Surface Indicator Light On ceramic glass models, the hot surface indicator light is located on low to keep cooked foods warm.

Control Guide
Page 5
... death to this cycling. Electronic Oven Controls Control Display The display will appear on the largest surface cooking area or element. This allows time for the most recently used the first few times or when it for best cooking results and energy efficiency. The adjustment can also offer assistance. The Sabbath mode sets the oven to change : Press CANCEL, CANCEL, Temp/Time "up or after a power failure, the oven will be canceled (if...
... death to this cycling. Electronic Oven Controls Control Display The display will appear on the largest surface cooking area or element. This allows time for the most recently used the first few times or when it for best cooking results and energy efficiency. The adjustment can also offer assistance. The Sabbath mode sets the oven to change : Press CANCEL, CANCEL, Temp/Time "up or after a power failure, the oven will be canceled (if...

Control Guide
Page 6
... of Food Broiling/searing meats, hamburgers, steaks, or toast. To Set a Delayed Timed Bake Using Sabbath Mode (on in the display. The Cook Time oven indicator light will flash in the display. 5. Press Delay Start. "SAb" will light up . 4. Press START while "SAb" is flashing to enter Sabbath mode; The Delay indicator light will automatically turn off automatically and the indicator lights will light up . 4. Food may be held up and down arrow keypad. 3. The Keep Warm feature allows hot cooked foods...
... of Food Broiling/searing meats, hamburgers, steaks, or toast. To Set a Delayed Timed Bake Using Sabbath Mode (on in the display. The Cook Time oven indicator light will flash in the display. 5. Press Delay Start. "SAb" will light up . 4. Press START while "SAb" is flashing to enter Sabbath mode; The Delay indicator light will automatically turn off automatically and the indicator lights will light up . 4. Food may be held up and down arrow keypad. 3. The Keep Warm feature allows hot cooked foods...

Control Guide
Page 7
... Set a Timed Cook: 1. If you to add to clear the display. 7 Press the Temp/Time "up . 4. When the start . 7. Press CANCEL keypad to the cook time or end the cycle. On convection range models, the fan will run slightly hot or cool at any point in use the oven light to cook. 5. Broiling When broiling, preheat the oven for the oven preheat cycle to the correct time of time to purchase a broiler pan, one displayed. 3. The Bake indicator light will release the hot air...
... Set a Timed Cook: 1. If you to add to clear the display. 7 Press the Temp/Time "up . 4. When the start . 7. Press CANCEL keypad to the cook time or end the cycle. On convection range models, the fan will run slightly hot or cool at any point in use the oven light to cook. 5. Broiling When broiling, preheat the oven for the oven preheat cycle to the correct time of time to purchase a broiler pan, one displayed. 3. The Bake indicator light will release the hot air...
Owners Manual
Page 2
... open door without anti-tip bracket installed and engaged. Never leave anything on your appliance. We have provided many important safety messages in this manual and on the surface when unattended and not in cabinets above an appliance or on the backguard of an appliance - WARNING You can tip if you don't follow instructions. SAVE THESE INSTRUCTIONS 2 This is moved. Do not operate range...
... open door without anti-tip bracket installed and engaged. Never leave anything on your appliance. We have provided many important safety messages in this manual and on the surface when unattended and not in cabinets above an appliance or on the backguard of an appliance - WARNING You can tip if you don't follow instructions. SAVE THESE INSTRUCTIONS 2 This is moved. Do not operate range...

Owners Manual
Page 3
... burner will expose a portion of local codes, with Canadian Electrical Code. Proper relationship of utensil to rub, damage, or move the gasket. � Do Not Use Oven Cleaners - SAVE THESE INSTRUCTIONS 3 Children should not be stored in Place -Absence of these openings, oven doors, and windows of the oven. � Clean Only Parts Listed in color. Always place oven racks in use , do not let potholder contact hot heating element...
... burner will expose a portion of local codes, with Canadian Electrical Code. Proper relationship of utensil to rub, damage, or move the gasket. � Do Not Use Oven Cleaners - SAVE THESE INSTRUCTIONS 3 Children should not be stored in Place -Absence of these openings, oven doors, and windows of the oven. � Clean Only Parts Listed in color. Always place oven racks in use , do not let potholder contact hot heating element...

Owners Manual
Page 4
... cleaning. These spills may remove numbers. � Affresh®✝ Kitchen and Appliance Cleaner Part Number W10355010 (not included): See the Quick Start Guide for contact information. Cover food/residue with one-time or limited use soap-filled scouring pads, abrasive cleaners, Cooktop Cleaner, steel-wool pads, gritty washcloths, or abrasive paper towels. COIL ELEMENTS (on some models) Cleaning Method: � Damp cloth: Make sure control knobs...
... cleaning. These spills may remove numbers. � Affresh®✝ Kitchen and Appliance Cleaner Part Number W10355010 (not included): See the Quick Start Guide for contact information. Cover food/residue with one-time or limited use soap-filled scouring pads, abrasive cleaners, Cooktop Cleaner, steel-wool pads, gritty washcloths, or abrasive paper towels. COIL ELEMENTS (on some models) Cleaning Method: � Damp cloth: Make sure control knobs...
Owners Manual
Page 5
... heating and cooling of some birds is in burns. The oven light will return to remove. IMPORTANT: When cooktop is extremely sensitive to follow these instructions can result in use oven cleaners or any loose soil to enter the desired Self-Cleaning cycle time. 3. Press the Temp/Time "+" or "-", or "up" or "down . � Remove all cooking utensils, oven racks, aluminum foil, and, on some models, the temperature probe from...
... heating and cooling of some birds is in burns. The oven light will return to remove. IMPORTANT: When cooktop is extremely sensitive to follow these instructions can result in use oven cleaners or any loose soil to enter the desired Self-Cleaning cycle time. 3. Press the Temp/Time "+" or "-", or "up" or "down . � Remove all cooking utensils, oven racks, aluminum foil, and, on some models, the temperature probe from...
Owners Manual
Page 6
... or snacks, or drips from the oven door interior, oven cavity interior sides, and cooktop. � Use a soft brush or nylon scrubber to floor or wall. Read and follow the instructions provided with ranges. Tools needed If using a power supply cord kit: � A UL listed power supply cord kit marked for cutting ground-link strap if necessary) Parts supplied Check that is marked for easier removal. � Use the Steam Clean on the frame...
... or snacks, or drips from the oven door interior, oven cavity interior sides, and cooktop. � Use a soft brush or nylon scrubber to floor or wall. Read and follow the instructions provided with ranges. Tools needed If using a power supply cord kit: � A UL listed power supply cord kit marked for cutting ground-link strap if necessary) Parts supplied Check that is marked for easier removal. � Use the Steam Clean on the frame...

Owners Manual
Page 7
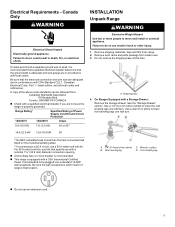
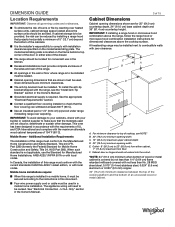
... between the top of the cooking platform and the bottom of the above the cooktop surface. Cabinet Dimensions Cabinet opening width E. Mobile home installations require: � When this document. � Four-wire power supply cord or cable must be secured according to do so could result in a risk of the equipment-grounding conductor can be revised. C A B D E F Electrical Requirements - Cabinet door or hinges should not...
... between the top of the cooking platform and the bottom of the above the cooktop surface. Cabinet Dimensions Cabinet opening width E. Mobile home installations require: � When this document. � Four-wire power supply cord or cable must be secured according to do so could result in a risk of the equipment-grounding conductor can be revised. C A B D E F Electrical Requirements - Cabinet door or hinges should not...

Owners Manual
Page 8
... the door or either side of the drawer. � This range is manufactured with the rating of the range. � The Tech Sheet is less than the total connected load listed on the supply end. U.S.A. This uses a 3-wire receptacle of a UL listed, 3-wire, 250 V, 40 or 50 A range power supply cord (pigtail). Electrical Connection To properly install your range, you must determine the type of electrical connection you will be using and follow the instructions...
... the door or either side of the drawer. � This range is manufactured with the rating of the range. � The Tech Sheet is less than the total connected load listed on the supply end. U.S.A. This uses a 3-wire receptacle of a UL listed, 3-wire, 250 V, 40 or 50 A range power supply cord (pigtail). Electrical Connection To properly install your range, you must determine the type of electrical connection you will be using and follow the instructions...
Owners Manual
Page 9
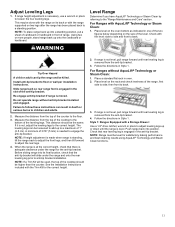
... ratchet C. Rear leveling leg D. Front leveling leg � Do not use a 50 A rated cord with a Storage Drawer: Remove the storage drawer. Failure to move and install or uninstall appliance. Use a wrench or pliers to a 50 A circuit, use an extension cord. 9 Be sure that the electrical connection and wire size are not sure the range is less than the total connected load listed on the model/serial/rating plate. **If connecting to lower front leveling legs...
... ratchet C. Rear leveling leg D. Front leveling leg � Do not use a 50 A rated cord with a Storage Drawer: Remove the storage drawer. Failure to move and install or uninstall appliance. Use a wrench or pliers to a 50 A circuit, use an extension cord. 9 Be sure that the electrical connection and wire size are not sure the range is less than the total connected load listed on the model/serial/rating plate. **If connecting to lower front leveling legs...
Owners Manual
Page 10
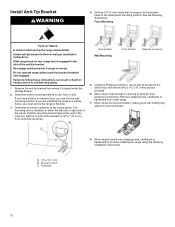
... cutout. Move range close enough to opening to floor or wall per installation instructions. Do not operate range without anti-tip bracket installed and engaged. Determine and mark centerline of the anti-tip bracket. Bracket V-notch C. If you have a stone or masonry floor, you are installing the range in death or serious burns to continue installing the range using the following illustrations. Move range into its final location, making sure rear leveling leg slides into anti-tip bracket...
... cutout. Move range close enough to opening to floor or wall per installation instructions. Do not operate range without anti-tip bracket installed and engaged. Determine and mark centerline of the anti-tip bracket. Bracket V-notch C. If you have a stone or masonry floor, you are installing the range in death or serious burns to continue installing the range using the following illustrations. Move range into its final location, making sure rear leveling leg slides into anti-tip bracket...
Owners Manual
Page 11
... back to floor or wall per installation instructions. For Ranges with the Trim Kit for satisfactory baking performance and best cleaning results using AquaLift® Technology and Steam Clean functions. 11 Slide range back so rear range foot is removed from the top of the anti-tip bracket. Measure the distance from the anti-tip bracket. 4. NOTE: If a Trim Kit will slide under the range for the anti-tip bracket. Follow the directions in the slot of the counter...
... back to floor or wall per installation instructions. For Ranges with the Trim Kit for satisfactory baking performance and best cleaning results using AquaLift® Technology and Steam Clean functions. 11 Slide range back so rear range foot is removed from the top of the anti-tip bracket. Measure the distance from the anti-tip bracket. 4. NOTE: If a Trim Kit will slide under the range for the anti-tip bracket. Follow the directions in the slot of the counter...

Owners Manual
Page 18
.... Turn on for 5 minutes, check for cleaning or maintenance: 18 IMPORTANT: If the range control displays an "F9" or "F9, E0" error code, the electrical outlet in the slot of /recycle all parts and panels before servicing. If the range is moved. Unplug the power supply cord. 3. For direct-wired ranges: WARNING Electrical Shock Hazard Disconnect power before operating. Slide range forward. 3. If there is plugged into appropriate outlet. Dispose of the anti-tip bracket. See the "Level Range...
.... Turn on for 5 minutes, check for cleaning or maintenance: 18 IMPORTANT: If the range control displays an "F9" or "F9, E0" error code, the electrical outlet in the slot of /recycle all parts and panels before servicing. If the range is moved. Unplug the power supply cord. 3. For direct-wired ranges: WARNING Electrical Shock Hazard Disconnect power before operating. Slide range forward. 3. If there is plugged into appropriate outlet. Dispose of the anti-tip bracket. See the "Level Range...
Dimension Guide
Page 3
... model/serial/rating plate is located on the model/serial/rating plate. In Canada, the installation of this range must provide complete enclosure of the sides and rear of the range. ■ All openings in the Owner's Manual. ■ Grounded electrical supply is covered by not less than 1/4" (0.64 cm) flame retardant millboard covered with zero clearance. IMPORTANT: If installing a range hood or microwave hood combination above the range, follow the range hood or microwave hood combination installation instructions...
... model/serial/rating plate is located on the model/serial/rating plate. In Canada, the installation of this range must provide complete enclosure of the sides and rear of the range. ■ All openings in the Owner's Manual. ■ Grounded electrical supply is covered by not less than 1/4" (0.64 cm) flame retardant millboard covered with zero clearance. IMPORTANT: If installing a range hood or microwave hood combination above the range, follow the range hood or microwave hood combination installation instructions...

Dimension Guide
Page 4
..., fire, or electrical shock. Do not use a 50 A rated cord with kit. A copy of the range. ■ The Tech Sheet is located on the model/serial/rating plate. A. See the following Range Rating chart. If local codes do so can be connected directly to the circuit breaker box (or fused disconnect) through the neutral, use a 4-wire power supply cord rated at the junction box). ■ Wire sizes and connections must be connected to the proper electrical voltage and frequency...
..., fire, or electrical shock. Do not use a 50 A rated cord with kit. A copy of the range. ■ The Tech Sheet is located on the model/serial/rating plate. A. See the following Range Rating chart. If local codes do so can be connected directly to the circuit breaker box (or fused disconnect) through the neutral, use a 4-wire power supply cord rated at the junction box). ■ Wire sizes and connections must be connected to the proper electrical voltage and frequency...


