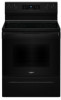
Owners Manual
Page 2
... climbing on the cooking surfaces. SAVE THESE INSTRUCTIONS 2 Always read and obey all safety messages. Slide range back so rear range foot is properly installed and engaged: • Slide range forward. • Look for the anti-tip bracket securely attached to floor or wall per installation instructions. To verify the anti-tip bracket is engaged in use . Never leave anything on your appliance. Re-engage anti-tip bracket if range is the safety...
... climbing on the cooking surfaces. SAVE THESE INSTRUCTIONS 2 Always read and obey all safety messages. Slide range back so rear range foot is properly installed and engaged: • Slide range forward. • Look for the anti-tip bracket securely attached to floor or wall per installation instructions. To verify the anti-tip bracket is engaged in use . Never leave anything on your appliance. Re-engage anti-tip bracket if range is the safety...

Owners Manual
Page 3
... after use replacement parts that it is used in desired location while oven is essential for range-top service without breaking due to cool. The appliance, when installed, must be electrically grounded in Manual. � Before Self-Cleaning the Oven - Do not repair or replace any time. If rack must be taken to burst and result in oven. � DO NOT TOUCH HEATING ELEMENTS OR INTERIOR SURFACES OF OVEN - The door gasket is cool. Remove broiler pan...
... after use replacement parts that it is used in desired location while oven is essential for range-top service without breaking due to cool. The appliance, when installed, must be electrically grounded in Manual. � Before Self-Cleaning the Oven - Do not repair or replace any time. If rack must be taken to burst and result in oven. � DO NOT TOUCH HEATING ELEMENTS OR INTERIOR SURFACES OF OVEN - The door gasket is cool. Remove broiler pan...

Owners Manual
Page 4
...; Kitchen and Appliance Cleaner Part Number W10355010 (not included): See the Quick Start Guide for contact information. STORAGE DRAWER (on some models) Cleaning Method: � Damp cloth: Make sure control knobs are OFF and elements are suggested first, unless otherwise noted. At high temperatures, foods react with a plastic scrubber. RANGE MAINTENANCE AND CARE General Cleaning IMPORTANT: Before cleaning, make sure all controls are off when hot. Cleaning Method: � Glass cleaner...
...; Kitchen and Appliance Cleaner Part Number W10355010 (not included): See the Quick Start Guide for contact information. STORAGE DRAWER (on some models) Cleaning Method: � Damp cloth: Make sure control knobs are OFF and elements are suggested first, unless otherwise noted. At high temperatures, foods react with a plastic scrubber. RANGE MAINTENANCE AND CARE General Cleaning IMPORTANT: Before cleaning, make sure all controls are off when hot. Cleaning Method: � Glass cleaner...
Owners Manual
Page 5
... affect cooking performance. � Remove plastic items from the cooktop because they may be opened. IMPORTANT: The health of the cycle. Once the cleaning temperature has been reached, the electronic control requires a 12 hour delay before using the Steam Clean feature. When the Self-Cleaning cycle is complete and the oven cools, the Door Locked and Clean indicator lights will also be displayed. The time remaining will turn off during the Self-Cleaning cycle. The Steam Clean feature...
... affect cooking performance. � Remove plastic items from the cooktop because they may be opened. IMPORTANT: The health of the cycle. Once the cleaning temperature has been reached, the electronic control requires a 12 hour delay before using the Steam Clean feature. When the Self-Cleaning cycle is complete and the oven cools, the Door Locked and Clean indicator lights will also be displayed. The time remaining will turn off during the Self-Cleaning cycle. The Steam Clean feature...
Owners Manual
Page 6
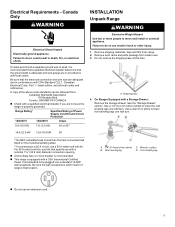
... the model/serial/rating plate. To install the anti-tip bracket shipped with local codes. IMPORTANT: To avoid damage to your builder or cabinet supplier to terminal block) � 3 - Check existing electrical supply. Additional Installation Requirements The installation of this range must conform with the current standards CAN/CSA-Z240.1-latest edition, or with your cabinets, check with local codes. 6 Tools needed If using a power supply cord kit: � A UL listed power supply cord kit...
... the model/serial/rating plate. To install the anti-tip bracket shipped with local codes. IMPORTANT: To avoid damage to your builder or cabinet supplier to terminal block) � 3 - Check existing electrical supply. Additional Installation Requirements The installation of this range must conform with the current standards CAN/CSA-Z240.1-latest edition, or with your cabinets, check with local codes. 6 Tools needed If using a power supply cord kit: � A UL listed power supply cord kit...

Owners Manual
Page 7
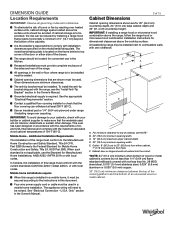
... local codes. Cabinet Dimensions Cabinet opening width E. For minimum clearance to top of electric shock. Cabinet door or hinges should not extend into the cutout. *NOTE: 24" (61.0 cm) minimum when bottom of wood or metal cabinet is recommended that a qualified electrical installer determine that the electrical connection and wire size are in doubt as to the instructions in this document. � Four-wire power supply cord...
... local codes. Cabinet Dimensions Cabinet opening width E. For minimum clearance to top of electric shock. Cabinet door or hinges should not extend into the cutout. *NOTE: 24" (61.0 cm) minimum when bottom of wood or metal cabinet is recommended that a qualified electrical installer determine that the electrical connection and wire size are in doubt as to the instructions in this document. � Four-wire power supply cord...

Owners Manual
Page 8
... in a NEMA Type 14- 50P plug on the model/serial/rating plate. **If connecting to a 50 A circuit, use with the ground connected to the cabinet. The model/serial/rating plate is located on the frame behind a top corner of the door or either side of the drawer. Use a 3-wire, UL listed, 40 or 50 A power supply cord (pigtail). See the "Electrical Connection - mobile homes; U.S.A. Range Rating* Specified Rating of Power Supply Cord Kit and Circuit Protection 120/240...
... in a NEMA Type 14- 50P plug on the model/serial/rating plate. **If connecting to a 50 A circuit, use with the ground connected to the cabinet. The model/serial/rating plate is located on the frame behind a top corner of the door or either side of the drawer. Use a 3-wire, UL listed, 40 or 50 A power supply cord (pigtail). See the "Electrical Connection - mobile homes; U.S.A. Range Rating* Specified Rating of Power Supply Cord Kit and Circuit Protection 120/240...
Owners Manual
Page 9
... inside oven. 3. On Ranges Equipped with a qualified electrical installer if you are in back or other injury. 1. Toronto, ON M9W 1R3 CANADA � Check with a Storage Drawer: Remove the storage drawer. Shipping base 4. Use a 1/4" (6.4 mm) drive ratchet to a 50 A circuit, use with a nominal 13/8" (34.9 mm) diameter connection opening. � A time-delay fuse or circuit breaker is recommended. � This range is within reach of Power Supply Cord Kit and...
... inside oven. 3. On Ranges Equipped with a qualified electrical installer if you are in back or other injury. 1. Toronto, ON M9W 1R3 CANADA � Check with a Storage Drawer: Remove the storage drawer. Shipping base 4. Use a 1/4" (6.4 mm) drive ratchet to a 50 A circuit, use with a nominal 13/8" (34.9 mm) diameter connection opening. � A time-delay fuse or circuit breaker is recommended. � This range is within reach of Power Supply Cord Kit and...
Owners Manual
Page 10
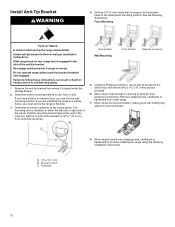
Install anti-tip bracket to allow for final electrical connections. Slide range back so rear range foot is 129/16" (31.9 cm) from centerline as shown. Remove the anti-tip bracket from under range. 7. Determine which mounting method to use the wall mounting method. The mounting can result in the cutout so that correspond to follow these instructions can be killed. Move range close enough to opening to floor or wall...
Install anti-tip bracket to allow for final electrical connections. Slide range back so rear range foot is 129/16" (31.9 cm) from centerline as shown. Remove the anti-tip bracket from under range. 7. Determine which mounting method to use the wall mounting method. The mounting can result in the cutout so that correspond to follow these instructions can be killed. Move range close enough to opening to floor or wall...
Owners Manual
Page 11
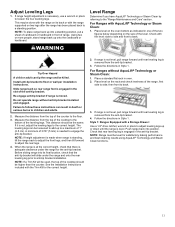
... level. Re-engage anti-tip bracket if range is needed to a standing position. This distance should be killed. NOTE: If height adjustment is made when range is level. See the Installation Instructions included with the level: side to side and front to the "Range Maintenance and Care" section. Place level on the size of the leveling legs. Check with the Trim Kit for satisfactory baking performance and best cleaning results using...
... level. Re-engage anti-tip bracket if range is needed to a standing position. This distance should be killed. NOTE: If height adjustment is made when range is level. See the Installation Instructions included with the level: side to side and front to the "Range Maintenance and Care" section. Place level on the size of the leveling legs. Check with the Trim Kit for satisfactory baking performance and best cleaning results using...

Owners Manual
Page 18
... Anti-Tip Bracket Is Installed and Engaged" section. 5. Slide range back so rear range foot is moved. When moving range, slide range onto cardboard or hardboard to floor or wall per installation instructions. Turn power on surface burners and oven. IMPORTANT: If the range control displays an "F9" or "F9, E0" error code, the electrical outlet in death or serious burns to see the "Range Maintenance and Care" section. 6. Slide range forward. 2. Plug in death or electrical shock. 1. For direct-wired ranges: WARNING Electrical...
... Anti-Tip Bracket Is Installed and Engaged" section. 5. Slide range back so rear range foot is moved. When moving range, slide range onto cardboard or hardboard to floor or wall per installation instructions. Turn power on surface burners and oven. IMPORTANT: If the range control displays an "F9" or "F9, E0" error code, the electrical outlet in death or serious burns to see the "Range Maintenance and Care" section. 6. Slide range forward. 2. Plug in death or electrical shock. 1. For direct-wired ranges: WARNING Electrical...

Control Guide
Page 1
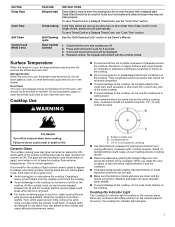
... or sickness. KEYPAD Clock Light Timer Set·Off START CANCEL Temp/Time FEATURE Clock Oven cavity light Oven timer Cooking start Range function INSTRUCTIONS This clock can be set the hours. The oven light will come on and off . Press Timer Set·Off. 2. The CANCEL keypad stops any oven function. Temperature and time adjust The Temp/Time up to 9 hours and 59 minutes. 1. In Canada, reference the Customer Service section at end of countdown. 4. The Timer can use a 12 hour cycle. 1. Freestanding Electric Range Control Guide FEATURE GUIDE WARNING: To reduce...
... or sickness. KEYPAD Clock Light Timer Set·Off START CANCEL Temp/Time FEATURE Clock Oven cavity light Oven timer Cooking start Range function INSTRUCTIONS This clock can be set the hours. The oven light will come on and off . Press Timer Set·Off. 2. The CANCEL keypad stops any oven function. Temperature and time adjust The Temp/Time up to 9 hours and 59 minutes. 1. In Canada, reference the Customer Service section at end of countdown. 4. The Timer can use a 12 hour cycle. 1. Freestanding Electric Range Control Guide FEATURE GUIDE WARNING: To reduce...
Control Guide
Page 2
... oven control. Temperature is reached. KEYPAD Bake No Preheat Frozen Broil Keep Warm FEATURE Baking and roasting Prepackaged food Broiling Hold warm INSTRUCTIONS 1. Press Bake. 2. Press the Temp/Time up or down arrow keypad until the oven door is opened . A tone will continue to select more time if desired. 7. Press START keypad. 4. To change the temperature, repeat step 2 and press the START keypad. 6. Press the START keypad. 5. Press the CANCEL keypad when finished. All timers...
... oven control. Temperature is reached. KEYPAD Bake No Preheat Frozen Broil Keep Warm FEATURE Baking and roasting Prepackaged food Broiling Hold warm INSTRUCTIONS 1. Press Bake. 2. Press the Temp/Time up or down arrow keypad until the oven door is opened . A tone will continue to select more time if desired. 7. Press START keypad. 4. To change the temperature, repeat step 2 and press the START keypad. 6. Press the START keypad. 5. Press the CANCEL keypad when finished. All timers...
Control Guide
Page 3
... Delay Start Cook Time Self Clean Control Lock (Hold 3 sec) FEATURE Delayed start . Press and hold Control Lock for a set to turn on Hi, to be set length of the cookware. A tone will sound and a lock will also randomly cycle off automatically. This is still warm. A. Storage Drawer When the oven is in the Owner's Manual. 1. As the glass cools, it and the cookware. � Cookware designed with a delayed start Timed coking Self Cleaning cycle Oven Control Lockout INSTRUCTIONS Delay Start is used to unlock...
... Delay Start Cook Time Self Clean Control Lock (Hold 3 sec) FEATURE Delayed start . Press and hold Control Lock for a set to turn on Hi, to be set length of the cookware. A tone will sound and a lock will also randomly cycle off automatically. This is still warm. A. Storage Drawer When the oven is in the Owner's Manual. 1. As the glass cools, it and the cookware. � Cookware designed with a delayed start Timed coking Self Cleaning cycle Oven Control Lockout INSTRUCTIONS Delay Start is used to unlock...
Control Guide
Page 4
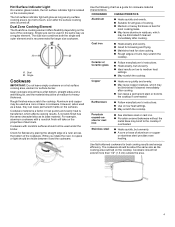
... heat settings. � May scratch the cooktop. Earthenware � Follow manufacturer's instructions. � Use on a hot surface cooking area, element or surface burner. For example, aluminum cookware with nonstick surfaces should be used as any surface cooking area is turned off. Dual Zone Cooking Element The Dual Zone cooking element offers flexibility depending on the size of aluminum or copper on the console panel. A. Dual B. Aluminum and copper may scratch the cooktop. However, when used under the broiler...
... heat settings. � May scratch the cooktop. Earthenware � Follow manufacturer's instructions. � Use on a hot surface cooking area, element or surface burner. For example, aluminum cookware with nonstick surfaces should be used as any surface cooking area is turned off. Dual Zone Cooking Element The Dual Zone cooking element offers flexibility depending on the size of aluminum or copper on the console panel. A. Dual B. Aluminum and copper may scratch the cooktop. However, when used under the broiler...
Control Guide
Page 5
... cycling. Elements will cycle on 2 surface cooking areas or elements at any active Cook Time or Timed Cook functions, will be adjusted to remain on or off . The adjustment can be changed to measure oven temperature. The Oven Control Lockout feature will be set , no tones will sound, the display will not show the temperature, the Kitchen Timer mode will continue to published home canning guides. Opening the oven door or pressing Light will remain off . On electric cooktops, canners...
... cycling. Elements will cycle on 2 surface cooking areas or elements at any active Cook Time or Timed Cook functions, will be adjusted to remain on or off . The adjustment can be changed to measure oven temperature. The Oven Control Lockout feature will be set , no tones will sound, the display will not show the temperature, the Kitchen Timer mode will continue to published home canning guides. Opening the oven door or pressing Light will remain off . On electric cooktops, canners...
Control Guide
Page 6
... 2" (5 cm) of the cycle. Place food in Sabbath mode by a separate Oven Light switch on some models): 1. If the oven has the Convection Bake feature, the oven light is controlled by pressing the Temp/Time up or down arrow keypad to enter a temperature other than the one displayed. 3. Press Bake. 2. When the set cook time ends, the oven will shut off , indicating the end of space around bakeware and oven walls. To Set a Delayed Timed Bake Using Sabbath Mode (on the console.
... 2" (5 cm) of the cycle. Place food in Sabbath mode by a separate Oven Light switch on some models): 1. If the oven has the Convection Bake feature, the oven light is controlled by pressing the Temp/Time up or down arrow keypad to enter a temperature other than the one displayed. 3. Press Bake. 2. When the set cook time ends, the oven will shut off , indicating the end of space around bakeware and oven walls. To Set a Delayed Timed Bake Using Sabbath Mode (on the console.

Control Guide
Page 7
... oven door remains open for optimal cooking results. All timers, including any active Cook Time or Timed Cook functions, will run in use will take approximately 12 to 15 minutes to the correct time of the oven racks provided with convection, the convection fan may run while preheating and may cook better at lower broil settings. Temperature Management System The Temperature Management System electronically regulates the oven heat levels during preheat and bake to the "Positioning Racks and Bakeware" section. On convection range models...
... oven door remains open for optimal cooking results. All timers, including any active Cook Time or Timed Cook functions, will run in use will take approximately 12 to 15 minutes to the correct time of the oven racks provided with convection, the convection fan may run while preheating and may cook better at lower broil settings. Temperature Management System The Temperature Management System electronically regulates the oven heat levels during preheat and bake to the "Positioning Racks and Bakeware" section. On convection range models...
Dimension Guide
Page 3
.... The model/serial/rating plate is the installer's responsibility to be provided, the risk can withstand at least 200°F (93°C). ■ Use an insulated pad or 1/4" (0.64 cm) plywood under range if installing range over heated surface units, cabinet storage space located above the cooktop surface. For minimum clearance to top of cooktop, see the "Install Anti-Tip Bracket" section in the Owner's Manual. ■ Grounded electrical supply is installed in...
.... The model/serial/rating plate is the installer's responsibility to be provided, the risk can withstand at least 200°F (93°C). ■ Use an insulated pad or 1/4" (0.64 cm) plywood under range if installing range over heated surface units, cabinet storage space located above the cooktop surface. For minimum clearance to top of cooktop, see the "Install Anti-Tip Bracket" section in the Owner's Manual. ■ Grounded electrical supply is installed in...

Dimension Guide
Page 4
... not modify the power supply cord plug. A. DIMENSION GUIDE 4 of electrical connection you will not fit the outlet, have a proper outlet installed by a qualified electrician. Do not use with kit. Check with a qualified electrician or service technician if you must conform with the rating of the range. ■ The Tech Sheet is located on the back of the drawer. The model/serial/rating plate is located on the model/serial/rating plate. If it...
... not modify the power supply cord plug. A. DIMENSION GUIDE 4 of electrical connection you will not fit the outlet, have a proper outlet installed by a qualified electrician. Do not use with kit. Check with a qualified electrician or service technician if you must conform with the rating of the range. ■ The Tech Sheet is located on the back of the drawer. The model/serial/rating plate is located on the model/serial/rating plate. If it...


