
Dimension Guide
Page 1
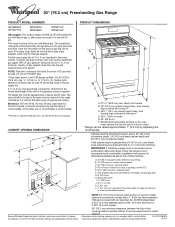
... side oven door frame has information on longer runs may be used in insufficient gas supply. E. 30¹⁄₈" (76.5 cm) min. Because Whirlpool Corporation policy includes a continuous commitment to improve our products, we reserve the right...46 " (119.1 cm) overall height (max.) with product. ® 30" (76.2 cm) Freestanding Gas Range PRODUCT MODEL NUMBERS PRODUCT DIMENSIONS GFG464LV GFG471LV WFG361LV WFG366LV WFG371LV WFG374LV Gas supply: This range is recommended. A. 18" (45.7 cm) upper side cabinet to change materials and specifications without notice. A...
... side oven door frame has information on longer runs may be used in insufficient gas supply. E. 30¹⁄₈" (76.5 cm) min. Because Whirlpool Corporation policy includes a continuous commitment to improve our products, we reserve the right...46 " (119.1 cm) overall height (max.) with product. ® 30" (76.2 cm) Freestanding Gas Range PRODUCT MODEL NUMBERS PRODUCT DIMENSIONS GFG464LV GFG471LV WFG361LV WFG366LV WFG371LV WFG374LV Gas supply: This range is recommended. A. 18" (45.7 cm) upper side cabinet to change materials and specifications without notice. A...

Installation Instructions
Page 4
...bracket to check that are included. See "Electrical Requirements" and "Gas Supply Requirements" sections. Mobile Home - In Canada, the installation of this range must be available. Parts needed ■ Tape measure ■ ...range, see "Install Anti-Tip Bracket" section. ■ Grounded electrical supply is installed in accordance with the requirements of NLW Holdings, Inc. 4 To install the antitip bracket shipped with the maximum allowable wood cabinet temperatures of combustion and ventilation air. ■ It is located on the model/serial rating plate. See "Gas...
...bracket to check that are included. See "Electrical Requirements" and "Gas Supply Requirements" sections. Mobile Home - In Canada, the installation of this range must be available. Parts needed ■ Tape measure ■ ...range, see "Install Anti-Tip Bracket" section. ■ Grounded electrical supply is installed in accordance with the requirements of NLW Holdings, Inc. 4 To install the antitip bracket shipped with the maximum allowable wood cabinet temperatures of combustion and ventilation air. ■ It is located on the model/serial rating plate. See "Gas...
Installation Instructions
Page 5
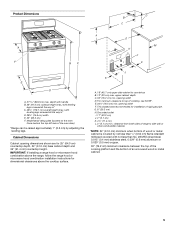
...cm) K. 4¹⁄₂" (11.4 cm) L. 2" (5.1 cm) min. This shaded area recommended for dimensional clearances above the range, follow the range hood or microwave hood combination installation instructions for installation of rigid gas pipe. depth with handle B. 36" (91.4 cm) cooktop height (max.) with leveling legs screwed all the way in* C. 46...bottom of wood or metal cabinet is covered by adjusting the leveling legs. Product Dimensions M A F BC E D A. 27 69.9 cm) max. Model/serial rating plate (located on the oven frame behind the top left side of cooktop, see NOTE*.
...cm) K. 4¹⁄₂" (11.4 cm) L. 2" (5.1 cm) min. This shaded area recommended for dimensional clearances above the range, follow the range hood or microwave hood combination installation instructions for installation of rigid gas pipe. depth with handle B. 36" (91.4 cm) cooktop height (max.) with leveling legs screwed all the way in* C. 46...bottom of wood or metal cabinet is covered by adjusting the leveling legs. Product Dimensions M A F BC E D A. 27 69.9 cm) max. Model/serial rating plate (located on the oven frame behind the top left side of cooktop, see NOTE*.

Installation Instructions
Page 6
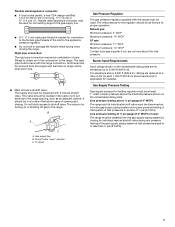
... wire is recommended that can be obtained from the gas specified on the model/serial rating plate for use with Natural gas. However, occasional nuisance tripping of the GFCI breaker is possible due to the normal operating nature of electronic gas ranges. ■ The wiring diagram is located on the...installation must conform with American National Standard, National Fuel Gas Code ANSI Z223.1 - The model/serial rating plate located on the oven frame behind the top left side of the oven door has information on the back of the range in death, explosion, or fire. IMPORTANT: This ...
... wire is recommended that can be obtained from the gas specified on the model/serial rating plate for use with Natural gas. However, occasional nuisance tripping of the GFCI breaker is possible due to the normal operating nature of electronic gas ranges. ■ The wiring diagram is located on the...installation must conform with American National Standard, National Fuel Gas Code ANSI Z223.1 - The model/serial rating plate located on the oven frame behind the top left side of the oven door has information on the back of the range in death, explosion, or fire. IMPORTANT: This ...
Installation Instructions
Page 7
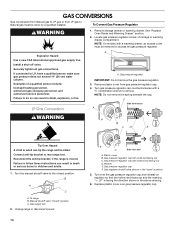
To range Gas Pressure Regulator The gas pressure regulator supplied with this range must be equipped with the range connection. Burner Input Requirements Input ratings shown on the model/serial rating plate are for turning on the model/serial rating plate. For elevations above sea level (not applicable for testing regulator must be level with a manual shutoff valve...
To range Gas Pressure Regulator The gas pressure regulator supplied with this range must be equipped with the range connection. Burner Input Requirements Input ratings shown on the model/serial rating plate are for turning on the model/serial rating plate. For elevations above sea level (not applicable for testing regulator must be level with a manual shutoff valve...
Installation Instructions
Page 10
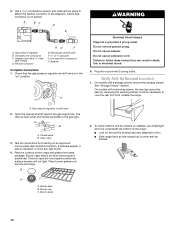
... caps are not properly positioned, surface burners will be necessary to floor. ■ Slide range back so rear range foot is indicated. Gas pressure regulator B. Use pipe-joint compound. On models with a warming drawer, the rear leg cannot be level when properly positioned. See "Storage... Drawer" section. Gas pressure regulator shutoff valve 2. Open valve 3. Use pipe-joint compound....
... caps are not properly positioned, surface burners will be necessary to floor. ■ Slide range back so rear range foot is indicated. Gas pressure regulator B. Use pipe-joint compound. On models with a warming drawer, the rear leg cannot be level when properly positioned. See "Storage... Drawer" section. Gas pressure regulator shutoff valve 2. Open valve 3. Use pipe-joint compound....
Installation Instructions
Page 12
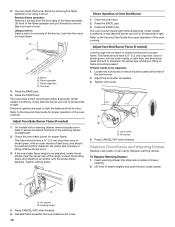
...Flame (if needed . 3. This flame should have a ½" (1.3 cm) long inner cone of bluish-green, with an outer mantle of the range. If the oven bake flame needs to be clean and soft in character. Press the BROIL pad. 3. The oven burner should be adjusted, locate...8 seconds. Air shutter 4. Replace Oven Racks and Warming Drawer Replace oven racks in character. B A A. A B C D A. Press the BAKE pad. 5. On models with an outer mantle of the broil burner. 2. This flame should have a ½" (1.3 cm) long inner cone of bluish-green, with a warming drawer, remove access...
...Flame (if needed . 3. This flame should have a ½" (1.3 cm) long inner cone of bluish-green, with an outer mantle of the range. If the oven bake flame needs to be clean and soft in character. Press the BROIL pad. 3. The oven burner should be adjusted, locate...8 seconds. Air shutter 4. Replace Oven Racks and Warming Drawer Replace oven racks in character. B A A. A B C D A. Press the BAKE pad. 5. On models with an outer mantle of the broil burner. 2. This flame should have a ½" (1.3 cm) long inner cone of bluish-green, with a warming drawer, remove access...
Installation Instructions
Page 14
... to rear range foot. Failure to do so can result in death or serious burns to follow these instructions can result in the "open" position) 5. Failure to children and adults. 1. Plastic cover B. To range B. Remove storage drawer or warming drawer. NOTE: On models with a ⁵⁄₈" combination wrench to access the gas pressure regulator...
... to rear range foot. Failure to do so can result in death or serious burns to follow these instructions can result in the "open" position) 5. Failure to children and adults. 1. Plastic cover B. To range B. Remove storage drawer or warming drawer. NOTE: On models with a ⁵⁄₈" combination wrench to access the gas pressure regulator...
Installation Instructions
Page 15
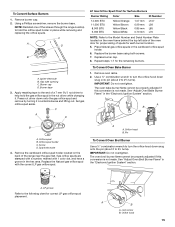
... oven racks. 2. Use a ½" combination wrench to turn the orifice hood down snug onto the pin (about 2 to the Model Number and Serial Number Plate located on the back of a 7 mm nut driver to the following chart for proper sizing of the ...each burner location. 5. A B A B A. Apply masking tape to the end of the range near the gas inlet. Orifice spud B. A A. Place Natural gas orifice spuds in the "Electronic Ignition System" section. Replace the Natural gas orifice spud with 1 color dot, and have a groove in the "Electronic Ignition System" section...
... oven racks. 2. Use a ½" combination wrench to turn the orifice hood down snug onto the pin (about 2 to the Model Number and Serial Number Plate located on the back of a 7 mm nut driver to the following chart for proper sizing of the ...each burner location. 5. A B A B A. Apply masking tape to the end of the range near the gas inlet. Orifice spud B. A A. Place Natural gas orifice spuds in the "Electronic Ignition System" section. Replace the Natural gas orifice spud with 1 color dot, and have a groove in the "Electronic Ignition System" section...

Installation Instructions
Page 16
... gas ...Gas Conversion WARNING To Convert Gas Pressure Regulator 1. NOTE: On models with a ⁵⁄₈" combination wrench to the gas supply. 2. Remove plastic cover from gas... pressure regulator cap. 4. F Side view before A LP Tip Over Hazard A child or adult can result in the "open" position) 5. Connect anti-tip bracket to children and adults. 1. B A C A. To range B. Manual shutoff valve "closed position. Unplug range or disconnect power. Gas...
... gas ...Gas Conversion WARNING To Convert Gas Pressure Regulator 1. NOTE: On models with a ⁵⁄₈" combination wrench to the gas supply. 2. Remove plastic cover from gas... pressure regulator cap. 4. F Side view before A LP Tip Over Hazard A child or adult can result in the "open" position) 5. Connect anti-tip bracket to children and adults. 1. B A C A. To range B. Manual shutoff valve "closed position. Unplug range or disconnect power. Gas...

Installation Instructions
Page 17
...orifice spuds. Use a ½" combination wrench to loosen the orifice hood away from the pin (about 2 to the Model Number and Serial Number Plate located on the side. Gas orifice spuds are stamped with a number on the oven frame behind the top left side of the oven door for proper... opening C. Press nut driver down onto the gas orifice spud and remove by turning it . To Convert Oven Bake Burner 1. Orifice spud holder C. Pin XXX A A. Screw D. Orifice hood B. Apply masking tape to the end of the screws through the range cooktop to help hold the orifice spud holder in ...
...orifice spuds. Use a ½" combination wrench to loosen the orifice hood away from the pin (about 2 to the Model Number and Serial Number Plate located on the side. Gas orifice spuds are stamped with a number on the oven frame behind the top left side of the oven door for proper... opening C. Press nut driver down onto the gas orifice spud and remove by turning it . To Convert Oven Bake Burner 1. Orifice spud holder C. Pin XXX A A. Screw D. Orifice hood B. Apply masking tape to the end of the screws through the range cooktop to help hold the orifice spud holder in ...

Owners Manual
Page 1
... cajón de almacenamiento. You will need assistance, call us at www.whirlpool.com for purchasing this high-quality product. ® GAS RANGE USER INSTRUCTIONS THANK YOU for additional information. If you still need your model and serial number located on some models 8 RANGE CARE 8 Self-Cleaning Cycle (on the oven frame behind the storage drawer...
... cajón de almacenamiento. You will need assistance, call us at www.whirlpool.com for purchasing this high-quality product. ® GAS RANGE USER INSTRUCTIONS THANK YOU for additional information. If you still need your model and serial number located on some models 8 RANGE CARE 8 Self-Cleaning Cycle (on the oven frame behind the storage drawer...
Owners Manual
Page 4
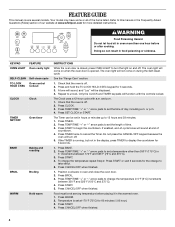
... the countdown for 5 seconds. 1. Food must be set at serving temperature before or after cooking. Your model may have some or all of our website at end of countdown. 4. Refer to turn off . 2....While the oven door is off . 5. The oven light will be displayed. 4. See the "Range Care" section. 1. Check that the oven is opened. Press and hold the TO LOCK HOLD 3...SEC keypad for the change the temperature repeat Step 2. Only the CLOCK and TIMER keypads will sound at www.whirlpool.com for 60 minutes (1.00 hour). 3. The Clock uses a 12-hour cycle with the controls locked....
... the countdown for 5 seconds. 1. Food must be set at serving temperature before or after cooking. Your model may have some or all of our website at end of countdown. 4. Refer to turn off . 2....While the oven door is off . 5. The oven light will be displayed. 4. See the "Range Care" section. 1. Check that the oven is opened. Press and hold the TO LOCK HOLD 3...SEC keypad for the change the temperature repeat Step 2. Only the CLOCK and TIMER keypads will sound at www.whirlpool.com for 60 minutes (1.00 hour). 3. The Clock uses a 12-hour cycle with the controls locked....
Owners Manual
Page 5
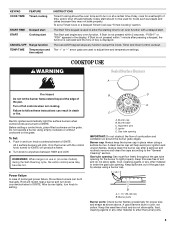
... the surface burners can result in use or (on the grate. Failure to anywhere between HIGH and LOW. To Set: 1. REMEMBER: When range is used to enter the starting time for an oven function with the control knob turned to IGNITE will produce a flame. 2. After burner... lights, turn knob counterclockwise to IGNITE. B D E C A. Burner base C. Gas tube opening for foods such as shown above. Keep spillovers out of the gas tube by always using empty cookware or without cookware on some models) during the Self-Cleaning cycle, the entire cooktop area may not bake properly...
... the surface burners can result in use or (on the grate. Failure to anywhere between HIGH and LOW. To Set: 1. REMEMBER: When range is used to enter the starting time for an oven function with the control knob turned to IGNITE will produce a flame. 2. After burner... lights, turn knob counterclockwise to IGNITE. B D E C A. Burner base C. Gas tube opening for foods such as shown above. Keep spillovers out of the gas tube by always using empty cookware or without cookware on some models) during the Self-Cleaning cycle, the entire cooktop area may not bake properly...

Owners Manual
Page 7
... broil elements or burners cycle on a cookie sheet, jelly roll pan, or in intervals. Preheating When START is designed to maintain a precise temperature range for the oven preheat cycle to cook food. Allow 2" (5 cm) of the oven rack. Rack 3: Most baked goods on and off in ...muffin pans; frozen convenience foods. Oven vent (ceramic glass model) Baking and Roasting ACCUBAKE® Temperature Management System (on grid in a broiler pan, then place it out to "Positioning Racks and Bakeware" section. When...
... broil elements or burners cycle on a cookie sheet, jelly roll pan, or in intervals. Preheating When START is designed to maintain a precise temperature range for the oven preheat cycle to cook food. Allow 2" (5 cm) of the oven rack. Rack 3: Most baked goods on and off in ...muffin pans; frozen convenience foods. Oven vent (ceramic glass model) Baking and Roasting ACCUBAKE® Temperature Management System (on grid in a broiler pan, then place it out to "Positioning Racks and Bakeware" section. When...

Owners Manual
Page 8
.... Burn Hazard Do not touch the oven during the Self-Cleaning cycle. IMPORTANT: The health of gloss, hairline cracks and popping sounds. Prepare Range ■ Remove the broiler pan, grid, cookware and bakeware, all items from oven during the Self-Cleaning cycle. Press SELF CLEAN. 2....Start by repeating steps 1-7. Press the TEMP/TIME "+" or "-" arrow pads to start. 7. The display will light up . 6. RANGE CARE Self-Cleaning Cycle (on some models) WARNING How the Cycle Works IMPORTANT: The heating and cooling of the cycle is time adjustable between 2 hours 30 minutes and 4...
.... Burn Hazard Do not touch the oven during the Self-Cleaning cycle. IMPORTANT: The health of gloss, hairline cracks and popping sounds. Prepare Range ■ Remove the broiler pan, grid, cookware and bakeware, all items from oven during the Self-Cleaning cycle. Press SELF CLEAN. 2....Start by repeating steps 1-7. Press the TEMP/TIME "+" or "-" arrow pads to start. 7. The display will light up . 6. RANGE CARE Self-Cleaning Cycle (on some models) WARNING How the Cycle Works IMPORTANT: The heating and cooling of the cycle is time adjustable between 2 hours 30 minutes and 4...
Owners Manual
Page 9
... or abrasive paper towels. Before replacing, make sure knobs are cool. Unplug range or disconnect power. 4. Cooked-on some models) Cleaning Method: ■ Soap and water: Pull knobs straight away from ... Oven Light The oven light is cool. Plug in the back of our website at www.whirlpool.com. Do not soak knobs. STAINLESS STEEL (on soils should be soaked or scrubbed before...; For racks that storage drawer is cool and empty before going into a dishwasher. ■ Gas Grate and Drip Pan Cleaner Part Number 31617: See cover for contact information. Liquid detergent or ...
... or abrasive paper towels. Before replacing, make sure knobs are cool. Unplug range or disconnect power. 4. Cooked-on some models) Cleaning Method: ■ Soap and water: Pull knobs straight away from ... Oven Light The oven light is cool. Plug in the back of our website at www.whirlpool.com. Do not soak knobs. STAINLESS STEEL (on soils should be soaked or scrubbed before...; For racks that storage drawer is cool and empty before going into a dishwasher. ■ Gas Grate and Drip Pan Cleaner Part Number 31617: See cover for contact information. Liquid detergent or ...
Owners Manual
Page 10
...range. See "Electronic Oven Controls" section. TROUBLESHOOTING First try the solutions suggested here or visit our website and reference Frequently Asked Questions (FAQs) to possibly avoid the cost of a service call an electrician. ■ Is the main or regulator gas shutoff valve in the off position? www.whirlpool... Surface Burners" section. ■ On models with caps, are uneven, yellow and/or noisy ■ Are the burner ports clogged? See "Sealed Surface Burners" section. ■ Is propane gas being pulled off . The range may have been converted improperly. Surface burner...
...range. See "Electronic Oven Controls" section. TROUBLESHOOTING First try the solutions suggested here or visit our website and reference Frequently Asked Questions (FAQs) to possibly avoid the cost of a service call an electrician. ■ Is the main or regulator gas shutoff valve in the off position? www.whirlpool... Surface Burners" section. ■ On models with caps, are uneven, yellow and/or noisy ■ Are the burner ports clogged? See "Sealed Surface Burners" section. ■ Is propane gas being pulled off . The range may have been converted improperly. Surface burner...
Owners Manual
Page 11
... cycle will have to wait 12 hours to higher position in the past 12 hours? Oven cooking results not what expected ■ Is the range level? Adjust cooking time. ■ Has the oven door been opened while cooking? See "Clock" keypad feature in the "Feature Guide" section...door open? Double-check the recipe in the pan? Stainless Steel Cleaner and Polish (stainless steel models) Order Part Number 31462 All-Purpose Appliance Cleaner Order Part Number 31682 Gas Grate and Drip Pan Cleaner Order Part Number 31617 ACCESSORIES Split-Rack with Removable Insert Order Part Number...
... cycle will have to wait 12 hours to higher position in the past 12 hours? Oven cooking results not what expected ■ Is the range level? Adjust cooking time. ■ Has the oven door been opened while cooking? See "Clock" keypad feature in the "Feature Guide" section...door open? Double-check the recipe in the pan? Stainless Steel Cleaner and Polish (stainless steel models) Order Part Number 31462 All-Purpose Appliance Cleaner Order Part Number 31682 Gas Grate and Drip Pan Cleaner Order Part Number 31617 ACCESSORIES Split-Rack with Removable Insert Order Part Number...


