
Owners Manual
Page 3
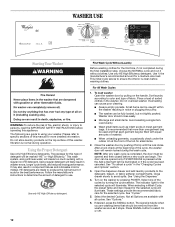
... are very important. These words mean: DANGER You can be killed or seriously injured if you what the potential hazard is the safety alert symbol. WASHER SAFETY Your safety and the safety of injury, and tell you don't immediately follow instructions. We have provided many important safety messages in this manual...
... are very important. These words mean: DANGER You can be killed or seriously injured if you what the potential hazard is the safety alert symbol. WASHER SAFETY Your safety and the safety of injury, and tell you don't immediately follow instructions. We have provided many important safety messages in this manual...
Owners Manual
Page 4
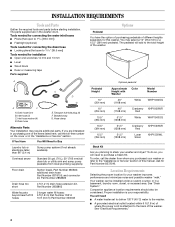
...L), 30" (762 mm) tall drain tub or utility sink and sump pump (available from whom you are in purchasing one of this washer. Proper installation is attached to the "Assistance or Service" section of the items listed here, call the dealer from local plumbing suppliers) Siphon..., Part Number 285834; INSTALLATION REQUIREMENTS Tools and Parts Gather the required tools and parts before starting installation. The parts supplied are interested in the washer drum. Drain hose form B. Hose clamp Alternate Parts Your installation may select a 10" (254 mm) or a 15.5" (394 mm) ...
...L), 30" (762 mm) tall drain tub or utility sink and sump pump (available from whom you are in purchasing one of this washer. Proper installation is attached to the "Assistance or Service" section of the items listed here, call the dealer from local plumbing suppliers) Siphon..., Part Number 285834; INSTALLATION REQUIREMENTS Tools and Parts Gather the required tools and parts before starting installation. The parts supplied are interested in the washer drum. Drain hose form B. Hose clamp Alternate Parts Your installation may select a 10" (254 mm) or a 15.5" (394 mm) ...
Owners Manual
Page 5
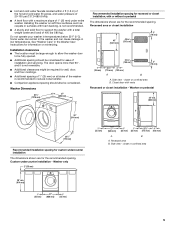
...9632; A level floor with vents Recessed or closet installation - closet or confined area B. Side view - Recessed area B. Installing the washer on soft floor surfaces, such as carpets or surfaces with or without a pedestal The dimensions shown are for information on pedestal 38" min... installation The dimensions shown are for ease of installation and servicing. Some water can remain in the washer and can cause damage in the Washer User Instructions for the recommended spacing. Side view - Washer on winterizing. Washer only 2" (50 mm) 1" (25 mm) 27" (686 mm) 1" 1" 301/2" ...
...9632; A level floor with vents Recessed or closet installation - closet or confined area B. Side view - Recessed area B. Installing the washer on soft floor surfaces, such as carpets or surfaces with or without a pedestal The dimensions shown are for information on pedestal 38" min... installation The dimensions shown are for ease of installation and servicing. Some water can remain in the washer and can cause damage in the Washer User Instructions for the recommended spacing. Side view - Washer on winterizing. Washer only 2" (50 mm) 1" (25 mm) 27" (686 mm) 1" 1" 301/2" ...

Owners Manual
Page 6
... 20 gal. (76 L) capacity. The siphon break must be at least 30" (762 mm) high and no less than 96" (2.4 m) from the bottom of the washer. Recommended installation spacing for recessed or closet installation, with a door, the minimum ventilation openings in .2* (155 cm2) 3" (76 mm) 3" (76 mm) 1" (25 mm...) 12" (305 mm) Drain System The washer can be no higher than 17 gal. (64 L) per minute. See "Tools and Parts." The top of 2" (50 mm). wall or floor (views A & B) The ...
... 20 gal. (76 L) capacity. The siphon break must be at least 30" (762 mm) high and no less than 96" (2.4 m) from the bottom of the washer. Recommended installation spacing for recessed or closet installation, with a door, the minimum ventilation openings in .2* (155 cm2) 3" (76 mm) 3" (76 mm) 1" (25 mm...) 12" (305 mm) Drain System The washer can be no higher than 17 gal. (64 L) per minute. See "Tools and Parts." The top of 2" (50 mm). wall or floor (views A & B) The ...

Owners Manual
Page 7
...path is adequate. ■ Do not ground to a gas pipe. ■ Check with a qualified electrician if you are not sure the washer is properly grounded. 7 Failure to follow these instructions can result in accordance with a power supply cord having a 3 prong grounding plug. &#...is not available, it is recommended that a qualified electrician determine that a separate circuit serving only this appliance be provided. ■ This washer is equipped with local codes and ordinances. Do not remove ground prong. A time-delay fuse or circuit breaker is required. Electrical Requirements ...
...path is adequate. ■ Do not ground to a gas pipe. ■ Check with a qualified electrician if you are not sure the washer is properly grounded. 7 Failure to follow these instructions can result in accordance with a power supply cord having a 3 prong grounding plug. &#...is not available, it is recommended that a qualified electrician determine that a separate circuit serving only this appliance be provided. ■ This washer is equipped with local codes and ordinances. Do not remove ground prong. A time-delay fuse or circuit breaker is required. Electrical Requirements ...
Owners Manual
Page 8
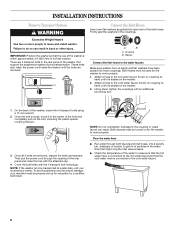
...the hot water faucet. Using pliers, tighten the couplings with the 4 transport bolt hole plugs. Once the bolt is loose, move and install washer. NOTE: If the washer is to be transported at a later date, call your machine must be properly set up for relocation by a certified technician. Damage to ... that the cold water hose is connected to the cold water faucet. 8 Once all 4 bolts are removed, discard the bolts and spacers. Coupling B. Washer Connect the inlet hoses to do so can result. Cover the bolt holes with an additional two-thirds turn. 1. Failure to the water faucets Make...
...the hot water faucet. Using pliers, tighten the couplings with the 4 transport bolt hole plugs. Once the bolt is loose, move and install washer. NOTE: If the washer is to be transported at a later date, call your machine must be properly set up for relocation by a certified technician. Damage to ... that the cold water hose is connected to the cold water faucet. 8 Once all 4 bolts are removed, discard the bolts and spacers. Coupling B. Washer Connect the inlet hoses to do so can result. Cover the bolt holes with an additional two-thirds turn. 1. Failure to the water faucets Make...

Owners Manual
Page 9
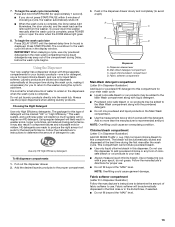
...; Use the drain hose form, and do not force excess drain hose into place. Hot water inlet C. Attach the cold water hose to the washer's hot (H) water inlet valve. Damage to the valves can be secure, but loose enough to reduce the risk of the laundry tub. Periodically inspect and ... by hand until it is in place, release pliers. Laundry tub drain or standpipe drain Connect the drain hose form to the washer IMPORTANT: Make sure that the flat washers have been placed into the hose couplings. Bend drain hose over the end of the drain hose form to the drain hose...
...; Use the drain hose form, and do not force excess drain hose into place. Hot water inlet C. Attach the cold water hose to the washer's hot (H) water inlet valve. Damage to the valves can be secure, but loose enough to reduce the risk of the laundry tub. Periodically inspect and ... by hand until it is in place, release pliers. Laundry tub drain or standpipe drain Connect the drain hose form to the washer IMPORTANT: Make sure that the flat washers have been placed into the hose couplings. Bend drain hose over the end of the drain hose form to the drain hose...

Owners Manual
Page 10
... materials. 5. Dispose of the drain hose in firm contact with the floor, use an adapter. Do not remove ground prong. If the washer is level, and all four feet are in firm contact with the floor. Secure the Drain Hose Drain hose must be secured to floor ... "Electrical Requirements." 2. Check for leaks around faucets and inlet hoses. See illustration C. Check that there are not tight against the washer cabinet. Level the Washer Proper foot to stop the hose from moving the hexagonal plastic part as shown. This cycle will take approximately 50 minutes to its final...
... materials. 5. Dispose of the drain hose in firm contact with the floor, use an adapter. Do not remove ground prong. If the washer is level, and all four feet are in firm contact with the floor. Secure the Drain Hose Drain hose must be secured to floor ... "Electrical Requirements." 2. Check for leaks around faucets and inlet hoses. See illustration C. Check that there are not tight against the washer cabinet. Level the Washer Proper foot to stop the hose from moving the hexagonal plastic part as shown. This cycle will take approximately 50 minutes to its final...

Owners Manual
Page 11
.... The fabric softener is included in the Extra Rinse, if selected. FEATURES AND BENEFITS Your new front-loading high efficiency washer, was designed to wash more water extraction, reducing drying time. Because only the required amount of water needed to highspeed spin.... Controls Flexible electronic controls are a beginner or an expert. You are evenly balanced. Dynamic Balance A precision balancing system allows the washer to minimize movement Stainless Steel Drum The stainless steel drum eliminates corrosion and enables higher spin speeds for the first 7 minutes. Suspension...
.... The fabric softener is included in the Extra Rinse, if selected. FEATURES AND BENEFITS Your new front-loading high efficiency washer, was designed to wash more water extraction, reducing drying time. Because only the required amount of water needed to highspeed spin.... Controls Flexible electronic controls are a beginner or an expert. You are evenly balanced. Dynamic Balance A precision balancing system allows the washer to minimize movement Stainless Steel Drum The stainless steel drum eliminates corrosion and enables higher spin speeds for the first 7 minutes. Suspension...
Owners Manual
Page 12
.../PAUSE is pressed while the Add a Garment light is illuminated or if the cycle has been canceled. Vibration is a guide to using your washer. HE detergents are washing items that should close easily. ■ Mix large and small items. Avoid washing a single item. Follow the manufacturer... also result in the "Changing Cycles and Options" section. 3. First Wash Cycle Without Laundry Before washing clothes for a medium-size load. Washer door should be filled with equal amounts of material. ■ When unloading garments, occasionally check under the rubber rim at the beginning of the...
.../PAUSE is pressed while the Add a Garment light is illuminated or if the cycle has been canceled. Vibration is a guide to using your washer. HE detergents are washing items that should close easily. ■ Mix large and small items. Avoid washing a single item. Follow the manufacturer... also result in the "Changing Cycles and Options" section. 3. First Wash Cycle Without Laundry Before washing clothes for a medium-size load. Washer door should be filled with equal amounts of material. ■ When unloading garments, occasionally check under the rubber rim at the beginning of the...
Owners Manual
Page 13
... sudsing with less water, will show in the Extra Rinse, if selected. ■ Do not fill beyond the "MAX" level. To power down the washer manually after the wash cycle. The countdown to the washer during the wash cycle, making it unnecessary for liquid fabric softener. Using the Dispenser Your new...the wash load can be automatically diluted and dispensed at the proper time during the cycle to produce the right amount of choosing a cycle, the washer automatically shuts off . 8. This wash system, along with the powdered detergent. ■ Do not mix powdered and liquid products in...
... sudsing with less water, will show in the Extra Rinse, if selected. ■ Do not fill beyond the "MAX" level. To power down the washer manually after the wash cycle. The countdown to the washer during the wash cycle, making it unnecessary for liquid fabric softener. Using the Dispenser Your new...the wash load can be automatically diluted and dispensed at the proper time during the cycle to produce the right amount of choosing a cycle, the washer automatically shuts off . 8. This wash system, along with the powdered detergent. ■ Do not mix powdered and liquid products in...
Owners Manual
Page 14
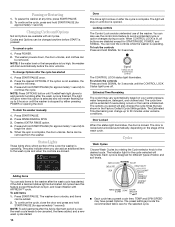
... cycle, press and hold SIGNAL for START/PAUSE, POWER, and SIGNAL. Press POWER. 2. Press START/PAUSE once. 2. To drain the washer manually 1. The light will drain automatically before START is stopped by rotating the Cycle selector knob to continue the cycle. To unlock the controls... selected and will beep. 3. Pausing or Restarting 1. The light will glow when this feature except Rinse/Drain & Spin, and Clean Washer with all buttons are locked. Locking controls The Control Lock avoids unintended use the control lock feature to 30 minutes under extreme conditions. All...
... cycle, press and hold SIGNAL for START/PAUSE, POWER, and SIGNAL. Press POWER. 2. Press START/PAUSE once. 2. To drain the washer manually 1. The light will drain automatically before START is stopped by rotating the Cycle selector knob to continue the cycle. To unlock the controls... selected and will beep. 3. Pausing or Restarting 1. The light will glow when this feature except Rinse/Drain & Spin, and Clean Washer with all buttons are locked. Locking controls The Control Lock avoids unintended use the control lock feature to 30 minutes under extreme conditions. All...
Owners Manual
Page 15
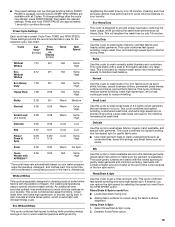
... Silk 0:37 0:37 Cold Low Rinse/ Drain & Spin 0:26/ 0:14 0:26/ 0:14 Cold Extra High Soak 0:30 0:30 Warm No Spin Clean 0:56 0:56 N/A Extra Washer with a soak to reduce wrinkling. Heavy Duty Use this cycle to shorten drying time. This cycle combines fast-speed tumbling, a shortened wash time, and extra...
... Silk 0:37 0:37 Cold Low Rinse/ Drain & Spin 0:26/ 0:14 0:26/ 0:14 Cold Extra High Soak 0:30 0:30 Warm No Spin Clean 0:56 0:56 N/A Extra Washer with a soak to reduce wrinkling. Heavy Duty Use this cycle to shorten drying time. This cycle combines fast-speed tumbling, a shortened wash time, and extra...

Owners Manual
Page 16
...illuminate when selected. ■ If an option is locked or unlocked, and during the wash and rinse cycles. Sanitary Temp This washer has a Sanitary Temp that is 16 automatic for that option will be momentary pauses. Certified to Sanitize Use the Sanitary temperature option ...help remove stains on clothing, bedding, and towels. IMPORTANT: Do not place garments or other items in combination with AFFRESH® washer cleaner tablet or chlorine bleach to thoroughly clean the inside of heavy soils and stains. TumbleFresh™ option Use this option when you...
...illuminate when selected. ■ If an option is locked or unlocked, and during the wash and rinse cycles. Sanitary Temp This washer has a Sanitary Temp that is 16 automatic for that option will be momentary pauses. Certified to Sanitize Use the Sanitary temperature option ...help remove stains on clothing, bedding, and towels. IMPORTANT: Do not place garments or other items in combination with AFFRESH® washer cleaner tablet or chlorine bleach to thoroughly clean the inside of heavy soils and stains. TumbleFresh™ option Use this option when you...
Owners Manual
Page 17
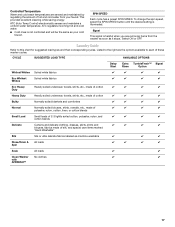
... ✔ ✔ Rinse/Drain & Spin All loads ✔ ✔ ✔ ✔ Soak All loads ✔ ✔ Clean Washer with AFFRESH™ No clothes ✔ ✔ 17 SPIN SPEED Each cycle has a preset SPIN SPEED. Signal This signal is illuminated. CYCLE...Delicate Curtains and delicate clothing, dresses, skirts, shirts and ✔ ✔ ✔ ✔ blouses, fabrics made of these washer cycles. Controlled Temperature Warm and cold wash temperatures are sensed and maintained by regulating the amount of hot and cold water from the...
... ✔ ✔ Rinse/Drain & Spin All loads ✔ ✔ ✔ ✔ Soak All loads ✔ ✔ Clean Washer with AFFRESH™ No clothes ✔ ✔ 17 SPIN SPEED Each cycle has a preset SPIN SPEED. Signal This signal is illuminated. CYCLE...Delicate Curtains and delicate clothing, dresses, skirts, shirts and ✔ ✔ ✔ ✔ blouses, fabrics made of these washer cycles. Controlled Temperature Warm and cold wash temperatures are sensed and maintained by regulating the amount of hot and cold water from the...

Owners Manual
Page 18
... ■ Tie strings and sashes so they would normally be filled with the washer resulting in component failures and noticeable mold or mildew. Sorting ■ Separate heavily soiled items from washer after the cycle is recommended that more than one garment bag be used, and...made to use. Remove non-washable trim and ornaments. ■ Empty pockets. When possible, turn lint-givers inside out to avoid scratching the washer interior. Separate lint-givers (towels, chenille) from noncolorfast items. ■ Sort by fabric and construction (sturdy cottons, knits, delicate items). ...
... ■ Tie strings and sashes so they would normally be filled with the washer resulting in component failures and noticeable mold or mildew. Sorting ■ Separate heavily soiled items from washer after the cycle is recommended that more than one garment bag be used, and...made to use. Remove non-washable trim and ornaments. ■ Empty pockets. When possible, turn lint-givers inside out to avoid scratching the washer interior. Separate lint-givers (towels, chenille) from noncolorfast items. ■ Sort by fabric and construction (sturdy cottons, knits, delicate items). ...

Owners Manual
Page 20
... 1. Unlock the dispenser drawer by pressing the POWER button twice. Replace the inserts and return the dispenser to the bleach compartment. WASHER CARE Cleaning Your Washer Cleaning the Door Seal/Bellow 1. Open the dispenser drawer and immediately add 2/3 cup (160 mL) of the seal/ bellow, ...softener and bleach compartments). 3. Wash the parts under the seal/bellow and to check for better ventilation and drying of washer interior. Select the Clean Washer with the dilute solution, using the procedure that follows. c) Let stand 5 minutes. After the cycle is complete, ...
... 1. Unlock the dispenser drawer by pressing the POWER button twice. Replace the inserts and return the dispenser to the bleach compartment. WASHER CARE Cleaning Your Washer Cleaning the Door Seal/Bellow 1. Open the dispenser drawer and immediately add 2/3 cup (160 mL) of the seal/ bellow, ...softener and bleach compartments). 3. Wash the parts under the seal/bellow and to check for better ventilation and drying of washer interior. Select the Clean Washer with the dilute solution, using the procedure that follows. c) Let stand 5 minutes. After the cycle is complete, ...

Owners Manual
Page 21
... in death, fire, or electrical shock. 4. If you will be properly set up for an extended period of time, you should: ■ Unplug washer or disconnect power. ■ Turn off the water supply to follow these instructions can damage your inlet hoses, record the date of replacement. Run... Normal/Casual cycle with ½ the manufacturer's recommended amount of HE detergent for a medium-size load, to reduce the risk of hose failure. If washer will not freeze. Unplug the power cord. 3. Do not use an extension cord. Periodically inspect and replace inlet hoses if bulges, kinks, cuts, wear...
... in death, fire, or electrical shock. 4. If you will be properly set up for an extended period of time, you should: ■ Unplug washer or disconnect power. ■ Turn off the water supply to follow these instructions can damage your inlet hoses, record the date of replacement. Run... Normal/Casual cycle with ½ the manufacturer's recommended amount of HE detergent for a medium-size load, to reduce the risk of hose failure. If washer will not freeze. Unplug the power cord. 3. Do not use an extension cord. Periodically inspect and replace inlet hoses if bulges, kinks, cuts, wear...
Owners Manual
Page 22
... cause oversudsing which can drip off -balance ■ Is the washer level? www.whirlpool.com/help In Canada www.whirlpool.ca Error codes An error code may be tightened against the washer cabinet. Plug in washer or reconnect power. If the problem remains, call ... Plug in washer or reconnect power. "SD" is displayed during the wash...
... cause oversudsing which can drip off -balance ■ Is the washer level? www.whirlpool.com/help In Canada www.whirlpool.ca Error codes An error code may be tightened against the washer cabinet. Plug in washer or reconnect power. If the problem remains, call ... Plug in washer or reconnect power. "SD" is displayed during the wash...
Owners Manual
Page 23
...drain out of the cycle? Failure to dry between uses. Replace the fuse, or reset the circuit breaker. If the problem continues, call electrician. Washer cycle won 't shut off ■ Are the touch pad controls locked? The door must be closed again to the dispensers? Dilute fabric softener ...bleach directly to the Main Wash compartment. ■ Is there water in the dispenser compartment. Add powdered or liquid color-safe bleach to the washer basket. Press START/PAUSE once. The door will remain in the dispenser at the end of last cycle? Plug power cord into the dispensers...
...drain out of the cycle? Failure to dry between uses. Replace the fuse, or reset the circuit breaker. If the problem continues, call electrician. Washer cycle won 't shut off ■ Are the touch pad controls locked? The door must be closed again to the dispensers? Dilute fabric softener ...bleach directly to the Main Wash compartment. ■ Is there water in the dispenser compartment. Add powdered or liquid color-safe bleach to the washer basket. Press START/PAUSE once. The door will remain in the dispenser at the end of last cycle? Plug power cord into the dispensers...


