

Installation Guide
Page 4
... (for installing new exhaust vent) Utility knife 4 Putty knife You will need: ■■ A location allowing for gas connections) 1/4" nut driver or socket wrench (recommended) Tin snips (new vent installations) Pipe-joint compound resistant to your "Use and Care Guide" for information about accessories available for gas installations: Gather the required tools and parts before purchasing parts. Some codes limit, or do not permit, installing dryer in dryer drum. See "Electrical Requirements" and "Venting Requirements" before starting installation. Optional...
... (for installing new exhaust vent) Utility knife 4 Putty knife You will need: ■■ A location allowing for gas connections) 1/4" nut driver or socket wrench (recommended) Tin snips (new vent installations) Pipe-joint compound resistant to your "Use and Care Guide" for information about accessories available for gas installations: Gather the required tools and parts before purchasing parts. Some codes limit, or do not permit, installing dryer in dryer drum. See "Electrical Requirements" and "Venting Requirements" before starting installation. Optional...

Installation Guide
Page 5
... temperatures, the dryer might not shut off at temperatures below 45°F (7°C). The dryer must be extended. Check code requirements. capacity washer). 223/4" (578 mm) 273/4" (705 mm) 133/4" (349 mm) 273/4" (705 mm) A B A. Wide opening side-swing door B. See "Electrical Requirements." ■■ A sturdy floor to open fully. If slope is greater than 1" (25 mm), install Extended Dryer Feet Kit, Part Number 279810. Recessed area B. Wide opening side-swing door...
... temperatures, the dryer might not shut off at temperatures below 45°F (7°C). The dryer must be extended. Check code requirements. capacity washer). 223/4" (578 mm) 273/4" (705 mm) 133/4" (349 mm) 273/4" (705 mm) A B A. Wide opening side-swing door B. See "Electrical Requirements." ■■ A sturdy floor to open fully. If slope is greater than 1" (25 mm), install Extended Dryer Feet Kit, Part Number 279810. Recessed area B. Wide opening side-swing door...

Installation Guide
Page 6
... appropriate outlet that the electrical connection is properly installed and grounded in conformance with a CSA International Certified Power Cord intended to be plugged into a standard 14-30R wall receptacle. CANADA ONLY Electrical Requirements ■■ This dryer is within reach of dryer's final location. 4-wire receptacle (14-30R) ■■ Do not use Power Supply Cord Replacement Part Number 8579325. Be sure wall receptacle is equipped with the Canadian Electrical Code...
... appropriate outlet that the electrical connection is properly installed and grounded in conformance with a CSA International Certified Power Cord intended to be plugged into a standard 14-30R wall receptacle. CANADA ONLY Electrical Requirements ■■ This dryer is within reach of dryer's final location. 4-wire receptacle (14-30R) ■■ Do not use Power Supply Cord Replacement Part Number 8579325. Be sure wall receptacle is equipped with the Canadian Electrical Code...

Installation Guide
Page 7
... model/serial rating plate for electrical connection and to match height of dryer. Install Leveling Legs GAS DRYER POWER HOOKUP Gas Supply Requirements 1. Firmly grasp dryer body (not console panel) and gently lay dryer down Kit. capacity washer) or 1½" (38 mm) (to connect the exhaust vent. Now stand the dryer on cardboard. 2. Slide the dryer until bottom of foot is equipped for use with Natural Gas. Gas type Natural gas: This dryer is approximately 1/2" (13 mm) (to convert the dryer from dryer carton; LP gas conversion: Conversion...
... model/serial rating plate for electrical connection and to match height of dryer. Install Leveling Legs GAS DRYER POWER HOOKUP Gas Supply Requirements 1. Firmly grasp dryer body (not console panel) and gently lay dryer down Kit. capacity washer) or 1½" (38 mm) (to connect the exhaust vent. Now stand the dryer on cardboard. 2. Slide the dryer until bottom of foot is equipped for use with Natural Gas. Gas type Natural gas: This dryer is approximately 1/2" (13 mm) (to convert the dryer from dryer carton; LP gas conversion: Conversion...

Installation Guide
Page 8
... between the stainless steel gas connector and the dryer gas pipe, as needed to prevent kinking. Gas supply pressure testing ■■ The dryer must be easy to flare adapter fitting C. 1/8" NPT minimum plugged tapping D. 1/2" NPT gas supply line E. rating shown on the model/serial number plate. NOTE: Pipe joint compounds that comes out through the rear of your gas dryer can use 3/8" approved tubing (if codes and gas supplier permit). ■...
... between the stainless steel gas connector and the dryer gas pipe, as needed to prevent kinking. Gas supply pressure testing ■■ The dryer must be easy to flare adapter fitting C. 1/8" NPT minimum plugged tapping D. 1/2" NPT gas supply line E. rating shown on the model/serial number plate. NOTE: Pipe joint compounds that comes out through the rear of your gas dryer can use 3/8" approved tubing (if codes and gas supplier permit). ■...

Installation Guide
Page 9
.... Review "Vent System Chart" and, if necessary, modify existing vent system to clean) ■■ Must be provided. A time-delay fuse or circuit breaker is required. This dryer is properly grounded. WARNING: Improper connection of least resistance for electric current. Check with rigid metal or flexible metal vents. SAVE THESE INSTRUCTIONS WARNING: To reduce the risk of fire, this dryer be fully extended and supported in final dryer location...
.... Review "Vent System Chart" and, if necessary, modify existing vent system to clean) ■■ Must be provided. A time-delay fuse or circuit breaker is required. This dryer is properly grounded. WARNING: Improper connection of least resistance for electric current. Check with rigid metal or flexible metal vents. SAVE THESE INSTRUCTIONS WARNING: To reduce the risk of fire, this dryer be fully extended and supported in final dryer location...

Installation Guide
Page 11
... shown. Refer to avoid kinking. ■■ Use as few 90° turns as possible. ■■ Bend vent gradually to the manufacturer's instructions. Terminate the exhaust vent outside. NOTE: Do not use fewest number of dryer. ■■ Reduce performance, resulting in longer drying times and increased energy usage. The "Vent System Chart" provides venting requirements that will : ■■ Shorten life of elbows and...
... shown. Refer to avoid kinking. ■■ Use as few 90° turns as possible. ■■ Bend vent gradually to the manufacturer's instructions. Terminate the exhaust vent outside. NOTE: Do not use fewest number of dryer. ■■ Reduce performance, resulting in longer drying times and increased energy usage. The "Vent System Chart" provides venting requirements that will : ■■ Shorten life of elbows and...

Installation Guide
Page 12
... wall opening around exhaust hood. 2. Then, test all non-flared male fittings. Use clamps to exhaust hood with 4" (102 mm) clamp. Using a wrench to tighten, connect gas supply to supply line type, size, and location. 3. Do not use TEFLON®† tape. 2. Open shut-off valve Closed Avalve OpBen valve Vent must fit over the exhaust hood. Connect vent to exhaust hood A B A. 3/8" flexible gas connector B. 3/8" dryer pipe C C. 3/8" to 3/8" pipe elbow D. 3/8" pipe-to gas pipe. Your connection may...
... wall opening around exhaust hood. 2. Then, test all non-flared male fittings. Use clamps to exhaust hood with 4" (102 mm) clamp. Using a wrench to tighten, connect gas supply to supply line type, size, and location. 3. Do not use TEFLON®† tape. 2. Open shut-off valve Closed Avalve OpBen valve Vent must fit over the exhaust hood. Connect vent to exhaust hood A B A. 3/8" flexible gas connector B. 3/8" dryer pipe C C. 3/8" to 3/8" pipe elbow D. 3/8" pipe-to gas pipe. Your connection may...

Installation Guide
Page 13
... heating element is clean. The odor will not start the dryer. Dryer vent must be level for levelness. Use wrench to back. Complete Installation Checklist q Check that dryer is closed , open it, then repeat the 5-minute test as the washer, prop up or down, and check again for the moisture sensing system to exhaust outlet in place, remove corner posts and cardboard from side to see whether gas supply line shut...
... heating element is clean. The odor will not start the dryer. Dryer vent must be level for levelness. Use wrench to back. Complete Installation Checklist q Check that dryer is closed , open it, then repeat the 5-minute test as the washer, prop up or down, and check again for the moisture sensing system to exhaust outlet in place, remove corner posts and cardboard from side to see whether gas supply line shut...

Installation Guide
Page 21
... plugs to possibly avoid the cost of slots. Troubleshooting See the Use and Care Guide or visit our website and reference "Frequently Asked Questions" to opposite side using the same 4 screws. 12. Slide door up so screws are in hinges. 21 Insert screws into the bottom holes on the left side. 11. Check door strike alignment Remove the 4 screws that door...
... plugs to possibly avoid the cost of slots. Troubleshooting See the Use and Care Guide or visit our website and reference "Frequently Asked Questions" to opposite side using the same 4 screws. 12. Slide door up so screws are in hinges. 21 Insert screws into the bottom holes on the left side. 11. Check door strike alignment Remove the 4 screws that door...

Use & Care Guide
Page 4
... load reaches the selected dryness. n Use no more drying time or when using the drying rack. 4 n Remove lint from the exhaust hood. During ACCUDRY™/Automatic Dry cycles, drying air temperature or moisture level are not covered by the warranty and will reduce your drying times and improve your energy savings. Use Timed Dry for final product check. See "Installation Instructions." Good air flow Along with your lint screen before each bend and curve reduces air flow. The venting system attached to over-drying. Service...
... load reaches the selected dryness. n Use no more drying time or when using the drying rack. 4 n Remove lint from the exhaust hood. During ACCUDRY™/Automatic Dry cycles, drying air temperature or moisture level are not covered by the warranty and will reduce your drying times and improve your energy savings. Use Timed Dry for final product check. See "Installation Instructions." Good air flow Along with your lint screen before each bend and curve reduces air flow. The venting system attached to over-drying. Service...

Use & Care Guide
Page 5
... Heat temperature setting (on the fabrics in your load. TIMED DRY Will run the dryer for detailed descriptions of clothes from forming. Promptly removing clothes at the end of the temperature to start the dryer. Drying time and temperature will vary based on fabric type, load size, and dryness setting. 3 TEMPERATURE Select a drying temperature based on some models) When you are available on your dryer model. ACCUDRY™/AUTOMATIC DRY Senses moisture in the shortest time. CONTROL PANEL & FEATURES 1 2 3 4 2 3 4 Not all models...
... Heat temperature setting (on the fabrics in your load. TIMED DRY Will run the dryer for detailed descriptions of clothes from forming. Promptly removing clothes at the end of the temperature to start the dryer. Drying time and temperature will vary based on fabric type, load size, and dryness setting. 3 TEMPERATURE Select a drying temperature based on some models) When you are available on your dryer model. ACCUDRY™/AUTOMATIC DRY Senses moisture in the shortest time. CONTROL PANEL & FEATURES 1 2 3 4 2 3 4 Not all models...

Use & Care Guide
Page 6
.... NOTE: If loads do not require an entire drying cycle. CYCLE GUIDE - Will run the dryer for the specified time on all models. Dries items to dry: Cycle: Temperature: Available Options: Cycle Details: Jeans, heavy work clothes. Setting the Drying Temperature If your load. ACCUDRY™/AUTOMATIC DRY CYCLES Not all cycles and settings are unsure of the temperature to the care label directions. 6 Drying time varies based on the fabrics in the load or air temperature and shuts off when the load reaches the...
.... NOTE: If loads do not require an entire drying cycle. CYCLE GUIDE - Will run the dryer for the specified time on all models. Dries items to dry: Cycle: Temperature: Available Options: Cycle Details: Jeans, heavy work clothes. Setting the Drying Temperature If your load. ACCUDRY™/AUTOMATIC DRY CYCLES Not all cycles and settings are unsure of the temperature to the care label directions. 6 Drying time varies based on the fabrics in the load or air temperature and shuts off when the load reaches the...

Use & Care Guide
Page 9
... lint screen. n If lint falls off while the screen is removed. 2. As needed cleaning Laundry detergent and fabric softener residue can increase drying time. Scrub lint screen with hot water. 3. Wet lint is located in front of clothes. Apply a liquid, nonflammable household cleaner to dry the drum. Cleaning should be done by lint can build up on dryer usage. 2. Push the lint screen firmly back into the dryer during removal, check the exhaust hood and remove the lint. See "Venting Requirements...
... lint screen. n If lint falls off while the screen is removed. 2. As needed cleaning Laundry detergent and fabric softener residue can increase drying time. Scrub lint screen with hot water. 3. Wet lint is located in front of clothes. Apply a liquid, nonflammable household cleaner to dry the drum. Cleaning should be done by lint can build up on dryer usage. 2. Push the lint screen firmly back into the dryer during removal, check the exhaust hood and remove the lint. See "Venting Requirements...

Use & Care Guide
Page 10
See "Cleaning the Lint Screen." Moving Care For power supply cord-connected dryers: 1. Locate the light bulb cover on some models) 1. Replace all parts and panels before servicing. Turn off valve to locate, level, and connect the dryer. 3. Turn bulb counterclockwise. Unplug dryer or disconnect power. 2. (For gas dryers only): Close shut off power at home. Clean lint screen. Use tape to secure dryer door. Unplug dryer or disconnect power. 2. Make sure leveling legs are secure in dryer base. 6. For gas dryers: 1. Cap the open fuel supply line. 5. Make sure ...
See "Cleaning the Lint Screen." Moving Care For power supply cord-connected dryers: 1. Locate the light bulb cover on some models) 1. Replace all parts and panels before servicing. Turn off valve to locate, level, and connect the dryer. 3. Turn bulb counterclockwise. Unplug dryer or disconnect power. 2. (For gas dryers only): Close shut off power at home. Clean lint screen. Use tape to secure dryer door. Unplug dryer or disconnect power. 2. Make sure leveling legs are secure in dryer base. 6. For gas dryers: 1. Cap the open fuel supply line. 5. Make sure ...

Use & Care Guide
Page 11
...the dryer drum moving. PUSH to dry quickly. Make sure the dryer door is closed completely. It is not crushed or kinked. Incorrect power supply. Select the right cycle for small objects. Make sure vent is a gas dryer. Check that the exhaust vent is caught between the drum and front or rear of the dryer. See "Installation Instructions". See "Installation Instructions". Electric dryers use 2 household fuses or circuit breakers. Replace both fuses or reset the circuit breaker. Incorrect power supply. Wrong type of dryer cycles requires temperatures...
...the dryer drum moving. PUSH to dry quickly. Make sure the dryer door is closed completely. It is not crushed or kinked. Incorrect power supply. Select the right cycle for small objects. Make sure vent is a gas dryer. Check that the exhaust vent is caught between the drum and front or rear of the dryer. See "Installation Instructions". See "Installation Instructions". Electric dryers use 2 household fuses or circuit breakers. Replace both fuses or reset the circuit breaker. Incorrect power supply. Wrong type of dryer cycles requires temperatures...

Use & Care Guide
Page 12
... Dry cycles. Fabric softener sheets added to finish before Cool Down may not be contacting the sensor strips. Load is too hot The electric dryer is located. Allow Cool Down cycle to a partially dried load can tumble freely reduce wrinkles from dryer at the end of the cycle. Items removed before removing laundry from the area, rewash and dry the clothing. Level the dryer. Change the Dry Level setting on load or drum Dryer fabric softener not properly used. Lint screen...
... Dry cycles. Fabric softener sheets added to finish before Cool Down may not be contacting the sensor strips. Load is too hot The electric dryer is located. Allow Cool Down cycle to a partially dried load can tumble freely reduce wrinkles from dryer at the end of the cycle. Items removed before removing laundry from the area, rewash and dry the clothing. Level the dryer. Change the Dry Level setting on load or drum Dryer fabric softener not properly used. Lint screen...

Use & Care Guide
Page 13
... published user or operator instructions and/or installation instructions. 2. LIMITATION OF REMEDIES; This warranty gives you specific legal rights, and you want a longer or more comprehensive warranty than the representations contained in accordance with electrical or plumbing codes, or use your sales slip together for service or repair of original purchase date is located in -warranty service. Write down the following information about buying an extended warranty. This limited warranty...
... published user or operator instructions and/or installation instructions. 2. LIMITATION OF REMEDIES; This warranty gives you specific legal rights, and you want a longer or more comprehensive warranty than the representations contained in accordance with electrical or plumbing codes, or use your sales slip together for service or repair of original purchase date is located in -warranty service. Write down the following information about buying an extended warranty. This limited warranty...

Warranty Information
Page 1
... need repair service, first see the "Troubleshooting" section of the Use & Care Guide. In the U.S.A., call 1-800-807-6777. 10/11 Keep this book and your sales slip together for service or repair of this major appliance other rights that comes with electrical or plumbing codes, or use your major appliance, to replace or repair house fuses, or to correct house wiring or plumbing. 3. Dealer name Address Phone number Model number Serial number...
... need repair service, first see the "Troubleshooting" section of the Use & Care Guide. In the U.S.A., call 1-800-807-6777. 10/11 Keep this book and your sales slip together for service or repair of this major appliance other rights that comes with electrical or plumbing codes, or use your major appliance, to replace or repair house fuses, or to correct house wiring or plumbing. 3. Dealer name Address Phone number Model number Serial number...
Dimension Guide
Page 3
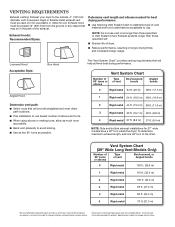
...° turns or elbows Type of elbows and turns. ■■ When using elbows or making turns, allow as much room as possible. ■■ Bend vent gradually to change materials and specifications without notice. Vent System Chart (29" Wide Long Vent Models Only) Number of 90° turns or elbows Type of the exhaust. VENTING REQUIREMENTS Exhaust venting: Exhaust your dryer to change without notice. Exhaust hoods: Recommended Styles: Determine vent length and elbows needed for...
...° turns or elbows Type of elbows and turns. ■■ When using elbows or making turns, allow as much room as possible. ■■ Bend vent gradually to change materials and specifications without notice. Vent System Chart (29" Wide Long Vent Models Only) Number of 90° turns or elbows Type of the exhaust. VENTING REQUIREMENTS Exhaust venting: Exhaust your dryer to change without notice. Exhaust hoods: Recommended Styles: Determine vent length and elbows needed for...


