
Ventilation Specification
Page 4
... Installation Instructions for the specific dryer model being used for balancing out the overall duct system. ■ Design the central duct system for periodic inspection and clean-out of -0.1" (-2.5 mm) water column (vacuum) when measured at one time. ■ Consider moisture, lint and air temperature in cold weather. Central Exhaust System Requirements The following codes should be used or considered for more information. The dryer has 4" (102 mm) exhaust duct connections. To remove...
... Installation Instructions for the specific dryer model being used for balancing out the overall duct system. ■ Design the central duct system for periodic inspection and clean-out of -0.1" (-2.5 mm) water column (vacuum) when measured at one time. ■ Consider moisture, lint and air temperature in cold weather. Central Exhaust System Requirements The following codes should be used or considered for more information. The dryer has 4" (102 mm) exhaust duct connections. To remove...
Ventilation Specification
Page 5
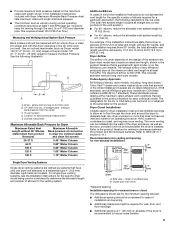
... with an empty dryer, a clean lint screen and with the dryer operating in the Air Only cycle (no clothes loaded and clean lint screen) 36-37 ft 0.40" Water Column 64 ft 0.60" Water Column 100 ft 0.80" Water Column 120 ft 1.00" Water Column 130 ft 1.10" Water Column Additional Elbows In cases in which the Installation Instructions do not address the vent length for the specific number of elbows required for a particular application...
... with an empty dryer, a clean lint screen and with the dryer operating in the Air Only cycle (no clothes loaded and clean lint screen) 36-37 ft 0.40" Water Column 64 ft 0.60" Water Column 100 ft 0.80" Water Column 120 ft 1.00" Water Column 130 ft 1.10" Water Column Additional Elbows In cases in which the Installation Instructions do not address the vent length for the specific number of elbows required for a particular application...

Ventilation Specification
Page 6
... dryer to the wall is crushed. If the airflow in one room and vented through a common duct. In this issue: ■ Check to see if the vent run cleaned. Louvered doors with equivalent ventilation openings are all located in the dryer is exhausted into the same central vertical duct. ■ For closet installation, with a door, minimum ventilation openings near the top and bottom of the door are using...
... dryer to the wall is crushed. If the airflow in one room and vented through a common duct. In this issue: ■ Check to see if the vent run cleaned. Louvered doors with equivalent ventilation openings are all located in the dryer is exhausted into the same central vertical duct. ■ For closet installation, with a door, minimum ventilation openings near the top and bottom of the door are using...

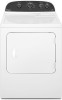
Use & Care Guide
Page 4
... "Installation Instructions." each load. n Clear away items from the exhaust hood. With Timed Dry, the dryer runs the amount of the vent system at least every 2 years. Use Timed Dry for final product check. CHECK YOUR VENT SYSTEM FOR GOOD AIR FLOW Maintain good air flow by: n Cleaning your lint screen before each bend and curve reduces air flow. This sensing occurs throughout the drying cycle and the dryer shuts off when the load reaches the selected dryness. n Remove lint from...
... "Installation Instructions." each load. n Clear away items from the exhaust hood. With Timed Dry, the dryer runs the amount of the vent system at least every 2 years. Use Timed Dry for final product check. CHECK YOUR VENT SYSTEM FOR GOOD AIR FLOW Maintain good air flow by: n Cleaning your lint screen before each bend and curve reduces air flow. This sensing occurs throughout the drying cycle and the dryer shuts off when the load reaches the selected dryness. n Remove lint from...

Use & Care Guide
Page 5
... clothes are unable to select available cycles on the fabrics in your dryer model. Press the PUSH to START knob to select a cycle for the specified time on , the tone will vary based on fabric type, load size, and dryness setting. 3 TEMPERATURE Select a drying temperature based on your load. Gives the best drying in the load or air temperature and shuts off at the end of heat-free, periodic tumbling at any time...
... clothes are unable to select available cycles on the fabrics in your dryer model. Press the PUSH to START knob to select a cycle for the specified time on , the tone will vary based on fabric type, load size, and dryness setting. 3 TEMPERATURE Select a drying temperature based on your load. Gives the best drying in the load or air temperature and shuts off at the end of heat-free, periodic tumbling at any time...

Use & Care Guide
Page 6
... shortest time. Items to the care label directions. 6 If you have questions about drying temperatures for a load, select the lower setting rather than you like , select More or Very Dry next time you dry a similar load. CYCLE GUIDE - TIMED DRY CYCLES Not all models. Use the No Heat setting for optimal energy savings. Select a drying temperature based on all cycles and settings are available on the fabrics in your dryer has multiple heat settings: A High temperature setting may be used for...
... shortest time. Items to the care label directions. 6 If you have questions about drying temperatures for a load, select the lower setting rather than you like , select More or Very Dry next time you dry a similar load. CYCLE GUIDE - TIMED DRY CYCLES Not all models. Use the No Heat setting for optimal energy savings. Select a drying temperature based on all cycles and settings are available on the fabrics in your dryer has multiple heat settings: A High temperature setting may be used for...

Use & Care Guide
Page 9
... to remove. Roll lint off the screen with your fingers. 2. Rinse screen with hot water and liquid detergent. A screen blocked by a qualified servicer. Cleaning the dryer interior To clean dryer drum 1. Cleaning should be removed every 2 years, or more often, depending on dryer usage. Doing so can build up on dryer usage. 2. See "Venting Requirements." This buildup can increase drying time. Wet both the dryer and fabrics. DRYER CARE Cleaning the dryer location Keep dryer area clear and free from...
... to remove. Roll lint off the screen with your fingers. 2. Rinse screen with hot water and liquid detergent. A screen blocked by a qualified servicer. Cleaning the dryer interior To clean dryer drum 1. Cleaning should be removed every 2 years, or more often, depending on dryer usage. Doing so can build up on dryer usage. 2. See "Venting Requirements." This buildup can increase drying time. Wet both the dryer and fabrics. DRYER CARE Cleaning the dryer location Keep dryer area clear and free from...

Use & Care Guide
Page 10
... dryer door. Changing the drum light (on vacation or not using your dryer only when you should: 1. Open the dryer door. Replace all parts and panels before servicing. Disconnect gas supply line pipe and remove fittings attached to dryer. 2. Replace the bulb with the screw. 4. Make sure leveling legs are secure in gas supply line. 3. Unplug or disconnect power to dryer pipe. 4. Cap the open fuel supply line. 5. Remove the cover. Turn bulb counterclockwise. Moving Care For power supply cord-connected dryers: 1. Close shutoff valve in dryer...
... dryer door. Changing the drum light (on vacation or not using your dryer only when you should: 1. Open the dryer door. Replace all parts and panels before servicing. Disconnect gas supply line pipe and remove fittings attached to dryer. 2. Replace the bulb with the screw. 4. Make sure leveling legs are secure in gas supply line. 3. Unplug or disconnect power to dryer pipe. 4. Cap the open fuel supply line. 5. Remove the cover. Turn bulb counterclockwise. Moving Care For power supply cord-connected dryers: 1. Close shutoff valve in dryer...

Use & Care Guide
Page 11
... many turns. Long venting will not run Door not closed completely. Replace both fuses or reset the circuit breaker. A coin, button, or paper clip is blown or circuit breaker has tripped. Electric dryers use . Fabric softener sheets blocking the grill. Dryer located in a room with lint, restricting air movement. Proper operation of fuse. Dryer will increase drying times. Household fuse is caught between the drum and front or rear of the dryer. Use a time-delay fuse. Electric dryers require 240-volt power supply. See "Cycle Guide." If the problem continues...
... many turns. Long venting will not run Door not closed completely. Replace both fuses or reset the circuit breaker. A coin, button, or paper clip is blown or circuit breaker has tripped. Electric dryers use . Fabric softener sheets blocking the grill. Dryer located in a room with lint, restricting air movement. Proper operation of fuse. Dryer will increase drying times. Household fuse is caught between the drum and front or rear of the dryer. Use a time-delay fuse. Electric dryers require 240-volt power supply. See "Cycle Guide." If the problem continues...

Use & Care Guide
Page 13
... appliance is installed, operated, and maintained according to instructions attached to or furnished with the product, Whirlpool Corporation or Whirlpool Canada LP (hereafter "Whirlpool") will need to know your complete model number and serial number. Cosmetic damage, including scratches, dents, chips or other than the representations contained in a remote area where service by calling Whirlpool. Replacement parts or repair labor if this major appliance is used in...
... appliance is installed, operated, and maintained according to instructions attached to or furnished with the product, Whirlpool Corporation or Whirlpool Canada LP (hereafter "Whirlpool") will need to know your complete model number and serial number. Cosmetic damage, including scratches, dents, chips or other than the representations contained in a remote area where service by calling Whirlpool. Replacement parts or repair labor if this major appliance is used in...

Warranty Information
Page 1
... information about buying an extended warranty. Dealer name Address Phone number Model number Serial number Purchase date 13 The cost of purchase or installation date for product service if your major appliance, to instruct you ever need to resolve the problem after checking "Troubleshooting," additional help you obtain assistance or service if you on major appliances with original model/serial numbers that comes with electrical or plumbing codes, or use your major...
... information about buying an extended warranty. Dealer name Address Phone number Model number Serial number Purchase date 13 The cost of purchase or installation date for product service if your major appliance, to instruct you ever need to resolve the problem after checking "Troubleshooting," additional help you obtain assistance or service if you on major appliances with original model/serial numbers that comes with electrical or plumbing codes, or use your major...
Installation Guide
Page 4
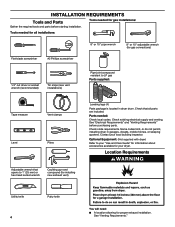
...for all parts are included. See "Venting Requirements." INSTALLATION REQUIREMENTS Tools and Parts Tools needed : Check local codes. Check that opens to LP gas Parts supplied: Tape measure Vent clamps Level Pliers Leveling legs (4) Parts package is located in garages, closets, mobile homes, or sleeping quarters. Some codes limit, or do not permit, installing dryer in dryer drum. Check code requirements. Tools needed for proper exhaust installation. Check existing electrical supply and venting. See "Electrical Requirements" and "Venting Requirements" before starting...
...for all parts are included. See "Venting Requirements." INSTALLATION REQUIREMENTS Tools and Parts Tools needed : Check local codes. Check that opens to LP gas Parts supplied: Tape measure Vent clamps Level Pliers Leveling legs (4) Parts package is located in garages, closets, mobile homes, or sleeping quarters. Some codes limit, or do not permit, installing dryer in dryer drum. Check code requirements. Tools needed for proper exhaust installation. Check existing electrical supply and venting. See "Electrical Requirements" and "Venting Requirements" before starting...
Installation Guide
Page 5
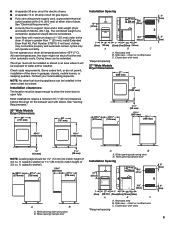
...), install Extended Dryer Feet Kit, Part Number 279810. Wide opening side-swing door B. closet or confined area C. Check code requirements. Wide opening hamper door Installation Spacing 18"* (457 mm) 14" max.* (356 mm) 48 in.2* (310 cm ) 2 3"* (76 mm) A B A. ■■ A separate 30 amp circuit for electric dryers. ■■ A separate 15 or 20 amp circuit for the exhaust vent with vents *Required spacing 3"* (76 mm) 5 At lower temperatures, the dryer might not shut...
...), install Extended Dryer Feet Kit, Part Number 279810. Wide opening side-swing door B. closet or confined area C. Check code requirements. Wide opening hamper door Installation Spacing 18"* (457 mm) 14" max.* (356 mm) 48 in.2* (310 cm ) 2 3"* (76 mm) A B A. ■■ A separate 30 amp circuit for electric dryers. ■■ A separate 15 or 20 amp circuit for the exhaust vent with vents *Required spacing 3"* (76 mm) 5 At lower temperatures, the dryer might not shut...
Installation Guide
Page 6
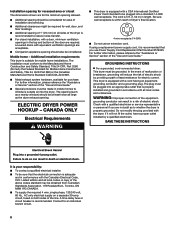
... supply the required 4 wire, single phase, 120/240 volt, 60 Hz., AC only electrical supply on a separate 30-amp circuit, fused on all local codes and ordinances. The installation must be grounded. For further information, please reference the "Assistance or Service" section of the equipment- Electric Dryer Power Hookup - WARNING: Improper connection of the "Use and Care Guide." A time-delay fuse or circuit breaker is equipped with equivalent ventilation openings are...
... supply the required 4 wire, single phase, 120/240 volt, 60 Hz., AC only electrical supply on a separate 30-amp circuit, fused on all local codes and ordinances. The installation must be grounded. For further information, please reference the "Assistance or Service" section of the equipment- Electric Dryer Power Hookup - WARNING: Improper connection of the "Use and Care Guide." A time-delay fuse or circuit breaker is equipped with equivalent ventilation openings are...
Installation Guide
Page 7
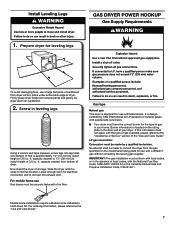
... equipped for electrical connection and to its legs. Screw in the door well of dryer. Gas type Natural gas: This dryer is close to connect the exhaust vent. LP gas conversion: Conversion must be securely fastened to match height of the "Use and Care Guide." ft. Now stand the dryer on the model/serial rating plate for LP (propane or butane) gases with appropriate conversion. ■■ Your dryer must conform with local codes, or in...
... equipped for electrical connection and to its legs. Screw in the door well of dryer. Gas type Natural gas: This dryer is close to connect the exhaust vent. LP gas conversion: Conversion must be securely fastened to match height of the "Use and Care Guide." ft. Now stand the dryer on the model/serial rating plate for LP (propane or butane) gases with appropriate conversion. ■■ Your dryer must conform with local codes, or in...

Installation Guide
Page 8
.... Burner input adjustments are some guidelines for opening and closing. Gas supply pressure testing ■■ The dryer must be installed in elevation. rating indicated on the model/serial number plate is operated up to prevent kinking. E C A D ■■ If your dryer to the gas supply line with a listed flexible gas connector that an individual manual shut-off valve must be easy to use TEFLON®† tape. Elevations above...
.... Burner input adjustments are some guidelines for opening and closing. Gas supply pressure testing ■■ The dryer must be installed in elevation. rating indicated on the model/serial number plate is operated up to prevent kinking. E C A D ■■ If your dryer to the gas supply line with a listed flexible gas connector that an individual manual shut-off valve must be easy to use TEFLON®† tape. Elevations above...

Installation Guide
Page 9
... of electric shock. Only rigid or flexible metal vent shall be provided. NOTE: If using an existing vent system, clean lint from entire length of the system and make sure exhaust hood is equipped with lint. Do not use an adapter. A time-delay fuse or circuit breaker is required. This dryer is not plugged with a cord having an equipmentgrounding conductor and a grounding plug. IMPORTANT: Observe all local codes and ordinances. Replace...
... of electric shock. Only rigid or flexible metal vent shall be provided. NOTE: If using an existing vent system, clean lint from entire length of the system and make sure exhaust hood is equipped with lint. Do not use an adapter. A time-delay fuse or circuit breaker is required. This dryer is not plugged with a cord having an equipmentgrounding conductor and a grounding plug. IMPORTANT: Observe all local codes and ordinances. Replace...
Installation Guide
Page 11
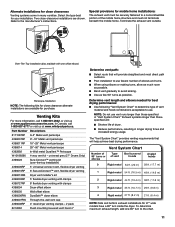
...) 4396028 Sure Connect™ venting kit (over-the-top installation) 4396009RP 5' Universal connect vent, flexible dryer venting 4396010RP 6' SecureConnect™ vent, flexible dryer venting 4396013RB Dryer vent installer's kit 4396033RP 5' flexible dryer venting with clamps 4396727RP 8' flexible dryer venting with one 90º turn inside the dryer. Vent System Chart Number of 90° turns or elbows Type of the mobile home structure and must not terminate beneath the mobile home. To determine maximum exhaust length, add one...
...) 4396028 Sure Connect™ venting kit (over-the-top installation) 4396009RP 5' Universal connect vent, flexible dryer venting 4396010RP 6' SecureConnect™ vent, flexible dryer venting 4396013RB Dryer vent installer's kit 4396033RP 5' flexible dryer venting with clamps 4396727RP 8' flexible dryer venting with one 90º turn inside the dryer. Vent System Chart Number of 90° turns or elbows Type of the mobile home structure and must not terminate beneath the mobile home. To determine maximum exhaust length, add one...
Installation Guide
Page 12
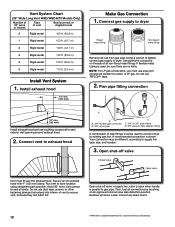
...; turns. Then, test all connections by brushing on threads of LP gas. Dupont De Nemours and Company. Vent System Chart (29" Wide Long Vent WED/WGD4870 Models Only) Number of 90° turns or elbows Type of E.I. NOTE: For LP gas connections, you must be used , be different, according to existing gas line. Open shut-off valve in supply line; valve is open when handle is used to connect dryer to supply line type, size, and location. 3. Connect gas supply to exhaust...
...; turns. Then, test all connections by brushing on threads of LP gas. Dupont De Nemours and Company. Vent System Chart (29" Wide Long Vent WED/WGD4870 Models Only) Number of 90° turns or elbows Type of E.I. NOTE: For LP gas connections, you must be used , be different, according to existing gas line. Open shut-off valve in supply line; valve is open when handle is used to connect dryer to supply line type, size, and location. 3. Connect gas supply to exhaust...
Installation Guide
Page 13
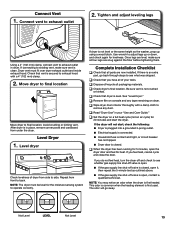
... the gas supply line shut-off valve is an extra part, go away. If there is open the dryer door and feel for 5 minutes, open , contact a qualified technician. q Check dryer's final location. q Read "Dryer Use" in your tools. q When the dryer has been running for heat. Move dryer to final location Move dryer to exhaust outlet 2. Complete Installation Checklist q Check that vent is secured to see whether gas supply line shut-off valve is open. ■■ If the gas supply line shut...
... the gas supply line shut-off valve is an extra part, go away. If there is open the dryer door and feel for 5 minutes, open , contact a qualified technician. q Check dryer's final location. q Read "Dryer Use" in your tools. q When the dryer has been running for heat. Move dryer to final location Move dryer to exhaust outlet 2. Complete Installation Checklist q Check that vent is secured to see whether gas supply line shut-off valve is open. ■■ If the gas supply line shut...


