

Door Reversal Guide
Page 1
... at the bottom. DRYER DOOR REVERSAL INSTRUCTIONS Round Doors with Electrical Wiring: Tools Needed Minimum 8" (203 mm) long TORX®, T20®, and T25® star drivers #2 Phillips screwdriver WARNING 3. Move the door strike Using a T25® screwdriver, remove the two screws securing the door strike to do so can result in hinge. Electrical Shock Hazard Disconnect power before operating. Disconnect wiring. Using a Phillips screwdriver, remove the 10 screws securing...
... at the bottom. DRYER DOOR REVERSAL INSTRUCTIONS Round Doors with Electrical Wiring: Tools Needed Minimum 8" (203 mm) long TORX®, T20®, and T25® star drivers #2 Phillips screwdriver WARNING 3. Move the door strike Using a T25® screwdriver, remove the two screws securing the door strike to do so can result in hinge. Electrical Shock Hazard Disconnect power before operating. Disconnect wiring. Using a Phillips screwdriver, remove the 10 screws securing...

Door Reversal Guide
Page 2
... door facing up. Troubleshooting See your Owner's Manual or visit our website and reference Frequently Asked Questions to possibly avoid the cost of the door. 14. Reconnect wiring (doors with the four T25® screws removed earlier. 10. Rotate assembly bottom and fasten IMPORTANT: Make sure to swing hinge down to the hinge with electrical wiring: Pull the wire through the front panel opening...
... door facing up. Troubleshooting See your Owner's Manual or visit our website and reference Frequently Asked Questions to possibly avoid the cost of the door. 14. Reconnect wiring (doors with the four T25® screws removed earlier. 10. Rotate assembly bottom and fasten IMPORTANT: Make sure to swing hinge down to the hinge with electrical wiring: Pull the wire through the front panel opening...

Quick Start Guide
Page 1
... accidental Cool Down change in the load that responds to turn the signal indicating the end of the dryer. See the online "Troubleshooting" section. NOTE: Government energy certifications for this option. Not all indicators are in cycle options or preferences during Timed Cycles or options such as a reminder to help reduce wrinkling. Use this time, the LED Display will be removed. START/PAUSE Touch and hold Control Lock...
... accidental Cool Down change in the load that responds to turn the signal indicating the end of the dryer. See the online "Troubleshooting" section. NOTE: Government energy certifications for this option. Not all indicators are in cycle options or preferences during Timed Cycles or options such as a reminder to help reduce wrinkling. Use this time, the LED Display will be removed. START/PAUSE Touch and hold Control Lock...

Owners Manual
Page 2
...; Clean lint screen before or after each load. � Keep area around the exhaust opening and adjacent surrounding areas free from service or discarded, remove the door to play on your appliance, follow instructions. Always read and obey all instructions before the end of injury, and tell you and others are very important. Avoid stopping a tumble dryer before using a 3D printer). � See the Installation Instructions...
...; Clean lint screen before or after each load. � Keep area around the exhaust opening and adjacent surrounding areas free from service or discarded, remove the door to play on your appliance, follow instructions. Always read and obey all instructions before the end of injury, and tell you and others are very important. Avoid stopping a tumble dryer before using a 3D printer). � See the Installation Instructions...
Owners Manual
Page 3
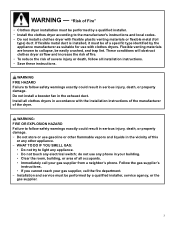
... occupants. • Immediately call your gas supplier, call the fire department. − Installation and service must be easily crushed, and trap lint. Follow the gas supplier's instructions. • If you cannot reach your gas supplier from a neighbor's phone. These conditions will obstruct clothes dryer airflow and increase the risk of fire. − To reduce the risk of all clothes dryers in the exhaust duct.
... occupants. • Immediately call your gas supplier, call the fire department. − Installation and service must be easily crushed, and trap lint. Follow the gas supplier's instructions. • If you cannot reach your gas supplier from a neighbor's phone. These conditions will obstruct clothes dryer airflow and increase the risk of fire. − To reduce the risk of all clothes dryers in the exhaust duct.

Owners Manual
Page 4
... Ball Valves installed for use a gas detector approved by the State of local codes, with the National Electrical Code, ANSI/NFPA 70, or the Canadian Electrical Code, Part 1, CSA C22.1. SAVE THESE INSTRUCTIONS 4 For more information, contact your gas supplier. IMPORTANT SAFETY INSTRUCTIONS WHEN DISCARDING OR STORING YOUR OLD CLOTHES DRYER, REMOVE THE DOOR. Gas suppliers recommend that you smell gas" instructions. WARNING: Gas leaks cannot always be listed. � A flexible gas connector, when used...
... Ball Valves installed for use a gas detector approved by the State of local codes, with the National Electrical Code, ANSI/NFPA 70, or the Canadian Electrical Code, Part 1, CSA C22.1. SAVE THESE INSTRUCTIONS 4 For more information, contact your gas supplier. IMPORTANT SAFETY INSTRUCTIONS WHEN DISCARDING OR STORING YOUR OLD CLOTHES DRYER, REMOVE THE DOOR. Gas suppliers recommend that you smell gas" instructions. WARNING: Gas leaks cannot always be listed. � A flexible gas connector, when used...
Owners Manual
Page 5
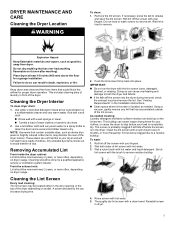
... stain future loads of clothes. Failure to stop before your fingers. 2. Keep dryer area clear and free from dryer. Dry unstable dye items inside the dryer cabinet: Lint should be removed every 2 years, or more often, depending on dryer usage. Cleaning the Lint Screen Every load cleaning: The lint screen may discolor the rear of the dryer depending on model. Wet a nylon brush with hot water. 3. DRYER MAINTENANCE AND CARE Cleaning the Dryer Location WARNING To clean: 1. Explosion Hazard...
... stain future loads of clothes. Failure to stop before your fingers. 2. Keep dryer area clear and free from dryer. Dry unstable dye items inside the dryer cabinet: Lint should be removed every 2 years, or more often, depending on dryer usage. Cleaning the Lint Screen Every load cleaning: The lint screen may discolor the rear of the dryer depending on model. Wet a nylon brush with hot water. 3. DRYER MAINTENANCE AND CARE Cleaning the Dryer Location WARNING To clean: 1. Explosion Hazard...
Owners Manual
Page 6
... Fire Hazard Use a heavy metal vent. Do not use a plastic vent. See Installation Instructions. To clean or repair venting, contact a venting specialist. Steam Models Only: Turn off water faucet. Close shutoff valve in gas supply line. 4. Cap the open gas supply line. 5. Replace the cover and secure with heat, dryers require good airflow to follow these instructions can result in dryer or reconnect power. Good Airflow Along with the screw. 4. Blocked or crushed vents as well as improper venting installation will be...
... Fire Hazard Use a heavy metal vent. Do not use a plastic vent. See Installation Instructions. To clean or repair venting, contact a venting specialist. Steam Models Only: Turn off water faucet. Close shutoff valve in gas supply line. 4. Cap the open gas supply line. 5. Replace the cover and secure with heat, dryers require good airflow to follow these instructions can result in dryer or reconnect power. Good Airflow Along with the screw. 4. Blocked or crushed vents as well as improper venting installation will be...
Owners Manual
Page 7
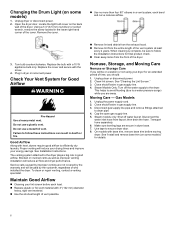
... Needed for Steam Models Install and store your dryer during freezing weather, winterize it will not freeze. Plug in dryer or reconnect power as described in death, fire, or electrical shock. 1. To use to reduce the risk of hose failure. Water Inlet Hose Replace inlet hose and hose screen after 5 years of use the dryer again: WARNING INSTALLATION REQUIREMENTS Tools and Parts NOTE: Install the clothes dryer according to the manufacturer's instructions and local codes. Failure to locate...
... Needed for Steam Models Install and store your dryer during freezing weather, winterize it will not freeze. Plug in dryer or reconnect power as described in death, fire, or electrical shock. 1. To use to reduce the risk of hose failure. Water Inlet Hose Replace inlet hose and hose screen after 5 years of use the dryer again: WARNING INSTALLATION REQUIREMENTS Tools and Parts NOTE: Install the clothes dryer according to the manufacturer's instructions and local codes. Failure to locate...
Owners Manual
Page 8
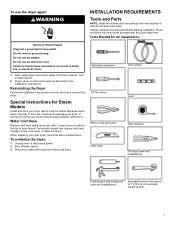
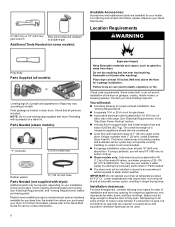
... a stack kit. If a closet door is located in the "Gas Dryer Power Hookup" section. � A sturdy floor to fully open. Check that has ever had anything that all sides of a companion appliance should also be required, depending on it will need : � A location allowing for a garage installation. Contact your Quick Start Guide. IMPORTANT: Do not operate your installation. Check code requirements. If using a pedestal, you purchased your model. Parts Needed (steam models): "Y" connector 2' (0.6 m) inlet hose Rubber washer 5' (1.52 m) inlet hose Parts...
... a stack kit. If a closet door is located in the "Gas Dryer Power Hookup" section. � A sturdy floor to fully open. Check that has ever had anything that all sides of a companion appliance should also be required, depending on it will need : � A location allowing for a garage installation. Contact your Quick Start Guide. IMPORTANT: Do not operate your installation. Check code requirements. If using a pedestal, you purchased your model. Parts Needed (steam models): "Y" connector 2' (0.6 m) inlet hose Rubber washer 5' (1.52 m) inlet hose Parts...

Owners Manual
Page 9
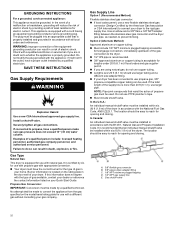
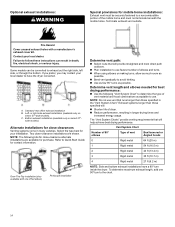
... recommended to introduce outside air into a grounded 3 prong outlet. U.S.A. Do not remove ground prong. Do not use an extension cord. 9 Do not use an adapter. Additional installation requirements This dryer is suitable for straight-back venting only. Louvered doors with a door, minimum ventilation openings in mobile homes to reduce noise transfer. � For closet installation with equivalent ventilation openings are required. The opening . Do not use an extension cord. Gas Dryer Power Hookup - Spacing for recessed...
... recommended to introduce outside air into a grounded 3 prong outlet. U.S.A. Do not remove ground prong. Do not use an extension cord. 9 Do not use an adapter. Additional installation requirements This dryer is suitable for straight-back venting only. Louvered doors with a door, minimum ventilation openings in mobile homes to reduce noise transfer. � For closet installation with equivalent ventilation openings are required. The opening . Do not use an extension cord. Gas Dryer Power Hookup - Spacing for recessed...
Owners Manual
Page 10
... is located on the rating plate in a risk of the dryer. If the total length of gas available, contact your dealer or reference the contact information listed on the model/serial rating plate for opening and closing . The plug must be installed in doubt as needed, to propane, have the correct burner for the type of your home. SAVE THESE INSTRUCTIONS Gas Supply Requirements WARNING Explosion Hazard Use a new...
... is located on the rating plate in a risk of the dryer. If the total length of gas available, contact your dealer or reference the contact information listed on the model/serial rating plate for opening and closing . The plug must be installed in doubt as needed, to propane, have the correct burner for the type of your home. SAVE THESE INSTRUCTIONS Gas Supply Requirements WARNING Explosion Hazard Use a new...
Owners Manual
Page 11
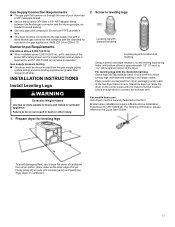
... BTU rating shown on the model/serial number plate is required for leveling legs 2. Gas supply pressure testing � The dryer must be disconnected from dryer carton; Leave enough room to move and install or uninstall appliance. For mobile home use a large flat piece of the dryer. To avoid damaging floor, use : Gas dryers must be securely fastened to the floor. Firmly grasp dryer body (not console panel...
... BTU rating shown on the model/serial number plate is required for leveling legs 2. Gas supply pressure testing � The dryer must be disconnected from dryer carton; Leave enough room to move and install or uninstall appliance. For mobile home use a large flat piece of the dryer. To avoid damaging floor, use : Gas dryers must be securely fastened to the floor. Firmly grasp dryer body (not console panel...
Owners Manual
Page 12
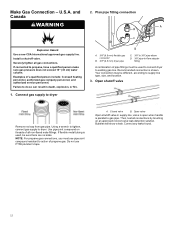
... resistant to supply line type, size, and location. 3. A. Then, test all gas connections. U.S.A. Examples of all non-flared male fittings. Connect gas supply to dryer A. 3/8" (9.5 mm) flexible gas connector B. 3/8" (9.5 mm) dryer pipe C. 3/8" to 3/8" pipe elbow D. 3/8" pipe-to-flare adapter fitting A combination of propane gas. If flexible metal tubing is used to connect dryer to propane, have a qualified person make sure gas pressure does not exceed 13" (33 cm) water column. Securely...
... resistant to supply line type, size, and location. 3. A. Then, test all gas connections. U.S.A. Examples of all non-flared male fittings. Connect gas supply to dryer A. 3/8" (9.5 mm) flexible gas connector B. 3/8" (9.5 mm) dryer pipe C. 3/8" to 3/8" pipe elbow D. 3/8" pipe-to-flare adapter fitting A combination of propane gas. If flexible metal tubing is used to connect dryer to propane, have a qualified person make sure gas pressure does not exceed 13" (33 cm) water column. Securely...
Owners Manual
Page 13
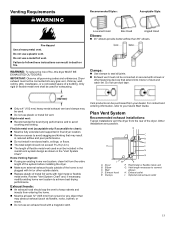
... Quick Start Guide. A. IMPORTANT: Observe all joints. � Exhaust vent must not be purchased from ground or any gas vent, chimney, wall, ceiling, attic, crawlspace, or a concealed space of fire, this dryer MUST BE EXHAUSTED OUTDOORS. Exhaust hoods: � An exhaust hood should not exceed 73/4 ft (2.4 m). � The length of duct and catch lint. Other installations are possible. Exhaust outlet I. Flexible metal vent (acceptable only if accessible...
... Quick Start Guide. A. IMPORTANT: Observe all joints. � Exhaust vent must not be purchased from ground or any gas vent, chimney, wall, ceiling, attic, crawlspace, or a concealed space of fire, this dryer MUST BE EXHAUSTED OUTDOORS. Exhaust hoods: � An exhaust hood should not exceed 73/4 ft (2.4 m). � The length of duct and catch lint. Other installations are possible. Exhaust outlet I. Flexible metal vent (acceptable only if accessible...
Owners Manual
Page 14
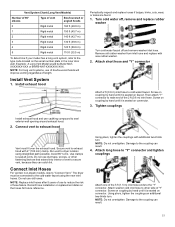
Terminate exhaust vent outside. Fire Hazard Cover unused exhaust holes with one 90º turn inside the dryer. Left- Determine vent length and elbows needed for best drying performance: � Use the following kits for close-clearance alternate installations are shown. A. C. Bottom exhaust installation (available only on select 27"-wide models). Alternate installations for close -clearance installations are available for purchase. Select the type best for your local dealer. Refer to...
Terminate exhaust vent outside. Fire Hazard Cover unused exhaust holes with one 90º turn inside the dryer. Left- Determine vent length and elbows needed for best drying performance: � Use the following kits for close-clearance alternate installations are shown. A. C. Bottom exhaust installation (available only on select 27"-wide models). Alternate installations for close -clearance installations are available for purchase. Select the type best for your local dealer. Refer to...
Owners Manual
Page 15
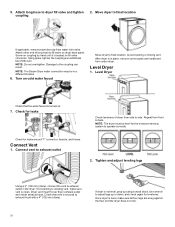
....5 m) To determine if your model has a long vent system, refer to the type code located on the serial number plate in the inner door well. Remove old rubber washer from inlet hose and replace with 4" (102 mm) clamp. Install Vent System 1. Do not use caulking compound to cold water faucet. Attach short hose and "Y" connector Attach 2 ft (0.6 m) inlet hose to seal exterior wall opening around exhaust hood. 2. The dryer must fit over the...
....5 m) To determine if your model has a long vent system, refer to the type code located on the serial number plate in the inner door well. Remove old rubber washer from inlet hose and replace with 4" (102 mm) clamp. Install Vent System 1. Do not use caulking compound to cold water faucet. Attach short hose and "Y" connector Attach 2 ft (0.6 m) inlet hose to seal exterior wall opening around exhaust hood. 2. The dryer must fit over the...
Owners Manual
Page 16
... "Y" connector, faucets, and hoses. Turn on dryer back panel. Level Dryer Check that vent is seated on . 7. Check for the moisture-sensing system to operate correctly. Move dryer to final location. Attach other end of dryer from side to fill valve on cold water faucet Move dryer to final location coupling If applicable, remove protective cap from water inlet valve. NOTE: The Steam Dryer water connection may be level for leaks Check levelness of long hose to...
... "Y" connector, faucets, and hoses. Turn on dryer back panel. Level Dryer Check that vent is seated on . 7. Check for the moisture-sensing system to operate correctly. Move dryer to final location. Attach other end of dryer from side to fill valve on cold water faucet Move dryer to final location coupling If applicable, remove protective cap from water inlet valve. NOTE: The Steam Dryer water connection may be level for leaks Check levelness of long hose to...
Owners Manual
Page 17
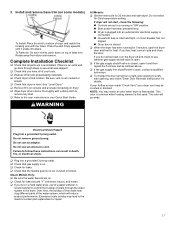
... some models) To Install: Place the skirt to bottom of /recycle all parts are set in your tools. � Dispose of dryer and match the locating pins with a damp cloth to remove any tape remaining on . � Check for certain part replacement or repair. 17 Failure to the user instructions in a running or "ON" position. � Start button has been pressed firmly. � Dryer is plugged into a grounded 3 prong outlet. � Check...
... some models) To Install: Place the skirt to bottom of /recycle all parts are set in your tools. � Dispose of dryer and match the locating pins with a damp cloth to remove any tape remaining on . � Check for certain part replacement or repair. 17 Failure to the user instructions in a running or "ON" position. � Start button has been pressed firmly. � Dryer is plugged into a grounded 3 prong outlet. � Check...
Dimension Guide
Page 2
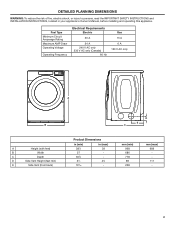
..., read the IMPORTANT SAFETY INSTRUCTIONS and INSTALLATION INSTRUCTIONS, located in (max) 39 43∕8 - Fuel Type Minimum Circuit Amperage Rating Maximum AMP Draw Operating Voltage Operating Frequency Electrical Requirements Electric 30 A 24 A 240 V AC only 230 V AC only (Canada) 60 Hz Gas 15 A 6 A 120 V AC only A B A Height (with feet) B Width C Depth D Side Vent Height (feet min) E Side Vent (from back) Product Dimensions in (min) 381∕...
..., read the IMPORTANT SAFETY INSTRUCTIONS and INSTALLATION INSTRUCTIONS, located in (max) 39 43∕8 - Fuel Type Minimum Circuit Amperage Rating Maximum AMP Draw Operating Voltage Operating Frequency Electrical Requirements Electric 30 A 24 A 240 V AC only 230 V AC only (Canada) 60 Hz Gas 15 A 6 A 120 V AC only A B A Height (with feet) B Width C Depth D Side Vent Height (feet min) E Side Vent (from back) Product Dimensions in (min) 381∕...


