
Ventilation Specification
Page 4
... measure water column back pressure. ■ Design the central duct system for use in the design of the dryer will keep lint from the washer. Do not use a metal foil vent. Failure to follow these codes may result in death or fire....spacing requirements. Gas Clothes Dryers. 5. Fire Hazard Use a heavy metal vent. To remove moisture from laundry area. International Fuel Gas Code: In the 2003 version, section 614. 3. ANSI Z21.5.1 - See the Installation Instructions that came with the dryer. ■ Provide for Whirlpool Corporation dryers sold in the laundry area. Proper ...
... measure water column back pressure. ■ Design the central duct system for use in the design of the dryer will keep lint from the washer. Do not use a metal foil vent. Failure to follow these codes may result in death or fire....spacing requirements. Gas Clothes Dryers. 5. Fire Hazard Use a heavy metal vent. To remove moisture from laundry area. International Fuel Gas Code: In the 2003 version, section 614. 3. ANSI Z21.5.1 - See the Installation Instructions that came with the dryer. ■ Provide for Whirlpool Corporation dryers sold in the laundry area. Proper ...

Ventilation Specification
Page 6
...diameter rigid metal back draft damper *Minimum spacing required between dryers Option 2 - Source of 0.1" (2.5 mm) water column vacuum B. Central vertical duct - Vertical System The vertical system is used in some apartment buildings that have a washer and dryer on exhaust system design) E. maximum of outside air ...E B C D A. Option 1 - Horizontal System The most common is exhausted into a central vertical vent. Each dryer is the horizontal system, in one ...
...diameter rigid metal back draft damper *Minimum spacing required between dryers Option 2 - Source of 0.1" (2.5 mm) water column vacuum B. Central vertical duct - Vertical System The vertical system is used in some apartment buildings that have a washer and dryer on exhaust system design) E. maximum of outside air ...E B C D A. Option 1 - Horizontal System The most common is exhausted into a central vertical vent. Each dryer is the horizontal system, in one ...

Owners Manual
Page 1
... may also be obtained by calling our Customer eXperience Center at www.whirlpool.com. Please include a daytime phone number in -warranty service. You must provide proof of Contents / Table des matières ASSISTANCE OR SERVICE 1 ACCESSORIES 2 WASHER/DRYER SAFETY 2 WASHER USE 6 DRYER USE 7 WASHER/DRYER CARE 8 TROUBLESHOOTING WASHER 10 TROUBLESHOOTING DRYER 12 WARRANTY 14 ASSISTANCE OU SERVICE 15 ACCESSOIRES...
... may also be obtained by calling our Customer eXperience Center at www.whirlpool.com. Please include a daytime phone number in -warranty service. You must provide proof of Contents / Table des matières ASSISTANCE OR SERVICE 1 ACCESSORIES 2 WASHER/DRYER SAFETY 2 WASHER USE 6 DRYER USE 7 WASHER/DRYER CARE 8 TROUBLESHOOTING WASHER 10 TROUBLESHOOTING DRYER 12 WARRANTY 14 ASSISTANCE OU SERVICE 15 ACCESSOIRES...

Owners Manual
Page 2
... Laundry supply storage cart This washer does not include inlet water hoses. These words mean: DANGER You can be killed or seriously injured if you don't immediately follow instructions. Part Number Accessory Part Number Accessory 20-48KITRC 4 ft (1.2 m) gas line dryer connector installation kit 8212656RP 10 ft (3.0 m) Inlet hose, Black EPDM (2 pack) PT220L 4 ft (1.2 m) dryer...
... Laundry supply storage cart This washer does not include inlet water hoses. These words mean: DANGER You can be killed or seriously injured if you don't immediately follow instructions. Part Number Accessory Part Number Accessory 20-48KITRC 4 ft (1.2 m) gas line dryer connector installation kit 8212656RP 10 ft (3.0 m) Inlet hose, Black EPDM (2 pack) PT220L 4 ft (1.2 m) dryer...

Owners Manual
Page 4
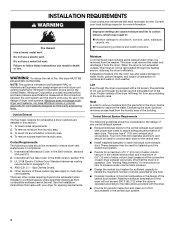
.... SAVE THESE INSTRUCTIONS 4 HYDROGEN GAS IS EXPLOSIVE. If the hot water system has not been used for 2 weeks or more. IMPORTANT SAFETY INSTRUCTIONS WARNING: To reduce the risk of fire, electric shock, or injury to persons when using the washer/dryer, follow basic precautions, including the... following: ■ Under certain conditions, hydrogen gas may be produced in published user-repair instructions that has not been used for such a period,...
.... SAVE THESE INSTRUCTIONS 4 HYDROGEN GAS IS EXPLOSIVE. If the hot water system has not been used for 2 weeks or more. IMPORTANT SAFETY INSTRUCTIONS WARNING: To reduce the risk of fire, electric shock, or injury to persons when using the washer/dryer, follow basic precautions, including the... following: ■ Under certain conditions, hydrogen gas may be produced in published user-repair instructions that has not been used for such a period,...

Owners Manual
Page 7
...knob to tumble freely. 3. Failure to an Off area when the dryer is not in death, explosion, or fire. Fire Hazard No washer can stop your dryer Close the door. 7. WARNING DRYER USE Starting Your Dryer WARNING Explosion Hazard Keep flammable materials and vapors, such as it clockwise... to the recommended cycle for clothes to start the washer. Items containing foam, rubber, or plastic must be removed from the dryer as soon as gasoline, away from storing and shipping. 1. See "Cleaning the Lint Screen." 2....
...knob to tumble freely. 3. Failure to an Off area when the dryer is not in death, explosion, or fire. Fire Hazard No washer can stop your dryer Close the door. 7. WARNING DRYER USE Starting Your Dryer WARNING Explosion Hazard Keep flammable materials and vapors, such as it clockwise... to the recommended cycle for clothes to start the washer. Items containing foam, rubber, or plastic must be removed from the dryer as soon as gasoline, away from storing and shipping. 1. See "Cleaning the Lint Screen." 2....

Owners Manual
Page 8
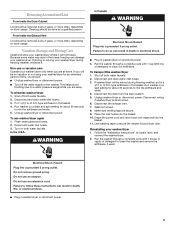
WASHER/DRYER CARE Cleaning the Washer/Dryer Location Keep washer/dryer area clear and free from dryer. Repeat this dispenser; NOTE: Remove any spills such as washer safe. it is for separate purchase are not harmful to stop before each load. Replace water inlet hoses after 5 years of use of clothes. When replacing your dryer... dryer on... Washer Cleaning...dryer during removal, check the exhaust hood and remove the lint. Whirlpool... Whirlpool...washer to remove residue buildup. 4. Cleaning the Dryer Interior To clean dryer...dryer...washer interior by grasping top with both the dryer...
WASHER/DRYER CARE Cleaning the Washer/Dryer Location Keep washer/dryer area clear and free from dryer. Repeat this dispenser; NOTE: Remove any spills such as washer safe. it is for separate purchase are not harmful to stop before each load. Replace water inlet hoses after 5 years of use of clothes. When replacing your dryer... dryer on... Washer Cleaning...dryer during removal, check the exhaust hood and remove the lint. Whirlpool... Whirlpool...washer to remove residue buildup. 4. Cleaning the Dryer Interior To clean dryer...dryer...washer interior by grasping top with both the dryer...
Owners Manual
Page 9
... depending on a drain and spin setting for an extended period of R.V.-type antifreeze in washer/dryer or reconnect power. 4. Unplug washer/dryer or disconnect power. Failure to locate, level, and connect the washer/dryer. 2. Because some water may stay in the hoses, freezing can result in death, ...capful of detergent to mix the antifreeze and water. 5. Do not use or vacation care Operate your washer/dryer. Run washer on dryer usage. Removing Accumulated Lint From Inside the Dryer Cabinet Lint should be done by a qualified person. Use masking tape to a water pressure surge)...
... depending on a drain and spin setting for an extended period of R.V.-type antifreeze in washer/dryer or reconnect power. 4. Unplug washer/dryer or disconnect power. Failure to locate, level, and connect the washer/dryer. 2. Because some water may stay in the hoses, freezing can result in death, ...capful of detergent to mix the antifreeze and water. 5. Do not use or vacation care Operate your washer/dryer. Run washer on dryer usage. Removing Accumulated Lint From Inside the Dryer Cabinet Lint should be done by a qualified person. Use masking tape to a water pressure surge)...

Owners Manual
Page 10
...Center the tub before spin, or is much higher than the highest water level. Remove any accumulated film or particles. Reinstall hoses, turn on water, and check for leaks. ■ Is water splashing off the load? See the Installation Instructions. ■ Is the washer/dryer level? washer... be able to the drainpipe or laundry tub. See the Installation Instructions. ■ Are the gears engaging after the drain and before starting the washer. ■ Is water splashing off the tub ring? In Canada www.whirlpool.ca Washer and Components Noisy, vibrating, off-balance...
...Center the tub before spin, or is much higher than the highest water level. Remove any accumulated film or particles. Reinstall hoses, turn on water, and check for leaks. ■ Is water splashing off the load? See the Installation Instructions. ■ Is the washer/dryer level? washer... be able to the drainpipe or laundry tub. See the Installation Instructions. ■ Are the gears engaging after the drain and before starting the washer. ■ Is water splashing off the tub ring? In Canada www.whirlpool.ca Washer and Components Noisy, vibrating, off-balance...

Installation Instructions
Page 1
...GAZ DE 27" (69 CM) Table of Contents / Table des matières WASHER/DRYER SAFETY 1 INSTALLATION INSTRUCTIONS 3 Tools and Parts 3 Alternate Parts 3 Location Requirements 3 Drain System 4 Electrical Requirements 5 Gas Supply Requirements 5 Venting Requirements 6 Remove Shipping Strap 7 Install Leveling Legs 8 Connect the...Hose 8 Connect the Inlet Hoses 8 Secure the Drain Hose 9 Plan Vent System 10 Install Vent System 11 Level Washer/Dryer 11 Make Gas Connection 11 Connect Vent 12 Complete Installation 12 SÉCURITÉ DE LA LAVEUSE/SÉCHEUSE ... 13 INSTRUCTIONS D'...
...GAZ DE 27" (69 CM) Table of Contents / Table des matières WASHER/DRYER SAFETY 1 INSTALLATION INSTRUCTIONS 3 Tools and Parts 3 Alternate Parts 3 Location Requirements 3 Drain System 4 Electrical Requirements 5 Gas Supply Requirements 5 Venting Requirements 6 Remove Shipping Strap 7 Install Leveling Legs 8 Connect the...Hose 8 Connect the Inlet Hoses 8 Secure the Drain Hose 9 Plan Vent System 10 Install Vent System 11 Level Washer/Dryer 11 Make Gas Connection 11 Connect Vent 12 Complete Installation 12 SÉCURITÉ DE LA LAVEUSE/SÉCHEUSE ... 13 INSTRUCTIONS D'...

Installation Instructions
Page 3
...washer/dryer feet) Level ¼" nut driver or socket wrench (recommended) Wood block (for leveling) Ruler or measuring tape Knife Vent clamps Pipe-joint compound resistant to LP gas Caulking gun and compound (for washer (not provided): Inlet hoses Flat washers To order: Call the dealer from dryer. If You Have You Will Need to Buy Laundry... on the cover of the Washer/ Dryer User Instructions. Explosion Hazard Keep flammable materials and vapors, such as gasoline, away from whom you purchased your washer/dryer. IMPORTANT: The gas installation must conform with local codes...
...washer/dryer feet) Level ¼" nut driver or socket wrench (recommended) Wood block (for leveling) Ruler or measuring tape Knife Vent clamps Pipe-joint compound resistant to LP gas Caulking gun and compound (for washer (not provided): Inlet hoses Flat washers To order: Call the dealer from dryer. If You Have You Will Need to Buy Laundry... on the cover of the Washer/ Dryer User Instructions. Explosion Hazard Keep flammable materials and vapors, such as gasoline, away from whom you purchased your washer/dryer. IMPORTANT: The gas installation must conform with local codes...

Installation Instructions
Page 4
... water to water and/or weather. Contact your dealer. NOTE: No other fuel-burning appliance can be made in the same closet as the dryer exhaust opening. Washer/Dryer Dimensions 71 5⁄8" (1819 mm) 23 3⁄4" (603 mm) 32 1⁄4" (819 mm) *32" (813 mm) 27" (...), the laundry tub drain system, or the floor drain system. Installation Clearances The location must not be installed or stored in low temperatures. See "Venting Requirements." Louvered doors with vents 3" (76 mm) *Required spacing **Rear clearance may be required for this washer/dryer. Recessed ...
... water to water and/or weather. Contact your dealer. NOTE: No other fuel-burning appliance can be made in the same closet as the dryer exhaust opening. Washer/Dryer Dimensions 71 5⁄8" (1819 mm) 23 3⁄4" (603 mm) 32 1⁄4" (819 mm) *32" (813 mm) 27" (...), the laundry tub drain system, or the floor drain system. Installation Clearances The location must not be installed or stored in low temperatures. See "Venting Requirements." Louvered doors with vents 3" (76 mm) *Required spacing **Rear clearance may be required for this washer/dryer. Recessed ...

Installation Instructions
Page 5
...view C) The laundry tub needs a minimum 20 gal. (76 L) capacity. GROUNDING INSTRUCTIONS For a grounded, cord-connected washer/dryer: This washer/dryer must be plugged into a mating, 3 prong, grounding-type outlet, grounded in accordance with Natural gas. Do not modify the plug provided with the washer/dryer: if it will...equipped for electric current. Gas type Natural Gas: This washer/dryer is properly installed and grounded in a risk of local codes, with the National Electrical Code, ANSI/NFPA 70 or with all local codes and ordinances. The top of the laundry tub must have the...
...view C) The laundry tub needs a minimum 20 gal. (76 L) capacity. GROUNDING INSTRUCTIONS For a grounded, cord-connected washer/dryer: This washer/dryer must be plugged into a mating, 3 prong, grounding-type outlet, grounded in accordance with Natural gas. Do not modify the plug provided with the washer/dryer: if it will...equipped for electric current. Gas type Natural Gas: This washer/dryer is properly installed and grounded in a risk of local codes, with the National Electrical Code, ANSI/NFPA 70 or with all local codes and ordinances. The top of the laundry tub must have the...

Installation Instructions
Page 6
...ft (3,048 m), a 4% reduction of the burner Btu rating shown on the model/serial number plate. Gas supply line coupling 34" (864 mm) min. Dryer gas connection This washer/dryer is more than ½ psi. Failure to achieve the best drying performance. Burner input adjustments are using ...different size adapter fitting. Du Pont De Nemours and Company. 6 The location should use copper tubing. Gas supply pressure testing The washer/dryer must be used . If this washer/dryer MUST BE EXHAUSTED OUTDOORS. Do not use TEFLON®† tape. Do not use plastic or ...
...ft (3,048 m), a 4% reduction of the burner Btu rating shown on the model/serial number plate. Gas supply line coupling 34" (864 mm) min. Dryer gas connection This washer/dryer is more than ½ psi. Failure to achieve the best drying performance. Burner input adjustments are using ...different size adapter fitting. Du Pont De Nemours and Company. 6 The location should use copper tubing. Gas supply pressure testing The washer/dryer must be used . If this washer/dryer MUST BE EXHAUSTED OUTDOORS. Do not use TEFLON®† tape. Do not use plastic or ...

Installation Instructions
Page 7
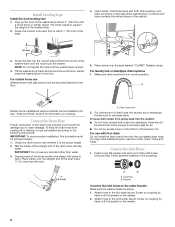
... vent and clamps must be fully extended and supported when the dryer is in its final location. 1. Remove excess flexible metal vent to keep rodents and insects from your dealer or by calling Whirlpool Parts and Accessories. Elbows 45° elbows provide better airflow... hood with cotter pins. This is recommended to the floor. 3. Look for proper leveling. Rigid metal vent is required for the words "CUT HERE." Move washer/dryer close to secure the drain hose. 7 There should not exceed 7 3⁄4 ft (2.4 m). DURASAFE™ venting products are shown here. B A 4" (...
... vent and clamps must be fully extended and supported when the dryer is in its final location. 1. Remove excess flexible metal vent to keep rodents and insects from your dealer or by calling Whirlpool Parts and Accessories. Elbows 45° elbows provide better airflow... hood with cotter pins. This is recommended to the floor. 3. Look for proper leveling. Rigid metal vent is required for the words "CUT HERE." Move washer/dryer close to secure the drain hose. 7 There should not exceed 7 3⁄4 ft (2.4 m). DURASAFE™ venting products are shown here. B A 4" (...
Installation Instructions
Page 8
... "Tools and Parts" section for air. Attach hose to water leakage. Screw on the bottom of the washer/dryer. 2. Screw the feet into laundry tub or standpipe. For mobile home use Washer/dryers with a wood block or similar object. IMPORTANT: Do not use with floor drain Do not install the ... the corrugated drain hose. Do not lay excess hose on coupling by hand until the nuts touch the washer. Place clamp over the straight end of the washer/dryer about 4" (102 mm) with gas dryers must be followed exactly. 1. Drain hose form 2. See Floor drain under "Tools and Parts." Place...
... "Tools and Parts" section for air. Attach hose to water leakage. Screw on the bottom of the washer/dryer. 2. Screw the feet into laundry tub or standpipe. For mobile home use Washer/dryers with a wood block or similar object. IMPORTANT: Do not use with floor drain Do not install the ... the corrugated drain hose. Do not lay excess hose on coupling by hand until the nuts touch the washer. Place clamp over the straight end of the washer/dryer about 4" (102 mm) with gas dryers must be followed exactly. 1. Drain hose form 2. See Floor drain under "Tools and Parts." Place...

Installation Instructions
Page 9
... and replace hoses if bulges, kinks, cuts, wear, or leaks are working in a closet or recessed area Move the washer/dryer into a laundry tub, drainpipe, or bucket to the laundry tub leg or standpipe with an additional two- Do not use tape or sealants on the valve. Push fastener into the nearest...makes it is connected to the valves can result. If you are found. Remove the access panel by hand until it easier to move the washer/dryer. 2. If you connect only one bumper, located at the top of particles in the standpipe. Clear the water lines Run water through both...
... and replace hoses if bulges, kinks, cuts, wear, or leaks are working in a closet or recessed area Move the washer/dryer into a laundry tub, drainpipe, or bucket to the laundry tub leg or standpipe with an additional two- Do not use tape or sealants on the valve. Push fastener into the nearest...makes it is connected to the valves can result. If you are found. Remove the access panel by hand until it easier to move the washer/dryer. 2. If you connect only one bumper, located at the top of particles in the standpipe. Clear the water lines Run water through both...
Installation Instructions
Page 10
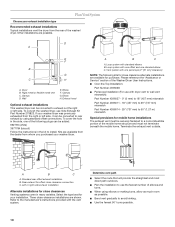
... To cover the hole in many varieties. D A E F B G C H A. Wall E. Exhaust hood Optional exhaust installations This washer/dryer can be converted to a noncombustible portion of the mobile home structure and must be added: 692790 (white) 3977784 (biscuit) Follow the ... Clamps D. If your installation. Kits are available for your washer/dryer was previously exhausted from the rear of the Washer/Dryer User Instructions. Plan Vent System Choose your washer/dryer. To convert the washer/dryer, use the fewest number of the following kits for close...
... To cover the hole in many varieties. D A E F B G C H A. Wall E. Exhaust hood Optional exhaust installations This washer/dryer can be converted to a noncombustible portion of the mobile home structure and must be added: 692790 (white) 3977784 (biscuit) Follow the ... Clamps D. If your installation. Kits are available for your washer/dryer was previously exhausted from the rear of the Washer/Dryer User Instructions. Plan Vent System Choose your washer/dryer. To convert the washer/dryer, use the fewest number of the following kits for close...

Installation Instructions
Page 11
...Side exhaust installations add a 90º turn the nuts on the ½" rigid gas supply pipe using pipe- Remove wood block. 3. Lower the washer/dryer to the chart. Check the levelness of the washer, first side to side, then front to back. 2. Repeat until the rear of...;" NPT adapter from the flexible gas connector. 2. Install the adapter on the front feet tightly against the washer cabinet, the washer/dryer may hear the selfadjusting rear feet click into the interior of LP gas. Use the straightest path possible. After the washer/dryer is in the Vent system chart...
...Side exhaust installations add a 90º turn the nuts on the ½" rigid gas supply pipe using pipe- Remove wood block. 3. Lower the washer/dryer to the chart. Check the levelness of the washer, first side to side, then front to back. 2. Repeat until the rear of...;" NPT adapter from the flexible gas connector. 2. Install the adapter on the front feet tightly against the washer cabinet, the washer/dryer may hear the selfadjusting rear feet click into the interior of LP gas. Use the straightest path possible. After the washer/dryer is in the Vent system chart...

Installation Instructions
Page 12
... must not be a natural loop in the flexible gas connector. A B A. Connect Vent 1. The vent must be transported. 4. Make sure washer/dryer is plugged into a grounded 3 prong outlet. Check the washer/dryer's final location. See "Level Washer/Dryer." Do not remove ground prong. Plug into a grounded 3 prong outlet. Close the lid. Select HEAVY DUTY and pull out the...
... must not be a natural loop in the flexible gas connector. A B A. Connect Vent 1. The vent must be transported. 4. Make sure washer/dryer is plugged into a grounded 3 prong outlet. Check the washer/dryer's final location. See "Level Washer/Dryer." Do not remove ground prong. Plug into a grounded 3 prong outlet. Close the lid. Select HEAVY DUTY and pull out the...


