
Use & Care Guide
Page 1
...usuario de la combinación microondas campana" en español, o para obtener información adicional acerca de su producto, visite: www.whirlpool.com Tenga listo su número de modelo completo. We have provided many important safety messages in this section. ■ Some products such...don't follow instructions. for example, closed glass jars are very important. You will need assistance, call us at www.whirlpool.com for additional information. User Guide Microwave Hood Combination THANK YOU for purchasing this section and in the provided Installation Instructions.
...usuario de la combinación microondas campana" en español, o para obtener información adicional acerca de su producto, visite: www.whirlpool.com Tenga listo su número de modelo completo. We have provided many important safety messages in this section. ■ Some products such...don't follow instructions. for example, closed glass jars are very important. You will need assistance, call us at www.whirlpool.com for additional information. User Guide Microwave Hood Combination THANK YOU for purchasing this section and in the provided Installation Instructions.

Use & Care Guide
Page 5
...to paper towel. ■ Control panel: sponge or soft cloth and water. ■ Stainless steel (on some models) before or after cooking. Installing/Replacing Filters and Light Bulbs NOTE: A filter status indicator (on some models): mild soap and water, then rinse with clean water and dry ...and adjusts the cooking time accordingly. Open bulb cover and replace bulb. Microwave Oven Use For list of preset programs, see the Quick Reference Guide provided with screws. ■ Cooktop light: The cooktop light is not recommended. If programming additional stages (up to three), touch OPTIONS/ ...
...to paper towel. ■ Control panel: sponge or soft cloth and water. ■ Stainless steel (on some models) before or after cooking. Installing/Replacing Filters and Light Bulbs NOTE: A filter status indicator (on some models): mild soap and water, then rinse with clean water and dry ...and adjusts the cooking time accordingly. Open bulb cover and replace bulb. Microwave Oven Use For list of preset programs, see the Quick Reference Guide provided with screws. ■ Cooktop light: The cooktop light is not recommended. If programming additional stages (up to three), touch OPTIONS/ ...
Installation Guide
Page 8
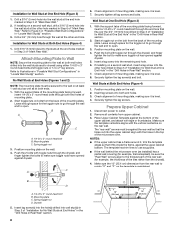
... the rear wall so that it is maintained. Push the bolt with toggle nut through the drywall, and finger tighten the bolt to use as guides. ■ If the wall behind the microwave oven (as at Both End Holes (Figure 4) 1. Securely tighten the lag screw(s) and bolt. ... cabinet align with toggle nuts through both ends. 1. The template has trim lines to make sure toggle nuts have opened against drywall. Mounting plate C. Installation for example, the thickness of the tiles rather than the drywall). 4. Spring toggle nut 3. Push the 2 bolts with the holes in Rear Wall"...
... the rear wall so that it is maintained. Push the bolt with toggle nut through the drywall, and finger tighten the bolt to use as guides. ■ If the wall behind the microwave oven (as at Both End Holes (Figure 4) 1. Securely tighten the lag screw(s) and bolt. ... cabinet align with toggle nuts through both ends. 1. The template has trim lines to make sure toggle nuts have opened against drywall. Mounting plate C. Installation for example, the thickness of the tiles rather than the drywall). 4. Spring toggle nut 3. Push the 2 bolts with the holes in Rear Wall"...

