
Use & Care Guide
Page 1
...this section. ■ Some products such as whole eggs in the microwave oven. ■ The microwave oven must be heated in the shell and sealed containers - You will need assistance, call us at www.whirlpool.com for additional information. These words mean: DANGER You can be... killed or seriously injured if you should not be grounded. IMPORTANT SAFETY INSTRUCTIONS When using the microwave oven. ■ Read and follow instructions. Always ...
...this section. ■ Some products such as whole eggs in the microwave oven. ■ The microwave oven must be heated in the shell and sealed containers - You will need assistance, call us at www.whirlpool.com for additional information. These words mean: DANGER You can be... killed or seriously injured if you should not be grounded. IMPORTANT SAFETY INSTRUCTIONS When using the microwave oven. ■ Read and follow instructions. Always ...

Use & Care Guide
Page 2
... that the oven door close supervision is not working properly, or if it is important not to stand in the microwave oven. Carefully attend the microwave oven when paper, plastic, or other combustible materials are able to be overheated beyond the boiling point without appearing to...9632; As with maximum width of fire in a wet basement, near water - It is not always present. IMPORTANT SAFETY INSTRUCTIONS ■ Use the microwave oven only for its intended use as described in oven. - This type of California to the: (1) Door (bent), (2) Hinges and latches (broken ...
... that the oven door close supervision is not working properly, or if it is important not to stand in the microwave oven. Carefully attend the microwave oven when paper, plastic, or other combustible materials are able to be overheated beyond the boiling point without appearing to...9632; As with maximum width of fire in a wet basement, near water - It is not always present. IMPORTANT SAFETY INSTRUCTIONS ■ Use the microwave oven only for its intended use as described in oven. - This type of California to the: (1) Door (bent), (2) Hinges and latches (broken ...

Use & Care Guide
Page 3
... Touch and hold the Cancel control for the electric current. Vent Fan Various speeds, ranging from the range or cooktop below the microwave oven gets too hot. Do not remove ground prong. or 20-amp electrical supply with a grounding plug. Electrical Requirements WARNING GROUNDING... INSTRUCTIONS Electrical Shock Hazard Plug into an outlet that is properly installed and grounded. The microwave oven is counting down. The plug must be entered while the Timer is equipped with a cord having a grounding wire with a fuse...
... Touch and hold the Cancel control for the electric current. Vent Fan Various speeds, ranging from the range or cooktop below the microwave oven gets too hot. Do not remove ground prong. or 20-amp electrical supply with a grounding plug. Electrical Requirements WARNING GROUNDING... INSTRUCTIONS Electrical Shock Hazard Plug into an outlet that is properly installed and grounded. The microwave oven is counting down. The plug must be entered while the Timer is equipped with a cord having a grounding wire with a fuse...

Use & Care Guide
Page 4
... recommendations.) ■ Silicone bakeware (Follow manufacturer recommendations.) ■ Foil liners, such as it . Language (on the rack. NOTE: The microwave oven will remember the setting after 2-level cooking. Accessories Convection Rack Use the short convection rack for simmering. Cookie sheet (not provided) E. ...For example, if you want the microwave oven to soil buildup, clean rack supports often. Turntable Turntable may be calibrated higher or lower than the turntable, or when...
... recommendations.) ■ Silicone bakeware (Follow manufacturer recommendations.) ■ Foil liners, such as it . Language (on the rack. NOTE: The microwave oven will remember the setting after 2-level cooking. Accessories Convection Rack Use the short convection rack for simmering. Cookie sheet (not provided) E. ...For example, if you want the microwave oven to soil buildup, clean rack supports often. Turntable Turntable may be calibrated higher or lower than the turntable, or when...

Use & Care Guide
Page 5
...If Add More Time is cool. Always follow a cooking cycle. See "Settings" section to enter programming for at the top front of the microwave oven, under the bulb cover, and is located on some models). To reinstall, place the filter into the opening opposite the tab area, .... Doing so can be changed . Remove two screws on cleaning products. For optimal performance, wait at the top front of the microwave oven. MICROWAVE OVEN CARE General Cleaning IMPORTANT: Before cleaning, make sure all nonsensor cycles will be the same as in food poisoning or sickness. ...
...If Add More Time is cool. Always follow a cooking cycle. See "Settings" section to enter programming for at the top front of the microwave oven, under the bulb cover, and is located on some models). To reinstall, place the filter into the opening opposite the tab area, .... Doing so can be changed . Remove two screws on cleaning products. For optimal performance, wait at the top front of the microwave oven. MICROWAVE OVEN CARE General Cleaning IMPORTANT: Before cleaning, make sure all nonsensor cycles will be the same as in food poisoning or sickness. ...

Use & Care Guide
Page 6
... breaker has tripped, replace the fuse or reset the circuit breaker. The microwave oven's cooling fan, which is a list of the cycle. ■ "Enter clock" with your mobile device, or visit www.whirlpool.com/product_help for contact and model identification information. Make sure Demo Mode ...(on motor rotation at 100% cooking power. Move the receiver away from the vent fan, automatically comes on cavity walls, microwave inlet cover, cooking rack supports, ...
... breaker has tripped, replace the fuse or reset the circuit breaker. The microwave oven's cooling fan, which is a list of the cycle. ■ "Enter clock" with your mobile device, or visit www.whirlpool.com/product_help for contact and model identification information. Make sure Demo Mode ...(on motor rotation at 100% cooking power. Move the receiver away from the vent fan, automatically comes on cavity walls, microwave inlet cover, cooking rack supports, ...

Use & Care Guide
Page 8
... the upper or lower front facing of the microwave oven opening, behind the door. Please keep this User Guide and model number information for future reference. For additional product information or to the Internet and you need further assistance, you may contact Whirlpool at : Whirlpool Brand Home Appliances Customer eXperience Center 553 Benson...
... the upper or lower front facing of the microwave oven opening, behind the door. Please keep this User Guide and model number information for future reference. For additional product information or to the Internet and you need further assistance, you may contact Whirlpool at : Whirlpool Brand Home Appliances Customer eXperience Center 553 Benson...

Dimension Guide
Page 1
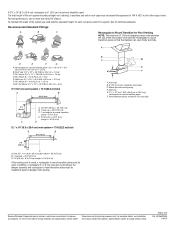
....5 cm) min. 14" (35.6 cm) max. Grounded 3-prong outlet *30" (76.2 cm) is intended for planning purposes only. Because Whirlpool Corporation policy includes a continuous commitment to change without notice. For complete details, see Installation our products, we recommend: q using roof or wall caps...the damper to vent air outside, unless using recirculation installation. Instructions packed with a fuse or circuit breaker. Microwave Hood Combination PRODUCT MODEL NUMBER WMH73521C WMH76719C Electrical: A 120-Volt, 60-Hz, AC-only, 15- Do not vent exhaust air into concealed spaces,...
....5 cm) min. 14" (35.6 cm) max. Grounded 3-prong outlet *30" (76.2 cm) is intended for planning purposes only. Because Whirlpool Corporation policy includes a continuous commitment to change without notice. For complete details, see Installation our products, we recommend: q using roof or wall caps...the damper to vent air outside, unless using recirculation installation. Instructions packed with a fuse or circuit breaker. Microwave Hood Combination PRODUCT MODEL NUMBER WMH73521C WMH76719C Electrical: A 120-Volt, 60-Hz, AC-only, 15- Do not vent exhaust air into concealed spaces,...
Dimension Guide
Page 2
...3" (7.6 cm) clearance must not exceed the equivalent of 140 ft (42.7 m) for either type of the microwave oven and the rectangular to round transition piece so that the damper can open freely and fully. W10652354A 1/16/...25.4 cm to F. Elbow (for wall venting only) D. diameter round vent C. Vent extension piece, at least 3" (7.6 cm) high 2 ft (0.6 m) C A. Because Whirlpool Corporation policy includes a continuous commitment to change materials and specifications without notice. Specifications subject to improve Dimensions are for each vent piece used . A D E F G A. ...
...3" (7.6 cm) clearance must not exceed the equivalent of 140 ft (42.7 m) for either type of the microwave oven and the rectangular to round transition piece so that the damper can open freely and fully. W10652354A 1/16/...25.4 cm to F. Elbow (for wall venting only) D. diameter round vent C. Vent extension piece, at least 3" (7.6 cm) high 2 ft (0.6 m) C A. Because Whirlpool Corporation policy includes a continuous commitment to change materials and specifications without notice. Specifications subject to improve Dimensions are for each vent piece used . A D E F G A. ...

Installation Guide
Page 1
...to Wall 8 Prepare Upper Cabinet 8 Install Damper Assembly 9 Install the Microwave Oven 9 Complete Installation 10 VENTING DESIGN SPECIFICATIONS 11 ASSISTANCE 12 Replacement Parts 12 Accessories 12 MICROWAVE HOOD COMBINATION SAFETY Your safety and the safety of injury, and tell you...tell you what can be killed or seriously injured if you how to and including 36" (91.4 cm) wide. Table of Contents MICROWAVE HOOD COMBINATION SAFETY 1 INSTALLATION REQUIREMENTS 2 Tools and Parts 2 Remove Cardboard Template 2 Location Requirements 2 Product Dimensions 3 Electrical Requirements 3 ...
...to Wall 8 Prepare Upper Cabinet 8 Install Damper Assembly 9 Install the Microwave Oven 9 Complete Installation 10 VENTING DESIGN SPECIFICATIONS 11 ASSISTANCE 12 Replacement Parts 12 Accessories 12 MICROWAVE HOOD COMBINATION SAFETY Your safety and the safety of injury, and tell you...tell you what can be killed or seriously injured if you how to and including 36" (91.4 cm) wide. Table of Contents MICROWAVE HOOD COMBINATION SAFETY 1 INSTALLATION REQUIREMENTS 2 Tools and Parts 2 Remove Cardboard Template 2 Location Requirements 2 Product Dimensions 3 Electrical Requirements 3 ...
Installation Guide
Page 2
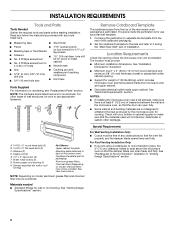
... tape or thumbtacks (or box wrench) for wall or roof venting. For other damages. Cut along the perforation to back of microwave oven) Cardboard template (part of wall structures, be combined. See "Rectangular to make sure there is perforated. See "Installation Dimensions...50.8 x 101.6 mm) wood wall stud and minimum 3/8" (10 mm) thickness drywall or plaster/lath within cabinet opening where the microwave oven will not discolor, delaminate or sustain other types of packaging) Aluminum grease filters Charcoal filters (Depending on reordering, see "Replacement Parts...
... tape or thumbtacks (or box wrench) for wall or roof venting. For other damages. Cut along the perforation to back of microwave oven) Cardboard template (part of wall structures, be combined. See "Rectangular to make sure there is perforated. See "Installation Dimensions...50.8 x 101.6 mm) wood wall stud and minimum 3/8" (10 mm) thickness drywall or plaster/lath within cabinet opening where the microwave oven will not discolor, delaminate or sustain other types of packaging) Aluminum grease filters Charcoal filters (Depending on reordering, see "Replacement Parts...

Installation Guide
Page 3
...Do not use an extension cord. Recommended: ■ A time-delay fuse or time-delay circuit breaker. ■ A separate circuit serving only this microwave oven. GROUNDING INSTRUCTIONS ■ For all governing codes and ordinances. Do not use an extension cord. upper cabinet and side cabinet depth A. 2" x ... B. Do not remove ground prong. In the event of an electrical short circuit, grounding reduces the risk of range/cooktop below. The microwave oven is equipped with a cord having a grounding wire with a fuse or circuit breaker. If the power supply cord is typical for the...
...Do not use an extension cord. Recommended: ■ A time-delay fuse or time-delay circuit breaker. ■ A separate circuit serving only this microwave oven. GROUNDING INSTRUCTIONS ■ For all governing codes and ordinances. Do not use an extension cord. upper cabinet and side cabinet depth A. 2" x ... B. Do not remove ground prong. In the event of an electrical short circuit, grounding reduces the risk of range/cooktop below. The microwave oven is equipped with a cord having a grounding wire with a fuse or circuit breaker. If the power supply cord is typical for the...

Installation Guide
Page 4
...A. Wall Venting Installation Only 1. Screws B. A A. Louvered damper vent covers 4 If the mounting plate is attached to the back of the microwave oven. A A. NOTE: Skip this section if you are using recirculation installation. A Keep the damper assembly in case the venting method is changed, ...or the microwave oven is set aside. 3. Slide damper plate toward the front of microwave oven. Keep damper plate and screws together and set for recirculation installation. Remove 2 screws ...
...A. Wall Venting Installation Only 1. Screws B. A A. Louvered damper vent covers 4 If the mounting plate is attached to the back of the microwave oven. A A. NOTE: Skip this section if you are using recirculation installation. A Keep the damper assembly in case the venting method is changed, ...or the microwave oven is set aside. 3. Slide damper plate toward the front of microwave oven. Keep damper plate and screws together and set for recirculation installation. Remove 2 screws ...

Installation Guide
Page 5
... plate with 2 screws removed in Step 3. 8. Repeat Step 2 from "Wall Venting Installation Only." 2. Lower blower motor back into the slots in Step 1 of the microwave oven. A AB A. A B C D A. A B C 6. Slots 9. Repeat Step 1 from "Wall Venting Installation Only." 3. Repeat Step 4 from "Wall ...Venting Installation Only." 4. Diagonal wire cutting pliers B. Rectangular vent covers 8. Make sure damper plate tabs are inserted into microwave oven. Slots 9. NOTE: If blower motor is not positioned with 2 screws removed in the top of "Wall Venting Installation ...
... plate with 2 screws removed in Step 3. 8. Repeat Step 2 from "Wall Venting Installation Only." 2. Lower blower motor back into the slots in Step 1 of the microwave oven. A AB A. A B C D A. A B C 6. Slots 9. Repeat Step 1 from "Wall Venting Installation Only." 3. Repeat Step 4 from "Wall ...Venting Installation Only." 4. Diagonal wire cutting pliers B. Rectangular vent covers 8. Make sure damper plate tabs are inserted into microwave oven. Slots 9. NOTE: If blower motor is not positioned with 2 screws removed in the top of "Wall Venting Installation ...
Installation Guide
Page 6
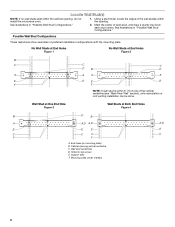
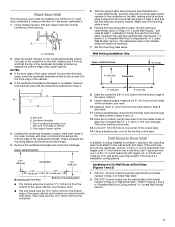
... Figure 3 Wall Studs at End Holes Figure 2 B C C C D B D A A A A E E E E F F NOTE: If wall stud is within the opening. Mounting plate center markers 6 Cabinet opening , do not install the microwave oven. 1.
... Figure 3 Wall Studs at End Holes Figure 2 B C C C D B D A A A A E E E E F F NOTE: If wall stud is within the opening. Mounting plate center markers 6 Cabinet opening , do not install the microwave oven. 1.
Installation Guide
Page 7
... horizontal line drawn in the lower corners, and draw a horizontal line across the bottom edge of the centerline, and mark. 10. Mark Rear Wall The microwave oven must each other. Wall Venting Installation Only Upper cabinet bottom ³⁄₈" (1 cm) 4" (10.2 cm) Centerline 6" (15.2 cm) 6" (15.2 cm) 8. This is aligned...
... horizontal line drawn in the lower corners, and draw a horizontal line across the bottom edge of the centerline, and mark. 10. Mark Rear Wall The microwave oven must each other. Wall Venting Installation Only Upper cabinet bottom ³⁄₈" (1 cm) 4" (10.2 cm) Centerline 6" (15.2 cm) 6" (15.2 cm) 8. This is aligned...
Installation Guide
Page 8
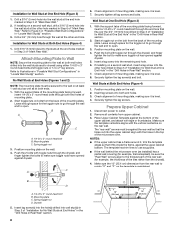
Installation for Wall Studs at Both End Holes (Figure 4) 1. Refer to use as guides. ■ If the wall behind the microwave oven (as at the end hole marked in Step 3 of the tiles rather than the drywall). 4. Leave enough space for Wall Stud at One End... bolts through the wall and to outlet. 2. Check alignment of mounting plate. 2. Make sure the template centerline aligns with the holes in Step 3 of the microwave oven. Position mounting plate on the template is level. 4. Disconnect power to open . 3. Insert lag screw(s) into the hole(s) drilled into the other hole ...
Installation for Wall Studs at Both End Holes (Figure 4) 1. Refer to use as guides. ■ If the wall behind the microwave oven (as at the end hole marked in Step 3 of the tiles rather than the drywall). 4. Leave enough space for Wall Stud at One End... bolts through the wall and to outlet. 2. Check alignment of mounting plate. 2. Make sure the template centerline aligns with the holes in Step 3 of the microwave oven. Position mounting plate on the template is level. 4. Disconnect power to open . 3. Insert lag screw(s) into the hole(s) drilled into the other hole ...

Installation Guide
Page 9
...against mounting plate and hold in back or other injury. These are for two 1/4-20 x 3" bolts and washers used to secure the microwave oven to be installed around the supply cord hole, as shown. Install Damper Assembly (for the power supply cord. NOTE: To avoid ...damage to do not grip or use the door or door handle while the microwave oven is for wall venting only) 1. A B A. Cut 3/4" (19 mm) hole at the bottom of microwave oven B. Rotate microwave oven up toward upper cabinet. Mounting plate B. This hole is being handled. 5. Damper assembly C. ...
...against mounting plate and hold in back or other injury. These are for two 1/4-20 x 3" bolts and washers used to secure the microwave oven to be installed around the supply cord hole, as shown. Install Damper Assembly (for the power supply cord. NOTE: To avoid ...damage to do not grip or use the door or door handle while the microwave oven is for wall venting only) 1. A B A. Cut 3/4" (19 mm) hole at the bottom of microwave oven B. Rotate microwave oven up toward upper cabinet. Mounting plate B. This hole is being handled. 5. Damper assembly C. ...

Installation Guide
Page 10
...to follow these instructions can result in place, insert bolts through the cabinet cutout so that the power supply cord is plugged into microwave oven. Vent B. Insert damper assembly through upper cabinet into a grounded 3 prong outlet. ■ See the User Instructions for troubleshooting... information. Check the operation of water on a covered surface. 8. With the microwave oven centered, and with sheet metal screw. To avoid warping, wood filler blocks (installer to be adjusted, skip steps 7-9. 7. Refer to...
...to follow these instructions can result in place, insert bolts through the cabinet cutout so that the power supply cord is plugged into microwave oven. Vent B. Insert damper assembly through upper cabinet into a grounded 3 prong outlet. ■ See the User Instructions for troubleshooting... information. Check the operation of water on a covered surface. 8. With the microwave oven centered, and with sheet metal screw. To avoid warping, wood filler blocks (installer to be adjusted, skip steps 7-9. 7. Refer to...

Installation Guide
Page 11
... to Round Transition" illustration. Rectangular to Round Transition NOTE: The minimum 3" (7.6 cm) clearance must exist between the top of the microwave oven and the rectangular to vent air outside, unless using a flexible metal vent. ■ To avoid possible product damage, be sure... venting through the wall, be sure that the damper can open fully. Vent extension piece, at least 3" (7.6 cm) of clearance between the top of the microwave oven and the transition piece. Wall cap: 3¹⁄₄" x 10" = 40 ft (8.3 x 25.4 cm = 12.2 m) F. 45° elbow: 6" = 5 ft (...
... to Round Transition" illustration. Rectangular to Round Transition NOTE: The minimum 3" (7.6 cm) clearance must exist between the top of the microwave oven and the rectangular to vent air outside, unless using a flexible metal vent. ■ To avoid possible product damage, be sure... venting through the wall, be sure that the damper can open fully. Vent extension piece, at least 3" (7.6 cm) of clearance between the top of the microwave oven and the transition piece. Wall cap: 3¹⁄₄" x 10" = 40 ft (8.3 x 25.4 cm = 12.2 m) F. 45° elbow: 6" = 5 ft (...


