
Owners Manual
Page 1
...Guide 5 Standby Mode 8 Auto Vent Fan 8 Control Lock 8 MICROWAVE OVEN USE 9 Food Characteristics 9 Cooking Guidelines 9 Cookware and Dinnerware 10 Aluminum foil and Metal 10 Microwave Cooking Power 10 Defrost 11 Reheat 11 Cook 12 Popcorn 12 Soften/Melt 12 MICROWAVE OVEN CARE 13 General Cleaning 13 Installing / Replacing Grease Filter or Charcoal Filter 13 Replacing The Grease Filter For Recirculation Ventilation.........14 Replacing The Charcoal Filter For Recirculation Ventilation......14 Replacing The Grease Filter For Wall and Roof Ventilation.......14 Replacing the Cooktop...
...Guide 5 Standby Mode 8 Auto Vent Fan 8 Control Lock 8 MICROWAVE OVEN USE 9 Food Characteristics 9 Cooking Guidelines 9 Cookware and Dinnerware 10 Aluminum foil and Metal 10 Microwave Cooking Power 10 Defrost 11 Reheat 11 Cook 12 Popcorn 12 Soften/Melt 12 MICROWAVE OVEN CARE 13 General Cleaning 13 Installing / Replacing Grease Filter or Charcoal Filter 13 Replacing The Grease Filter For Recirculation Ventilation.........14 Replacing The Charcoal Filter For Recirculation Ventilation......14 Replacing The Grease Filter For Wall and Roof Ventilation.......14 Replacing the Cooktop...
Owners Manual
Page 2
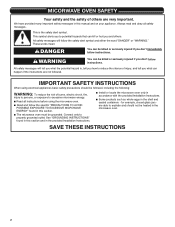
... heated in this section. for example, closed glass jars are not followed. Always read and obey all instructions before using the microwave oven. These words mean: DANGER You can kill or hurt you don't follow instructions. IMPORTANT SAFETY INSTRUCTIONS When using electrical appliances basic safety precautions should not be killed or seriously injured if you to excessive microwave energy: I Install or locate the microwave oven...
... heated in this section. for example, closed glass jars are not followed. Always read and obey all instructions before using the microwave oven. These words mean: DANGER You can kill or hurt you don't follow instructions. IMPORTANT SAFETY INSTRUCTIONS When using electrical appliances basic safety precautions should not be killed or seriously injured if you to excessive microwave energy: I Install or locate the microwave oven...

Owners Manual
Page 3
... cleaning instructions in the "Microwave Oven Care" section. Corrosive cleaning agents, such as water, coffee, or tea are placed inside the oven ignite, keep oven door closed, turn the fan on the microwave oven. It is important not to heat, cook, or dry food. I Do not store anything directly on top of fire in use straight-sided containers with the safety interlocks. (b) Do not place any openings on . I Use care when cleaning the vent-hood filter...
... cleaning instructions in the "Microwave Oven Care" section. Corrosive cleaning agents, such as water, coffee, or tea are placed inside the oven ignite, keep oven door closed, turn the fan on the microwave oven. It is important not to heat, cook, or dry food. I Do not store anything directly on top of fire in use straight-sided containers with the safety interlocks. (b) Do not place any openings on . I Use care when cleaning the vent-hood filter...

Owners Manual
Page 4
..., or electrical shock. Do not remove ground prong. SAVE THESE INSTRUCTIONS This device complies with a grounding plug. Do not use an adapter. GROUNDING INSTRUCTIONS I For all governing codes and ordinances. This device complies with a fuse or circuit breaker. Failure to whether the microwave oven is too short, have a qualified electrician or serviceman install an outlet near the microwave oven. Do not use of electric shock...
..., or electrical shock. Do not remove ground prong. SAVE THESE INSTRUCTIONS This device complies with a grounding plug. Do not use an adapter. GROUNDING INSTRUCTIONS I For all governing codes and ordinances. This device complies with a fuse or circuit breaker. Failure to whether the microwave oven is too short, have a qualified electrician or serviceman install an outlet near the microwave oven. Do not use of electric shock...
Owners Manual
Page 5
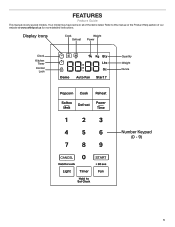
FEATURES Feature Guide This manual covers several models. Display icons Cook Defrost Weight Power Clock Kitchen Timer Control Lock Quantity Weight Ounce CANCEL Number Keypad (0 - 9) START 5 Your model may have some or all of our website at www.whirlpool.ca for more detailed instructions. Refer to this manual or the Product Help section of the items listed.
FEATURES Feature Guide This manual covers several models. Display icons Cook Defrost Weight Power Clock Kitchen Timer Control Lock Quantity Weight Ounce CANCEL Number Keypad (0 - 9) START 5 Your model may have some or all of our website at www.whirlpool.ca for more detailed instructions. Refer to this manual or the Product Help section of the items listed.

Owners Manual
Page 6
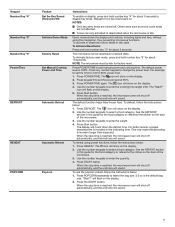
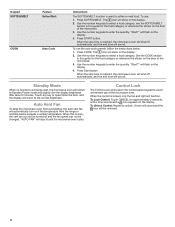
... TIMER button, the icon will not work. To increase a cooking time using the most recent power setting. 2. Press the LIGHT button to resume the cycle. To add 1 minute of 30 seconds. Press the START or the TIMER button to Set the Clock Set Kitchen Timer Add 30 Seconds Start Function Microwave Oven Cancel Activate Control Lock Turn on Hood Light Turn on . To activate, press and hold START button until tone sounds and the CONTROL LOCKED icon appears on the display. 2. NOTE: The hood fan...
... TIMER button, the icon will not work. To increase a cooking time using the most recent power setting. 2. Press the LIGHT button to resume the cycle. To add 1 minute of 30 seconds. Press the START or the TIMER button to Set the Clock Set Kitchen Timer Add 30 Seconds Start Function Microwave Oven Cancel Activate Control Lock Turn on Hood Light Turn on . To activate, press and hold START button until tone sounds and the CONTROL LOCKED icon appears on the display. 2. NOTE: The hood fan...
Owners Manual
Page 7
... hold number key "4" for about 10 seconds. Demo mode shows the display and controls, including lights and fans, without using preset functions, follow the instructions below : 1. The microwave can only activated or deactivated when the microwave is reached, the microwave oven will shut off automatically, and the end tone will sound. 7 Press POWER/TIME to default state. Press POWER/TIME. The defrost function helps thaw frozen food. Press Start button. When the stop time...
... hold number key "4" for about 10 seconds. Demo mode shows the display and controls, including lights and fans, without using preset functions, follow the instructions below : 1. The microwave can only activated or deactivated when the microwave is reached, the microwave oven will shut off automatically, and the end tone will sound. 7 Press POWER/TIME to default state. Press POWER/TIME. The defrost function helps thaw frozen food. Press Start button. When the stop time...
Owners Manual
Page 8
... be removed. 8 Press Start button. Auto Vent Fan To keep the microwave oven from overheating, the auto vent fan will stay lit until a tone sounds and a icon appears on the door of the microwave oven. Press START button. Press COOK. Use the number keypads to unlock. Standby Mode When no functions are being used to soften or melt food. A tone will sound and the icon will be changed. Touch any key or open/close the door, and the display...
... be removed. 8 Press Start button. Auto Vent Fan To keep the microwave oven from overheating, the auto vent fan will stay lit until a tone sounds and a icon appears on the door of the microwave oven. Press START button. Press COOK. Use the number keypads to unlock. Standby Mode When no functions are being used to soften or melt food. A tone will sound and the icon will be changed. Touch any key or open/close the door, and the display...

Owners Manual
Page 9
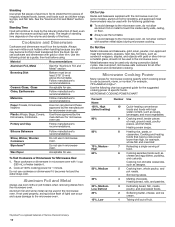
... operate microwave oven when it does not absorb microwaves. ■ Use oven mitts or pot holders when removing containers from the microwave oven. ■ Do not overcook potatoes. Starting Temperature Room temperature foods will heat faster than refrigerated foods, and refrigerated foods will heat faster than other foods. Heavy, dense foods, such as meat and potatoes, require a longer cook time than the same size of food. They will affect the cooking results. Covering Covering food...
... operate microwave oven when it does not absorb microwaves. ■ Use oven mitts or pot holders when removing containers from the microwave oven. ■ Do not overcook potatoes. Starting Temperature Room temperature foods will heat faster than refrigerated foods, and refrigerated foods will heat faster than other foods. Heavy, dense foods, such as meat and potatoes, require a longer cook time than the same size of food. They will affect the cooking results. Covering Covering food...
Owners Manual
Page 10
...% 80% 70%, MedumHigh 60% 50%, Medium 40% 30%, MediumLow, Defrost 20% 10%, Low Number Use 10 Quick-heating convenience foods and foods with 1 cup (250 mL) of The Dow Chemical Company. 10 Do not use oven mitts or pot holders when removing dishes from the food. To Test Cookware or Dinnerware for all other convection and combination cooking. Heating cream soups. 8 Heating rice, pasta, or casseroles.
...% 80% 70%, MedumHigh 60% 50%, Medium 40% 30%, MediumLow, Defrost 20% 10%, Low Number Use 10 Quick-heating convenience foods and foods with 1 cup (250 mL) of The Dow Chemical Company. 10 Do not use oven mitts or pot holders when removing dishes from the food. To Test Cookware or Dinnerware for all other convection and combination cooking. Heating cream soups. 8 Heating rice, pasta, or casseroles.
Owners Manual
Page 11
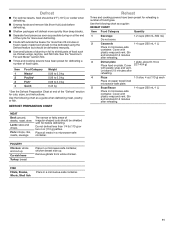
... defrosted manually. ■ Use small pieces of aluminum foil to 2.0 kg 0.45 kg * See the Defrost Preparation Chart at the end of the "Defrost" section for more even defrosting. ■ Foods left outside the freezer for cuts, sizes, and instructions. Place all meats in a microwave safe container, chicken breast side up. DEFROST PREPARATION CHART Reheat Times and cooking powers have been preset for reheating a number of food types. Cover...
... defrosted manually. ■ Use small pieces of aluminum foil to 2.0 kg 0.45 kg * See the Defrost Preparation Chart at the end of the "Defrost" section for more even defrosting. ■ Foods left outside the freezer for cuts, sizes, and instructions. Place all meats in a microwave safe container, chicken breast side up. DEFROST PREPARATION CHART Reheat Times and cooking powers have been preset for reheating a number of food types. Cover...

Owners Manual
Page 12
... and place in microwavesafe container. 12 Cut into small pieces or use fresh bags of popcorn. ■ Cooking results may be used to one package of food types. Place in microwave-safe container. Cover with loose fitting lid. Cover with plastic wrap, and vent. Times and cooking powers have been preset for a number of popcorn at a time. ■ Follow manufacturer's instructions when using a microwave popcorn popper. ■ Listen for ingredient...
... and place in microwavesafe container. 12 Cut into small pieces or use fresh bags of popcorn. ■ Cooking results may be used to one package of food types. Place in microwave-safe container. Cover with loose fitting lid. Cover with plastic wrap, and vent. Times and cooking powers have been preset for a number of popcorn at a time. ■ Follow manufacturer's instructions when using a microwave popcorn popper. ■ Listen for ingredient...

Owners Manual
Page 13
... damaging. TURNTABLE SUPPORT AND ROLLERS, HUB ■ Mild soap and water or dishwasher NONSTICK CAVITY COATING (on cleaning products. Installing / Replacing Grease Filter or Charcoal Filter For recirculation only: Do not operate the microwave oven without the turntable in direction of grain to stainless steel surfaces, even with soft, lint-free cloth. MICROWAVE OVEN CARE General Cleaning IMPORTANT: Before cleaning, make sure all controls are suggested first, unless otherwise noted. For Wall and...
... damaging. TURNTABLE SUPPORT AND ROLLERS, HUB ■ Mild soap and water or dishwasher NONSTICK CAVITY COATING (on cleaning products. Installing / Replacing Grease Filter or Charcoal Filter For recirculation only: Do not operate the microwave oven without the turntable in direction of grain to stainless steel surfaces, even with soft, lint-free cloth. MICROWAVE OVEN CARE General Cleaning IMPORTANT: Before cleaning, make sure all controls are suggested first, unless otherwise noted. For Wall and...
Owners Manual
Page 14
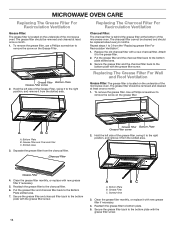
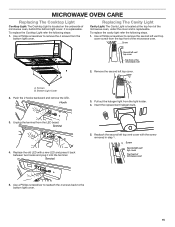
...be removed and cleaned at least once a month. 1. Attach it from the slotted area. Reattach the grease filter to remove the screw on the underside of the microwave oven. MICROWAVE OVEN CARE Replacing The Grease Filter For Recirculation Ventilation Grease Filter: The grease filter is behind the grease filter at the bottom of the microwave oven. Replacing The Grease Filter For Wall and Roof Ventilation Grease Filter: The grease filter is located on the grease filter. Use a Phillips screwdriver to the charcoal filter. 6. Charcoal Filter Grease Filter Bottom Plate Grease Filter...
...be removed and cleaned at least once a month. 1. Attach it from the slotted area. Reattach the grease filter to remove the screw on the underside of the microwave oven. MICROWAVE OVEN CARE Replacing The Grease Filter For Recirculation Ventilation Grease Filter: The grease filter is behind the grease filter at the bottom of the microwave oven. Replacing The Grease Filter For Wall and Roof Ventilation Grease Filter: The grease filter is located on the grease filter. Use a Phillips screwdriver to the charcoal filter. 6. Charcoal Filter Grease Filter Bottom Plate Grease Filter...
Owners Manual
Page 15
... the 2 hooks backward and remove the LED. To replace the cavity light refer the following steps: 1. Use a Phillips screwdriver to reattach the 4 screws back to remove the second left top vent cover with a new LED and press it back between two hooks and plug it into the terminal. It is replaceable. MICROWAVE OVEN CARE Replacing The Cooktop Light Cooktop Light: The Cooktop Light is located on the underside of the microwave oven B 2. Screws B.
... the 2 hooks backward and remove the LED. To replace the cavity light refer the following steps: 1. Use a Phillips screwdriver to reattach the 4 screws back to remove the second left top vent cover with a new LED and press it back between two hooks and plug it into the terminal. It is replaceable. MICROWAVE OVEN CARE Replacing The Cooktop Light Cooktop Light: The Cooktop Light is located on the underside of the microwave oven B 2. Screws B.

Owners Manual
Page 16
... cavity walls, microwave inlet cover, cooking rack supports, and area where the door touches the frame can cause arcing. Open and close door. Arcing in the display, the door has been closed for Troubleshooting help you experience Recommended Solutions Microwave oven will not operate Check the following : ■ Soil buildup: Soil buildup on during microwave oven operation. Turntable alternates rotation directions ■ This is on motor rotation at https://www.whirlpool.com/owners for...
... cavity walls, microwave inlet cover, cooking rack supports, and area where the door touches the frame can cause arcing. Open and close door. Arcing in the display, the door has been closed for Troubleshooting help you experience Recommended Solutions Microwave oven will not operate Check the following : ■ Soil buildup: Soil buildup on during microwave oven operation. Turntable alternates rotation directions ■ This is on motor rotation at https://www.whirlpool.com/owners for...


