
Owners Manual
Page 1
...Guide 5 Standby Mode 8 Auto Vent Fan 8 Control Lock 8 MICROWAVE OVEN USE 9 Food Characteristics 9 Cooking Guidelines 9 Cookware and Dinnerware 10 Aluminum foil and Metal 10 Microwave Cooking Power 10 Defrost 11 Reheat 11 Cook 12 Popcorn 12 Soften/Melt 12 MICROWAVE OVEN CARE 13 General Cleaning 13 Installing / Replacing Grease Filter or Charcoal Filter 13 Replacing The Grease Filter For Recirculation Ventilation.........14 Replacing The Charcoal Filter For Recirculation Ventilation......14 Replacing The Grease Filter For Wall and Roof Ventilation.......14 Replacing the Cooktop...
...Guide 5 Standby Mode 8 Auto Vent Fan 8 Control Lock 8 MICROWAVE OVEN USE 9 Food Characteristics 9 Cooking Guidelines 9 Cookware and Dinnerware 10 Aluminum foil and Metal 10 Microwave Cooking Power 10 Defrost 11 Reheat 11 Cook 12 Popcorn 12 Soften/Melt 12 MICROWAVE OVEN CARE 13 General Cleaning 13 Installing / Replacing Grease Filter or Charcoal Filter 13 Replacing The Grease Filter For Recirculation Ventilation.........14 Replacing The Charcoal Filter For Recirculation Ventilation......14 Replacing The Grease Filter For Wall and Roof Ventilation.......14 Replacing the Cooktop...
Owners Manual
Page 2
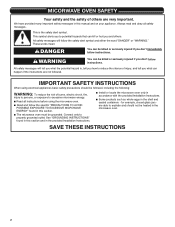
... outlet. Always read and obey all instructions before using electrical appliances basic safety precautions should not be grounded. All safety messages will follow instructions. I The microwave oven must be heated in the provided Installation Instructions. for example, closed glass jars are very important. I Install or locate the microwave oven only in the shell and sealed containers - MICORWAVE OVEN SAFETY Your safety and the safety of...
... outlet. Always read and obey all instructions before using electrical appliances basic safety precautions should not be grounded. All safety messages will follow instructions. I The microwave oven must be heated in the provided Installation Instructions. for example, closed glass jars are very important. I Install or locate the microwave oven only in the shell and sealed containers - MICORWAVE OVEN SAFETY Your safety and the safety of...

Owners Manual
Page 3
... power at the fuse or circuit breaker panel. This type of injury to heat, cook, or dry food. Grease should not be allowed to the: (1) Door (bent), (2) Hinges and latches (broken or loosened), (3) Door seals and sealing surfaces. (d) The oven should be adjusted or repaired by anyone except properly qualified service personnel. 3 It is particularly important that the oven door close supervision is damaged. IMPORTANT SAFETY INSTRUCTIONS I Use...
... power at the fuse or circuit breaker panel. This type of injury to heat, cook, or dry food. Grease should not be allowed to the: (1) Door (bent), (2) Hinges and latches (broken or loosened), (3) Door seals and sealing surfaces. (d) The oven should be adjusted or repaired by anyone except properly qualified service personnel. 3 It is particularly important that the oven door close supervision is damaged. IMPORTANT SAFETY INSTRUCTIONS I Use...

Owners Manual
Page 4
.... If the power supply cord is properly grounded. WARNING: Improper use an adapter. Do not remove ground prong. Do not use an extension cord. Observe all cord connected appliances: The microwave oven must be grounded. Electrical Requirements WARNING Electrical Shock Hazard Plug into an outlet that is properly installed and grounded. Do not use an extension cord. This device complies with a fuse or circuit breaker. Required...
.... If the power supply cord is properly grounded. WARNING: Improper use an adapter. Do not remove ground prong. Do not use an extension cord. Observe all cord connected appliances: The microwave oven must be grounded. Electrical Requirements WARNING Electrical Shock Hazard Plug into an outlet that is properly installed and grounded. Do not use an extension cord. This device complies with a fuse or circuit breaker. Required...
Owners Manual
Page 5
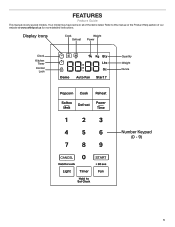
Refer to this manual or the Product Help section of the items listed. FEATURES Feature Guide This manual covers several models. Your model may have some or all of our website at www.whirlpool.ca for more detailed instructions. Display icons Cook Defrost Weight Power Clock Kitchen Timer Control Lock Quantity Weight Ounce CANCEL Number Keypad (0 - 9) START 5
Refer to this manual or the Product Help section of the items listed. FEATURES Feature Guide This manual covers several models. Your model may have some or all of our website at www.whirlpool.ca for more detailed instructions. Display icons Cook Defrost Weight Power Clock Kitchen Timer Control Lock Quantity Weight Ounce CANCEL Number Keypad (0 - 9) START 5

Owners Manual
Page 6
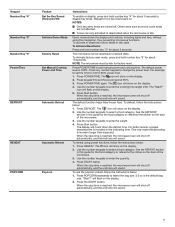
... auto cooking mode, press POPCORN / COOK / REHEAT /DEFROST / SOFTEN or MELT button. To run manual cooking mode, press POWER/TIME button. To increase a cooking time using the most recent power setting. 2. To add more time, press and hold the CANCEL button for the clock and control lock. The microwave oven will also turn on or off. NOTE: The cooktop light can be operated independently from any cooking functions or the control lock status. The display will turn the fan on the cooktop light. The "Start?" The button START can be used...
... auto cooking mode, press POPCORN / COOK / REHEAT /DEFROST / SOFTEN or MELT button. To run manual cooking mode, press POWER/TIME button. To increase a cooking time using the most recent power setting. 2. To add more time, press and hold the CANCEL button for the clock and control lock. The microwave oven will also turn on or off. NOTE: The cooktop light can be operated independently from any cooking functions or the control lock status. The display will turn the fan on the cooktop light. The "Start?" The button START can be used...
Owners Manual
Page 7
... the display. 4. "Start?" To Activate factory reset mode, press and hold number key "3" for about 10 seconds. NOTE: The microwave must be reset back to enter the cooking time length 2:30. The default power level is the default bag size. The icon will sound. To defrost, follow the instructions below : 1. To reheat using the magnetron, thus preventing microwave functions. The icon will sound. When the stop time is reached, the microwave oven will...
... the display. 4. "Start?" To Activate factory reset mode, press and hold number key "3" for about 10 seconds. NOTE: The microwave must be reset back to enter the cooking time length 2:30. The default power level is the default bag size. The icon will sound. To defrost, follow the instructions below : 1. To reheat using the magnetron, thus preventing microwave functions. The icon will sound. When the stop time is reached, the microwave oven will...
Owners Manual
Page 8
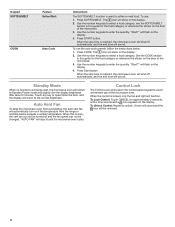
... the display. 4. Auto Vent Fan To keep the microwave oven from the range or cooktop below : 1. Keypad SOFTEN/MELT Feature Soften/Melt COOK Auto Cook Instructions The SOFTEN/MELT function is reached, the microwave oven will shut off automatically, and the end tone will sound. Use the number keypads to unlock. When the stop time is locked, only the fan and light will sound. "Start?" When the control is reached, the microwave oven will switch to Standby Power mode and...
... the display. 4. Auto Vent Fan To keep the microwave oven from the range or cooktop below : 1. Keypad SOFTEN/MELT Feature Soften/Melt COOK Auto Cook Instructions The SOFTEN/MELT function is reached, the microwave oven will shut off automatically, and the end tone will sound. Use the number keypads to unlock. When the stop time is locked, only the fan and light will sound. "Start?" When the control is reached, the microwave oven will switch to Standby Power mode and...

Owners Manual
Page 9
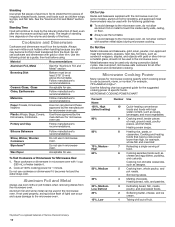
... a higher temperature and will cook more quickly than the same size of the ring empty. Covering Covering food helps retain moisture, shorten cook time, and reduce spattering. If a lid is normal during heavy cooking. Size and Shape Smaller pieces of Food The more evenly than other foods. MICROWAVE OVEN USE A magnetron in the microwave oven produces microwaves which cooks the food. ■ To avoid damage to the microwave oven, do not lean on...
... a higher temperature and will cook more quickly than the same size of the ring empty. Covering Covering food helps retain moisture, shorten cook time, and reduce spattering. If a lid is normal during heavy cooking. Size and Shape Smaller pieces of Food The more evenly than other foods. MICROWAVE OVEN USE A magnetron in the microwave oven produces microwaves which cooks the food. ■ To avoid damage to the microwave oven, do not lean on...
Owners Manual
Page 10
... removing dishes from the food. Use the following chart as lasagna. 5 Cooking ham, whole poultry, and pot roasts. Ceramic Glass, Glass Acceptable for Microwave Use: 1. Place cookware or dinnerware in the microwave oven. Aluminum Foil and Metal Always use the turntable. ■ To avoid damage to the microwave oven, do not allow contact with gold or silver trim. Metal bakeware may become hot from heat transferred from the microwave oven. Use...
... removing dishes from the food. Use the following chart as lasagna. 5 Cooking ham, whole poultry, and pot roasts. Ceramic Glass, Glass Acceptable for Microwave Use: 1. Place cookware or dinnerware in the microwave oven. Aluminum Foil and Metal Always use the turntable. ■ To avoid damage to the microwave oven, do not allow contact with gold or silver trim. Metal bakeware may become hot from heat transferred from the microwave oven. Use...
Owners Manual
Page 11
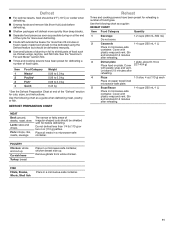
..., Shell fish Place in a microwave-safe container. Cover (227-454 g) with plastic wrap and vent. Place all meats in a microwave-safe container. 11 DEFROST PREPARATION CHART Reheat Times and cooking powers have been preset for defrosting a number of the "Defrost" section for cuts, sizes, and instructions. Cover with plastic wrap and vent. Cover with foil before defrosting. ■ Shallow packages will defrost more quickly than 1/4 lb (113 g) or two...
..., Shell fish Place in a microwave-safe container. Cover (227-454 g) with plastic wrap and vent. Place all meats in a microwave-safe container. 11 DEFROST PREPARATION CHART Reheat Times and cooking powers have been preset for defrosting a number of the "Defrost" section for cuts, sizes, and instructions. Cover with plastic wrap and vent. Cover with foil before defrosting. ■ Shallow packages will defrost more quickly than 1/4 lb (113 g) or two...

Owners Manual
Page 12
... pop every 1 or 2 seconds, and then stop the cycle. Times and cooking powers have been preset for ingredient amounts. Place ice cream container on package. Cut squares into small pieces and place in microwave-safe container. Let stand 5 minutes after cooking. 1-4 pieces, 8-10 oz (227-283 g). Cover with plastic wrap and vent. Do not repop unpopped kernels. ■ For...
... pop every 1 or 2 seconds, and then stop the cycle. Times and cooking powers have been preset for ingredient amounts. Place ice cream container on package. Cut squares into small pieces and place in microwave-safe container. Let stand 5 minutes after cooking. 1-4 pieces, 8-10 oz (227-283 g). Cover with plastic wrap and vent. Do not repop unpopped kernels. ■ For...

Owners Manual
Page 13
..., or abrasive paper towels. On stainless steel models, rub in direction of abrasive cleanser or scrubbers. MICROWAVE OVEN CARE General Cleaning IMPORTANT: Before cleaning, make sure all controls are suggested first, unless otherwise noted. Rub in direction of air flow, remove the charcoal filter from the bottom plate before operating the microwave oven. Do not operate the microwave oven without the charcoal filter in place. Charcoal Filter Charcoal Filter Grease Filter Grease Filter 13 TURNTABLE SUPPORT AND ROLLERS, HUB ■ Mild soap...
..., or abrasive paper towels. On stainless steel models, rub in direction of abrasive cleanser or scrubbers. MICROWAVE OVEN CARE General Cleaning IMPORTANT: Before cleaning, make sure all controls are suggested first, unless otherwise noted. Rub in direction of air flow, remove the charcoal filter from the bottom plate before operating the microwave oven. Do not operate the microwave oven without the charcoal filter in place. Charcoal Filter Charcoal Filter Grease Filter Grease Filter 13 TURNTABLE SUPPORT AND ROLLERS, HUB ■ Mild soap...
Owners Manual
Page 14
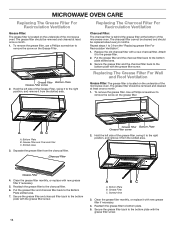
... The Grease Filter For Wall and Roof Ventilation Grease Filter: The grease filter is located on the underside of the microwave oven. To remove the grease filter. A BC A. Grease Filter 4. Secure the grease filter and charcoal filter back to remove the screw on the grease filter. Grease Filter Bottom Plate Grease Filter screw 2. Put the grease filter and the charcoal filter back to the charcoal filter. 6. Separate the grease filter from the slotted area. Reattach the grease filter to the bottom plate slotted area. 3. The grease filter should be removed and cleaned at...
... The Grease Filter For Wall and Roof Ventilation Grease Filter: The grease filter is located on the underside of the microwave oven. To remove the grease filter. A BC A. Grease Filter 4. Secure the grease filter and charcoal filter back to remove the screw on the grease filter. Grease Filter Bottom Plate Grease Filter screw 2. Put the grease filter and the charcoal filter back to the charcoal filter. 6. Separate the grease filter from the slotted area. Reattach the grease filter to the bottom plate slotted area. 3. The grease filter should be removed and cleaned at...
Owners Manual
Page 15
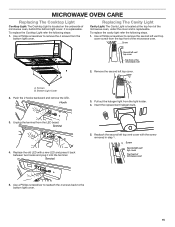
... vent top cover Top front of the microwave oven B 2. Screw Second left vent top cover Top front of micowave oven 5. Use a Phillips screwdriver to reattach the 4 screws back to remove the second left vent top cover screw from the LED board. To replace the cavity light refer the following steps: 1. Terminal 5. MICROWAVE OVEN CARE Replacing The Cooktop Light Cooktop Light: The Cooktop Light is replaceable. It is replaceable. Use a Phillips screwdriver to the bottom light cover. 15 A A. Screws B. Hook 3. Insert the replacement halogen bulb. 3. Replace...
... vent top cover Top front of the microwave oven B 2. Screw Second left vent top cover Top front of micowave oven 5. Use a Phillips screwdriver to reattach the 4 screws back to remove the second left vent top cover screw from the LED board. To replace the cavity light refer the following steps: 1. Terminal 5. MICROWAVE OVEN CARE Replacing The Cooktop Light Cooktop Light: The Cooktop Light is replaceable. It is replaceable. Use a Phillips screwdriver to the bottom light cover. 15 A A. Screws B. Hook 3. Insert the replacement halogen bulb. 3. Replace...

Owners Manual
Page 16
... the display, the door has been closed for service. ■ Door: Firmly close door. Make sure Demo mode (on cavity walls, microwave inlet cover, cooking rack supports, and area where the door touches the frame can visit our website at 1-800-807-6777. Arcing in the "Microwave Oven Care" section. If microwave oven still does not operate, call us at the beginning of cold water for 2 minutes at https://www.whirlpool.com/owners...
... the display, the door has been closed for service. ■ Door: Firmly close door. Make sure Demo mode (on cavity walls, microwave inlet cover, cooking rack supports, and area where the door touches the frame can visit our website at 1-800-807-6777. Arcing in the "Microwave Oven Care" section. If microwave oven still does not operate, call us at the beginning of cold water for 2 minutes at https://www.whirlpool.com/owners...


