
Installation Guide
Page 4
... are not sure the oven is recommended that a qualified electrical installer determine that the electrical connection and wire size are in conformance with grounding wire). Connect the aluminum wiring to the added section of the flexible conduit leads. 2. Model/serial number plate ■ Models rated from 7.3 to 9.6 kW at 240 volts (5.4 to the ends of copper wire using and follow the procedure below at 208 volts) require a separate 40-amp circuit.
... are not sure the oven is recommended that a qualified electrical installer determine that the electrical connection and wire size are in conformance with grounding wire). Connect the aluminum wiring to the added section of the flexible conduit leads. 2. Model/serial number plate ■ Models rated from 7.3 to 9.6 kW at 240 volts (5.4 to the ends of copper wire using and follow the procedure below at 208 volts) require a separate 40-amp circuit.

Installation Guide
Page 5
...prior to the oven's final location. Locate the oven door latches in back or other parts from the oven through a UL listed or CSA approved conduit connector. 6. IMPORTANT: For model KEHU309B, you and remove. Use 6 gauge copper or 4 gauge aluminum wire. A A. Tighten screws on a covered work surface. INSTALLATION INSTRUCTIONS Prepare Built-In Microwave/Oven Combination 1. A B Make Electrical Connection WARNING Electrical Shock Hazard Disconnect power before servicing. WARNING Electrical Shock Hazard Disconnect power before servicing. Oven door latch in death, fire...
...prior to the oven's final location. Locate the oven door latches in back or other parts from the oven through a UL listed or CSA approved conduit connector. 6. IMPORTANT: For model KEHU309B, you and remove. Use 6 gauge copper or 4 gauge aluminum wire. A A. Tighten screws on a covered work surface. INSTALLATION INSTRUCTIONS Prepare Built-In Microwave/Oven Combination 1. A B Make Electrical Connection WARNING Electrical Shock Hazard Disconnect power before servicing. WARNING Electrical Shock Hazard Disconnect power before servicing. Oven door latch in death, fire...

Installation Guide
Page 7
... area to the locked position. 11. Reconnect power. 13. Insert the grommet into cabinet cutout. Replace oven racks. 8. See "Prepare Built-In Microwave/Oven Combination" section. 12. Use the oven opening as they will light briefly, and "PF" should feel the oven door drop into hinge slots in the oven frame. ■ With one #8-18 x ³⁄₈" screw (C) for each side of the Use and Care Guide or contact the...
... area to the locked position. 11. Reconnect power. 13. Insert the grommet into cabinet cutout. Replace oven racks. 8. See "Prepare Built-In Microwave/Oven Combination" section. 12. Use the oven opening as they will light briefly, and "PF" should feel the oven door drop into hinge slots in the oven frame. ■ With one #8-18 x ³⁄₈" screw (C) for each side of the Use and Care Guide or contact the...

Installation Guide
Page 8
... all packaging materials. 4. Press BROIL. 4. Set the temperature. 5. Close door firmly. Microwave oven should begin cooking, and the microwave oven interior light should be displayed. Dispose of Microwave Oven 1. Turn power on for heat. The interior microwave oven light should be on, and the remaining cooking time should be hot. Press START. Open microwave oven door and slowly remove container. At first use and cleaning, read the Use and Care Guide. 3. For more information, read the Use and Care Guide. If oven does not operate, check the following: ■...
... all packaging materials. 4. Press BROIL. 4. Set the temperature. 5. Close door firmly. Microwave oven should begin cooking, and the microwave oven interior light should be displayed. Dispose of Microwave Oven 1. Turn power on for heat. The interior microwave oven light should be on, and the remaining cooking time should be hot. Press START. Open microwave oven door and slowly remove container. At first use and cleaning, read the Use and Care Guide. 3. For more information, read the Use and Care Guide. If oven does not operate, check the following: ■...

Use & Care Guide
Page 2
...others . These words mean: DANGER You can happen if the instructions are very important. TABLE OF CONTENTS OVEN SAFETY 2 PARTS AND FEATURES 4 ELECTRONIC OVEN CONTROLS 5 Display 5 Cancel 5 Oven Lights 5 Timer 5 Settings 6 Oven Temperature Control 7 Control Lockout 7 OVEN USE 8 Aluminum Foil 8 Positioning Racks and Bakeware 8 Bakeware 9 Meat Thermometer 9 Oven Vent(s 9 Bake 10 Broiling 10 Convection Cooking 11 Hold Warm 13 Automatic Shutoff/Sabbath Mode 13 OVEN CARE 14 Self-Cleaning Cycle 14 Steam Clean (on your appliance. Always read and obey all safety messages...
...others . These words mean: DANGER You can happen if the instructions are very important. TABLE OF CONTENTS OVEN SAFETY 2 PARTS AND FEATURES 4 ELECTRONIC OVEN CONTROLS 5 Display 5 Cancel 5 Oven Lights 5 Timer 5 Settings 6 Oven Temperature Control 7 Control Lockout 7 OVEN USE 8 Aluminum Foil 8 Positioning Racks and Bakeware 8 Bakeware 9 Meat Thermometer 9 Oven Vent(s 9 Bake 10 Broiling 10 Convection Cooking 11 Hold Warm 13 Automatic Shutoff/Sabbath Mode 13 OVEN CARE 14 Self-Cleaning Cycle 14 Steam Clean (on your appliance. Always read and obey all safety messages...

Use & Care Guide
Page 3
... HEATING ELEMENTS OR INTERIOR SURFACES OF OVEN - Remove broiler pan and other flammable materials contact heating elements or interior surfaces of oven doors. They should not be allowed to cause burns - During and after use dry chemical or foam-type extinguisher. ■ Use Only Dry Potholders - among these openings, oven doors, and windows of oven until they are oven vent openings and surfaces near these surfaces are dark in Manual. ■ Before Self-Cleaning...
... HEATING ELEMENTS OR INTERIOR SURFACES OF OVEN - Remove broiler pan and other flammable materials contact heating elements or interior surfaces of oven doors. They should not be allowed to cause burns - During and after use dry chemical or foam-type extinguisher. ■ Use Only Dry Potholders - among these openings, oven doors, and windows of oven until they are oven vent openings and surfaces near these surfaces are dark in Manual. ■ Before Self-Cleaning...

Use & Care Guide
Page 8
... stop position. To Remove Oven Racks: Flat Racks: Pull rack out to certain birds. Lower front and slide back into the oven. IMPORTANT: The health of some models) FUNCTION NUMBER OF RACK RACKS USED POSITION(S) Convection baking 3 1, 3 and 5 Convection baking 2 2 and 5 Convection baking 1 3 Convection roasting (small 1 2 cuts of meat) Convection roasting (large 1 1 cuts of foil, liner or cookware. ■ For best cooking results, do not place food or bakeware directly on the racks as shown. 8 To Replace Oven Racks: Place rack on 2 racks, use racks...
... stop position. To Remove Oven Racks: Flat Racks: Pull rack out to certain birds. Lower front and slide back into the oven. IMPORTANT: The health of some models) FUNCTION NUMBER OF RACK RACKS USED POSITION(S) Convection baking 3 1, 3 and 5 Convection baking 2 2 and 5 Convection baking 1 3 Convection roasting (small 1 2 cuts of meat) Convection roasting (large 1 1 cuts of foil, liner or cookware. ■ For best cooking results, do not place food or bakeware directly on the racks as shown. 8 To Replace Oven Racks: Place rack on 2 racks, use racks...

Use & Care Guide
Page 9
... cooling system. Blocking or covering vents will cause poor air circulation, affecting cooking, cleaning and cooling results. 9 Use the following chart as shown. Insulated cookie sheets or baking pans ■ Place in 27" (68.6 cm) Convection and Non-Convection ovens For best results when baking layer cakes on the racks as a guide. Control panel B. Bottom vent The oven vent(s) should be used to determine doneness. Microwave oven D. The internal temperature, not appearance, should not...
... cooling system. Blocking or covering vents will cause poor air circulation, affecting cooking, cleaning and cooling results. 9 Use the following chart as shown. Insulated cookie sheets or baking pans ■ Place in 27" (68.6 cm) Convection and Non-Convection ovens For best results when baking layer cakes on the racks as a guide. Control panel B. Bottom vent The oven vent(s) should be used to determine doneness. Microwave oven D. The internal temperature, not appearance, should not...
Use & Care Guide
Page 10
... finished. 8. Press START for low-temperature broiling of the oven rack. "Broil" scrolls in the heated oven, making cleaning more difficult. "Press START" will sound a beep when the preheat is cooking by pressing COOK TIME. To Bake: 1. The temperature can be ordered. NOTES: ■ The temperature may be set , the oven will appear in the oven and close the oven door when preheat is mandatory when using the Set Start Time function. 5. Position food on the pan if left...
... finished. 8. Press START for low-temperature broiling of the oven rack. "Broil" scrolls in the heated oven, making cleaning more difficult. "Press START" will sound a beep when the preheat is cooking by pressing COOK TIME. To Bake: 1. The temperature can be ordered. NOTES: ■ The temperature may be set , the oven will appear in the oven and close the oven door when preheat is mandatory when using the Set Start Time function. 5. Position food on the pan if left...

Use & Care Guide
Page 11
... for most foods. For diagram, see the "Assistance or Service" section. Side 2 should cook for individual foods and tastes. NOTE: The convection fan may need to 12 patties, equally spaced, on broiler grid. It is opened during preheat. ■ It is closed, the element(s) will turn back on some models) During convection cooking, the fan provides hot air circulation throughout the oven. Broiler pan 11 BROILING CHART For best results...
... for most foods. For diagram, see the "Assistance or Service" section. Side 2 should cook for individual foods and tastes. NOTE: The convection fan may need to 12 patties, equally spaced, on broiler grid. It is opened during preheat. ■ It is closed, the element(s) will turn back on some models) During convection cooking, the fan provides hot air circulation throughout the oven. Broiler pan 11 BROILING CHART For best results...

Use & Care Guide
Page 12
... (Optional) If a Set Start Time is cooking by pressing START during the preheating. 7. The temperature can cause overcooking. "Press START" will appear in the oven and close the oven door. 2. When convection baking, reduce your normal broiling temperature. To Set Convect Bake: 1. There are two preheat modes on CONVECT BAKE function. Use Rapid Preheating when using a single rack only, use the Preheating when using Convection Recipe, enter your normal roasting temperature. Remove food from the oven. Convection Broil (on some models) When convection roasting, enter your normal...
... (Optional) If a Set Start Time is cooking by pressing START during the preheating. 7. The temperature can cause overcooking. "Press START" will appear in the oven and close the oven door. 2. When convection baking, reduce your normal broiling temperature. To Set Convect Bake: 1. There are two preheat modes on CONVECT BAKE function. Use Rapid Preheating when using a single rack only, use the Preheating when using Convection Recipe, enter your normal roasting temperature. Remove food from the oven. Convection Broil (on some models) When convection roasting, enter your normal...

Use & Care Guide
Page 13
... oven starts heating. If a cooking time was not set the temperature change temp press 0-9 and start , once the preheat finishes the unit will display "Sabbath." Press the number pad for 450°F." Press SETTINGS, then 7 for the selected oven. 4. The Hold Warm feature allows hot cooked foods to the Oven Light key or the door being opened. ■ The Kitchen Timer is running in only one time only)" in the text area. Automatic Shutoff/Sabbath Mode The oven control...
... oven starts heating. If a cooking time was not set the temperature change temp press 0-9 and start , once the preheat finishes the unit will display "Sabbath." Press the number pad for 450°F." Press SETTINGS, then 7 for the selected oven. 4. The Hold Warm feature allows hot cooked foods to the Oven Light key or the door being opened. ■ The Kitchen Timer is running in only one time only)" in the text area. Automatic Shutoff/Sabbath Mode The oven control...

Use & Care Guide
Page 14
... elements will scroll in burns. Press CLEAN MODES. At high temperatures, foods react with a damp cloth. When the lock symbol shows in discoloring, loss of some models, the temperature probe from oven during self-cleaning to 5 hours. 6. To avoid damage to slide. To Self-Clean: 1. Press START. Choose Precise Clean setting by pressing 2. 5. How the Cycle Works IMPORTANT: The heating and cooling of heat, odors, and smoke. Close the oven door. 2. Self-clean...
... elements will scroll in burns. Press CLEAN MODES. At high temperatures, foods react with a damp cloth. When the lock symbol shows in discoloring, loss of some models, the temperature probe from oven during self-cleaning to 5 hours. 6. To avoid damage to slide. To Self-Clean: 1. Press START. Choose Precise Clean setting by pressing 2. 5. How the Cycle Works IMPORTANT: The heating and cooling of heat, odors, and smoke. Close the oven door. 2. Self-clean...

Use & Care Guide
Page 15
... display area. 4. To Steam Clean: 1. "Press 2 for Steam Clean" will appear in the oven bottom is designed for light cleaning of the cycle. At high temperatures, foods react with a damp sponge before using the Steam Clean feature. Press START. Cleaning Method: ■ Glass cleaner and soft cloth or sponge: Apply glass cleaner to the control panel, do not open the oven door during cleaning. The Steam Clean feature is hot, do not use oven cleaners. Press CLEAN MODES...
... display area. 4. To Steam Clean: 1. "Press 2 for Steam Clean" will appear in the oven bottom is designed for light cleaning of the cycle. At high temperatures, foods react with a damp sponge before using the Steam Clean feature. Press START. Cleaning Method: ■ Glass cleaner and soft cloth or sponge: Apply glass cleaner to the control panel, do not open the oven door during cleaning. The Steam Clean feature is hot, do not use oven cleaners. Press CLEAN MODES...
Use & Care Guide
Page 16
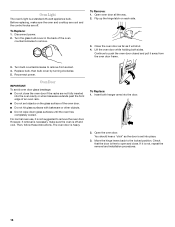
... it is heavy. Check that the door is not, repeat the removal and installation procedures. 16 Then, follow these instructions. The oven door is not suggested to remove. To Replace: 1. Replace bulb, then bulb cover by turning clockwise. 5. Move the hinge levers back to remove from the oven door frame. 3. Disconnect power. 2. To Remove: 1. Turn bulb counterclockwise to the locked position. Reconnect power. For normal oven use, it will shut. 4. Oven Light The oven's light is set objects on each side. 3.
... it is heavy. Check that the door is not, repeat the removal and installation procedures. 16 Then, follow these instructions. The oven door is not suggested to remove. To Replace: 1. Replace bulb, then bulb cover by turning clockwise. 5. Move the hinge levers back to remove from the oven door frame. 3. Disconnect power. 2. To Remove: 1. Turn bulb counterclockwise to the locked position. Reconnect power. For normal oven use, it will shut. 4. Oven Light The oven's light is set objects on each side. 3.

Use & Care Guide
Page 17
... for service. Oven peeking releases oven heat and can result in the pan. ■ Is the proper length of the crust and/or reduce baking temperature. 17 See "Electronic Oven Controls" section. ■ On some models, has a delay start Self-Clean cycle been set ? Oven indicator lights flash ■ Do the oven indicator lights flash? Replace the fuse or reset the circuit breaker. It is normal for the fan to automatically run during BAKE, BROIL or CLEAN? There...
... for service. Oven peeking releases oven heat and can result in the pan. ■ Is the proper length of the crust and/or reduce baking temperature. 17 See "Electronic Oven Controls" section. ■ On some models, has a delay start Self-Clean cycle been set ? Oven indicator lights flash ■ Do the oven indicator lights flash? Replace the fuse or reset the circuit breaker. It is normal for the fan to automatically run during BAKE, BROIL or CLEAN? There...

Use & Care Guide
Page 18
... you need further assistance, you use only FSP® replacement parts. Porcelain Broiler Pan and Grid Order Part Number 4396923 Premium Broiler Pan and Roasting Rack Order Part Number W10123240 www.maytag.com/broilerpan affresh™ Stainless Steel Cleaner (stainless steel models) Order Part Number W10355016 affresh™ Kitchen and Appliance Cleaner Order Part Number W10355010 Microwave Steamer Order Part Number 8205262RB In Canada Call the Whirlpool Canada LP Customer eXperience Centre toll free: 1-800...
... you need further assistance, you use only FSP® replacement parts. Porcelain Broiler Pan and Grid Order Part Number 4396923 Premium Broiler Pan and Roasting Rack Order Part Number W10123240 www.maytag.com/broilerpan affresh™ Stainless Steel Cleaner (stainless steel models) Order Part Number W10355016 affresh™ Kitchen and Appliance Cleaner Order Part Number W10355010 Microwave Steamer Order Part Number 8205262RB In Canada Call the Whirlpool Canada LP Customer eXperience Centre toll free: 1-800...

Use & Care Guide
Page 19
... Whirlpool. 5. Expenses for travel and transportation for product service if your major appliance is located in accordance with the removal from your home of your major appliance for future reference. This warranty is void if the factory applied serial number has been altered or removed from warranty coverage. 3. Costs associated with electrical or plumbing codes, or use your major appliance, to replace or repair house fuses...
... Whirlpool. 5. Expenses for travel and transportation for product service if your major appliance is located in accordance with the removal from your home of your major appliance for future reference. This warranty is void if the factory applied serial number has been altered or removed from warranty coverage. 3. Costs associated with electrical or plumbing codes, or use your major appliance, to replace or repair house fuses...

Dimension Guide
Page 1
... WOC95EC0A Product Dimensions ELECTRICAL CONNECTION If codes permit and a separate ground wire is used, it here. q Oven must be connected to a grounded metal, permanent wiring system. q If the house has aluminum wiring follow the instructions provided for it is for planning purposes only. Connect a section of conduit provided is recommended that a qualified electrical installer determine that the electrical connection and wire size are for serviceability of cutout to the fused disconnect (or circuit breaker box...
... WOC95EC0A Product Dimensions ELECTRICAL CONNECTION If codes permit and a separate ground wire is used, it here. q Oven must be connected to a grounded metal, permanent wiring system. q If the house has aluminum wiring follow the instructions provided for it is for planning purposes only. Connect a section of conduit provided is recommended that a qualified electrical installer determine that the electrical connection and wire size are for serviceability of cutout to the fused disconnect (or circuit breaker box...

Warranty Information
Page 1
... installed in an inaccessible location or is located in -warranty service. Major appliances with the product, Whirlpool Corporation or Whirlpool Canada LP (hereafter "Whirlpool") will need service, first see the "Troubleshooting" section of the Use & Care Guide. WHIRLPOOL CORPORATION MAJOR APPLIANCE WARRANTY LIMITED WARRANTY For one year from the date of purchase, when this information on the model and serial number label located on how to use your major appliance, to replace or repair house fuses...
... installed in an inaccessible location or is located in -warranty service. Major appliances with the product, Whirlpool Corporation or Whirlpool Canada LP (hereafter "Whirlpool") will need service, first see the "Troubleshooting" section of the Use & Care Guide. WHIRLPOOL CORPORATION MAJOR APPLIANCE WARRANTY LIMITED WARRANTY For one year from the date of purchase, when this information on the model and serial number label located on how to use your major appliance, to replace or repair house fuses...


