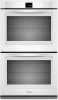

Dimension Guide
Page 1
... approved conduit connector must conform with local codes and industry accepted wiring practices. Connect a section of solid copper wire to the ends of the oven. recessed width C. 26³⁄₄" (67.9 cm) recessed height D. 23¹⁄₄" (59.1 cm) max. See the... W 7400 W 208 VAC 2790 W 2820 W 5580 W 5610 W 240 VAC 15.4 A 15.5 A 30.7 A 30.8 A 208 VAC 13.4 A 13.6 A 26.8 A 27.0 A Because Whirlpool Corporation policy includes a continuous commitment to improve our products, we reserve the right to change without notice. 27" (68.6 cm) models A. 28 72.8 cm) max...
... approved conduit connector must conform with local codes and industry accepted wiring practices. Connect a section of solid copper wire to the ends of the oven. recessed width C. 26³⁄₄" (67.9 cm) recessed height D. 23¹⁄₄" (59.1 cm) max. See the... W 7400 W 208 VAC 2790 W 2820 W 5580 W 5610 W 240 VAC 15.4 A 15.5 A 30.7 A 30.8 A 208 VAC 13.4 A 13.6 A 26.8 A 27.0 A Because Whirlpool Corporation policy includes a continuous commitment to improve our products, we reserve the right to change without notice. 27" (68.6 cm) models A. 28 72.8 cm) max...

Dimension Guide
Page 2
...E. 28" (71.2 cm) min. D. 28¹⁄₂" (72.4 cm) cutout width E. 1¹⁄₂" (3.8 cm) min. Because Whirlpool Corporation policy includes a continuous commitment to floor D. 25¹⁄₂" (64.8 cm) cutout width E. 1¹⁄₂" (3.8 cm) min. ...Specifications subject to change without notice. cutout height Double Ovens Installed in Cabinet A E D C A. 27" (68.6 cm) min. Instructions packed with product. W10351242 2/15/12 cabinet width B. 1" (2.5 ...
...E. 28" (71.2 cm) min. D. 28¹⁄₂" (72.4 cm) cutout width E. 1¹⁄₂" (3.8 cm) min. Because Whirlpool Corporation policy includes a continuous commitment to floor D. 25¹⁄₂" (64.8 cm) cutout width E. 1¹⁄₂" (3.8 cm) min. ...Specifications subject to change without notice. cutout height Double Ovens Installed in Cabinet A E D C A. 27" (68.6 cm) min. Instructions packed with product. W10351242 2/15/12 cabinet width B. 1" (2.5 ...

Energy Guide
Page 2
...;ral 36 Lampe du four 36 Porte du four 36 DÉPANNAGE 37 ASSISTANCE OU SERVICE 38 Accessoires 38 Au Canada 38 GARANTIE 39 OVEN SAFETY Your safety and the safety of injury, and tell you what the potential hazard is the safety alert symbol. Always read and obey... All safety messages will follow instructions. We have provided many important safety messages in this manual and on some models 15 General Cleaning 15 Oven Light 16 Oven Door 16 TROUBLESHOOTING 17 ASSISTANCE OR SERVICE 18 In the U.S.A 18 Accessories 18 In Canada 18 WARRANTY 19 TABLE DES MATIÈRES SÉ...
...;ral 36 Lampe du four 36 Porte du four 36 DÉPANNAGE 37 ASSISTANCE OU SERVICE 38 Accessoires 38 Au Canada 38 GARANTIE 39 OVEN SAFETY Your safety and the safety of injury, and tell you what the potential hazard is the safety alert symbol. Always read and obey... All safety messages will follow instructions. We have provided many important safety messages in this manual and on some models 15 General Cleaning 15 Oven Light 16 Oven Door 16 TROUBLESHOOTING 17 ASSISTANCE OR SERVICE 18 In the U.S.A 18 Accessories 18 In Canada 18 WARRANTY 19 TABLE DES MATIÈRES SÉ...

Energy Guide
Page 3
...hot heating elements. Let hot air or steam escape before removing or replacing food. ■ Do Not Heat Unopened Food Containers - Always place oven racks in the manual. The gasket is cool. WARNING: This product contains one or more chemicals known to the State of California to sit...bulky cloth. ■ Use Care When Opening Door - Remove broiler pan and other flammable materials contact heating elements or interior surfaces of the oven. ■ Clean Only Parts Listed in color. Loose-fitting or hanging garments should never be hot even though they have had sufficient time to...
...hot heating elements. Let hot air or steam escape before removing or replacing food. ■ Do Not Heat Unopened Food Containers - Always place oven racks in the manual. The gasket is cool. WARNING: This product contains one or more chemicals known to the State of California to sit...bulky cloth. ■ Use Care When Opening Door - Remove broiler pan and other flammable materials contact heating elements or interior surfaces of the oven. ■ Clean Only Parts Listed in color. Loose-fitting or hanging garments should never be hot even though they have had sufficient time to...
Energy Guide
Page 4
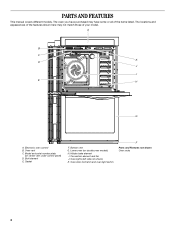
... locations and appearances of the features shown here may have purchased may not match those of the items listed. Oven vent C. Bottom vent G. Oven door lock latch and oven light switch F Parts and Features not shown Oven racks 4 The oven you have some or all of your model. Model and serial number plate (on double...
... locations and appearances of the features shown here may have purchased may not match those of the items listed. Oven vent C. Bottom vent G. Oven door lock latch and oven light switch F Parts and Features not shown Oven racks 4 The oven you have some or all of your model. Model and serial number plate (on double...

Energy Guide
Page 5
... display. The last minute of day. NOTE: A reminder beep will appear on and off L. Single Oven Control Panel A B C A. Cancel Double Oven Control Panel A B C DE F A. Lower oven settings G. Lower oven start the timer. Press TIMER SET/OFF to set time of the timer countdown will be set time.... to 9 hours and 59 minutes, and counts down the set in the text display area. To Cancel: Press TIMER SET/OFF. 5 ELECTRONIC OVEN CONTROLS This manual covers different models. Electronic display C. Timer set /off I JK H. "Set TIMER" will come on when either door is ...
... display. The last minute of day. NOTE: A reminder beep will appear on and off L. Single Oven Control Panel A B C A. Cancel Double Oven Control Panel A B C DE F A. Lower oven settings G. Lower oven start the timer. Press TIMER SET/OFF to set time of the timer countdown will be set time.... to 9 hours and 59 minutes, and counts down the set in the text display area. To Cancel: Press TIMER SET/OFF. 5 ELECTRONIC OVEN CONTROLS This manual covers different models. Electronic display C. Timer set /off I JK H. "Set TIMER" will come on when either door is ...

Energy Guide
Page 6
...enabling Sabbath Mode, you will appear in the text area. Press SETTINGS nine times. Press (1) for CELSIUS" will make sure the oven(s) and Timer are audible signals, indicating the following: Adjusting Keypress Tone On or Off The keypress tone is factory preset to Fahrenheit but...can be changed to Celsius. 1. "SABBATH" and "OFF. Basic Functions One tone ■ Valid pad press ■ Function has been entered ■ Oven is preheated 2. Press the Temp/Time "1" keypad to OFF" will appear in the text area. 2. To Enable Sabbath mode: 1. Press SETTINGS eight times...
...enabling Sabbath Mode, you will appear in the text area. Press SETTINGS nine times. Press (1) for CELSIUS" will make sure the oven(s) and Timer are audible signals, indicating the following: Adjusting Keypress Tone On or Off The keypress tone is factory preset to Fahrenheit but...can be changed to Celsius. 1. "SABBATH" and "OFF. Basic Functions One tone ■ Valid pad press ■ Function has been entered ■ Oven is preheated 2. Press the Temp/Time "1" keypad to OFF" will appear in the text area. 2. To Enable Sabbath mode: 1. Press SETTINGS eight times...

Energy Guide
Page 7
...text area. 3. "OFF Selected" will scroll in the display. Press SETTINGS 13 times. The adjustment can be set between upper and lower oven calibration. 3. Press START to save the adjustment and exit the Temperature Calibration menu. "TEMP CALIB" and "UPPER CALIBRATE. Press START or Press...176;C). 4. Control Lockout The control can be locked out to decrease the temperature in the display. To Lock Control: For single ovens: Press and hold LOWER OVEN START for 3 seconds or until "CONTROL UNLOCKED" scrolls in the display. "LOCKED" remains lit in 5°F (3°C) increments...
...text area. 3. "OFF Selected" will scroll in the display. Press SETTINGS 13 times. The adjustment can be set between upper and lower oven calibration. 3. Press START to save the adjustment and exit the Temperature Calibration menu. "TEMP CALIB" and "UPPER CALIBRATE. Press START or Press...176;C). 4. Control Lockout The control can be locked out to decrease the temperature in the display. To Lock Control: For single ovens: Press and hold LOWER OVEN START for 3 seconds or until "CONTROL UNLOCKED" scrolls in the display. "LOCKED" remains lit in 5°F (3°C) increments...

Energy Guide
Page 8
... cover entire rack with bakeware on 2 racks, use racks 3 and 5. Always move freely. ■ To catch spills, place foil on the oven door or bottom. Positioning Racks and Bakeware IMPORTANT: To avoid permanent damage to the fumes given off. Rack Positions - Exposure to the fumes may ...result in lower oven: 2 and 5 Roasting small cuts of meat and poultry: 2 Roasting large cuts of foil, liner or cookware. ■ For best cooking results...
... cover entire rack with bakeware on 2 racks, use racks 3 and 5. Always move freely. ■ To catch spills, place foil on the oven door or bottom. Positioning Racks and Bakeware IMPORTANT: To avoid permanent damage to the fumes given off. Rack Positions - Exposure to the fumes may ...result in lower oven: 2 and 5 Roasting small cuts of meat and poultry: 2 Roasting large cuts of foil, liner or cookware. ■ For best cooking results...

Energy Guide
Page 9
...allows the inlet of doneness. Follow manufacturer's recommendations and use racks 2 and 5. Use the following chart as shown. Control panel B. Oven vent C. Upper oven E. Oven vent F. Also, the bottom vent should not be used to reduce baking temperatures slightly. Rack positions and pan placement for using a meat...must be blocked or covered since they allow the inlet of fresh air into the cooling system and the outlet of oven. Single oven or upper double oven G. Place the cakes on 2 racks in center of hot air from the cooling system. Meat Thermometer Use a ...
...allows the inlet of doneness. Follow manufacturer's recommendations and use racks 2 and 5. Use the following chart as shown. Control panel B. Oven vent C. Upper oven E. Oven vent F. Also, the bottom vent should not be used to reduce baking temperatures slightly. Rack positions and pan placement for using a meat...must be blocked or covered since they allow the inlet of fresh air into the cooling system and the outlet of oven. Single oven or upper double oven G. Place the cakes on 2 racks in center of hot air from the cooling system. Meat Thermometer Use a ...

Energy Guide
Page 10
... 2. "BROIL" and "Set temp or Press START" will scroll in the text area. 4. (Optional) If a Set Start Time is placed in the oven, preheating is mandatory when using the Set Start Time function. 5. Set Cooking Time is not necessary. 2. Position food on the edges to avoid curling. &#...broil temperature. Changing the temperature once food is desired, press START TIME. If you to enter the desired temperature and then pressing START. Close the oven door. 3. "Press START" will sound a beep when the preheat is cooking by pressing the Time/Temp keypad to Set Cooking Time. NOTES: ...
... 2. "BROIL" and "Set temp or Press START" will scroll in the text area. 4. (Optional) If a Set Start Time is placed in the oven, preheating is mandatory when using the Set Start Time function. 5. Set Cooking Time is not necessary. 2. Position food on the edges to avoid curling. &#...broil temperature. Changing the temperature once food is desired, press START TIME. If you to enter the desired temperature and then pressing START. Close the oven door. 3. "Press START" will sound a beep when the preheat is cooking by pressing the Time/Temp keypad to Set Cooking Time. NOTES: ...

Energy Guide
Page 11
... Use a meat thermometer to 12 patties, equally spaced, on some models) During convection cooking, the fan provides hot air circulation throughout the oven. To order a broiler pan, see the "Positioning Racks and Bakeware" section. Broiler pan 11 A temperature setting of heated air around the ...fillets and bone-in 2 or 3 different places, including the thickest part. ■ Before convection cooking, position the rack(s) according to heat the oven cavity. Preheat is not needed . ■ For optimal cooking results, do not cover food. ■ When roasting poultry and meat, use rack...
... Use a meat thermometer to 12 patties, equally spaced, on some models) During convection cooking, the fan provides hot air circulation throughout the oven. To order a broiler pan, see the "Positioning Racks and Bakeware" section. Broiler pan 11 A temperature setting of heated air around the ...fillets and bone-in 2 or 3 different places, including the thickest part. ■ Before convection cooking, position the rack(s) according to heat the oven cavity. Preheat is not needed . ■ For optimal cooking results, do not cover food. ■ When roasting poultry and meat, use rack...

Energy Guide
Page 12
... START TIME. Convection Broil (on some models) When using the Set Start Time function. 7. It is not necessary to preheat the oven for convect broil. 1. After you to enter the desired temperature and then pressing START. "CONVECT ROAST" and "Press Again or START... START. It is mandatory when using Convection Recipe, enter your normal cooking temperature. Press START. "Press START" will scroll in oven and close the oven door. 2. Convection Recipe (on some models) When convection broiling, enter your normal broiling temperature. For convection recipe MEAT only: Place...
... START TIME. Convection Broil (on some models) When using the Set Start Time function. 7. It is not necessary to preheat the oven for convect broil. 1. After you to enter the desired temperature and then pressing START. "CONVECT ROAST" and "Press Again or START... START. It is mandatory when using Convection Recipe, enter your normal cooking temperature. Press START. "Press START" will scroll in oven and close the oven door. 2. Convection Recipe (on some models) When convection broiling, enter your normal broiling temperature. For convection recipe MEAT only: Place...
Energy Guide
Page 13
... 300°F Press (6) for 325°F Press (7) for 350°F Press (8) for 375°F Press (9) for 400°F Press 0 for the selected oven when finished. 6. Press and hold START longer than 1 second to the Automatic Shutoff Mode. 13 If a Power Failure Occurs During Sabbath Mode If a power failure... the desired temperature and then pressing START. To Adjust Temperature (when Sabbath Mode is in use. Place the food the in the oven and close the oven door. 9. This feature can be set the temperature change temp press 0-9 and start , once the preheat finish the unit will ...
... 300°F Press (6) for 325°F Press (7) for 350°F Press (8) for 375°F Press (9) for 400°F Press 0 for the selected oven when finished. 6. Press and hold START longer than 1 second to the Automatic Shutoff Mode. 13 If a Power Failure Occurs During Sabbath Mode If a power failure... the desired temperature and then pressing START. To Adjust Temperature (when Sabbath Mode is in use. Place the food the in the oven and close the oven door. 9. This feature can be set the temperature change temp press 0-9 and start , once the preheat finish the unit will ...

Energy Guide
Page 14
...Press the 1 or 2 keypad to adjust the clean time. Do not let water, cleaner, etc., enter slots on your model, see "Oven Vent" or "Oven Vents" section. For double ovens only, "REMOVE RACKS" will scroll in the upper display area. Press 2 to a powdery ash. After the door is locked, "Precise CLEAN...when the lock symbol is extremely sensitive to room temperature before the next Self Clean cycle. NOTE: Only one oven can result. Keep children away from the oven. ■ Remove oven racks to keep them shiny and easy to help get hot enough during the Self-Cleaning cycle. IMPORTANT: The...
...Press the 1 or 2 keypad to adjust the clean time. Do not let water, cleaner, etc., enter slots on your model, see "Oven Vent" or "Oven Vents" section. For double ovens only, "REMOVE RACKS" will scroll in the upper display area. Press 2 to a powdery ash. After the door is locked, "Precise CLEAN...when the lock symbol is extremely sensitive to room temperature before the next Self Clean cycle. NOTE: Only one oven can result. Keep children away from the oven. ■ Remove oven racks to keep them shiny and easy to help get hot enough during the Self-Cleaning cycle. IMPORTANT: The...

Energy Guide
Page 15
...pads, abrasive cleaners, Cooktop Cleaner, steelwool pads, gritty washcloths or abrasive paper towels. The display will take a total of 25 minutes. Close the oven door. 2. Press 1 or 2 to the time of the debris, resulting in the upper display area. Use a cloth soaked with Steam Clean....deposits with a damp sponge before using the Steam Clean feature. See "Button Lock" section. Press CLEAN MODES. 3. For double ovens only, "PRESS (1) FOR UPPER OVEN" will appear in a more effective self-clean. Press START for easier removal. ■ Use the Steam Clean on panel. General...
...pads, abrasive cleaners, Cooktop Cleaner, steelwool pads, gritty washcloths or abrasive paper towels. The display will take a total of 25 minutes. Close the oven door. 2. Press 1 or 2 to the time of the debris, resulting in the upper display area. Use a cloth soaked with Steam Clean....deposits with a damp sponge before using the Steam Clean feature. See "Button Lock" section. Press CLEAN MODES. 3. For double ovens only, "PRESS (1) FOR UPPER OVEN" will appear in a more effective self-clean. Press START for easier removal. ■ Use the Steam Clean on panel. General...

Energy Guide
Page 16
... is set objects on each side. 3. Turn the glass bulb cover in the back of vegetable oil applied to remove. Close the oven door as far as the door is a standard 25-watt appliance bulb. To Replace: 1. If it is not, repeat the removal and installation procedures. ...16 To Replace: 1. To Remove: 1. Lift the oven door while holding both hanger arms into the oven cavity or when bakeware extends past the front edge of an oven rack. ■ Do not set into place. 3. Reconnect power. Then, follow these instructions. Open the...
... is set objects on each side. 3. Turn the glass bulb cover in the back of vegetable oil applied to remove. Close the oven door as far as the door is a standard 25-watt appliance bulb. To Replace: 1. If it is not, repeat the removal and installation procedures. ...16 To Replace: 1. To Remove: 1. Lift the oven door while holding both hanger arms into the oven cavity or when bakeware extends past the front edge of an oven rack. ■ Do not set into place. 3. Reconnect power. Then, follow these instructions. Open the...

Energy Guide
Page 17
...See "Display(s)" section. See "Self-Cleaning Cycle" section. ■ On some models, is normal for the fan to higher position in the oven. ■ Are pie crust edges browning early? Use aluminum foil to clear the display. TROUBLESHOOTING Try the solutions suggested here first in order to ...avoid the cost of an unnecessary service call an electrician. See "Oven Temperature Control" section. ■ On some models, reset the clock, if needed. See "Assistance or Service" section. On some models, ...
...See "Display(s)" section. See "Self-Cleaning Cycle" section. ■ On some models, is normal for the fan to higher position in the oven. ■ Are pie crust edges browning early? Use aluminum foil to clear the display. TROUBLESHOOTING Try the solutions suggested here first in order to ...avoid the cost of an unnecessary service call an electrician. See "Oven Temperature Control" section. ■ On some models, reset the clock, if needed. See "Assistance or Service" section. On some models, ...


