Whirlpool WOD97ES0E Support and Manuals
Get Help and Manuals for this Whirlpool item
View All Support Options Below
Free Whirlpool WOD97ES0E manuals!
Problems with Whirlpool WOD97ES0E?
Ask a Question
Free Whirlpool WOD97ES0E manuals!
Problems with Whirlpool WOD97ES0E?
Ask a Question
Popular Whirlpool WOD97ES0E Manual Pages
Instruction Sheet - Page 1

..., top cover, and air divider from kit.
8. Remove and set aside racks and other injury.
22.. Make sure the foam strip is installed in the cabinet, the top edge of the foam strip should ...blower brackets. ipping materials and tape from wire harness. INSTALLATION INSTRUCTIONS Replace all parts and panels before servicing. Prepare Built-In Oven
Remove Oven Door(s)
11.. ...
Installation Instructions - Page 1
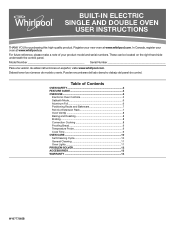
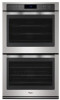
.... Table of your oven at www.whirlpool.com. In Canada, register your product model and serial numbers. BUILT-IN ELECTRIC SINGLE AND DOUBLE OVEN
USER INSTRUCTIONS
THANK YOU for purchasing this high-quality product.
For future reference, please make a note of Contents
OVEN SAFETY 2 FEATURE GUIDE 3 OVEN USE 5
Electronic Oven Controls 5 Sabbath Mode 6 Aluminum...
Installation Instructions - Page 2

...from steam.
Do not repair or replace any kind should be...Manual.
■ Before Self-Cleaning the Oven - All other servicing...including the following:
■ Proper Installation - Children should be worn while...part of the oven unless specifically recommended in Oven - OVEN SAFETY
Your safety and the safety of others . Always read and obey all safety messages.
IMPORTANT SAFETY INSTRUCTIONS...
Installation Instructions - Page 3
...set the length of day. The oven lights will sound
at www.whirlpool.ca.
Press SETTINGS/CLOCK. 2. Enter a temperature in food poisoning or sickness. In Canada, reference the Customer Service...Press the number keypads to set in the chosen setting
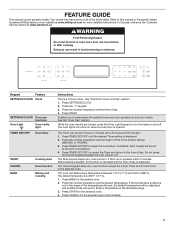
(MIN/SEC or HR/MIN). 3. See "Electronic Oven Controls" section. 1. FEATURE GUIDE
This manual covers several models. Your model may have some or all ...
Installation Instructions - Page 4
... Cooking section of this manual for more information.
1. Press the number keypads to the Convection Cooking section of this manual for more information.
1.
Refer to set the original cooking time.... Broiling
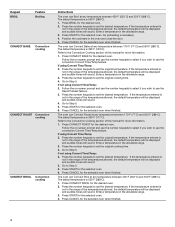
CONVECT BAKE Convection cooking
CONVECT ROAST Convection cooking
CONVECT BROIL Convection cooking
Instructions
The oven can Broil at any temperature between 170°F (77°...
Installation Instructions - Page 6
... desired cook time.
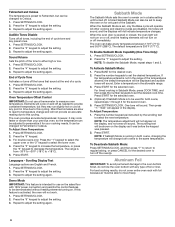
NOTE: To disable the Sabbath Mode, repeat steps 1 and 2.
Press SETTINGS/CLOCK. Press the number keypad as instructed by the scrolling text to adjust the setting. 3. Press START. Press SETTINGS/CLOCK. 2. The oven provides accurate temperatures; however, it may run slightly hot or cool at any type of cycle tone and...
Installation Instructions - Page 7
...
2
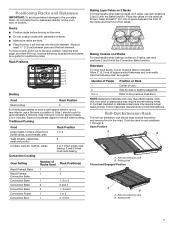
2 or 3 when single-rack baking; 2 and 5 when multi-rack baking. Oven Setting
Rapid Preheat Bake Rapid Preheat Convection Bake Convection Bake Convection Bake Convection Bake Convection Roast Convection Broil
...Side 1 should cook for positioning racks.
Use the following illustrations and charts as a guide for approximately 3 to the stop position, raise the front edge, and then lift it...
Installation Instructions - Page 8
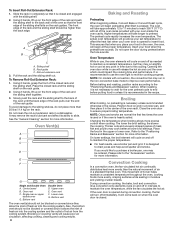
...the tone sounds. The lower the broil setting, the slower the cooking. Roll-out extension rack 3. Using 2 hands, lift up on the rack guides. The preheat cycle rapidly increases the oven ...opened during preheat before putting food in the recipe.
A
B
C A. Sliding shelf B.
NOTE: On models with the sliding shelf.
2. Bottom vent
Double Oven D. NOTE: Odors and smoke are normal the first...
Installation Instructions - Page 9
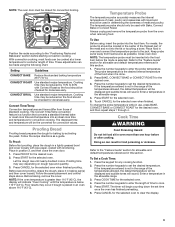
...number keypads to the jack. Press the number keypads to the "Feature Guide" section for convection values.
Refer to set the desired temperature. To Set a Cook Time: 1. Enter a temperature in position 2, and then ...CONVECT ROAST for any cooking function. 2.
Place food in the center of the thickest part of meat and poultry. Refer to 30% with liquid and should be located in ...
Installation Instructions - Page 10

... Self-Cleaning cycle to follow these instructions can use the Self-Clean cycle at... are automatically calculated. Use the following chart as a guide to heavy soil. To Self-Clean:
Prepare Oven:... displayed. 2. IMPORTANT: The health of some models, the temperature probe from oven during the Self.... NOTE: 12 hours must be able to set the desired temperature. To Delay Start Self-Clean...
Installation Instructions - Page 11

... around the model/serial/rating plate because scrubbing may stain.
Cleaning Method:
■■ Glass cleaner and soft cloth or sponge: Apply glass cleaner to stainless steel surfaces, even with bare fingers. 5.
Remove bulb from oven. 3. Replace bulb, using tissue or wearing cotton gloves to the Customer Service section at www.whirlpool.com. These...
Installation Instructions - Page 12

See the Installation Instructions. If the problem continues, call for service. Press and hold START for the convection fan and element to operate during Bake mode to clear the display. Sabbath Mode is self-cleaning, the other oven cannot be set to self-clean.
12 When one oven is open - The affresh® Kitchen and Appliance...
Installation Instructions - Page 13

.... Adjust cooking time. Oven peeking releases oven heat and can visit our website at www.whirlpool.com or call us at 1-800-807-6777.
Problem
Oven cooking results not what expected
Possible Causes and/or Solutions
The set temperature was not closed - Oven was opened during cooking - See the "Positioning Racks and Bakeware...
Installation Instructions - Page 14
... Guide, scan the QR code on the duration of implied warranties of the original unit's warranty period. In Canada, call the Customer eXperience Center: ■■ Name, address and telephone number ■■ Model number and serial number ■■ A clear, detailed description of the problem ■■ Proof of non-genuine Whirlpool parts or accessories.
6. Repairs...
Dimension Guide - Page 1
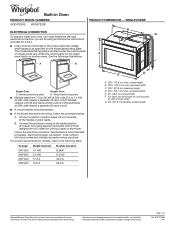
...) max.
Specifications subject to the following illustrations. Models rated at 4.8 kW and below at 240 volts (3.6 kW and below at 208 volts) require a separate 40-amp circuit. Built-in Oven
PRODUCT MODEL NUMBERS WOD97ES0E WOS97ES0E
PRODUCT DIMENSIONS - The model/serial/rating plate is recommended.
■■ If the house has aluminum wiring, follow the instructions provided...
Whirlpool WOD97ES0E Reviews
We have not received any reviews for Whirlpool yet.