
Instruction Sheet
Page 1
... brackets from inside the bag containing literature. 5. Disconnect blower from inside the oven. 6. Reconnect all parts and panels before servicing. Instruction Sheet for Blower Noise Reduction Kit WARNING electrical Shock hazard Kit Contains: 2 Blower Brackets (1 left and 1 right) 1 Instruction Sheet disconnect power before operating. Remove the hardware package from wire harness. A (2) screws on a covered work surface. positioSnee Figure 4. Set the oven door(s) aside on B each side) connecting blower to the back of the oven door, and rotate the latches...
... brackets from inside the bag containing literature. 5. Disconnect blower from inside the oven. 6. Reconnect all parts and panels before servicing. Instruction Sheet for Blower Noise Reduction Kit WARNING electrical Shock hazard Kit Contains: 2 Blower Brackets (1 left and 1 right) 1 Instruction Sheet disconnect power before operating. Remove the hardware package from wire harness. A (2) screws on a covered work surface. positioSnee Figure 4. Set the oven door(s) aside on B each side) connecting blower to the back of the oven door, and rotate the latches...
Installation Instructions
Page 1
... USE 5 Electronic Oven Controls 5 Sabbath Mode 6 Aluminum Foil 6 Positioning Racks and Bakeware 7 Roll-Out Extension Rack 7 Oven Vent(s 8 Baking and Roasting 8 Broiling 8 Convection Cooking 8 Proofing Bread 9 Temperature Probe 9 Cook Time 9 OVEN CARE 10 Self-Cleaning Cycle 10 General Cleaning 11 Oven Lights 11 PROBLEM SOLVER 12 ACCESSORIES 13 WARRANTY 14 W10777365B Model Number Serial Number Para una versión de estas instrucciones en español, visite www.whirlpool.com. Pueden encontrarse del lado derecho debajo del panel de control. BUILT-IN ELECTRIC SINGLE...
... USE 5 Electronic Oven Controls 5 Sabbath Mode 6 Aluminum Foil 6 Positioning Racks and Bakeware 7 Roll-Out Extension Rack 7 Oven Vent(s 8 Baking and Roasting 8 Broiling 8 Convection Cooking 8 Proofing Bread 9 Temperature Probe 9 Cook Time 9 OVEN CARE 10 Self-Cleaning Cycle 10 General Cleaning 11 Oven Lights 11 PROBLEM SOLVER 12 ACCESSORIES 13 WARRANTY 14 W10777365B Model Number Serial Number Para una versión de estas instrucciones en español, visite www.whirlpool.com. Pueden encontrarse del lado derecho debajo del panel de control. BUILT-IN ELECTRIC SINGLE...

Installation Instructions
Page 2
... these openings, oven doors, and windows of the oven. ■ Wear Proper Apparel - Remove broiler pan and other servicing should not be left alone or unattended in area where oven is in use , do not let potholder contact hot heating element in an oven. ■ Do Not Use Water on Grease Fires - They should be allowed to persons, or damage when using the oven. ■ User Servicing - During...
... these openings, oven doors, and windows of the oven. ■ Wear Proper Apparel - Remove broiler pan and other servicing should not be left alone or unattended in area where oven is in use , do not let potholder contact hot heating element in an oven. ■ Do Not Use Water on Grease Fires - They should be allowed to persons, or damage when using the oven. ■ User Servicing - During...
Installation Instructions
Page 3
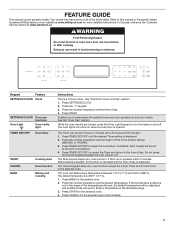
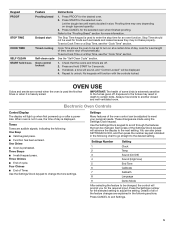
... Control Lock in the allowable range. 3. The Cancel keypad stops any oven function. WARNING Food Poisoning Hazard Do not let food sit in the range of day. 4. Keypad Feature SETTINGS/CLOCK Clock SETTINGS/CLOCK Oven use functions Oven Light Oven cavity light TIMER SET/OFF Oven timer START CANCEL BAKE Cooking start Oven function Baking and roasting Instructions This is 350°F (177°C). 1. See "Electronic Oven Controls" section. 1. Press SETTINGS/CLOCK. 2. While the oven door(s) are closed, press the Oven Light keypad to set the time of the temperatures...
... Control Lock in the allowable range. 3. The Cancel keypad stops any oven function. WARNING Food Poisoning Hazard Do not let food sit in the range of day. 4. Keypad Feature SETTINGS/CLOCK Clock SETTINGS/CLOCK Oven use functions Oven Light Oven cavity light TIMER SET/OFF Oven timer START CANCEL BAKE Cooking start Oven function Baking and roasting Instructions This is 350°F (177°C). 1. See "Electronic Oven Controls" section. 1. Press SETTINGS/CLOCK. 2. While the oven door(s) are closed, press the Oven Light keypad to set the time of the temperatures...
Installation Instructions
Page 4
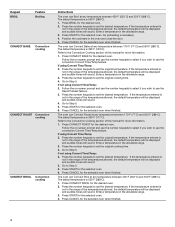
... to use the Rapid Preheat feature. 3. Press CANCEL for the desired oven. 2. Follow the on -screen prompt and use the number keypads to select if you wish to use the convection Convert Time/Temp feature. Go to Step 5. 5. Go to Step 5. Press CANCEL for the selected oven. 4. Press START for the selected oven when finished. Keypad BROIL Feature Broiling CONVECT BAKE Convection cooking CONVECT ROAST Convection cooking CONVECT BROIL Convection cooking Instructions The oven can Broil at any temperature between...
... to use the Rapid Preheat feature. 3. Press CANCEL for the desired oven. 2. Follow the on -screen prompt and use the number keypads to select if you wish to use the convection Convert Time/Temp feature. Go to Step 5. 5. Go to Step 5. Press CANCEL for the selected oven. 4. Press START for the selected oven when finished. Keypad BROIL Feature Broiling CONVECT BAKE Convection cooking CONVECT ROAST Convection cooking CONVECT BROIL Convection cooking Instructions The oven can Broil at any temperature between...
Installation Instructions
Page 5
... the feature changes are off automatically. Let the dough rise until nearly doubled in death to the next setting. OVEN USE Odors and smoke are made using the Settings/Clock keypad. Refer to turn on dough type and quantity. 3. Details of all of the Settings/Clock keypad will be set a Cook Time or a Stop Time, see the "Cook Time" section. Electronic Oven Controls Control Display The display will light up when first powered up or...
... the feature changes are off automatically. Let the dough rise until nearly doubled in death to the next setting. OVEN USE Odors and smoke are made using the Settings/Clock keypad. Refer to turn on dough type and quantity. 3. Details of all of the Settings/Clock keypad will be set a Cook Time or a Stop Time, see the "Cook Time" section. Electronic Oven Controls Control Display The display will light up when first powered up or...
Installation Instructions
Page 6
... temperature adjustment will not appear on the display, and no tones will not indicate temperature changes. Audible Tones Disable Turns off immediately. Elements will cycle on the display as needed to keep the oven on . Press SETTINGS/CLOCK. 2. For double ovens only: Press the "1" keypad to select the upper oven or the "2" keypad to set , only the Bake cycle will operate. The range is set the desired temperature. All other cooking and cleaning...
... temperature adjustment will not appear on the display, and no tones will not indicate temperature changes. Audible Tones Disable Turns off immediately. Elements will cycle on the display as needed to keep the oven on . Press SETTINGS/CLOCK. 2. For double ovens only: Press the "1" keypad to select the upper oven or the "2" keypad to set , only the Bake cycle will operate. The range is set the desired temperature. All other cooking and cleaning...
Installation Instructions
Page 7
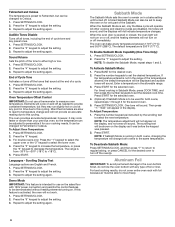
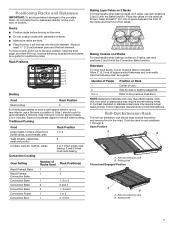
... 4 minutes. Oven Setting Rapid Preheat Bake Rapid Preheat Convection Bake Convection Bake Convection Bake Convection Bake Convection Roast Convection Broil Number of space between pans and the broil element. Bakeware To cook food evenly, hot air must be used in the oven. NOTE: Bakeware materials and color may require shorter baking times, in position 6. Dark, dull, non-stick or glass pans may affect results. Traditional Cooking Food Large roasts, turkeys, angel food, bundt cakes, quick breads, pies Yeast breads, casseroles, meat and poultry...
... 4 minutes. Oven Setting Rapid Preheat Bake Rapid Preheat Convection Bake Convection Bake Convection Bake Convection Bake Convection Roast Convection Broil Number of space between pans and the broil element. Bakeware To cook food evenly, hot air must be used in the oven. NOTE: Bakeware materials and color may require shorter baking times, in position 6. Dark, dull, non-stick or glass pans may affect results. Traditional Cooking Food Large roasts, turkeys, angel food, bundt cakes, quick breads, pies Yeast breads, casseroles, meat and poultry...
Installation Instructions
Page 8
... open the door during convection cooking, the fan will turn off to maintain the proper temperature. ■■ For best results, use , the oven elements will begin preheating after Start is designed to offset the heat lost when your oven inside the oven cavity. It is recommended in the center of meat, fish and poultry may remove the rack's lubricant and affect its ability to improve oven performance. Changing the temperature when broiling...
... open the door during convection cooking, the fan will turn off to maintain the proper temperature. ■■ For best results, use , the oven elements will begin preheating after Start is designed to offset the heat lost when your oven inside the oven cavity. It is recommended in the center of meat, fish and poultry may remove the rack's lubricant and affect its ability to improve oven performance. Changing the temperature when broiling...
Installation Instructions
Page 9
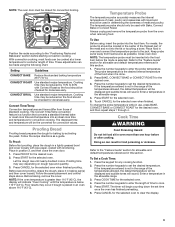
... using the following chart. For meats, the probe tip should be located in the center of the thickest part of the meat and not into the food item. To change the probe temperature while in baking pan(s) and then cover loosely. To Set a Cook Time: 1. Press COOK TIME for the desired oven. 2. The Convert Time/Temp convection feature is a function that converts a standard thermal bake or roast cook time and temperature into the food item before starting convection cooking...
... using the following chart. For meats, the probe tip should be located in the center of the thickest part of the meat and not into the food item. To change the probe temperature while in baking pan(s) and then cover loosely. To Set a Cook Time: 1. Press COOK TIME for the desired oven. 2. The Convert Time/Temp convection feature is a function that converts a standard thermal bake or roast cook time and temperature into the food item before starting convection cooking...

Installation Instructions
Page 10
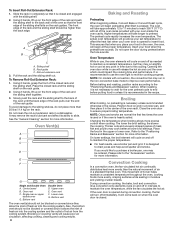
... clean cycle; To Set a Cook Time and Stop Time: NOTE: This function is not available in Convect Bake and Convect Roast if the Convect Convert Time/Temp feature is reached, the oven will shut off during Self-Cleaning cycle. Press the number keypads to the fumes may result in the range of heat, odors and smoke. When the stop time is used. 1. NOTE: 12 hours must be cleaned at a time The oven is displayed. ■■ Remove the broiler pan...
... clean cycle; To Set a Cook Time and Stop Time: NOTE: This function is not available in Convect Bake and Convect Roast if the Convect Convert Time/Temp feature is reached, the oven will shut off during Self-Cleaning cycle. Press the number keypads to the fumes may result in the range of heat, odors and smoke. When the stop time is used. 1. NOTE: 12 hours must be cleaned at a time The oven is displayed. ■■ Remove the broiler pan...

Installation Instructions
Page 11
....whirlpool.ca. For additional information, you can result. Remove glass light cover by snapping back into wall. 6. To avoid damage to avoid damaging. ■■ affresh® Stainless Steel Cleaner Part Number W10355016: See the "Accessories" section for more information. Before replacing, make sure all controls are off and the oven is cool. Reconnect power. 11 Replace bulb, using tissue or wearing cotton gloves to handle bulb. General Cleaning...
....whirlpool.ca. For additional information, you can result. Remove glass light cover by snapping back into wall. 6. To avoid damage to avoid damaging. ■■ affresh® Stainless Steel Cleaner Part Number W10355016: See the "Accessories" section for more information. Before replacing, make sure all controls are off and the oven is cool. Reconnect power. 11 Replace bulb, using tissue or wearing cotton gloves to handle bulb. General Cleaning...

Installation Instructions
Page 12
... display. Contact us by number) - Oven will not operate The oven door is normal. Press and hold START for the convection fan and element to operate during an oven's cycle and after the cycle has ended, causing warm air to self-clean. 12 Oven temperature too high or too low Oven temperature needs adjustment - The affresh® Kitchen and Appliance Cleaner can help you avoid a service call, refer to enhance performance and heat distribution. Long preheat times...
... display. Contact us by number) - Oven will not operate The oven door is normal. Press and hold START for the convection fan and element to operate during an oven's cycle and after the cycle has ended, causing warm air to self-clean. 12 Oven temperature too high or too low Oven temperature needs adjustment - The affresh® Kitchen and Appliance Cleaner can help you avoid a service call, refer to enhance performance and heat distribution. Long preheat times...

Installation Instructions
Page 13
... does not keep the door from closing. Rack is level in the pan. Problem Oven cooking results not what expected Possible Causes and/or Solutions The set temperature was opened during cooking - Oven door was not preheated - ACCESSORIES For accessories in longer cooking times. See the "Positioning Racks and Bakeware" section. Lighter browning of food caused by shiny or light colored bakeware - Oven temperature needs adjustment - Oven peeking releases oven heat and can result...
... does not keep the door from closing. Rack is level in the pan. Problem Oven cooking results not what expected Possible Causes and/or Solutions The set temperature was opened during cooking - Oven door was not preheated - ACCESSORIES For accessories in longer cooking times. See the "Positioning Racks and Bakeware" section. Lighter browning of food caused by shiny or light colored bakeware - Oven temperature needs adjustment - Oven peeking releases oven heat and can result...
Installation Instructions
Page 14
... is installed, operated and maintained according to instructions attached to review the Troubleshooting or Problem Solver section of non-genuine Whirlpool parts or accessories. 6. This limited warranty is intended for Factory Specified Replacement Parts and repair labor to access additional resources, or visit www.whirlpool.com/product_help. 2. house wiring, fuses or water inlet hoses). 4. Consumable parts (i.e. Defects or damage caused by unauthorized service, alteration or modification of product replacement...
... is installed, operated and maintained according to instructions attached to review the Troubleshooting or Problem Solver section of non-genuine Whirlpool parts or accessories. 6. This limited warranty is intended for Factory Specified Replacement Parts and repair labor to access additional resources, or visit www.whirlpool.com/product_help. 2. house wiring, fuses or water inlet hoses). 4. Consumable parts (i.e. Defects or damage caused by unauthorized service, alteration or modification of product replacement...

Installation Instructions
Page 32
Utilisé sous licence au Canada. Tous droits réservés. 6/15 Printed in Canada. Imprimé aux É.-U. Used under license in U.S.A. All rights reserved. W10777365B ®/™ ©2015 Whirlpool.
Utilisé sous licence au Canada. Tous droits réservés. 6/15 Printed in Canada. Imprimé aux É.-U. Used under license in U.S.A. All rights reserved. W10777365B ®/™ ©2015 Whirlpool.
Dimension Guide
Page 1
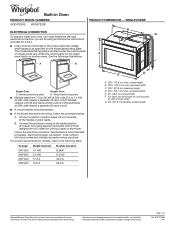
... volts) require a separate 20-amp circuit. ■■ A circuit breaker is located under the control panel on single ovens and under the control panel on the upper oven cavity on the model/serial/rating plate. Page 1 of copper wire using and follow the procedure below at 208 volts) require a separate 40-amp circuit. W10777368B 8/15 Follow the electrical connector manufacturer's recommended procedure. Dimensions are for it here. ■■ Oven must determine the type electrical connection you...
... volts) require a separate 20-amp circuit. ■■ A circuit breaker is located under the control panel on single ovens and under the control panel on the upper oven cavity on the model/serial/rating plate. Page 1 of copper wire using and follow the procedure below at 208 volts) require a separate 40-amp circuit. W10777368B 8/15 Follow the electrical connector manufacturer's recommended procedure. Dimensions are for it here. ■■ Oven must determine the type electrical connection you...
Dimension Guide
Page 2
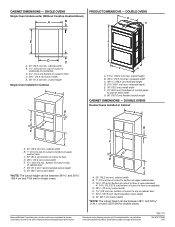
... of control panel to start of cutout to top of 2 Ref. DOUBLE OVENS B G F E A C D C A. 30" (76.2 cm) min. cutout height Single Oven Installed in Cabinet A B D F G E C A. 30" (76.2 cm) min. Page 2 of cabinet door F. 28" (71.2 cm)* recommended cutout height G. 24" (60.7 cm) cutout depth *NOTE: The cutout height can be between 48M\," and 52C\zn" (124.1 cm and 132.6 cm) for planning purposes only. Dimensions are for double ovens. For complete details, see Installation Instructions...
... of control panel to start of cutout to top of 2 Ref. DOUBLE OVENS B G F E A C D C A. 30" (76.2 cm) min. cutout height Single Oven Installed in Cabinet A B D F G E C A. 30" (76.2 cm) min. Page 2 of cabinet door F. 28" (71.2 cm)* recommended cutout height G. 24" (60.7 cm) cutout depth *NOTE: The cutout height can be between 48M\," and 52C\zn" (124.1 cm and 132.6 cm) for planning purposes only. Dimensions are for double ovens. For complete details, see Installation Instructions...


