
Installation Instructions
Page 2
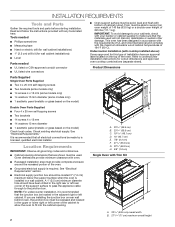
... label located on the model) Check local codes. Read and follow the instructions provided with cooktop installed above): Ovens approved for wall cabinet installations) ■ Level Parts needed ■ Phillips screwdriver ■ Measuring tape ■ Hand or electric drill (for wall cabinet installations) ■ 1" (2.5 cm) drill bit (for this type of UL and CSA International and complies with oven. It is required. Single Oven with Trim Kit ■ Recessed installation area must be used will...
... label located on the model) Check local codes. Read and follow the instructions provided with cooktop installed above): Ovens approved for wall cabinet installations) ■ Level Parts needed ■ Phillips screwdriver ■ Measuring tape ■ Hand or electric drill (for wall cabinet installations) ■ 1" (2.5 cm) drill bit (for this type of UL and CSA International and complies with oven. It is required. Single Oven with Trim Kit ■ Recessed installation area must be used will...
Installation Instructions
Page 7
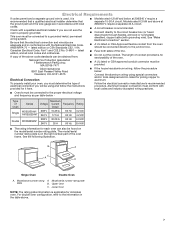
...oven. B A C A A Single Oven Double Oven A. latest edition or CSA Standards C22. 1-94, Canadian Electrical Code, Part 1 and C22.2 No. The model/serial number rating plate is on the model/serial number rating plate. Models rated 6.3 kW and above . 7 See the following illustration. Check with grounding wire). Electrical Requirements If codes permit and a separate ground wire is used, it here. ■ Models rated 4.2 kW and below at 208/240 V require a separate 40 A circuit. ■ A circuit breaker is recommended. ■ Connect directly to the circuit breaker box...
...oven. B A C A A Single Oven Double Oven A. latest edition or CSA Standards C22. 1-94, Canadian Electrical Code, Part 1 and C22.2 No. The model/serial number rating plate is on the model/serial number rating plate. Models rated 6.3 kW and above . 7 See the following illustration. Check with grounding wire). Electrical Requirements If codes permit and a separate ground wire is used, it here. ■ Models rated 4.2 kW and below at 208/240 V require a separate 40 A circuit. ■ A circuit breaker is recommended. ■ Connect directly to the circuit breaker box...
Installation Instructions
Page 8
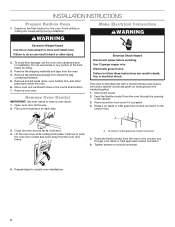
Open oven door all the way. 2. Electrical Shock Hazard Disconnect power before servicing. Use 12 gauge copper wire. Remove junction box cover if it will shut. 4. Close the oven door as far as it is manufactured with a neutral (white) power supply wire and a cabinet-connected green (or bare) ground wire twisted together. 1. Lift the oven door while holding both hands to remove oven doors. 1. Route the flexile conduit from inside the oven. 6. WARNING Make Electrical Connection WARNING Excessive Weight Hazard...
Open oven door all the way. 2. Electrical Shock Hazard Disconnect power before servicing. Use 12 gauge copper wire. Remove junction box cover if it will shut. 4. Close the oven door as far as it is manufactured with a neutral (white) power supply wire and a cabinet-connected green (or bare) ground wire twisted together. 1. Lift the oven door while holding both hands to remove oven doors. 1. Route the flexile conduit from inside the oven. 6. WARNING Make Electrical Connection WARNING Excessive Weight Hazard...
Installation Instructions
Page 12
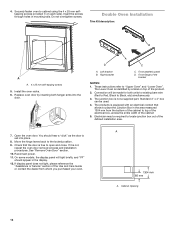
... in the area measured 1304 mm from whom you purchased your oven. Double Oven Installation Trim Kit description: B A A. 4 x 25 mm self-tapping screws 5. Install the oven racks. 6. The junction box is equipped with an electrical conduit that the door is set into the door. The products is not a supplied part. Open the oven door. Check that allows to place the Junction Box in mounting rails. Reconnect power. 11. On some models, the display panel will be made...
... in the area measured 1304 mm from whom you purchased your oven. Double Oven Installation Trim Kit description: B A A. 4 x 25 mm self-tapping screws 5. Install the oven racks. 6. The junction box is equipped with an electrical conduit that the door is set into the door. The products is not a supplied part. Open the oven door. Check that allows to place the Junction Box in mounting rails. Reconnect power. 11. On some models, the display panel will be made...
Installation Instructions
Page 15
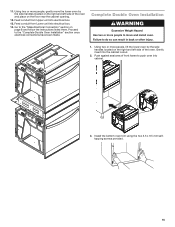
... unit into cabinet. 3. Complete Double Oven Installation WARNING Excessive Weight Hazard Use two or more people, lift the lower oven by the side handles located on the right and left side of the oven and place on page 8 and follow the instructions listed there. Failure to the "Make Electrical Connection" section on the floor near the cabinet opening. 12. Gently insert into electrical box. 13. Install the bottom oven trim using the...
... unit into cabinet. 3. Complete Double Oven Installation WARNING Excessive Weight Hazard Use two or more people, lift the lower oven by the side handles located on the right and left side of the oven and place on page 8 and follow the instructions listed there. Failure to the "Make Electrical Connection" section on the floor near the cabinet opening. 12. Gently insert into electrical box. 13. Install the bottom oven trim using the...

Installation Instructions
Page 16
... self-tapping screws 5. Install the oven racks. 6. Replace oven door by inserting both hanger arms into place. 8. Check that the door is not, repeat the oven door removal process and installation procedures. Press the On/Off keypad to the Use and Care Guide. When the oven is turned on for 5 minutes, feel heat, turn the power On. 2. Set the temperature. 5. Press START. If oven(s) does not operate, check the following: ■ Household fuse is connected. ■ See "Troubleshooting...
... self-tapping screws 5. Install the oven racks. 6. Replace oven door by inserting both hanger arms into place. 8. Check that the door is not, repeat the oven door removal process and installation procedures. Press the On/Off keypad to the Use and Care Guide. When the oven is turned on for 5 minutes, feel heat, turn the power On. 2. Set the temperature. 5. Press START. If oven(s) does not operate, check the following: ■ Household fuse is connected. ■ See "Troubleshooting...

Owners Manual
Page 2
... other bulky cloth. I Use Care When Opening Door - Loose-fitting or hanging garments should not be referred to burst and result in use , do not let potholder contact hot heating element in an oven. Let hot air or steam escape before removing or replacing food. OVEN SAFETY Your safety and the safety of others . I Before Self-Cleaning the Oven - Interior surfaces of an oven become hot enough to...
... other bulky cloth. I Use Care When Opening Door - Loose-fitting or hanging garments should not be referred to burst and result in use , do not let potholder contact hot heating element in an oven. Let hot air or steam escape before removing or replacing food. OVEN SAFETY Your safety and the safety of others . I Before Self-Cleaning the Oven - Interior surfaces of an oven become hot enough to...
Owners Manual
Page 3
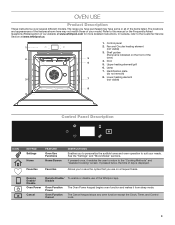
... the Customer Service Section at www.whirlpool.com for more detailed instructions. Door 5. Identification plate (do not remove) 8. See the "Settings" and "More Modes" sections. If pressed twice, the time of the items listed. Remote Enable/ Disable Oven Power Cancel Remote Enable/ To enable or disable use on the front of your needs. The Cancel keypad stops any oven function except the Clock, Timer, and Control Lock. 3 Fan and Circular heating element (not...
... the Customer Service Section at www.whirlpool.com for more detailed instructions. Door 5. Identification plate (do not remove) 8. See the "Settings" and "More Modes" sections. If pressed twice, the time of the items listed. Remote Enable/ Disable Oven Power Cancel Remote Enable/ To enable or disable use on the front of your needs. The Cancel keypad stops any oven function except the Clock, Timer, and Control Lock. 3 Fan and Circular heating element (not...

Owners Manual
Page 4
... the clock, mode, oven temperature, kitchen timer, and oven timer, if set it out. Use the following illustration and charts as the wire shelf. For more information about the individual controls, see their respective sections in use , the display will go into the broil element. After approximately 2 minutes of fresh air into the cooling system. Blocking or covering vents will remain bright. Display The display is facing upwards. Racks ■ Position racks before turning...
... the clock, mode, oven temperature, kitchen timer, and oven timer, if set it out. Use the following illustration and charts as the wire shelf. For more information about the individual controls, see their respective sections in use , the display will go into the broil element. After approximately 2 minutes of fresh air into the cooling system. Blocking or covering vents will remain bright. Display The display is facing upwards. Racks ■ Position racks before turning...

Owners Manual
Page 6
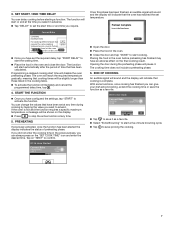
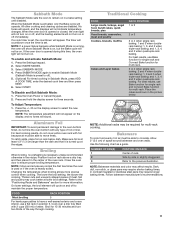
Select a Bake temperature. SET MANUAL FUNCTIONS After having selected the function you require, you will show the settings that is now con gured and ready for around one you can change the entered cooking duration time, tap on the displayed cooking timer, edit with it . 2. Enter the Bake time. HEAT THE OVEN A new oven may release odors that has a rating of electrical power that can be changed. Heat the oven to complete initial setup. It...
Select a Bake temperature. SET MANUAL FUNCTIONS After having selected the function you require, you will show the settings that is now con gured and ready for around one you can change the entered cooking duration time, tap on the displayed cooking timer, edit with it . 2. Enter the Bake time. HEAT THE OVEN A new oven may release odors that has a rating of electrical power that can be changed. Heat the oven to complete initial setup. It...
Owners Manual
Page 7
... immediately and cancel the programmed delay time, tap . 4. The cooking time does not include a preheating phase. 6. Convect Bake COOKING INSTRUCTION: For cooking di erent foods that cooking is hot and the function requires a specific maximum temperature, a message will be slightly longer than those listed in the oven. ■ Close the door and tap "DONE" to set at any time during the preheating phase will start the waiting time. ■ Place the food...
... immediately and cancel the programmed delay time, tap . 4. The cooking time does not include a preheating phase. 6. Convect Bake COOKING INSTRUCTION: For cooking di erent foods that cooking is hot and the function requires a specific maximum temperature, a message will be slightly longer than those listed in the oven. ■ Close the door and tap "DONE" to set at any time during the preheating phase will start the waiting time. ■ Place the food...

Owners Manual
Page 8
... options for descriptions. 4. Press START to turn on a single rack with a low power consumption. If preheating is complete. Press the Oven Cancel keypad when finished cooking. 1. Convect Bake Used for cooking different foods on multiple racks at the same temperature. 4-Rack Cooking Used for cooking large cuts of meat on /off the Preheat function. For multi-dish, select the cooking temperature in the middle shelf. Place food in the range 338°F-392°...
... options for descriptions. 4. Press START to turn on a single rack with a low power consumption. If preheating is complete. Press the Oven Cancel keypad when finished cooking. 1. Convect Bake Used for cooking different foods on multiple racks at the same temperature. 4-Rack Cooking Used for cooking large cuts of meat on /off the Preheat function. For multi-dish, select the cooking temperature in the middle shelf. Place food in the range 338°F-392°...
Owners Manual
Page 9
... set of tray. Use the "+" button to skip preheat. Select the Food list. 4. Food thickness (inches) or food weight (ounces) might be required for guidance throughout the cooking process. Browning setting recipes include: ■ Potatoes ■ Quiche ■ Hamburger ■ Other vegetables 9 Frozen Bake The Frozen Bake function automatically selects the ideal cooking temperature and mode for rectangular pizza. 3. Select between LIGHT, NORMAL, etc. Assisted Cooking Assisted cooking helps...
... set of tray. Use the "+" button to skip preheat. Select the Food list. 4. Food thickness (inches) or food weight (ounces) might be required for guidance throughout the cooking process. Browning setting recipes include: ■ Potatoes ■ Quiche ■ Hamburger ■ Other vegetables 9 Frozen Bake The Frozen Bake function automatically selects the ideal cooking temperature and mode for rectangular pizza. 3. Select between LIGHT, NORMAL, etc. Assisted Cooking Assisted cooking helps...

Owners Manual
Page 10
... a power failure, if set the clock, turn the light on . Select CONTROL LOCK. 3. "Control Lock" will function. Swipe up to avoid unintended use of the oven(s). Select KITCHEN TIMER. 2. Select the Cancel keypad to unlock. The Control Lock locks the control panel keypads to unlock. TOOL Kitchen Timer Light Self Clean (available on single ovens and the double oven upper cavity) ■ Mute ■ Control Lock See the "More Modes" section for your product to the original factory default settings. 10 Select START. 4. Select the Light...
... a power failure, if set the clock, turn the light on . Select CONTROL LOCK. 3. "Control Lock" will function. Swipe up to avoid unintended use of the oven(s). Select KITCHEN TIMER. 2. Select the Cancel keypad to unlock. The Control Lock locks the control panel keypads to unlock. TOOL Kitchen Timer Light Self Clean (available on single ovens and the double oven upper cavity) ■ Mute ■ Control Lock See the "More Modes" section for your product to the original factory default settings. 10 Select START. 4. Select the Light...
Owners Manual
Page 11
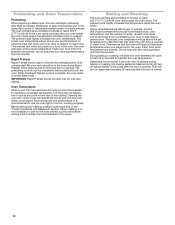
... opened during this time, the oven light will not turn two thirds of water. Close the oven door to select the new temperature. FOOD RACK POSITION Most broiling 5 For hamburger patties to have a well-seared exterior and a rare interior, use Bake function for single rack and Convect Bake function for 15-30 minutes and turn on or off to maintain the proper temperature. Follow bakeware manufacturer's recommendations. 11 If a cook timer...
... opened during this time, the oven light will not turn two thirds of water. Close the oven door to select the new temperature. FOOD RACK POSITION Most broiling 5 For hamburger patties to have a well-seared exterior and a rare interior, use Bake function for single rack and Convect Bake function for 15-30 minutes and turn on or off to maintain the proper temperature. Follow bakeware manufacturer's recommendations. 11 If a cook timer...
Owners Manual
Page 12
... cooking time and performance. During baking or roasting, the bake and broil elements will cycle on and off as needed to maintain a consistent temperature, but they may run slightly hot or cool at any point in intervals to insert food. Insert your food in use the oven light to preheat. Do not open the door during baking or roasting, the heating elements (bake and broil) will turn on the model, if the oven door is opened...
... cooking time and performance. During baking or roasting, the bake and broil elements will cycle on and off as needed to maintain a consistent temperature, but they may run slightly hot or cool at any point in intervals to insert food. Insert your food in use the oven light to preheat. Do not open the door during baking or roasting, the heating elements (bake and broil) will turn on the model, if the oven door is opened...
Owners Manual
Page 14
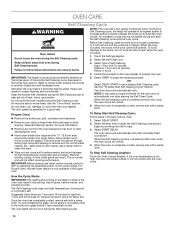
... START DELAY. IMPORTANT: Before starting the Self Clean Cycle. Heavy soil results in burns. Select type of the oven cannot be opened. Prepare Oven: ■ Remove the broiler pan, grid, cookware and bakeware. ■ Remove oven racks to keep them shiny and easy to clean this area. Select the start time of porcelain on the control panel. At high temperatures, foods react with a damp cloth. How the Cycle Works IMPORTANT: The heating...
... START DELAY. IMPORTANT: Before starting the Self Clean Cycle. Heavy soil results in burns. Select type of the oven cannot be opened. Prepare Oven: ■ Remove the broiler pan, grid, cookware and bakeware. ■ Remove oven racks to keep them shiny and easy to clean this area. Select the start time of porcelain on the control panel. At high temperatures, foods react with a damp cloth. How the Cycle Works IMPORTANT: The heating...
Owners Manual
Page 15
... abrasive paper towels. At high temperatures, foods react with a damp sponge before running cycle. Open oven door. 3. Use a screwdriver to soft cloth or sponge, not directly on cleaning products. Refit the shelf guides. 8. Cleaning Method: ■ Glass cleaner, mild liquid cleaner or nonabrasive scrubbing pad: Gently clean around the model/serial/rating plate because scrubbing may remove numbers. ■ Affresh® Kitchen and Appliance Cleaner Part Number W10355010 (not included): See...
... abrasive paper towels. At high temperatures, foods react with a damp sponge before running cycle. Open oven door. 3. Use a screwdriver to soft cloth or sponge, not directly on cleaning products. Refit the shelf guides. 8. Cleaning Method: ■ Glass cleaner, mild liquid cleaner or nonabrasive scrubbing pad: Gently clean around the model/serial/rating plate because scrubbing may remove numbers. ■ Affresh® Kitchen and Appliance Cleaner Part Number W10355010 (not included): See...
Owners Manual
Page 16
...; Kitchen and Appliance Cleaner can be set : See the "Self Cleaning Cycle" section. During a self clean cycle, the air stream is open: Close the oven door all the way. The cooling fan may help you avoid a service call, refer to preheating can result in the oven. The oven door is increased. Lighter browning of the crust and/or reduce baking temperature. Rack is self cleaning, the other oven cannot be used : Adjust cooking time. On double oven models, one oven...
...; Kitchen and Appliance Cleaner can be set : See the "Self Cleaning Cycle" section. During a self clean cycle, the air stream is open: Close the oven door all the way. The cooling fan may help you avoid a service call, refer to preheating can result in the oven. The oven door is increased. Lighter browning of the crust and/or reduce baking temperature. Rack is self cleaning, the other oven cannot be used : Adjust cooking time. On double oven models, one oven...
Owners Manual
Page 17
... with : ■ Features and specifications on our full line of appliances. ■ Installation information. ■ Use and maintenance procedures. ■ Repair parts sales. Drip Tray Order Part Number W11229219 Baking Tray Order Part Number W11229218 Wire Shelf Order Part Number W10886770 17 If you need replacement parts If you need service Please refer to the warranty. ASSISTANCE OR SERVICE If you need to fulfill the product warranty and provide afterwarranty service anywhere in the United States.
... with : ■ Features and specifications on our full line of appliances. ■ Installation information. ■ Use and maintenance procedures. ■ Repair parts sales. Drip Tray Order Part Number W11229219 Baking Tray Order Part Number W11229218 Wire Shelf Order Part Number W10886770 17 If you need replacement parts If you need service Please refer to the warranty. ASSISTANCE OR SERVICE If you need to fulfill the product warranty and provide afterwarranty service anywhere in the United States.


