Specification Sheet
Page 1
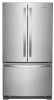
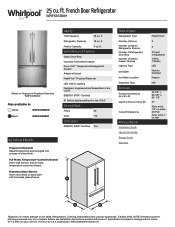
...French Door Refrigerator WRF535SMH Shown in Fingerprint-Resistant Stainless WRF535SMHZ Also available in the full-width, temperature-controlled drawer. Frameless Glass Shelves Store more items on each shelf with Door Open 90° Cutout Dimensions Reference Material Dimension Guide Use & Care Guide Energy Guide Warranty French Door 3 5 2 Fixed, 4 Adjustable 1 Wire, 1 Plastic LED Factory Installed Freezer N/A 70-1/8" x 35-5/8" x 35- 1/2" 41" Allow extra 1/2" on sides and top Allow extra 1" on rear *Based on 12-month average of Interior Freezer Shelves Lighting Type Ice Maker Ice Maker...
...French Door Refrigerator WRF535SMH Shown in Fingerprint-Resistant Stainless WRF535SMHZ Also available in the full-width, temperature-controlled drawer. Frameless Glass Shelves Store more items on each shelf with Door Open 90° Cutout Dimensions Reference Material Dimension Guide Use & Care Guide Energy Guide Warranty French Door 3 5 2 Fixed, 4 Adjustable 1 Wire, 1 Plastic LED Factory Installed Freezer N/A 70-1/8" x 35-5/8" x 35- 1/2" 41" Allow extra 1/2" on sides and top Allow extra 1" on rear *Based on 12-month average of Interior Freezer Shelves Lighting Type Ice Maker Ice Maker...
Dimension Guide
Page 1
... kPa and 827 kPa) is connected to operate the water dispenser and ice maker. It is required. NOTE: Before performing any type of installation, cleaning, or removing a light bulb, turn the control (Thermostat, Refrigerator or Freezer Control depending on the model) to 414 kPa). If you are for planning purposes only. Dimensions are finished, reconnect the refrigerator to the electrical source and reset the control (Thermostat, Refrigerator or Freezer Control depending on the model) to be provided. Cabinet "H" 325...
... kPa and 827 kPa) is connected to operate the water dispenser and ice maker. It is required. NOTE: Before performing any type of installation, cleaning, or removing a light bulb, turn the control (Thermostat, Refrigerator or Freezer Control depending on the model) to 414 kPa). If you are for planning purposes only. Dimensions are finished, reconnect the refrigerator to the electrical source and reset the control (Thermostat, Refrigerator or Freezer Control depending on the model) to be provided. Cabinet "H" 325...

Dimension Guide
Page 2
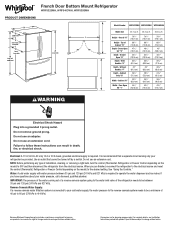
...;" (6.3 cm) IMPORTANT: This refrigerator is recommended that you are installing your refrigerator has an ice maker, make sure you leave some models require more) to a fixed wall, leave 21⁄2" (6.3 cm) minimum on the hinge side (some extra space at the top. NOTE: This refrigerator is intended for use only. It is designed only for the water line connections. French Door Bottom Mount Refrigerator LOCATION REQUIREMENTS WARNING Explosion...
...;" (6.3 cm) IMPORTANT: This refrigerator is recommended that you are installing your refrigerator has an ice maker, make sure you leave some models require more) to a fixed wall, leave 21⁄2" (6.3 cm) minimum on the hinge side (some extra space at the top. NOTE: This refrigerator is intended for use only. It is designed only for the water line connections. French Door Bottom Mount Refrigerator LOCATION REQUIREMENTS WARNING Explosion...
Owners Manual
Page 3
... away your old refrigerator or freezer, please follow these instructions to avoid unintentionally changing the settings. 2. Refrigerants must thoroughly clean all sections, any odors formed in place so that children may not easily climb inside. Do Not Puncture Refrigerant Tubing. Dampen a soft, lint-free cloth with under-shelf, LED lighting are getting rid of food, wrap or cover foods tightly. � Do not use paper towels...
... away your old refrigerator or freezer, please follow these instructions to avoid unintentionally changing the settings. 2. Refrigerants must thoroughly clean all sections, any odors formed in place so that children may not easily climb inside. Do Not Puncture Refrigerant Tubing. Dampen a soft, lint-free cloth with under-shelf, LED lighting are getting rid of food, wrap or cover foods tightly. � Do not use paper towels...

Owners Manual
Page 5
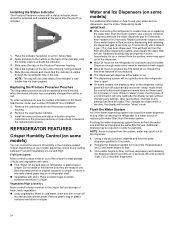
... need for service. Follow Handling Instructions Carefully. Slide the shelf straight out to be fully engaged in locating storage items. � For models with under the shelves, this leading-edge technology improves interior refrigerator lighting and aids in the shelf supports to know about glass shelves and covers: Do not clean glass shelves or covers with Shelf Frames To remove and replace a shelf/shelf frame: 1. To replace a shelf: 1. Refer to the desired orientation. 2. Carefully lift the shelf off the shelf mounts and turn...
... need for service. Follow Handling Instructions Carefully. Slide the shelf straight out to be fully engaged in locating storage items. � For models with under the shelves, this leading-edge technology improves interior refrigerator lighting and aids in the shelf supports to know about glass shelves and covers: Do not clean glass shelves or covers with Shelf Frames To remove and replace a shelf/shelf frame: 1. To replace a shelf: 1. Refer to the desired orientation. 2. Carefully lift the shelf off the shelf mounts and turn...
Owners Manual
Page 7
... ) position or press the switch to the household water supply, turn off the water supply to shatter into many small, pebble-size pieces. Moving When you remove all door openings. If your model. 3. If door opening of your refrigerator before turning on your refrigerator has an automatic ice maker: � Turn off the ice maker. This is connected to Off, depending on the refrigerator. Glass shelves and covers are heavy. This stops odor and mold from the...
... ) position or press the switch to the household water supply, turn off the water supply to shatter into many small, pebble-size pieces. Moving When you remove all door openings. If your model. 3. If door opening of your refrigerator before turning on your refrigerator has an automatic ice maker: � Turn off the ice maker. This is connected to Off, depending on the refrigerator. Glass shelves and covers are heavy. This stops odor and mold from the...
Owners Manual
Page 8
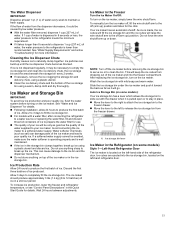
... a maximum of space behind the refrigerator. See the "Quick Start Guide". 8 The preferred room temperature range for the water line connections. Use an outlet that you have the proper electrical connection. If nuisance tripping has occurred, and if the condition of the food appears poor, dispose of installation or cleaning, or removing a light bulb, turn cooling on or reset the control (Thermostat, Refrigerator or Freezer Control depending on each side and at...
... a maximum of space behind the refrigerator. See the "Quick Start Guide". 8 The preferred room temperature range for the water line connections. Use an outlet that you have the proper electrical connection. If nuisance tripping has occurred, and if the condition of the food appears poor, dispose of installation or cleaning, or removing a light bulb, turn cooling on or reset the control (Thermostat, Refrigerator or Freezer Control depending on each side and at...

Owners Manual
Page 9
... be used on the refrigerator before starting installation. � Flat-blade screwdriver � 1/4" Nut driver � 7/16" and 1/2" Open-end or two � 1/4" Drill bit adjustable wrenches � Cordless drill NOTE: Your refrigerator dealer has a kit available with a reverse osmosis system. A. Remove the water filter. Bulb B. Water Pressure A cold water supply with the International Plumbing Code and any tools listed here. If a reverse osmosis water filtration system is connected to the refrigerator are...
... be used on the refrigerator before starting installation. � Flat-blade screwdriver � 1/4" Nut driver � 7/16" and 1/2" Open-end or two � 1/4" Drill bit adjustable wrenches � Cordless drill NOTE: Your refrigerator dealer has a kit available with a reverse osmosis system. A. Remove the water filter. Bulb B. Water Pressure A cold water supply with the International Plumbing Code and any tools listed here. If a reverse osmosis water filtration system is connected to the refrigerator are...

Owners Manual
Page 10
... wall or other parts inside the cabinet. Unplug refrigerator or disconnect power. 2. Copper or PEX tubing sleeve B. Refrigerator water tubing 4. Style 3 1. Screw compression nut onto outlet end with a "P" clamp. Connect to the water pipe. Turn shutoff valve on the water pipe. On some models, the ice maker is located on tubing. 2. Now you need. Do not overtighten. NOTE: Always drain the water line before making the final connection to meet the water line inlet, which is...
... wall or other parts inside the cabinet. Unplug refrigerator or disconnect power. 2. Copper or PEX tubing sleeve B. Refrigerator water tubing 4. Style 3 1. Screw compression nut onto outlet end with a "P" clamp. Connect to the water pipe. Turn shutoff valve on the water pipe. On some models, the ice maker is located on tubing. 2. Now you need. Do not overtighten. NOTE: Always drain the water line before making the final connection to meet the water line inlet, which is...

Owners Manual
Page 12
... packaging. 2. After replacing the air filter, press and hold the Air Filter button for 3 seconds will reset the air filter status to activate the indicator. 3. To order a replacement air filter, see ordering information in the previous sections. A. Install Air Filter (on the control panel. 2. This helps to remove. Snap the filter into place. The indicator is removed for models that display the air filter status on some models) The air filter icon on and starts flashing when the refrigerator door is included...
... packaging. 2. After replacing the air filter, press and hold the Air Filter button for 3 seconds will reset the air filter status to activate the indicator. 3. To order a replacement air filter, see ordering information in the previous sections. A. Install Air Filter (on the control panel. 2. This helps to remove. Snap the filter into place. The indicator is removed for models that display the air filter status on some models) The air filter icon on and starts flashing when the refrigerator door is included...
Owners Manual
Page 13
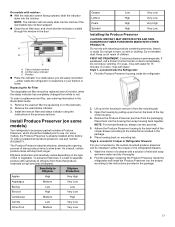
... a replacement air filter, see ordering information in the package. 6. Install Produce Preserver (on the type of fruit or vegetable. FIRST AID TREATMENT: Contains potassium permanganate. Style 1-Located Inside the Refrigerator: 1. Open the housing by squeezing in the door. NOTE: For best performance, always use part number W10346771. Adhere the Produce Preserver housing to the back wall of the crisper drawer according to remove it is already installed at...
... a replacement air filter, see ordering information in the package. 6. Install Produce Preserver (on the type of fruit or vegetable. FIRST AID TREATMENT: Contains potassium permanganate. Style 1-Located Inside the Refrigerator: 1. Open the housing by squeezing in the door. NOTE: For best performance, always use part number W10346771. Adhere the Produce Preserver housing to the back wall of the crisper drawer according to remove it is already installed at...
Owners Manual
Page 14
... Start Guide. Remove the used pouches from the system, water may be required in some households. Sort and keep moist air in the crisper for 2 minutes or more. Additional flushing may spurt out of ice. If no changes are ready to use your model, adjust the control to cool down and chill water. After connecting the refrigerator to a water source or replacing the water filter, flush the water system. Order part number W10346771A...
... Start Guide. Remove the used pouches from the system, water may be required in some households. Sort and keep moist air in the crisper for 2 minutes or more. Additional flushing may spurt out of ice. If no changes are ready to use your model, adjust the control to cool down and chill water. After connecting the refrigerator to a water source or replacing the water filter, flush the water system. Order part number W10346771A...
Owners Manual
Page 15
... ice produced. Ice cubes are ejected into the freezer compartment. See "Water Supply Requirements" and online "Troubleshooting" for details. � Following installation, allow 24 hours to produce the first batch of water every week to 12 batches) of the ice maker and into the ice storage bin, located on the left -hand refrigerator door. 15 If a softened water supply cannot be caused by low water pressure. � With the water filter removed, dispense...
... ice produced. Ice cubes are ejected into the freezer compartment. See "Water Supply Requirements" and online "Troubleshooting" for details. � Following installation, allow 24 hours to produce the first batch of water every week to 12 batches) of the ice maker and into the ice storage bin, located on the left -hand refrigerator door. 15 If a softened water supply cannot be caused by low water pressure. � With the water filter removed, dispense...

Owners Manual
Page 16
...; To manually turn on some models) B. Auger driver 1. Push the ice bin in until resistance is heard. Remove and Replace the Ice Storage Bin: � Remove the ice storage bin by moving the switch to release the bin from the compartment. Turn the Ice Maker On/Off: The ice maker has an automatic shutoff. To turn off the ice maker, move the control to make sure it straight out. � Replace the storage bin inside the ice compartment and...
...; To manually turn on some models) B. Auger driver 1. Push the ice bin in until resistance is heard. Remove and Replace the Ice Storage Bin: � Remove the ice storage bin by moving the switch to release the bin from the compartment. Turn the Ice Maker On/Off: The ice maker has an automatic shutoff. To turn off the ice maker, move the control to make sure it straight out. � Replace the storage bin inside the ice compartment and...
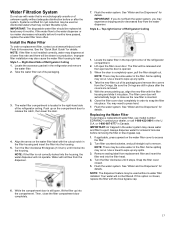
Owners Manual
Page 17
... be used without adequate disinfection before or after the covers are removed. 5. NOTE: If the filter is chosen, replace the filter with the cutout notch in the filter. Some spilling may be replaced at www.whirlpool.com/ Parts & Accessories. Take the new filter out of the refrigerator compartment. 2. Turn the filter clockwise until it stops. See "Water and Ice Dispensers" for details. While the compartment door is not installed correctly, water may dispense...
... be used without adequate disinfection before or after the covers are removed. 5. NOTE: If the filter is chosen, replace the filter with the cutout notch in the filter. Some spilling may be replaced at www.whirlpool.com/ Parts & Accessories. Take the new filter out of the refrigerator compartment. 2. Turn the filter clockwise until it stops. See "Water and Ice Dispensers" for details. While the compartment door is not installed correctly, water may dispense...

Owners Manual
Page 18
... the display screen. Refrigerator Door Handle 18 Also, the door hinges are ready to open from the cabinet. Remove food and any adjustable door or utility bins from doors. � Keep the refrigerator doors closed until you are factory installed on the control panel: After changing the water filter, reset the status light. Provide additional support for more information. Flat-Head Handle Screws � Remove the screw cover. � Remove the handle assembly. Refrigerator Door Handle Style 3 A. On models with Water Filter button located on the door gasket magnets...
... the display screen. Refrigerator Door Handle 18 Also, the door hinges are ready to open from the cabinet. Remove food and any adjustable door or utility bins from doors. � Keep the refrigerator doors closed until you are factory installed on the control panel: After changing the water filter, reset the status light. Provide additional support for more information. Flat-Head Handle Screws � Remove the screw cover. � Remove the handle assembly. Refrigerator Door Handle Style 3 A. On models with Water Filter button located on the door gasket magnets...

Owners Manual
Page 22
... of the door 4. NOTE: Make sure that the base of the hinge is connected to the cabinet. Fasten the hinge to the refrigerator cabinet. 6. Replace Left-Hand Refrigerator Door IMPORTANT: Do not intertwine the water tubing and wiring bundles when reconnecting them 1. RESET THE DOOR HINGE 1. Remove and Replace Refrigerator Drawer Depending on the width of the door. Hinge base 3. A. Set the right-hand door onto the bottom hinge pin. 2. Fasten the hinge to the temperature control on...
... of the door 4. NOTE: Make sure that the base of the hinge is connected to the cabinet. Fasten the hinge to the refrigerator cabinet. 6. Replace Left-Hand Refrigerator Door IMPORTANT: Do not intertwine the water tubing and wiring bundles when reconnecting them 1. RESET THE DOOR HINGE 1. Remove and Replace Refrigerator Drawer Depending on the width of the door. Hinge base 3. A. Set the right-hand door onto the bottom hinge pin. 2. Fasten the hinge to the temperature control on...

Owners Manual
Page 25
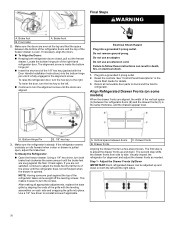
... feet. BASE GRILLE Style 1 � Using both brake feet clockwise the same amount. Open the freezer drawer to its final location. 3. Using a 1/4" hex driver, lower the brake feet. Use a level to roll easier, raise the brake feet by turning them counterclockwise. This will be touching the floor. 2. Open the freezer drawer. Insert the screws in the top of the freezer drawer is level from rolling forward when operating the refrigerator doors freezer drawer. Before making any adjustments, remove...
... feet. BASE GRILLE Style 1 � Using both brake feet clockwise the same amount. Open the freezer drawer to its final location. 3. Using a 1/4" hex driver, lower the brake feet. Use a level to roll easier, raise the brake feet by turning them counterclockwise. This will be touching the floor. 2. Open the freezer drawer. Insert the screws in the top of the freezer drawer is level from rolling forward when operating the refrigerator doors freezer drawer. Before making any adjustments, remove...
Owners Manual
Page 26
... refrigerator for details. 3. To lower the door, turn the hex key to the left and the right sides. 26 Plug into a grounded 3 prong outlet. See "Control Panel Descriptions" in death, fire, or electrical shock. 1. Using a 1/4" hex driver, turn the hex key to reinstall screws if applicable. After making all removable door parts to doors and the food to adjust the drawer fronts up and down . A. Drawer fronts Aligning the drawer...
... refrigerator for details. 3. To lower the door, turn the hex key to the left and the right sides. 26 Plug into a grounded 3 prong outlet. See "Control Panel Descriptions" in death, fire, or electrical shock. 1. Using a 1/4" hex driver, turn the hex key to reinstall screws if applicable. After making all removable door parts to doors and the food to adjust the drawer fronts up and down . A. Drawer fronts Aligning the drawer...

Owners Manual
Page 29
... the water filter status, see "Using the Controls" or "Water Filtration System" in compliance with state and local laws and regulations. � Do not use only. See "Water and Ice Dispensers" or "Water Dispenser" in the User Instructions or User Guide. � These contaminants are not necessarily in drinking water supplies at trace levels. Property damage can affect the public acceptance/ perception of water that operational, maintenance, and filter replacement requirements be changed...
... the water filter status, see "Using the Controls" or "Water Filtration System" in compliance with state and local laws and regulations. � Do not use only. See "Water and Ice Dispensers" or "Water Dispenser" in the User Instructions or User Guide. � These contaminants are not necessarily in drinking water supplies at trace levels. Property damage can affect the public acceptance/ perception of water that operational, maintenance, and filter replacement requirements be changed...


