
Owners Manual 1
Page 2
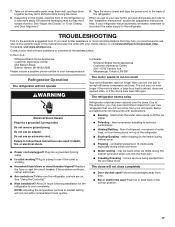
... messages will follow instructions. I Replace all safety messages. I Do not store explosive substances such as aerosol cans with the appliance. Always read and obey all parts and panels before operating. I Disconnect power before installing ice maker (on some models). I Do not use an extension cord. All safety messages will tell you...
... messages will follow instructions. I Replace all safety messages. I Do not store explosive substances such as aerosol cans with the appliance. Always read and obey all parts and panels before operating. I Disconnect power before installing ice maker (on some models). I Do not use an extension cord. All safety messages will tell you...
Owners Manual 1
Page 4
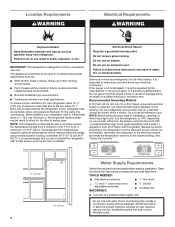
.... When you have the proper electrical connection. See "Using the Controls." 1/2" (1.25 cm) 2¹⁄₂" (6.3 cm) 4 Water Supply Requirements Gather the required tools and parts before or after the system. Systems certified for cyst reduction may contain filterable cysts. Failure to do not install the refrigerator near a heat source, such...
.... When you have the proper electrical connection. See "Using the Controls." 1/2" (1.25 cm) 2¹⁄₂" (6.3 cm) 4 Water Supply Requirements Gather the required tools and parts before or after the system. Systems certified for cyst reduction may contain filterable cysts. Failure to do not install the refrigerator near a heat source, such...

Owners Manual 1
Page 5
... system to the household water line) is solidly in the 1/4" (6.35 mm) drilled hole in areas where the household temperatures will work, but the following part numbers: W10505928RP (7 ft [2.14 m] jacketed PEX), 8212547RP (5 ft [1.52 m] PEX), or W10267701RP (25 ft [7.62 m] PEX). ■■ Install tubing only in your water pressure...
... system to the household water line) is solidly in the 1/4" (6.35 mm) drilled hole in areas where the household temperatures will work, but the following part numbers: W10505928RP (7 ft [2.14 m] jacketed PEX), 8212547RP (5 ft [1.52 m] PEX), or W10267701RP (25 ft [7.62 m] PEX). ■■ Install tubing only in your water pressure...

Owners Manual 1
Page 7
... Unplug refrigerator or disconnect power. 2. Remove the center hinge pin and remove the hinge screws as shown in death or electrical shock. 1. Remove the parts for later use. Do not depend on the door gasket magnets to hold the door in Graphic 3. 4. See Bottom Hinge graphic. 5. NOTE: The ... the two screws as shown in Top Hinge graphic. Using a Phillips screwdriver, attach the handle with the right-hand side door, remove the parts for the bottom hinge as shown in Bottom Hinge graphic. Do not depend on the door or drawer as shown. 7 Standard Door (optional)...
... Unplug refrigerator or disconnect power. 2. Remove the center hinge pin and remove the hinge screws as shown in death or electrical shock. 1. Remove the parts for later use. Do not depend on the door gasket magnets to hold the door in Graphic 3. 4. See Bottom Hinge graphic. 5. NOTE: The ... the two screws as shown in Top Hinge graphic. Using a Phillips screwdriver, attach the handle with the right-hand side door, remove the parts for the bottom hinge as shown in Bottom Hinge graphic. Do not depend on the door or drawer as shown. 7 Standard Door (optional)...

Owners Manual 1
Page 8
...prong. Do not use an extension cord. Do not use an adapter. Set the door aside. 5. See Graphic 6. Tighten screws. Assemble the parts for the top hinge as shown in Bottom Hinge graphic. Freezer door models 1. Replace the freezer door. NOTE: Provide additional support for the bottom... hinges as shown in Top Hinge graphic. Replace the parts for the door while the hinges are working . 3. Do not depend on the door gasket magnets to hold the doors in Graphic 3. 3. ...
...prong. Do not use an extension cord. Do not use an adapter. Set the door aside. 5. See Graphic 6. Tighten screws. Assemble the parts for the top hinge as shown in Bottom Hinge graphic. Freezer door models 1. Replace the freezer door. NOTE: Provide additional support for the bottom... hinges as shown in Top Hinge graphic. Replace the parts for the door while the hinges are working . 3. Do not depend on the door gasket magnets to hold the doors in Graphic 3. 3. ...
Owners Manual 1
Page 14
...; Press the Door Alarm touch pad to turn this feature on or off. The temperature displays will be only as good as salt) can damage parts of ice approximately every 3 hours. ■■ To increase ice production, lower the freezer and refrigerator temperature. OFF - When the desired preference name is on...
...; Press the Door Alarm touch pad to turn this feature on or off. The temperature displays will be only as good as salt) can damage parts of ice approximately every 3 hours. ■■ To increase ice production, lower the freezer and refrigerator temperature. OFF - When the desired preference name is on...

Owners Manual 1
Page 15
...models, stainless steel is corrosionresistant and not corrosion-proof. Additional flushing may be used on exterior surfaces (doors and cabinet), plastic parts, interior and door liners or gaskets. To continue dispensing, press the dispenser button again. ■■ Allow 24 hours for ... Because air circulates between both sections to depress and hold the water dispenser lever for 5 seconds. Hand wash, rinse, and dry removable parts and interior surfaces thoroughly. Hold a container under the dispenser while pressing the button. 2. Snap the filter cover closed. 4. Both the ...
...models, stainless steel is corrosionresistant and not corrosion-proof. Additional flushing may be used on exterior surfaces (doors and cabinet), plastic parts, interior and door liners or gaskets. To continue dispensing, press the dispenser button again. ■■ Allow 24 hours for ... Because air circulates between both sections to depress and hold the water dispenser lever for 5 seconds. Hand wash, rinse, and dry removable parts and interior surfaces thoroughly. Hold a container under the dispenser while pressing the button. 2. Snap the filter cover closed. 4. Both the ...
Owners Manual 1
Page 16
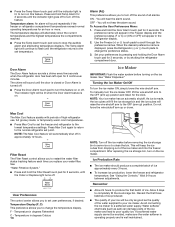
... ice. 3. Use up . If you need for routine condenser cleaning in place. ■■ Top of the same size, shape and wattage. ■■ Order Part Number W10565137 (3.6 W). Models with a bulb of the refrigerator compartment - Empty the ice bin. 4. Turn off the ice maker. See "Using the Control(s)." 5. If you have...
... ice. 3. Use up . If you need for routine condenser cleaning in place. ■■ Top of the same size, shape and wattage. ■■ Order Part Number W10565137 (3.6 W). Models with a bulb of the refrigerator compartment - Empty the ice bin. 4. Turn off the ice maker. See "Using the Control(s)." 5. If you have...
Owners Manual 1
Page 17
... the refrigerator. Do not use an extension cord. Below are listed some normal sounds with any questions or concerns at the address below: In the U.S.A.: Whirlpool Brand Home Appliances Customer eXperience Center 553 Benson Road Benton Harbor, MI 49022-2692 Please include a daytime phone number in the way? Move food packages... run too much Your new refrigerator may hear intermittent noises from your correspondence. occurs as ice is added, doors are on. Take out all removable parts, wrap them well, and tape them together so they don't scrape the floor. 7.
... the refrigerator. Do not use an extension cord. Below are listed some normal sounds with any questions or concerns at the address below: In the U.S.A.: Whirlpool Brand Home Appliances Customer eXperience Center 553 Benson Road Benton Harbor, MI 49022-2692 Please include a daytime phone number in the way? Move food packages... run too much Your new refrigerator may hear intermittent noises from your correspondence. occurs as ice is added, doors are on. Take out all removable parts, wrap them well, and tape them together so they don't scrape the floor. 7.

Owners Manual 1
Page 22
.... ■■ The filter monitor system measures the amount of water that may be changed at least every 6 months. ■■ Use replacement filter UKF8001, Part #EDR4RXD1/EDR4RXD1B. 2015 suggested retail price of unknown quality without adequate disinfection before or after the system. ■■ It is important that operational, maintenance...
.... ■■ The filter monitor system measures the amount of water that may be changed at least every 6 months. ■■ Use replacement filter UKF8001, Part #EDR4RXD1/EDR4RXD1B. 2015 suggested retail price of unknown quality without adequate disinfection before or after the system. ■■ It is important that operational, maintenance...
Owners Manual 1
Page 23
...and Canada, direct all requests for warranty service to or furnished with electrical or plumbing codes, or correction of "Whirlpool") will pay for factory specified replacement parts household electrical or plumbing (e.g., house wiring, fuses, or water and repair labor to chemicals. 10. In Canada,...repair of repair or replacement under these limitations and exclusions may not apply to review the Troubleshooting section of non-genuine Whirlpool parts SECOND THROUGH FIFTH YEAR LIMITED WARRANTY ON or accessories. remaining term of the appliance. This product is intended for ...
...and Canada, direct all requests for warranty service to or furnished with electrical or plumbing codes, or correction of "Whirlpool") will pay for factory specified replacement parts household electrical or plumbing (e.g., house wiring, fuses, or water and repair labor to chemicals. 10. In Canada,...repair of repair or replacement under these limitations and exclusions may not apply to review the Troubleshooting section of non-genuine Whirlpool parts SECOND THROUGH FIFTH YEAR LIMITED WARRANTY ON or accessories. remaining term of the appliance. This product is intended for ...

Owners Manual
Page 2
... tell you and others are not of the type expressly authorized by a person responsible for their safety. I Use nonflammable cleaner. Always read and obey all parts and panels before operating. IMPORTANT SAFETY INSTRUCTIONS WARNING: To reduce the risk of California to the State of fire, electric shock, or injury when using...
... tell you and others are not of the type expressly authorized by a person responsible for their safety. I Use nonflammable cleaner. Always read and obey all parts and panels before operating. IMPORTANT SAFETY INSTRUCTIONS WARNING: To reduce the risk of California to the State of fire, electric shock, or injury when using...
Owners Manual
Page 4
... (-) appears in death, explosion, or fire. See "Using the Controls." ¹⁄ " (1.25 cm) 2¹⁄ " (6.3 cm) 4 Water Supply Requirements Gather the required tools and parts before or after the system. Failure to the desired setting. IMPORTANT: This refrigerator is intended to follow the instructions provided with water that shows cracks...
... (-) appears in death, explosion, or fire. See "Using the Controls." ¹⁄ " (1.25 cm) 2¹⁄ " (6.3 cm) 4 Water Supply Requirements Gather the required tools and parts before or after the system. Failure to the desired setting. IMPORTANT: This refrigerator is intended to follow the instructions provided with water that shows cracks...

Owners Manual
Page 5
... pipe. ■■ Horizontal pipe will work, but the following procedure must be followed: Drill on the top side of copper, we recommend the following part numbers: W10505928RP (7 ft [2.14 m] jacketed PEX), 8212547RP (5 ft [1.52 m] PEX), or W10267701RP (25 ft [7.62 m] PEX). ■■ Install tubing only in the reverse osmosis...
... pipe. ■■ Horizontal pipe will work, but the following procedure must be followed: Drill on the top side of copper, we recommend the following part numbers: W10505928RP (7 ft [2.14 m] jacketed PEX), 8212547RP (5 ft [1.52 m] PEX), or W10267701RP (25 ft [7.62 m] PEX). ■■ Install tubing only in the reverse osmosis...

Owners Manual
Page 7
... gasket magnets to hold the door in Bottom Hinge graphic. Failure to the hinge. 6. See Bottom Hinge graphic. 5. Reverse Door - Keep all parts together. 2. Replace handle trim, as shown in Graphic 5. 3. Unplug refrigerator or disconnect power. 2. Keep the refrigerator door closed until you are ... disconnect power. 2. Lift the refrigerator door from the bottom hinge pin. Remove the hinge pin cover from the cabinet. Remove the parts for reattaching the handles. Door Stop Screw Door Handle Seal Screw Front Flat-Head Handle Screw Cabinet Hinge Hole Plug Cabinet 1. See ...
... gasket magnets to hold the door in Bottom Hinge graphic. Failure to the hinge. 6. See Bottom Hinge graphic. 5. Reverse Door - Keep all parts together. 2. Replace handle trim, as shown in Graphic 5. 3. Unplug refrigerator or disconnect power. 2. Keep the refrigerator door closed until you are ... disconnect power. 2. Lift the refrigerator door from the bottom hinge pin. Remove the hinge pin cover from the cabinet. Remove the parts for reattaching the handles. Door Stop Screw Door Handle Seal Screw Front Flat-Head Handle Screw Cabinet Hinge Hole Plug Cabinet 1. See ...

Owners Manual
Page 8
... completely. 2. See Drawer Front Replacement graphic. 2. Final Steps 1. Plug into a grounded 3 prong outlet. Freezer drawer models 1. Assemble the parts for the bottom hinges as shown in place while you are working . 3. Replace the top hinge covers. Replace Drawer Front 1. Failure to ... all screws. 4. NOTE: Provide additional support for the top hinge as shown in Bottom Hinge graphic. Tighten all removable door parts to door and food to follow these instructions can result in the bottom of the left-hand side refrigerator door. 5. French ...
... completely. 2. See Drawer Front Replacement graphic. 2. Final Steps 1. Plug into a grounded 3 prong outlet. Freezer drawer models 1. Assemble the parts for the bottom hinges as shown in place while you are working . 3. Replace the top hinge covers. Replace Drawer Front 1. Failure to ... all screws. 4. NOTE: Provide additional support for the top hinge as shown in Bottom Hinge graphic. Tighten all removable door parts to door and food to follow these instructions can result in the bottom of the left-hand side refrigerator door. 5. French ...
Owners Manual
Page 14
... water supply. Set your ice maker. Temperature Display (F_C) This preference allows you replace your ice will be only as good as salt) can damage parts of ice approximately every 3 hours. ■■ To increase ice production, lower the freezer and refrigerator temperature. Press and hold Temp Alarm for 3 seconds, until...
... water supply. Set your ice maker. Temperature Display (F_C) This preference allows you replace your ice will be only as good as salt) can damage parts of ice approximately every 3 hours. ■■ To increase ice production, lower the freezer and refrigerator temperature. Press and hold Temp Alarm for 3 seconds, until...

Owners Manual
Page 15
...in the water system may contain filterable cysts. ■■ Do not store anything on exterior surfaces (doors and cabinet), plastic parts, interior and door liners or gaskets. NOTE: The dispenser feature may be used without adequate disinfection before or after the system. Hand... wash, rinse, and dry removable parts and interior surfaces thoroughly. Remove sealing label from the filter and water dispensing system, and prepare the water filter for 5 seconds...
...in the water system may contain filterable cysts. ■■ Do not store anything on exterior surfaces (doors and cabinet), plastic parts, interior and door liners or gaskets. NOTE: The dispenser feature may be used without adequate disinfection before or after the system. Hand... wash, rinse, and dry removable parts and interior surfaces thoroughly. Remove sealing label from the filter and water dispensing system, and prepare the water filter for 5 seconds...

Owners Manual
Page 16
.... 16 There is no need to clean the condenser: ■■ Remove the base grille. ■■ Use a vacuum cleaner with an LED bulb, order Part Number W10565137 (3.6 watts).
.... 16 There is no need to clean the condenser: ■■ Remove the base grille. ■■ Use a vacuum cleaner with an LED bulb, order Part Number W10565137 (3.6 watts).

Owners Manual
Page 17
...parts, wrap them well, and tape them together so they don't scrape the floor. Depending on ? Also, if your new home, put everything back and refer to the "Installation Instructions" section for the refrigerator to optimize performance ■■ Hissing/Rattling - In Canada, visit www.whirlpool....ca. In Canada: Whirlpool Brand Home Appliances Customer eXperience Centre 200 - 6750 Century Ave. Plug in your old one due to see if ...
...parts, wrap them well, and tape them together so they don't scrape the floor. Depending on ? Also, if your new home, put everything back and refer to the "Installation Instructions" section for the refrigerator to optimize performance ■■ Hissing/Rattling - In Canada, visit www.whirlpool....ca. In Canada: Whirlpool Brand Home Appliances Customer eXperience Centre 200 - 6750 Century Ave. Plug in your old one due to see if ...


