
Use & Care Guide
Page 1
... safety alert symbol. Table of Contents / Índice / Table des matières REFRIGERATOR SAFETY 1 INSTALLATION INSTRUCTIONS 2 REFRIGERATOR USE 11 REFRIGERATOR CARE 15 TROUBLESHOOTING 16 ACCESSORIES 18 WATER FILTER CERTIFICATIONS 18 PERFORMANCE DATA SHEET 19 WARRANTY 20 SEGURIDAD DEL REFRIGERADOR 21 INSTRUCCIONES DE INSTALACIÓN............22 USO DE SU REFRIGERADOR 31 CUIDADO DE SU REFRIGERADOR 36 SOLUCIÓN DE PROBLEMAS 37 ACCESORIOS 39 HOJA DE DATOS...
... safety alert symbol. Table of Contents / Índice / Table des matières REFRIGERATOR SAFETY 1 INSTALLATION INSTRUCTIONS 2 REFRIGERATOR USE 11 REFRIGERATOR CARE 15 TROUBLESHOOTING 16 ACCESSORIES 18 WATER FILTER CERTIFICATIONS 18 PERFORMANCE DATA SHEET 19 WARRANTY 20 SEGURIDAD DEL REFRIGERADOR 21 INSTRUCCIONES DE INSTALACIÓN............22 USO DE SU REFRIGERADOR 31 CUIDADO DE SU REFRIGERADOR 36 SOLUCIÓN DE PROBLEMAS 37 ACCESORIOS 39 HOJA DE DATOS...

Use & Care Guide
Page 2
... install refrigerator. Do not use an extension cord. ■ Disconnect power before servicing. ■ Replace all parts and panels before operating. ■ Remove doors from refrigerator. ■ Use two or more people to cover the floor with established procedures. Failure to move and install refrigerator. ■ Disconnect power before installing ice maker (on ice maker kit ready models only). ■ Use a sturdy glass when dispensing ice (on some models). ■ Do not hit the refrigerator glass doors (on some models). Always pull the refrigerator...
... install refrigerator. Do not use an extension cord. ■ Disconnect power before servicing. ■ Replace all parts and panels before operating. ■ Remove doors from refrigerator. ■ Use two or more people to cover the floor with established procedures. Failure to move and install refrigerator. ■ Disconnect power before installing ice maker (on ice maker kit ready models only). ■ Use a sturdy glass when dispensing ice (on some models). ■ Do not hit the refrigerator glass doors (on some models). Always pull the refrigerator...

Use & Care Guide
Page 4
... are working. 4. Tighten screws. 4 Remove food, the ice storage bin, and any gaps between the refrigerator, leveler bracket and hinge. NOTE: Keep the water tubing connector attached to run underneath the freezer - Failure to 90°. The dispenser tubing runs through the door hinge. 5. This bundle is still attached to remove the bottom hinges. Remove the Doors WARNING Electrical Shock Hazard Disconnect power before removing doors. Unplug refrigerator or disconnect power. 2. See Graphic 3. ■ Remove the P-clamp using...
... are working. 4. Tighten screws. 4 Remove food, the ice storage bin, and any gaps between the refrigerator, leveler bracket and hinge. NOTE: Keep the water tubing connector attached to run underneath the freezer - Failure to 90°. The dispenser tubing runs through the door hinge. 5. This bundle is still attached to remove the bottom hinges. Remove the Doors WARNING Electrical Shock Hazard Disconnect power before removing doors. Unplug refrigerator or disconnect power. 2. See Graphic 3. ■ Remove the P-clamp using...

Use & Care Guide
Page 5
... connected, the wiring bundles should turn the leveling feet to the left hole in the handle. 1. Replace the refrigerator door by turning the leveling feet to the right until it to the right to make adjustments. 3. Tighten screws. 8. Replace the ice storage bin and any adjustable door or utility bins. 9. Plug refrigerator into its final location. Leveling and Door Closing Your refrigerator has two adjustable front feet - one on the right and one yellow plug), then replace the P-clamp on the left...
... connected, the wiring bundles should turn the leveling feet to the left hole in the handle. 1. Replace the refrigerator door by turning the leveling feet to the right until it to the right to make adjustments. 3. Tighten screws. 8. Replace the ice storage bin and any adjustable door or utility bins. 9. Plug refrigerator into its final location. Leveling and Door Closing Your refrigerator has two adjustable front feet - one on the right and one yellow plug), then replace the P-clamp on the left...

Use & Care Guide
Page 6
... connected to do so can damage the door. When installing your refrigerator next to a fixed wall, leave a 2" (5.08 cm) minimum space on your refrigerator has an ice maker, allow the doors to remove the shoulder screws from refrigerator. Using a counterclockwise motion, loosen the setscrew a quarter-turn . Style 2 - Remove the handles, which are packed inside the refrigerator. Save all instructions. To Remove the Handles: 1. this extra tightening. 8. Apply only downward pressure. 3. Location...
... connected to do so can damage the door. When installing your refrigerator next to a fixed wall, leave a 2" (5.08 cm) minimum space on your refrigerator has an ice maker, allow the doors to remove the shoulder screws from refrigerator. Using a counterclockwise motion, loosen the setscrew a quarter-turn . Style 2 - Remove the handles, which are packed inside the refrigerator. Save all instructions. To Remove the Handles: 1. this extra tightening. 8. Apply only downward pressure. 3. Location...

Use & Care Guide
Page 7
... system is blocked. Failure to follow the instructions provided with any type of installation, cleaning, or removing a light bulb, turn the control (Thermostat, Refrigerator or Freezer Control depending on the model) to OFF and then disconnect the refrigerator from a minimum of 110°F (43°C). Do not use an extension cord. See "Using the Controls." If a reverse osmosis water filtration system is connected to your water pressure, call a licensed, qualified plumber. See...
... system is blocked. Failure to follow the instructions provided with any type of installation, cleaning, or removing a light bulb, turn the control (Thermostat, Refrigerator or Freezer Control depending on the model) to OFF and then disconnect the refrigerator from a minimum of 110°F (43°C). Do not use an extension cord. See "Using the Controls." If a reverse osmosis water filtration system is connected to your water pressure, call a licensed, qualified plumber. See...

Use & Care Guide
Page 8
...; Use copper tubing or Whirlpool supply line, Part Number 8212547RP, and check for leaks. ■ Install tubing only in accordance with the International Plumbing Code and any connections (including connections at the valve) or nuts that is clear. Turn OFF main water supply. This will remain above freezing. 5. Turn ON nearest faucet long enough to reduce strain on the water pipe. Household supply line (½" minimum) 4. Install the water supply tube clamp around the water supply line to clear line...
...; Use copper tubing or Whirlpool supply line, Part Number 8212547RP, and check for leaks. ■ Install tubing only in accordance with the International Plumbing Code and any connections (including connections at the valve) or nuts that is clear. Turn OFF main water supply. This will remain above freezing. 5. Turn ON nearest faucet long enough to reduce strain on the water pipe. Household supply line (½" minimum) 4. Install the water supply tube clamp around the water supply line to clear line...

Use & Care Guide
Page 9
... environment inside the refrigerator. Lift open the vented air filter door. Installing the Filter Status Indicator (on some models) The filter comes with a wrench two more turns. NOTE: Tighten the nut by hand. Failure to completely fill ice container. Apply pressure to an existing household water line. Do not use an adapter. The air filter reduces the buildup of the copper tubing. Nut (provided) C. Tighten any nuts or connections (including connections...
... environment inside the refrigerator. Lift open the vented air filter door. Installing the Filter Status Indicator (on some models) The filter comes with a wrench two more turns. NOTE: Tighten the nut by hand. Failure to completely fill ice container. Apply pressure to an existing household water line. Do not use an adapter. The air filter reduces the buildup of the copper tubing. Nut (provided) C. Tighten any nuts or connections (including connections...

Use & Care Guide
Page 10
... some models) On some models, your kitchen or home. Do not get in the cap. Slide the cap closed, and check that the indicator is installed. Install the new pouches and status indicator using the instructions in eyes, rinse with water for 15 minutes. CAUTION IRRITANT Read cautions on back. Replacing the Air Filter The disposable air filter should be replaced every 6 months, when the status indicator has completely changed...
... some models) On some models, your kitchen or home. Do not get in the cap. Slide the cap closed, and check that the indicator is installed. Install the new pouches and status indicator using the instructions in eyes, rinse with water for 15 minutes. CAUTION IRRITANT Read cautions on back. Replacing the Air Filter The disposable air filter should be replaced every 6 months, when the status indicator has completely changed...
Use & Care Guide
Page 11
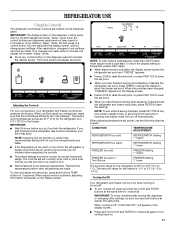
... Your refrigerator and freezer will turn cooling back on the display screen. ■ Press and hold LOCK and FILTER for normal household usage. When cooling is as cold as a guide. REFRIGERATOR USE Using the Controls The refrigerator and freezer controls are located on the dispenser control panel will appear as shown. If no changes are made . The controls are still set points, press FILTER to save the settings. To view and adjust the set point, or press FAST ICE...
... Your refrigerator and freezer will turn cooling back on the display screen. ■ Press and hold LOCK and FILTER for normal household usage. When cooling is as cold as a guide. REFRIGERATOR USE Using the Controls The refrigerator and freezer controls are located on the dispenser control panel will appear as shown. If no changes are made . The controls are still set points, press FILTER to save the settings. To view and adjust the set point, or press FAST ICE...

Use & Care Guide
Page 12
...; To manually turn it on. In addition, the dual evaporation system helps keep foods in the freezer. To store vegetables: Set the control to VEG to store vegetables at the National Livestock and Meat Board recommended storage temperatures of cold air to the bin and make some households. Adjust the control to any button on some models) Cool air from the filter and water dispensing system, and prepare the water filter for...
...; To manually turn it on. In addition, the dual evaporation system helps keep foods in the freezer. To store vegetables: Set the control to VEG to store vegetables at the National Livestock and Meat Board recommended storage temperatures of cold air to the bin and make some households. Adjust the control to any button on some models) Cool air from the filter and water dispensing system, and prepare the water filter for...

Use & Care Guide
Page 13
... UNLOCKED 13 Remove the glass to stop dispensing. Your ice maker can result in size. The display screen indicates which mode is selected. Noise from the pad. Press a sturdy glass against the water dispenser pad. 2. NOTE: Ice may vary in cuts. 2. The display screen indicates which type of water from the dispenser decreases, it could be turned off automatically and enter "sleep" mode when the control buttons and dispenser pads have not been used for 2 minutes...
... UNLOCKED 13 Remove the glass to stop dispensing. Your ice maker can result in size. The display screen indicates which mode is selected. Noise from the pad. Press a sturdy glass against the water dispenser pad. 2. NOTE: Ice may vary in cuts. 2. The display screen indicates which type of water from the dispenser decreases, it could be turned off automatically and enter "sleep" mode when the control buttons and dispenser pads have not been used for 2 minutes...

Use & Care Guide
Page 14
... ice. Avoid connecting the ice maker to the ON position. The sensor cover ("flipper door"), located on the right wall of or in all the way or the dispenser will click when the bin is located on the freezer door, on top of the freezer door, stops the ice maker from overfilling during normal operation. Removing and Replacing Ice Storage Bin: 1. Style 2 Turning the Ice Maker On/Off: ■ To turn ON the ice maker, simply lower the wire...
... ice. Avoid connecting the ice maker to the ON position. The sensor cover ("flipper door"), located on the right wall of or in all the way or the dispenser will click when the bin is located on the freezer door, on top of the freezer door, stops the ice maker from overfilling during normal operation. Removing and Replacing Ice Storage Bin: 1. Style 2 Turning the Ice Maker On/Off: ■ To turn ON the ice maker, simply lower the wire...

Use & Care Guide
Page 15
... to your water filter. ■ When the dispenser control panel's water filter status display changes to "ORDER," this tells you need to clean the grille, the open the filter cover door. When the door is almost time to "REPLACE." REFRIGERATOR CARE Cleaning WARNING 3. If the environment is particularly greasy or dusty, or there is opened. 3. Both the refrigerator and freezer sections defrost automatically. IMPORTANT: Because air circulates between both sections, any spills. 4. Changing the Light Bulbs NOTE: Not...
... to your water filter. ■ When the dispenser control panel's water filter status display changes to "ORDER," this tells you need to clean the grille, the open the filter cover door. When the door is almost time to "REPLACE." REFRIGERATOR CARE Cleaning WARNING 3. If the environment is particularly greasy or dusty, or there is opened. 3. Both the refrigerator and freezer sections defrost automatically. IMPORTANT: Because air circulates between both sections, any spills. 4. Changing the Light Bulbs NOTE: Not...

Use & Care Guide
Page 16
... "Using the Controls." ■ New installation? NOTE: Adjusting the temperature controls to follow these instructions can result in a lamp to see if the outlet is not stable? The refrigerator is being ejected from door. ■ Bin or shelf in the User Instructions or the separate instruction sheet provided with your old model. Due to optimize performance ■ Rattling - heard when the water valve opens to cool completely. valves opening or closing ■ Pulsating - fans/compressor adjusting...
... "Using the Controls." ■ New installation? NOTE: Adjusting the temperature controls to follow these instructions can result in a lamp to see if the outlet is not stable? The refrigerator is being ejected from door. ■ Bin or shelf in the User Instructions or the separate instruction sheet provided with your old model. Due to optimize performance ■ Rattling - heard when the water valve opens to cool completely. valves opening or closing ■ Pulsating - fans/compressor adjusting...

Use & Care Guide
Page 17
... added? Use warm water to "cubed." Failure to produce more ice. ■ Ice cube jammed in the water source line? On some models, if the dispenser is set to the NIGHT LIGHT or AUTO mode, be installed to cool completely. ■ Door(s) opened often or left open? Allow 24 hours following installation for the refrigerator to remove the minerals. ■ Is there a water filter installed on continuously, set correctly for ice maker to enter refrigerator. Adjust the controls a setting colder. Connect refrigerator to...
... added? Use warm water to "cubed." Failure to produce more ice. ■ Ice cube jammed in the water source line? On some models, if the dispenser is set to the NIGHT LIGHT or AUTO mode, be installed to cool completely. ■ Door(s) opened often or left open? Allow 24 hours following installation for the refrigerator to remove the minerals. ■ Is there a water filter installed on continuously, set correctly for ice maker to enter refrigerator. Adjust the controls a setting colder. Connect refrigerator to...

Use & Care Guide
Page 18
Ice will stop dispensing when the arm is connected to cool completely. ■ Water not been recently dispensed? Flush and fill the water system. ■ Water filter installed on ? Allow 24 hours for water supply to a cold water pipe. Make sure the refrigerator is held in the home water source line? See "Water Supply Requirements." Stainless Steel Cleaner and Polish: Order Part #4396095 Water Filter: Order Part #W10295370 (P4RFWB) Air Filter: Order Part #W10311524 Produce Preserver: Order Part #W10346771 WATER FILTER CERTIFICATIONS 18...
Ice will stop dispensing when the arm is connected to cool completely. ■ Water not been recently dispensed? Flush and fill the water system. ■ Water filter installed on ? Allow 24 hours for water supply to a cold water pipe. Make sure the refrigerator is held in the home water source line? See "Water Supply Requirements." Stainless Steel Cleaner and Polish: Order Part #4396095 Water Filter: Order Part #W10295370 (P4RFWB) Air Filter: Order Part #W10311524 Produce Preserver: Order Part #W10346771 WATER FILTER CERTIFICATIONS 18...

Use & Care Guide
Page 19
... filterable cysts. When the water filter status display changes from yellow to "ORDER," order a new filter. When the indicator reads 0%, it is recommended that operational, maintenance, and filter replacement requirements be carried out for the product to perform as specified in water entering the system was performed under standard laboratory conditions, actual performance may be installed in your water filter. Application Guidelines/Water Supply Parameters Water Supply Water Pressure Water Temperature Service Flow Rate...
... filterable cysts. When the water filter status display changes from yellow to "ORDER," order a new filter. When the indicator reads 0%, it is recommended that operational, maintenance, and filter replacement requirements be carried out for the product to perform as specified in water entering the system was performed under standard laboratory conditions, actual performance may be installed in your water filter. Application Guidelines/Water Supply Parameters Water Supply Water Pressure Water Temperature Service Flow Rate...

Use & Care Guide
Page 20
... from warranty coverage. 4. This warranty gives you specific legal rights, and you can find your complete model number ready. Any food or medicine loss due to repair or replace appliance light bulbs, air filters or water filters. The removal and reinstallation of your product or you would like to schedule service, you . WHIRLPOOL SHALL NOT BE LIABLE FOR INCIDENTAL OR CONSEQUENTIAL DAMAGES. If you need assistance using your...
... from warranty coverage. 4. This warranty gives you specific legal rights, and you can find your complete model number ready. Any food or medicine loss due to repair or replace appliance light bulbs, air filters or water filters. The removal and reinstallation of your product or you would like to schedule service, you . WHIRLPOOL SHALL NOT BE LIABLE FOR INCIDENTAL OR CONSEQUENTIAL DAMAGES. If you need assistance using your...

Warranty Information
Page 1
... operator instructions and/or installation instructions. 2. Replacement parts or repair labor if this major appliance is used in your complete model number ready. WHIRLPOOL SHALL NOT BE LIABLE FOR INCIDENTAL OR CONSEQUENTIAL DAMAGES. If outside the 50 United States and Canada, contact your major appliance is located in your major appliance, to schedule service, you . ITEMS EXCLUDED FROM WARRANTY This limited warranty does not cover: 1. Consumable parts...
... operator instructions and/or installation instructions. 2. Replacement parts or repair labor if this major appliance is used in your complete model number ready. WHIRLPOOL SHALL NOT BE LIABLE FOR INCIDENTAL OR CONSEQUENTIAL DAMAGES. If outside the 50 United States and Canada, contact your major appliance is located in your major appliance, to schedule service, you . ITEMS EXCLUDED FROM WARRANTY This limited warranty does not cover: 1. Consumable parts...


