
Dimension Guide
Page 1
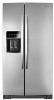
... without notice. For complete details, see Installation Instructions packed with product. Product Dimension Guide for planning purposes only. Dimensions are for models WRS970CIH Description Inches mm A Width of FC door 15-7/16 392.1 B Width of RC door 20-1/16 509.5 C Space between doors... L Water line location distance from side 2-½ 63.5 M Water line location 6-⅞ distance from bottom 174.6 Because Whirlpool Corporation policy includes a continuous commitment to improve our products, we reserve the right to change materials and specifications without notice.
... without notice. For complete details, see Installation Instructions packed with product. Product Dimension Guide for planning purposes only. Dimensions are for models WRS970CIH Description Inches mm A Width of FC door 15-7/16 392.1 B Width of RC door 20-1/16 509.5 C Space between doors... L Water line location distance from side 2-½ 63.5 M Water line location 6-⅞ distance from bottom 174.6 Because Whirlpool Corporation policy includes a continuous commitment to improve our products, we reserve the right to change materials and specifications without notice.
Dimension Guide
Page 2
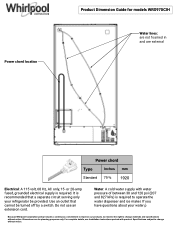
...Inches mm Standard 75-⅝ 1920 Electrical: A 115 volt, 60 Hz, AC only, 15- Use an outlet that a separate circuit serving only your water p Because Whirlpool Corporation policy includes a continuous commitment to improve our products, we reserve the right to change materials and specifications without notice. Do not use an extension... supply is required to operate the water dispenser and ice maker. Water: A cold water supply with product. Power chord location Product Dimension Guide for models WRS970CIH Water lines: are not foamed in and are for planning purposes only.
...Inches mm Standard 75-⅝ 1920 Electrical: A 115 volt, 60 Hz, AC only, 15- Use an outlet that a separate circuit serving only your water p Because Whirlpool Corporation policy includes a continuous commitment to improve our products, we reserve the right to change materials and specifications without notice. Do not use an extension... supply is required to operate the water dispenser and ice maker. Water: A cold water supply with product. Power chord location Product Dimension Guide for models WRS970CIH Water lines: are not foamed in and are for planning purposes only.
Dimension Guide
Page 3
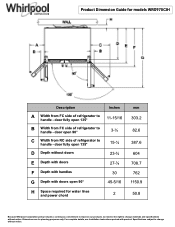
...8542; F Depth with handles 30 G Depth with product. Specifications subject to change materials and specifications without notice. Product Dimension Guide for models WRS970CIH Description Inches A Width from FC side of refrigerator to handle - Dimensions are for water lines and power chord 2 mm 303.2... 82.6 387.6 604 708.7 762 1150.9 50.8 Because Whirlpool Corporation policy includes a continuous commitment to improve our products, we reserve the right to handle - For complete details, see Installation ...
...8542; F Depth with handles 30 G Depth with product. Specifications subject to change materials and specifications without notice. Product Dimension Guide for models WRS970CIH Description Inches A Width from FC side of refrigerator to handle - Dimensions are for water lines and power chord 2 mm 303.2... 82.6 387.6 604 708.7 762 1150.9 50.8 Because Whirlpool Corporation policy includes a continuous commitment to improve our products, we reserve the right to handle - For complete details, see Installation ...
Dimension Guide
Page 4
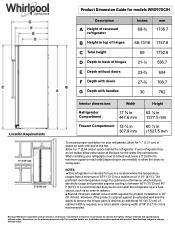
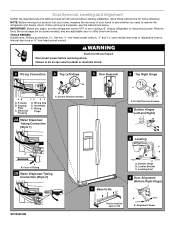
...27 cm) of space on your refrigerator has an ice maker, allow the doors to swing open. If your model) to allow extra space at the top. Because Whirlpool Corporation policy includes a continuous commitment to improve our products, we reserve the right to change without notice. When ...on each side (depending on each side and at the back for the water line connections. Allow for planning purposes only. Product Dimension Guide for models WRS970CIH Description A Height of recessed refrigerator B Height to top of hinges C Total height D Depth to back of hinges E Depth without doors ...
...27 cm) of space on your refrigerator has an ice maker, allow the doors to swing open. If your model) to allow extra space at the top. Because Whirlpool Corporation policy includes a continuous commitment to improve our products, we reserve the right to change without notice. When ...on each side (depending on each side and at the back for the water line connections. Allow for planning purposes only. Product Dimension Guide for models WRS970CIH Description A Height of recessed refrigerator B Height to top of hinges C Total height D Depth to back of hinges E Depth without doors ...
Dimension Guide
Page 5
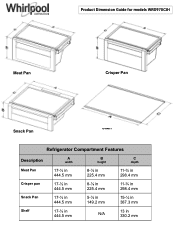
Product Dimension Guide for models WRS970CIH Meat Pan Crisper Pan Snack Pan Shelf Refrigerator Compartment Features Description A width B height C depth Meat Pan 17-½ in 444.5 mm 8-⅞ in 225.4 mm 11-¾ in 298.4 mm Crisper pan 17-½ in 444.5 mm 8-⅞ in 225.4 mm 11-¾ in 298.4 mm Snack Pan 17-½ in 444.5 mm 5-⅞ in 149.2 mm 15-¼ in 387.3 mm Shelf 17-½ in 444.5 mm N/A 13 in 330.2 mm
Product Dimension Guide for models WRS970CIH Meat Pan Crisper Pan Snack Pan Shelf Refrigerator Compartment Features Description A width B height C depth Meat Pan 17-½ in 444.5 mm 8-⅞ in 225.4 mm 11-¾ in 298.4 mm Crisper pan 17-½ in 444.5 mm 8-⅞ in 225.4 mm 11-¾ in 298.4 mm Snack Pan 17-½ in 444.5 mm 5-⅞ in 149.2 mm 15-¼ in 387.3 mm Shelf 17-½ in 444.5 mm N/A 13 in 330.2 mm

Dimension Guide
Page 6
Product Dimension Guide for models WRS970CIH Bottom bin Top bin Bottom Shelf Top Shelf Description Bottom bin Top bin Bottom Shelf Top Shelf Freezer Compartment Features A width B height C depth 11-11/16 in 297 mm 7-⅝ in 193.6 mm 11-½ in 292.1 mm 11-11/16 in 297 mm 8-¾ in 222.2 mm 11-½ in 292.1 mm 11-11/16 in 297 mm N/A 10 in 254 mm 11-11/16 in 297 mm N/A 11-½ in 292.1 mm
Product Dimension Guide for models WRS970CIH Bottom bin Top bin Bottom Shelf Top Shelf Description Bottom bin Top bin Bottom Shelf Top Shelf Freezer Compartment Features A width B height C depth 11-11/16 in 297 mm 7-⅝ in 193.6 mm 11-½ in 292.1 mm 11-11/16 in 297 mm 8-¾ in 222.2 mm 11-½ in 292.1 mm 11-11/16 in 297 mm N/A 10 in 254 mm 11-11/16 in 297 mm N/A 11-½ in 292.1 mm
Installation Instructions
Page 1
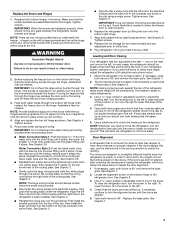
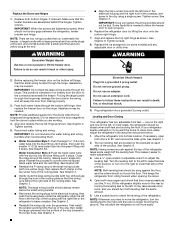
IMPORTANT: Before you need to see the instructions below. Remove food, the ice storage bin (on some models), and any adjustable door or utility bins from doors. Failure to 90˚ A Raise Lower A. Do Not Remove Screws. 7 Bottom Hinges (Left and Right) A A A. Leveling ...
IMPORTANT: Before you need to see the instructions below. Remove food, the ice storage bin (on some models), and any adjustable door or utility bins from doors. Failure to 90˚ A Raise Lower A. Do Not Remove Screws. 7 Bottom Hinges (Left and Right) A A A. Leveling ...
Installation Instructions
Page 3
... hole of the product. If the doors are touching the floor. Check that they are assembled behind the right side of the refrigerator takes some models) and any gaps between the refrigerator, leveler bracket and hinge. Replace the base grille. Before replacing the freezer door on each side of the routing...
... hole of the product. If the doors are touching the floor. Check that they are assembled behind the right side of the refrigerator takes some models) and any gaps between the refrigerator, leveler bracket and hinge. Replace the base grille. Before replacing the freezer door on each side of the routing...
Owners Manual
Page 2
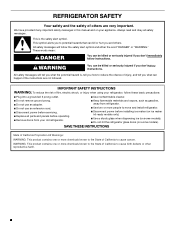
...; Do not use an extension cord. ■ Disconnect power before installing ice maker (on ice maker kit ready models only). ■ Use a sturdy glass when dispensing ice (on some models). This is , tell you how to cause cancer. WARNING: This product contains one or more chemicals known to...and tell you what the potential hazard is the safety alert symbol. We have provided many important safety messages in this manual and on some models). ■ Do not hit the refrigerator glass doors (on your old refrigerator. ■ Keep flammable materials and vapors, such as gasoline, ...
...; Do not use an extension cord. ■ Disconnect power before installing ice maker (on ice maker kit ready models only). ■ Use a sturdy glass when dispensing ice (on some models). This is , tell you how to cause cancer. WARNING: This product contains one or more chemicals known to...and tell you what the potential hazard is the safety alert symbol. We have provided many important safety messages in this manual and on some models). ■ Do not hit the refrigerator glass doors (on your old refrigerator. ■ Keep flammable materials and vapors, such as gasoline, ...

Owners Manual
Page 4
... into your home, measure the doorway of Fitting 2B Water Dispenser Tubing Connection (Style 2) 8 Leveling A B Raise Lower C A. Remove food, the ice storage bin (on some models), and any adjustable door or utility bins from doors. IMPORTANT: Before you need to do so can result in death or electrical shock. 3 Wiring Connection...
... into your home, measure the doorway of Fitting 2B Water Dispenser Tubing Connection (Style 2) 8 Leveling A B Raise Lower C A. Remove food, the ice storage bin (on some models), and any adjustable door or utility bins from doors. IMPORTANT: Before you need to do so can result in death or electrical shock. 3 Wiring Connection...
Owners Manual
Page 6
... should be needed . NOTE: Provide additional support for the doors while the top hinges are assembled behind the right side of the refrigerator takes some models) and any gaps between the refrigerator, leveler bracket and hinge. See Graphic 4. See Graphic 2B. ■ Reinstall the P-clamp around the tubing, making sure it...
... should be needed . NOTE: Provide additional support for the doors while the top hinges are assembled behind the right side of the refrigerator takes some models) and any gaps between the refrigerator, leveler bracket and hinge. See Graphic 4. See Graphic 2B. ■ Reinstall the P-clamp around the tubing, making sure it...
Owners Manual
Page 8
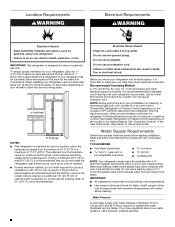
...to OFF, and then disconnect the refrigerator from a minimum of 55°F (13°C) to a maximum of space on each side (depending on your model) to follow the instructions provided with a ¹⁄₄" (6.35 mm) saddle-type shutoff valve, a union, and copper tubing. Before purchasing, ... turned off or turn cooling on or reset the control (Thermostat, Refrigerator or Freezer Control depending on the model) to a fixed wall, leave a 2" (5.08 cm) minimum space on the model) to swing open -end or two adjustable wrenches nut driver drill bit ■ Cordless drill NOTE: Your...
...to OFF, and then disconnect the refrigerator from a minimum of 55°F (13°C) to a maximum of space on each side (depending on your model) to follow the instructions provided with a ¹⁄₄" (6.35 mm) saddle-type shutoff valve, a union, and copper tubing. Before purchasing, ... turned off or turn cooling on or reset the control (Thermostat, Refrigerator or Freezer Control depending on the model) to a fixed wall, leave a 2" (5.08 cm) minimum space on the model) to swing open -end or two adjustable wrenches nut driver drill bit ■ Cordless drill NOTE: Your...
Owners Manual
Page 10
.... Flush the tubing until water is attached to reduce strain on the copper tubing as shown. Tighten the nut by hand. Valve inlet 7. On some models, the ice maker is under the pipe clamp. If your nearest appliance dealer. Remove and discard the black nylon plug from the connection on the...
.... Flush the tubing until water is attached to reduce strain on the copper tubing as shown. Tighten the nut by hand. Valve inlet 7. On some models, the ice maker is under the pipe clamp. If your nearest appliance dealer. Remove and discard the black nylon plug from the connection on the...
Owners Manual
Page 11
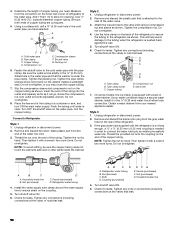
... the door. 4. Replacing the Air Filter The disposable air filter should be installed prior to follow these instructions can result in your model) along either inside the refrigerator. Remove the old status indicator. 3. Do not use an extension cord. Failure to use. Install Air...been popped. ■ Close the air filter door, and check that the indicator is installed. 1. Apply pressure to the bubble on some models, your refrigerator's accessory packet includes an air filter, which must be replaced every 6 months, when the status indicator has completely changed from ...
... the door. 4. Replacing the Air Filter The disposable air filter should be installed prior to follow these instructions can result in your model) along either inside the refrigerator. Remove the old status indicator. 3. Do not use an extension cord. Failure to use. Install Air...been popped. ■ Close the air filter door, and check that the indicator is installed. 1. Apply pressure to the bubble on some models, your refrigerator's accessory packet includes an air filter, which must be replaced every 6 months, when the status indicator has completely changed from ...
Owners Manual
Page 12
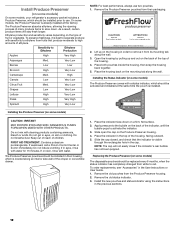
...of the top of the housing. 4. Installing the Status Indicator (on some models) The Produce Preserver comes with water. Do not induce vomiting. ATTENTION IRRITANT Lisez des prudences sur le revers. 1. Whirlpool Corporation, Benton Harbor MI 49022 2. Place both pouches inside the housing, ...then snap the housing back together. 5. Installing the Produce Preserver (on some models, the Produce Preserver is already installed at the same time...
...of the top of the housing. 4. Installing the Status Indicator (on some models) The Produce Preserver comes with water. Do not induce vomiting. ATTENTION IRRITANT Lisez des prudences sur le revers. 1. Whirlpool Corporation, Benton Harbor MI 49022 2. Place both pouches inside the housing, ...then snap the housing back together. 5. Installing the Produce Preserver (on some models, the Produce Preserver is already installed at the same time...
Owners Manual
Page 14
.... Crisper Humidity Control (on the dispenser display screen. Wait 72 hours for 5 seconds. 2. NOTE: As air is always activated when your model, a measuring cup may affect the accuracy of the Measured Fill feature. When the feature is on, the Fast Ice icon will not operate ... control and dispenser sounds, press the OPTIONS button to enter Options mode, then press OPTIONS again. ■ To turn it on some models) Some models come equipped with a dual sequential evaporation system, which helps keep food smells in the moisture-sealed crisper. Disabling Sounds ■ To turn...
.... Crisper Humidity Control (on the dispenser display screen. Wait 72 hours for 5 seconds. 2. NOTE: As air is always activated when your model, a measuring cup may affect the accuracy of the Measured Fill feature. When the feature is on, the Fast Ice icon will not operate ... control and dispenser sounds, press the OPTIONS button to enter Options mode, then press OPTIONS again. ■ To turn it on some models) Some models come equipped with a dual sequential evaporation system, which helps keep food smells in the moisture-sealed crisper. Disabling Sounds ■ To turn...

Owners Manual
Page 19
... Removal" instructions, either in the User Instructions or the Installation Instructions and Owner's Manual, or in the separate instruction sheet provided with your model, raise the wire shutoff arm to OFF (up ) position or move . 1. NOTE: Depending on plastic parts, interior and door liners ...clean the grille, the open far enough for routine condenser cleaning in normal home operating environments. To order replacement LED lightings, please, call Whirlpool service (1-800-253-1301 (U.S.A.) or 1-800-807-6777 (Canada).) Freezer Compartment - Replacement Bulb: ■ If the burned-out light ...
... Removal" instructions, either in the User Instructions or the Installation Instructions and Owner's Manual, or in the separate instruction sheet provided with your model, raise the wire shutoff arm to OFF (up ) position or move . 1. NOTE: Depending on plastic parts, interior and door liners ...clean the grille, the open far enough for routine condenser cleaning in normal home operating environments. To order replacement LED lightings, please, call Whirlpool service (1-800-253-1301 (U.S.A.) or 1-800-807-6777 (Canada).) Freezer Compartment - Replacement Bulb: ■ If the burned-out light ...
Owners Manual
Page 20
...because the compressor and fans operate at the address below: In the U.S.A.: In Canada: Whirlpool Brand Home Appliances Customer eXperience Center 553 Benson Road Benton Harbor, MI 49022-2692 Whirlpool Brand Home Appliances Customer eXperience Centre 200 - 6750 Century Ave. Failure to an electrical supply... you avoid a service call, refer to cool completely. In Canada, visit www.whirlpool.ca. Contact us by mail with your correspondence. Plug in your mobile device, or visit www.whirlpool.com/product_help. Turn on the refrigerator control, or turn cooling on. This is ...
...because the compressor and fans operate at the address below: In the U.S.A.: In Canada: Whirlpool Brand Home Appliances Customer eXperience Center 553 Benson Road Benton Harbor, MI 49022-2692 Whirlpool Brand Home Appliances Customer eXperience Centre 200 - 6750 Century Ave. Failure to an electrical supply... you avoid a service call, refer to cool completely. In Canada, visit www.whirlpool.ca. Contact us by mail with your correspondence. Plug in your mobile device, or visit www.whirlpool.com/product_help. Turn on the refrigerator control, or turn cooling on. This is ...
Owners Manual
Page 21
...the temperature control(s) to OFF, the light will not cool either the front cover or the Warranty for the surrounding conditions - On some models) Possible Causes and/or Recommended Solutions The compressor in 24 hours. ■ Top refrigerator shelf is set to cool completely. Clean with ...sure both doors are properly sealed. ■ Air vents are unfamiliar. As a result, the top shelf can be slightly colder than older models. Remove items that are blocked - NOTE: Some moisture buildup is normal. Following installation, allow 24 hours for assistance or service if the dispenser...
...the temperature control(s) to OFF, the light will not cool either the front cover or the Warranty for the surrounding conditions - On some models) Possible Causes and/or Recommended Solutions The compressor in 24 hours. ■ Top refrigerator shelf is set to cool completely. Clean with ...sure both doors are properly sealed. ■ Air vents are unfamiliar. As a result, the top shelf can be slightly colder than older models. Remove items that are blocked - NOTE: Some moisture buildup is normal. Following installation, allow 24 hours for assistance or service if the dispenser...
Owners Manual
Page 22
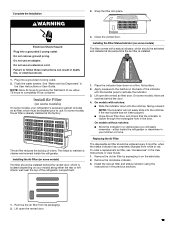
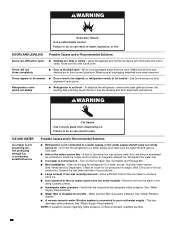
... valve is jammed in the water line can decrease water pressure. Turn on - See "Water Supply Requirements." ■ Water filter is not turned on some models) - WARNING Explosion Hazard Use nonflammable cleaner. A kink in the ice maker ejector arm (on - Make sure the filter is not connected to do so can...
... valve is jammed in the water line can decrease water pressure. Turn on - See "Water Supply Requirements." ■ Water filter is not turned on some models) - WARNING Explosion Hazard Use nonflammable cleaner. A kink in the ice maker ejector arm (on - Make sure the filter is not connected to do so can...


