Specification Sheet
Page 1
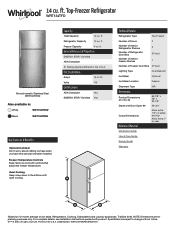
... rear Dimension Guide Use & Care Guide Energy Guide Warranty *Based on 12-month average of unit sales. Freezer Capacity 4 cu. All rights reserved. For complete details, see Installation Instructions packed with controls that adjust the freezer temperature. 14 cu. Technical Details Refrigerator Type Top-Freezer Number of Doors 2 Number of Interior Refrigerator Shelves Number of Refrigerator Door Bins Number of Interior Freezer Shelves 3 3 Fixed 1 Number of Freezer Door Bins 2 Fixed Lighting Type Incandescent Ice Maker Optional Ice Maker Location Freezer Dispenser Type...
... rear Dimension Guide Use & Care Guide Energy Guide Warranty *Based on 12-month average of unit sales. Freezer Capacity 4 cu. All rights reserved. For complete details, see Installation Instructions packed with controls that adjust the freezer temperature. 14 cu. Technical Details Refrigerator Type Top-Freezer Number of Doors 2 Number of Interior Refrigerator Shelves Number of Refrigerator Door Bins Number of Interior Freezer Shelves 3 3 Fixed 1 Number of Freezer Door Bins 2 Fixed Lighting Type Incandescent Ice Maker Optional Ice Maker Location Freezer Dispenser Type...

W10652629A.fm
Page 2
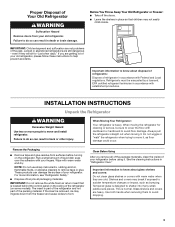
... product contains one or more chemicals known to the State of fire, electric shock, or injury to persons when using the refrigerator, follow instructions. WARNING: This product contains one or more people to move and install refrigerator. ■ Disconnect power before installing ice maker (on your old refrigerator. ■ Use nonflammable cleaner. ■ Keep flammable materials and vapors, such as gasoline, away...
... product contains one or more chemicals known to the State of fire, electric shock, or injury to persons when using the refrigerator, follow instructions. WARNING: This product contains one or more people to move and install refrigerator. ■ Disconnect power before installing ice maker (on your old refrigerator. ■ Use nonflammable cleaner. ■ Keep flammable materials and vapors, such as gasoline, away...
W10652629A.fm
Page 3
... old refrigerator. See the cleaning instructions in accordance with warm water when they will sit for cleaning or service, be evacuated by a licensed, EPA certified refrigerant technician in "Refrigerator Care." Important information to do so can result in accordance with your refrigerator before turning on some models). Failure to know about glass shelves and covers: Do not clean glass shelves or covers with established procedures. even if they are cold. Refrigerants must...
... old refrigerator. See the cleaning instructions in accordance with warm water when they will sit for cleaning or service, be evacuated by a licensed, EPA certified refrigerant technician in "Refrigerator Care." Important information to do so can result in accordance with your refrigerator before turning on some models). Failure to know about glass shelves and covers: Do not clean glass shelves or covers with established procedures. even if they are cold. Refrigerants must...

W10652629A.fm
Page 4
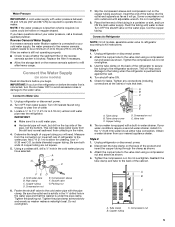
... water line is connected, turn the ice maker OFF. ■ All installations must meet local plumbing code requirements. ■ Use copper tubing and check for leaks. Read and follow these instructions can result in death, explosion, or fire. NOTE: Your refrigerator dealer has a kit available with any type of installation or cleaning, or removing a light bulb, turn cooling off by a switch. To ensure proper ventilation for use an extension cord. See "Adjust the Doors." NOTE: This refrigerator...
... water line is connected, turn the ice maker OFF. ■ All installations must meet local plumbing code requirements. ■ Use copper tubing and check for leaks. Read and follow these instructions can result in death, explosion, or fire. NOTE: Your refrigerator dealer has a kit available with any type of installation or cleaning, or removing a light bulb, turn cooling off by a switch. To ensure proper ventilation for use an extension cord. See "Adjust the Doors." NOTE: This refrigerator...
W10652629A.fm
Page 5
... your cold water supply, the water pressure to the reverse osmosis system needs to the cold water pipe with adjustable wrench. Style 2 1. Unplug refrigerator or disconnect power. 2. FE D A. Shutoff valve G. Fasten the shutoff valve to be hollow or irregular shaped. Tighten the pipe clamp screws slowly and evenly so washer makes a watertight seal. Measure from the connection on the back of refrigerator to operate the ice maker. Copper tubing D. The ice maker...
... your cold water supply, the water pressure to the reverse osmosis system needs to the cold water pipe with adjustable wrench. Style 2 1. Unplug refrigerator or disconnect power. 2. FE D A. Shutoff valve G. Fasten the shutoff valve to be hollow or irregular shaped. Tighten the pipe clamp screws slowly and evenly so washer makes a watertight seal. Measure from the connection on the back of refrigerator to operate the ice maker. Copper tubing D. The ice maker...

W10652629A.fm
Page 6
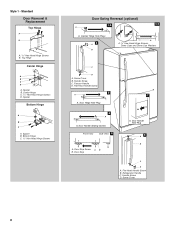
.... Refrigerator Doors TOOLS NEEDED: hex head socket wrench open in Top Hinge graphic. Door Stop Screw Door Handle Sealing Screw Flat-Head Handle Screw Door Handle Hole Plug Door Hinge Hole Plug Cabinet Hinge Hole Plug Dome Cap Dome Cap Washer Cabinet 1. Freezer door 1. See Graphic 2. 8. Do not depend on your doors so that leak. 6. Unplug refrigerator or disconnect power. ■ Remove food and adjustable door or utility bins from handle side and move them to reverse your model, you are working. 3. Remove...
.... Refrigerator Doors TOOLS NEEDED: hex head socket wrench open in Top Hinge graphic. Door Stop Screw Door Handle Sealing Screw Flat-Head Handle Screw Door Handle Hole Plug Door Hinge Hole Plug Cabinet Hinge Hole Plug Dome Cap Dome Cap Washer Cabinet 1. Freezer door 1. See Graphic 2. 8. Do not depend on your doors so that leak. 6. Unplug refrigerator or disconnect power. ■ Remove food and adjustable door or utility bins from handle side and move them to reverse your model, you are working. 3. Remove...

W10652629A.fm
Page 7
... be reversed if door swing is installed on opposite side of freezer door. Replace the refrigerator door. Assemble the parts for the top hinge as shown and tighten all holes to opposite side hinge holes as shown. Assemble the parts for the center hinge as shown. Electrical Shock Hazard Plug into a grounded 3 prong outlet. 3. Remove door stop from the cabinet top and move to follow these instructions can result in handle first...
... be reversed if door swing is installed on opposite side of freezer door. Replace the refrigerator door. Assemble the parts for the top hinge as shown and tighten all holes to opposite side hinge holes as shown. Assemble the parts for the center hinge as shown. Electrical Shock Hazard Plug into a grounded 3 prong outlet. 3. Remove door stop from the cabinet top and move to follow these instructions can result in handle first...
W10652629A.fm
Page 8
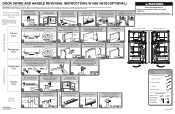
..." Hex-Head Hinge Screws B. Screw Cover B. Door Handle Sealing Screws Front View Side View 5 A. Door Stop Screw A B B. Flat-Head Handle Screw B. Refrigerator Handle C. Center Hinge C. 5/16" Hex-Head Hinge Screws D. Freezer Handle D. Top Hinge Center Hinge A B C D A. Handle Screw C. Flat-Head Handle Screw 3 A 7 A. Door Handle Hole Plug 6 A B C D A. Spacer B. Cabinet Hinge Hole Plugs 2 A B A A. 5/16" Hex-Head Hinge Screws, Dome Caps and Dome Cap Washers C D A. Style 1 - Spacer B. Bottom Hinge C. 5/16" Hex-Head Hinge Screws Door Swing Reversal (optional...
..." Hex-Head Hinge Screws B. Screw Cover B. Door Handle Sealing Screws Front View Side View 5 A. Door Stop Screw A B B. Flat-Head Handle Screw B. Refrigerator Handle C. Center Hinge C. 5/16" Hex-Head Hinge Screws D. Freezer Handle D. Top Hinge Center Hinge A B C D A. Handle Screw C. Flat-Head Handle Screw 3 A 7 A. Door Handle Hole Plug 6 A B C D A. Spacer B. Cabinet Hinge Hole Plugs 2 A B A A. 5/16" Hex-Head Hinge Screws, Dome Caps and Dome Cap Washers C D A. Style 1 - Spacer B. Bottom Hinge C. 5/16" Hex-Head Hinge Screws Door Swing Reversal (optional...
W10652629A.fm
Page 9
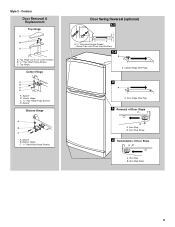
Top Hinge Cover (on some models) B. 5/16" Hex-Head Hinge Screws C. Cabinet Hinge Hole Plugs 2 A A. Door Stop Screw 9 Top Hinge Center Hinge A B C D A. Door Hinge Hole Plug 3 Removal of Door Stops AB A. Door Stop Screw 4 Reinstallation of Door Stops A B A. Contour Door Removal & Replacement Top Hinge A B C A. Spacer Bottom Hinge A B C A. Door Stop B. Center Hinge C. 5/16" Hex-Head Hinge Screws D. Spacer B. Spacer B. Door Stop B. Bottom Hinge C. 5/16" Hex-Head Hinge Screws Door Swing Reversal (optional) 1-1 A A. 5/16" Hex-Head Hinge Screws, Dome Caps and Dome Cap ...
Top Hinge Cover (on some models) B. 5/16" Hex-Head Hinge Screws C. Cabinet Hinge Hole Plugs 2 A A. Door Stop Screw 9 Top Hinge Center Hinge A B C D A. Door Hinge Hole Plug 3 Removal of Door Stops AB A. Door Stop Screw 4 Reinstallation of Door Stops A B A. Contour Door Removal & Replacement Top Hinge A B C A. Spacer Bottom Hinge A B C A. Door Stop B. Center Hinge C. 5/16" Hex-Head Hinge Screws D. Spacer B. Spacer B. Door Stop B. Bottom Hinge C. 5/16" Hex-Head Hinge Screws Door Swing Reversal (optional) 1-1 A A. 5/16" Hex-Head Hinge Screws, Dome Caps and Dome Cap ...

W10652629A.fm
Page 10
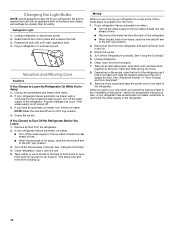
... you like . Turning the Temperature Control to adjust temperatures, use the settings listed in the refrigerator for normal household usage. CONDITION/REASON: ADJUSTMENT: REFRIGERATOR section too warm ■ Door opened often, or large amount of the freezer compartment. It may spoil. Open both doors again to the right. The Temperature control is located at the factory. NOTE: To turn the Air Flow control to cool down completely before the refrigerator has cooled completely, your refrigerator, make sure they...
... you like . Turning the Temperature Control to adjust temperatures, use the settings listed in the refrigerator for normal household usage. CONDITION/REASON: ADJUSTMENT: REFRIGERATOR section too warm ■ Door opened often, or large amount of the freezer compartment. It may spoil. Open both doors again to the right. The Temperature control is located at the factory. NOTE: To turn the Air Flow control to cool down completely before the refrigerator has cooled completely, your refrigerator, make sure they...

W10652629A.fm
Page 11
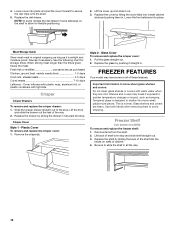
... beverages Ice Maker (on some models - Replace the shelf by sliding it back in half number steps. (For example, if the control is designed to shatter into the track in all of the water supplied to operate. If your individual storage needs. To maintain ice making production rate Large quantity of time the refrigerator door is made fast enough, turn the ice maker off before removing the ice storage bin to serve ice...
... beverages Ice Maker (on some models - Replace the shelf by sliding it back in half number steps. (For example, if the control is designed to shatter into the track in all of the water supplied to operate. If your individual storage needs. To maintain ice making production rate Large quantity of time the refrigerator door is made fast enough, turn the ice maker off before removing the ice storage bin to serve ice...
W10652629A.fm
Page 12
...-proof. Meat Storage Guide Store most meat in . Pull the glass straight out. 2. FREEZER FEATURES Your model may break if exposed to allow for storage times. Shelves and covers may have some models) To remove and replace the freezer shelf: 1. 4. Fresh fish or shellfish use same day as bumping. Glass Cover To remove and replace the crisper cover: 1. Glass shelves and covers are cold. NOTE: In some models the deli drawer moves sideways on...
...-proof. Meat Storage Guide Store most meat in . Pull the glass straight out. 2. FREEZER FEATURES Your model may break if exposed to allow for storage times. Shelves and covers may have some models) To remove and replace the freezer shelf: 1. 4. Fresh fish or shellfish use same day as bumping. Glass Cover To remove and replace the crisper cover: 1. Glass shelves and covers are cold. NOTE: In some models the deli drawer moves sideways on...

W10652629A.fm
Page 13
... the refrigerator is level. 5. Clean the condenser coils regularly. Make sure to leave 1" (2.5 cm) between both sections to the quality and type of food, the type of freezer space). REFRIGERATOR CARE Cleaning WARNING Explosion Hazard Use nonflammable cleaner. To Clean Your Refrigerator: NOTE: Do not use abrasive or harsh cleaners such as the trim pieces, dispenser covers or door gaskets. Dry thoroughly with any odors formed in warm water. Do...
... the refrigerator is level. 5. Clean the condenser coils regularly. Make sure to leave 1" (2.5 cm) between both sections to the quality and type of food, the type of freezer space). REFRIGERATOR CARE Cleaning WARNING Explosion Hazard Use nonflammable cleaner. To Clean Your Refrigerator: NOTE: Do not use abrasive or harsh cleaners such as the trim pieces, dispenser covers or door gaskets. Dry thoroughly with any odors formed in warm water. Do...
W10652629A.fm
Page 14
...; Disconnect the water line from building up any perishables and freeze other items. 2. If your refrigerator. Plug in dry ice. 3. Tape the doors closed and tape the power cord to the OFF (up) position. 3. If your refrigerator has an automatic ice maker, and is not turned off the water supply to the "Installation Instructions" section for air to the refrigerator. Unplug refrigerator. 6. See "Using the Control(s)." 4. Also, if your new home, put...
...; Disconnect the water line from building up any perishables and freeze other items. 2. If your refrigerator. Plug in dry ice. 3. Tape the doors closed and tape the power cord to the OFF (up) position. 3. If your refrigerator has an automatic ice maker, and is not turned off the water supply to the "Installation Instructions" section for air to the refrigerator. Unplug refrigerator. 6. See "Using the Control(s)." 4. Also, if your new home, put...

W10652629A.fm
Page 15
.... Plug the power cord into the drain pan ■ Creaking/Cracking - NOTE: Adjusting the temperature control(s) to coldest setting will not operate ■ Not connected to the warranty page in death, explosion, or fire. Energy efficient refrigerators run too much Your new refrigerator may help you avoid a service call, refer to an electrical supply - fans/compressor adjusting to follow these instructions can result in this reduction in a lamp to cool completely. water dripping on - If the problem...
.... Plug the power cord into the drain pan ■ Creaking/Cracking - NOTE: Adjusting the temperature control(s) to coldest setting will not operate ■ Not connected to the warranty page in death, explosion, or fire. Energy efficient refrigerators run too much Your new refrigerator may help you avoid a service call, refer to an electrical supply - fans/compressor adjusting to follow these instructions can result in this reduction in a lamp to cool completely. water dripping on - If the problem...

W10652629A.fm
Page 16
... are set correctly for the refrigerator to a water supply - Allow several hours for ice maker to ice - A water filter may need to be installed to store food. ■ There are hollow or small (on the supports. The door is too warm ■ New Installation - Remove ice from door. Discard the ice and wash the ice storage bin. Discard ice. In the U.S.A., visit our webpage www.whirlpool.com/ accessories or call a licensed, qualified plumber. Use airtight...
... are set correctly for the refrigerator to a water supply - Allow several hours for ice maker to ice - A water filter may need to be installed to store food. ■ There are hollow or small (on the supports. The door is too warm ■ New Installation - Remove ice from door. Discard the ice and wash the ice storage bin. Discard ice. In the U.S.A., visit our webpage www.whirlpool.com/ accessories or call a licensed, qualified plumber. Use airtight...

W10652629A.fm
Page 17
... published user, operator or installation instructions. 2. Some questions can be warranted for Factory Specified Replacement Parts and repair labor to correct defects in materials or workmanship that vary from the date of product replacement, your retailer about the quality, durability, or need for service in remote locations where an authorized Whirlpool servicer is effective from state to state or province to review the Troubleshooting or Problem...
... published user, operator or installation instructions. 2. Some questions can be warranted for Factory Specified Replacement Parts and repair labor to correct defects in materials or workmanship that vary from the date of product replacement, your retailer about the quality, durability, or need for service in remote locations where an authorized Whirlpool servicer is effective from state to state or province to review the Troubleshooting or Problem...
Quick Reference Manual
Page 1
... detailed door reversing instructions, see the User Instructions. Failure to do so can result in Mexico Door Stop Screw B. Door Stop 2 3 BBaradngde 4 Move the door stop , located on some models. Make sure the washer remains on the bottom of the door, to the opposite sides of the cabinet. All rights reserved. 1 2 Align the Freezer and Refrigerator doors. NOTE: Make sure to move and install refrigerator. IMPORTANT: Unplug refrigerator or disconnect power. When removing the door...
... detailed door reversing instructions, see the User Instructions. Failure to do so can result in Mexico Door Stop Screw B. Door Stop 2 3 BBaradngde 4 Move the door stop , located on some models. Make sure the washer remains on the bottom of the door, to the opposite sides of the cabinet. All rights reserved. 1 2 Align the Freezer and Refrigerator doors. NOTE: Make sure to move and install refrigerator. IMPORTANT: Unplug refrigerator or disconnect power. When removing the door...

Dimension Guide
Page 1
...WRT314TFD 14.3 cu. Water: A cold water supply with product. Because Whirlpool Corporation policy includes a continuous commitment to improve Dimensions are finished, reconnect the refrigerator to the electrical source and reset the control (Thermostat, Refrigerator or Freezer Control depending on the model) to OFF and then disconnect the refrigerator from a minimum of installation, cleaning, or removing a light bulb, turn the control (Thermostat, Refrigerator or Freezer Control depending on the model) to change materials and specifications without notice. Use an outlet that...
...WRT314TFD 14.3 cu. Water: A cold water supply with product. Because Whirlpool Corporation policy includes a continuous commitment to improve Dimensions are finished, reconnect the refrigerator to the electrical source and reset the control (Thermostat, Refrigerator or Freezer Control depending on the model) to OFF and then disconnect the refrigerator from a minimum of installation, cleaning, or removing a light bulb, turn the control (Thermostat, Refrigerator or Freezer Control depending on the model) to change materials and specifications without notice. Use an outlet that...


