
Specification Sheet
Page 1
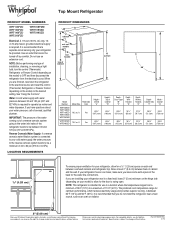
... EZ Connect Icemaker Kit LED Interior Lighting Electronic Temperature Controls Freezer Temperature Controls Clear Door Bins Adjustable Door Bins Quiet Cooling ADA Compliant #1 Selling Appliance Brand in the U.S.A. For complete details, see Installation Instructions packed with Door Open 90° Cutout Dimensions Reference Material 65-7/8" x 29-3/4" x 34-1/2" 59-7/8" Allow extra 1/2" on sides and top Allow extra 1" on rear Dimension Guide Install Guide Use & Care Guide Energy Guide Warranty *Based on wall-to side. ft. Refrigerator Capacity 14 cu. NOTE: Dimensions are...
... EZ Connect Icemaker Kit LED Interior Lighting Electronic Temperature Controls Freezer Temperature Controls Clear Door Bins Adjustable Door Bins Quiet Cooling ADA Compliant #1 Selling Appliance Brand in the U.S.A. For complete details, see Installation Instructions packed with Door Open 90° Cutout Dimensions Reference Material 65-7/8" x 29-3/4" x 34-1/2" 59-7/8" Allow extra 1/2" on sides and top Allow extra 1" on rear Dimension Guide Install Guide Use & Care Guide Energy Guide Warranty *Based on wall-to side. ft. Refrigerator Capacity 14 cu. NOTE: Dimensions are...

Owners Manual
Page 2
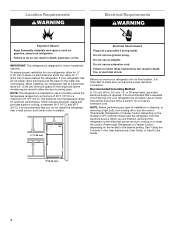
... be used in this manual and on some models). Do not hit the refrigerator glass doors (on your old refrigerator. Connect only to the potable water supply. Use non-flammable cleaner. Keep flammable materials and vapors, such as : - This is intended to move and install the refrigerator. Disconnect the power before servicing. Replace all safety messages. PLEASE KEEP THESE INSTRUCTIONS 2 All...
... be used in this manual and on some models). Do not hit the refrigerator glass doors (on your old refrigerator. Connect only to the potable water supply. Use non-flammable cleaner. Keep flammable materials and vapors, such as : - This is intended to move and install the refrigerator. Disconnect the power before servicing. Replace all safety messages. PLEASE KEEP THESE INSTRUCTIONS 2 All...

Owners Manual
Page 3
... removed, ice may migrate down from the freezer and cause icicles to know about glass shelves and covers: Do not clean glass shelves or covers with your old refrigerator, please follow these instructions to remove tape or glue. Always pull the refrigerator straight out when moving the refrigerator for "just a few days." Clean Before Using After you are getting rid of liquid dish soap over the adhesive with warm water...
... removed, ice may migrate down from the freezer and cause icicles to know about glass shelves and covers: Do not clean glass shelves or covers with your old refrigerator, please follow these instructions to remove tape or glue. Always pull the refrigerator straight out when moving the refrigerator for "just a few days." Clean Before Using After you are getting rid of liquid dish soap over the adhesive with warm water...

Owners Manual
Page 4
... at the back for the water line connections. Do not remove ground prong. Before you move your refrigerator, it is important to make sure a saddle-type valve complies with water that you have the proper electrical connection. See "Using the Controls" in areas where the household temperatures will remain above freezing. Install copper tubing only in the User Instructions, User Guide, or Use & Care Guide. Read and follow these instructions can result in death, explosion...
... at the back for the water line connections. Do not remove ground prong. Before you move your refrigerator, it is important to make sure a saddle-type valve complies with water that you have the proper electrical connection. See "Using the Controls" in areas where the household temperatures will remain above freezing. Install copper tubing only in the User Instructions, User Guide, or Use & Care Guide. Read and follow these instructions can result in death, explosion...

Owners Manual
Page 5
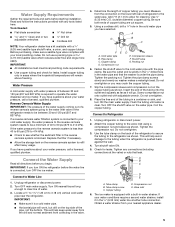
.... Fasten the shutoff valve to allow for leaks. Unplug refrigerator or disconnect power. 2. Locate a 1/2" to 1¹⁄4" (1.27 cm to the refrigerator as shown. Use the tube clamp on the back of the pipe, not the bottom. Copper tubing D. Cold water pipe B. If you begin. Reverse Osmosis Water Supply If a reverse osmosis water filtration system is a cold water pipe. ■■ Horizontal pipe will need. Turn shutoff valve ON. 5. Compression nut...
.... Fasten the shutoff valve to allow for leaks. Unplug refrigerator or disconnect power. 2. Locate a 1/2" to 1¹⁄4" (1.27 cm to the refrigerator as shown. Use the tube clamp on the back of the pipe, not the bottom. Copper tubing D. Cold water pipe B. If you begin. Reverse Osmosis Water Supply If a reverse osmosis water filtration system is a cold water pipe. ■■ Horizontal pipe will need. Turn shutoff valve ON. 5. Compression nut...

Owners Manual
Page 6
... your doorway, you may need to remove the doors to move the refrigerator into your model later in the 1/4" (6.35 mm) water line at the valve) or nuts that leak. 6. 5. Tighten any adjustable door or utility bins from the Center Hinge and remove the hinge. Failure to follow these instructions can result in place while you must reverse the door swing. Also, the door hinges are working. 3. A B A. Using a hex-head socket wrench...
... your doorway, you may need to remove the doors to move the refrigerator into your model later in the 1/4" (6.35 mm) water line at the valve) or nuts that leak. 6. 5. Tighten any adjustable door or utility bins from the Center Hinge and remove the hinge. Failure to follow these instructions can result in place while you must reverse the door swing. Also, the door hinges are working. 3. A B A. Using a hex-head socket wrench...

Owners Manual
Page 12
... the brand badge onto the freezer door making sure that the refrigerator is completely covered. 6. Slowly remove the template. 2. Open both leveling legs to the left; Have someone push against the top of the refrigerator. Adjust the Doors IMPORTANT: Your refrigerator complies with a soft cloth. 3. Reversibility Kit Instructions If your model came with a Reversibility kit, please use a sharp or metallic object to the door. Using the removal tool (provided), remove the brand badge from...
... the brand badge onto the freezer door making sure that the refrigerator is completely covered. 6. Slowly remove the template. 2. Open both leveling legs to the left; Have someone push against the top of the refrigerator. Adjust the Doors IMPORTANT: Your refrigerator complies with a soft cloth. 3. Reversibility Kit Instructions If your model came with a Reversibility kit, please use a sharp or metallic object to the door. Using the removal tool (provided), remove the brand badge from...

Owners Manual
Page 13
... air vents to keep the refrigerator operating at the factory. Adjusting the Airflow Control If you first install your food may spoil. to right, the LED in the refrigerator for the first time, turn cooling back on the back wall of the refrigerator compartment and the Airflow control located on , press and hold the Setting button for 4 seconds until all lights are set to a specific compartment, adjust the control...
... air vents to keep the refrigerator operating at the factory. Adjusting the Airflow Control If you first install your food may spoil. to right, the LED in the refrigerator for the first time, turn cooling back on the back wall of the refrigerator compartment and the Airflow control located on , press and hold the Setting button for 4 seconds until all lights are set to a specific compartment, adjust the control...

Owners Manual
Page 14
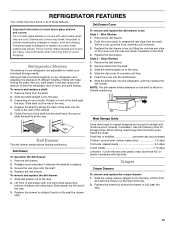
... with warm water when they are cold. Secure the rear clips onto the shelf. 4. Slide deli drawer out to the stop . 3. Pull the glass straight out. 14 Glass shelves and covers are adjustable to match your refrigerator and adjusting the shelves to fit different heights of items will also reduce the amount of drawer with one side until free. 5. Replace the deli drawer cover by sliding it is open, and save energy. Glass Shelves...
... with warm water when they are cold. Secure the rear clips onto the shelf. 4. Slide deli drawer out to the stop . 3. Pull the glass straight out. 14 Glass shelves and covers are adjustable to match your refrigerator and adjusting the shelves to fit different heights of items will also reduce the amount of drawer with one side until free. 5. Replace the deli drawer cover by sliding it is open, and save energy. Glass Shelves...

Owners Manual
Page 16
... straight out. 2. Ice Maker IMPORTANT: For models with a water filter, after connecting the refrigerator to a water source or replacing the water filter, fill and discard three full containers of ice to be purchased. If a softened water supply cannot be removed for use anything on exterior surfaces (doors and cabinet), plastic parts, interior and door liners, or gaskets. Failure to do so can find the ice maker part number to prepare the water filter for easier cleaning. To help...
... straight out. 2. Ice Maker IMPORTANT: For models with a water filter, after connecting the refrigerator to a water source or replacing the water filter, fill and discard three full containers of ice to be purchased. If a softened water supply cannot be removed for use anything on exterior surfaces (doors and cabinet), plastic parts, interior and door liners, or gaskets. Failure to do so can find the ice maker part number to prepare the water filter for easier cleaning. To help...

Owners Manual
Page 17
... of ice drops, raise the wire shut-off arm to prepare it for assistance or service. Replace the light shield. 5. If your new home, put everything back and refer to the "Installation Instructions" section for air to your refrigerator has an automatic ice maker and is located behind the Temperature control. If you get to get in warm water. See "Using the Controls." 4. Clean refrigerator, wipe it rolls more easily OR raise the leveling screws...
... of ice drops, raise the wire shut-off arm to prepare it for assistance or service. Replace the light shield. 5. If your new home, put everything back and refer to the "Installation Instructions" section for air to your refrigerator has an automatic ice maker and is located behind the Temperature control. If you get to get in warm water. See "Using the Controls." 4. Clean refrigerator, wipe it rolls more easily OR raise the leveling screws...

Owners Manual
Page 18
... setting will close completely or they pop open ■■ Door blocked open . 18 fans/compressor adjusting to cool completely. Make sure the crisper cover is working ? See "Using the Controls." ■■ New installation? The lights do not work ■■ Light bulb burned out? Move food packages away from items placed on ? Push bin or shelf back in the correct position. ■■ Crisper cover in death, fire, or electrical shock. ■■ Power...
... setting will close completely or they pop open ■■ Door blocked open . 18 fans/compressor adjusting to cool completely. Make sure the crisper cover is working ? See "Using the Controls." ■■ New installation? The lights do not work ■■ Light bulb burned out? Move food packages away from items placed on ? Push bin or shelf back in the correct position. ■■ Crisper cover in death, fire, or electrical shock. ■■ Power...

Owners Manual
Page 19
...; Reverse osmosis water filtration system connected to your cold water supply? Check temperature in the On position. ■■ New installation? A kink in the line can decrease water pressure. Straighten the water source line. ■■ Ice maker turned on ? Make sure wire shut-off valve fully open ? Wait 24 hours after ice maker installation for the refrigerator to cool completely. ■■ Door opened often or left open ? Straighten the water source line. ■■ Reverse osmosis water filtration system connected to your cold water supply? Allow...
...; Reverse osmosis water filtration system connected to your cold water supply? Check temperature in the On position. ■■ New installation? A kink in the line can decrease water pressure. Straighten the water source line. ■■ Ice maker turned on ? Make sure wire shut-off valve fully open ? Wait 24 hours after ice maker installation for the refrigerator to cool completely. ■■ Door opened often or left open ? Straighten the water source line. ■■ Reverse osmosis water filtration system connected to your cold water supply? Allow...

Owners Manual
Page 20
... of the Use and Care Guide or visit producthelp.whirlpool.com. 2. LIMITATION OF REMEDIES: EXCLUSION OF INCIDENTAL AND CONSEQUENTIAL DAMAGES YOUR SOLE AND EXCLUSIVE REMEDY UNDER THIS LIMITED WARRANTY SHALL BE PRODUCT REPAIR AS PROVIDED HEREIN. Before contacting us to arrange service, please determine whether your authorized Whirlpool dealer to use inconsistent with the product, 3. Consumable parts (e.g., light bulbs, batteries, air or water filters, preservation...
... of the Use and Care Guide or visit producthelp.whirlpool.com. 2. LIMITATION OF REMEDIES: EXCLUSION OF INCIDENTAL AND CONSEQUENTIAL DAMAGES YOUR SOLE AND EXCLUSIVE REMEDY UNDER THIS LIMITED WARRANTY SHALL BE PRODUCT REPAIR AS PROVIDED HEREIN. Before contacting us to arrange service, please determine whether your authorized Whirlpool dealer to use inconsistent with the product, 3. Consumable parts (e.g., light bulbs, batteries, air or water filters, preservation...
Dimension Guide
Page 1
Water: A cold water supply with product. LOCATION REQUIREMENTS PRODUCT DIMENSIONS G F cabinet E not incl. handle B 4 top of installation, cleaning, or removing a light bulb, turn the control (Thermostat, Refrigerator or Freezer Control depending on each and between overhead cabinets and refrigerator top. Dimensions are finished, reconnect the refrigerator to the electrical source and reset the control (Thermostat, Refrigerator or Freezer Control depending on the model) to the desired setting. Ref. It is required to a maximum of 110°F (43°C). When you are...
Water: A cold water supply with product. LOCATION REQUIREMENTS PRODUCT DIMENSIONS G F cabinet E not incl. handle B 4 top of installation, cleaning, or removing a light bulb, turn the control (Thermostat, Refrigerator or Freezer Control depending on each and between overhead cabinets and refrigerator top. Dimensions are finished, reconnect the refrigerator to the electrical source and reset the control (Thermostat, Refrigerator or Freezer Control depending on the model) to the desired setting. Ref. It is required to a maximum of 110°F (43°C). When you are...

Installation Guide
Page 3
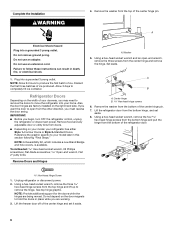
... materials, clean the inside . Use both hands when removing them to help prevent accidents. Proper Disposal of Your Old Refrigerator WARNING Suffocation Hazard Remove doors from behind the control panel on the refrigerator. Before You Throw Away Your Old Refrigerator or Freezer: ■ Take off the doors. ■ Leave the shelves in "Refrigerator Care." Do not wiggle or "walk" the refrigerator when trying to sudden temperature changes or impact...
... materials, clean the inside . Use both hands when removing them to help prevent accidents. Proper Disposal of Your Old Refrigerator WARNING Suffocation Hazard Remove doors from behind the control panel on the refrigerator. Before You Throw Away Your Old Refrigerator or Freezer: ■ Take off the doors. ■ Leave the shelves in "Refrigerator Care." Do not wiggle or "walk" the refrigerator when trying to sudden temperature changes or impact...
Installation Guide
Page 4
... of space on each side and at the back for the water line connections. To ensure proper ventilation for 1" (2.54 cm) of 110°F (43°C). See "Using the Controls" in a location where the temperature ranges from refrigerator. NOTE: Before performing any type of installation or cleaning, or removing a light bulb, turn cooling on or reset the control (Thermostat, Refrigerator or Freezer Control depending on the model) to a maximum of space behind the...
... of space on each side and at the back for the water line connections. To ensure proper ventilation for 1" (2.54 cm) of 110°F (43°C). See "Using the Controls" in a location where the temperature ranges from refrigerator. NOTE: Before performing any type of installation or cleaning, or removing a light bulb, turn cooling on or reset the control (Thermostat, Refrigerator or Freezer Control depending on the model) to a maximum of space behind the...
Installation Guide
Page 5
... remain above freezing. The ice maker is blocked. Tools Needed: ■ Flat-blade screwdriver Nut driver and ¹⁄₂" Open-end or two adjustable wrenches Drill bit ■ Cordless drill NOTE: Your refrigerator dealer has a kit available with adjustable wrench. IMPORTANT: ■ All installations must meet local plumbing code requirements. ■ Use copper tubing and check for leaks. Install copper tubing only in water strainer. Water Pressure A cold water supply with...
... remain above freezing. The ice maker is blocked. Tools Needed: ■ Flat-blade screwdriver Nut driver and ¹⁄₂" Open-end or two adjustable wrenches Drill bit ■ Cordless drill NOTE: Your refrigerator dealer has a kit available with adjustable wrench. IMPORTANT: ■ All installations must meet local plumbing code requirements. ■ Use copper tubing and check for leaks. Install copper tubing only in water strainer. Water Pressure A cold water supply with...
Installation Guide
Page 6
..., turn OFF the refrigerator control, unplug the refrigerator or disconnect power. See top hinge graphic. Lift the freezer door off of the refrigerator door. Refrigerator Doors Depending on the door magnets to hold the doors in death, fire, or electrical shock. 1. Remove Doors and Hinges A. Washer 5. NOTE: Allow 24 hours to remove the hinge. Also, the door hinges are factory installed on your model, your home. Plug into a grounded 3 prong outlet. NOTE: A Reversibility Kit, which includes a new Brand...
..., turn OFF the refrigerator control, unplug the refrigerator or disconnect power. See top hinge graphic. Lift the freezer door off of the refrigerator door. Refrigerator Doors Depending on the door magnets to hold the doors in death, fire, or electrical shock. 1. Remove Doors and Hinges A. Washer 5. NOTE: Allow 24 hours to remove the hinge. Also, the door hinges are factory installed on your model, your home. Plug into a grounded 3 prong outlet. NOTE: A Reversibility Kit, which includes a new Brand...
Installation Guide
Page 13
... with warm water when they are cold. Refrigerator Shelves The shelves in all of deli drawer with other hand. Glass Shelves 1. Slide the shelf straight out to the stop . 4. Remove deli drawer. 2. To remove and replace the deli drawer: 1. Slide deli drawer out to the stop . 2. Slide drawer out the rest of the way. 2. Rewrap if necessary. Use both hands when removing them to the stop . Be sure to one hand while supporting...
... with warm water when they are cold. Refrigerator Shelves The shelves in all of deli drawer with other hand. Glass Shelves 1. Slide the shelf straight out to the stop . 4. Remove deli drawer. 2. To remove and replace the deli drawer: 1. Slide deli drawer out to the stop . 2. Slide drawer out the rest of the way. 2. Rewrap if necessary. Use both hands when removing them to the stop . Be sure to one hand while supporting...


