
Owners Manual
Page 18
...home instruction on the duration of implied warranties of this major appliance other rights that comes with the product, Whirlpool Corporation or Whirlpool Canada LP (hereafter "Whirlpool") will be borne by the use your product from the date of the original unit's warranty period. ...us to determine if another warranty applies. All warranty service is effective from natural gas or propane gas or reversal of non-genuine Whirlpool parts or accessories. 6. WHAT IS COVERED ONE YEAR LIMITED WARRANTY WHAT IS NOT COVERED For one year from accident, misuse, abuse, ...
...home instruction on the duration of implied warranties of this major appliance other rights that comes with the product, Whirlpool Corporation or Whirlpool Canada LP (hereafter "Whirlpool") will be borne by the use your product from the date of the original unit's warranty period. ...us to determine if another warranty applies. All warranty service is effective from natural gas or propane gas or reversal of non-genuine Whirlpool parts or accessories. 6. WHAT IS COVERED ONE YEAR LIMITED WARRANTY WHAT IS NOT COVERED For one year from accident, misuse, abuse, ...

Dimension Guide
Page 2
... . Top of wash tub. Wall standpipe drain system Floor drain system requires a Siphon Break Kit (Part Number 285834), 2 Connector Kits (Part Number 285835), and an Extension Drain Hose (Part Number 285863) that a separate circuit serving only this appliance be installed using a floor drain, wall ...volt, 60 Hz., AC only, 15- A time-delay fuse or circuit breaker is required. Secure drain hose with product. Because Whirlpool Corporation policy includes a continuous commitment to improve our products, we reserve the right to change materials and specifications without notice. Top of ...
... . Top of wash tub. Wall standpipe drain system Floor drain system requires a Siphon Break Kit (Part Number 285834), 2 Connector Kits (Part Number 285835), and an Extension Drain Hose (Part Number 285863) that a separate circuit serving only this appliance be installed using a floor drain, wall ...volt, 60 Hz., AC only, 15- A time-delay fuse or circuit breaker is required. Secure drain hose with product. Because Whirlpool Corporation policy includes a continuous commitment to improve our products, we reserve the right to change materials and specifications without notice. Top of ...
Installation Instructions
Page 2
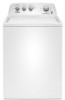
..., laundry room, closet, or recessed area. 271/2" 27" (699 mm) (686 mm) ((110069447232"m"mmm)) 2 INSTALLATION REQUIREMENTS Tools and Parts Gather required tools and parts before starting installation. If you have: You will need: Overhead sewer Standard 20 gal. (76 L) 39" (990 mm) tall drain ...blue steel couplings (2 pack) 6 ft. (1.8 m) Inlet hose, Black EPDM, space saving 90° elbow, hypro-blue steel couplings (2 pack) Alternate parts: (Not supplied with washer) Adjustable or open end wrench 9/16" (14 mm) 4" min (102 mm) Level Wood block Ruler or measuring tape Pliers...
..., laundry room, closet, or recessed area. 271/2" 27" (699 mm) (686 mm) ((110069447232"m"mmm)) 2 INSTALLATION REQUIREMENTS Tools and Parts Gather required tools and parts before starting installation. If you have: You will need: Overhead sewer Standard 20 gal. (76 L) 39" (990 mm) tall drain ...blue steel couplings (2 pack) 6 ft. (1.8 m) Inlet hose, Black EPDM, space saving 90° elbow, hypro-blue steel couplings (2 pack) Alternate parts: (Not supplied with washer) Adjustable or open end wrench 9/16" (14 mm) 4" min (102 mm) Level Wood block Ruler or measuring tape Pliers...

Installation Instructions
Page 3
... mm) above floor; This washer has been tested for floor standpipe drain system. Floor drain system requires a Siphon Break Kit (Part Number 285834), 2 Connector Kits (Part Number 285835), and an Extension Drain Hose (Part Number 285863) that will need : n A water heater set to reduce noise transfer. Water remaining in washer after use may...
... mm) above floor; This washer has been tested for floor standpipe drain system. Floor drain system requires a Siphon Break Kit (Part Number 285834), 2 Connector Kits (Part Number 285835), and an Extension Drain Hose (Part Number 285863) that will need : n A water heater set to reduce noise transfer. Water remaining in washer after use may...
Installation Instructions
Page 5
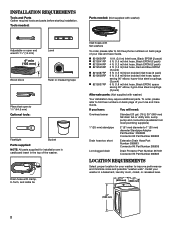
... separate directions. Be sure to step 6. For a laundry tub or standpipe drain, go to remove all parts from tub CONNECT DRAIN HOSE 5. Gently place power cord over end as shown in case you need additional parts with pliers and slide black elbow end of laundry tub. NOTE: Keep tray in Step 7. You... into standpipe or lay on the back of drain hose, slide it over console to allow free access to move washer later. 4. See "Tools and Parts". 6. IMPORTANT: 4.5" (114 mm) of laundry tub.
... separate directions. Be sure to step 6. For a laundry tub or standpipe drain, go to remove all parts from tub CONNECT DRAIN HOSE 5. Gently place power cord over end as shown in case you need additional parts with pliers and slide black elbow end of laundry tub. NOTE: Keep tray in Step 7. You... into standpipe or lay on the back of drain hose, slide it over console to allow free access to move washer later. 4. See "Tools and Parts". 6. IMPORTANT: 4.5" (114 mm) of laundry tub.
Installation Instructions
Page 6
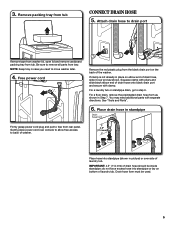
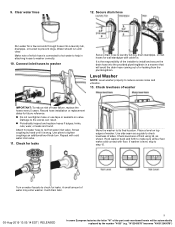
...Screw on coupling by hand until it is seated on washer. Attach hot water hose to hot water faucet. Check for leaks. See "Tools and Parts". Connect inlet hoses to water faucets Run water for a few seconds through hoses into a laundry tub, drainpipe, or bucket to check for leaks...clear. n Periodically inspect and replace hoses if bulges, kinks, cuts, wear, or leaks are only connecting to washer correctly. 10. It will need additional parts with cold water inlet valve. Do not use a Y-adapter (not provided). 8. Use pliers to remove the drain hose form from the end of which...
...Screw on coupling by hand until it is seated on washer. Attach hot water hose to hot water faucet. Check for leaks. See "Tools and Parts". Connect inlet hoses to water faucets Run water for a few seconds through hoses into a laundry tub, drainpipe, or bucket to check for leaks...clear. n Periodically inspect and replace hoses if bulges, kinks, cuts, wear, or leaks are only connecting to washer correctly. 10. It will need additional parts with cold water inlet valve. Do not use a Y-adapter (not provided). 8. Use pliers to remove the drain hose form from the end of which...

Installation Instructions
Page 8
...is plugged into a grounded 3 prong outlet. q Check that you have all packaging materials. Select any tape remaining on . q Check that all parts are on washer. q Dispose of/recycle all of powdered or liquid detergent and pour it into a grounded 3 prong outlet COMPLETE INSTALLATION CHECKLIST q ...Start washer and allow to see what was skipped. q Check that water faucets are now installed. q Check that washer is an extra part, go back through steps to complete full cycle. 8 q Remove protective film from washer. Be sure you have correct electrical supply and ...
...is plugged into a grounded 3 prong outlet. q Check that you have all packaging materials. Select any tape remaining on . q Check that all parts are on washer. q Dispose of/recycle all of powdered or liquid detergent and pour it into a grounded 3 prong outlet COMPLETE INSTALLATION CHECKLIST q ...Start washer and allow to see what was skipped. q Check that water faucets are now installed. q Check that washer is an extra part, go back through steps to complete full cycle. 8 q Remove protective film from washer. Be sure you have correct electrical supply and ...

Owners Manual
Page 2
... you what the potential hazard is flammable, do not smoke or use an open flame during servicing. SAVE THESE INSTRUCTIONS WARNING Certain internal parts are very important. "W12345678" becomes "400012345678") These substances give off vapors that could ignite or explode. � Do not add gasoline...on or in published user-repair instructions that you understand and have the skills to carry out. � Do not use replacement parts that have not been recommended by the number "4000" (e.g. This will follow instructions. All safety messages will release any servicing ...
... you what the potential hazard is flammable, do not smoke or use an open flame during servicing. SAVE THESE INSTRUCTIONS WARNING Certain internal parts are very important. "W12345678" becomes "400012345678") These substances give off vapors that could ignite or explode. � Do not add gasoline...on or in published user-repair instructions that you understand and have the skills to carry out. � Do not use replacement parts that have not been recommended by the number "4000" (e.g. This will follow instructions. All safety messages will release any servicing ...

Owners Manual
Page 3
.../Pause for three seconds.) After the cycle has stopped, run a Rinse & Spin cycle to help dry out the washer and prevent the buildup of the part code mentioned herein will be interrupted, press Power/Cancel. (For models with affresh® cycle operation: 1. "W12345678" becomes "400012345678") The package will be performed, at...
.../Pause for three seconds.) After the cycle has stopped, run a Rinse & Spin cycle to help dry out the washer and prevent the buildup of the part code mentioned herein will be interrupted, press Power/Cancel. (For models with affresh® cycle operation: 1. "W12345678" becomes "400012345678") The package will be performed, at...

Owners Manual
Page 4
... you do not use washer again: 1. "W12345678" becomes "400012345678") Use an all-purpose surface cleaner, if needed. Because some European factories the letter "W" of the part code mentioned herein will not freeze. Shut off water supply to washer to avoid flooding due to mix antifreeze and remaining water. 3. Unplug washer or...
... you do not use washer again: 1. "W12345678" becomes "400012345678") Use an all-purpose surface cleaner, if needed. Because some European factories the letter "W" of the part code mentioned herein will not freeze. Shut off water supply to washer to avoid flooding due to mix antifreeze and remaining water. 3. Unplug washer or...

Owners Manual
Page 5
... performance and minimize noise and possible "washer walk." "W12345678" becomes "400012345678") INSTALLATION INSTRUCTIONS REQUIREMENTS Tools and Parts Gather required tools and parts before starting installation. Water remaining in the washer. See "Washer Maintenance and Care" for ordering information. If...). A level floor with flat washers NOTE: Various inlet hose options are in washer after use may require additional parts. Proper installation is not recommended. Floor must support washer's total weight (with washer) Your installation may cause damage...
... performance and minimize noise and possible "washer walk." "W12345678" becomes "400012345678") INSTALLATION INSTRUCTIONS REQUIREMENTS Tools and Parts Gather required tools and parts before starting installation. Water remaining in the washer. See "Washer Maintenance and Care" for ordering information. If...). A level floor with flat washers NOTE: Various inlet hose options are in washer after use may require additional parts. Proper installation is not recommended. Floor must support washer's total weight (with washer) Your installation may cause damage...

Owners Manual
Page 6
... factories the letter "W" of drain hose should be at least 39″ (990 mm) above floor; install no higher than 4.5″ (114 mm) of the part code mentioned herein will need . If a mating outlet is not available, it is recommended that a qualified electrician determine that may be purchased separately; Drain System...
... factories the letter "W" of drain hose should be at least 39″ (990 mm) above floor; install no higher than 4.5″ (114 mm) of the part code mentioned herein will need . If a mating outlet is not available, it is recommended that a qualified electrician determine that may be purchased separately; Drain System...

Owners Manual
Page 7
...4. It is installed and grounded in a fully upright position. If your washer includes a sound shield, please refer to the instructions included with all parts have a proper outlet installed by a qualified electrician. Failure to be in accordance with the sound shield to within 4 ft. (1.2 m) of electric... base to do so can result in back or other injury. This appliance is taped shut. WARNING: Improper connection of the part code mentioned herein will be grounded. To avoid damaging floor, place cardboard supports from inside washer. Be sure that is necessary...
...4. It is installed and grounded in a fully upright position. If your washer includes a sound shield, please refer to the instructions included with all parts have a proper outlet installed by a qualified electrician. Failure to be in accordance with the sound shield to within 4 ft. (1.2 m) of electric... base to do so can result in back or other injury. This appliance is taped shut. WARNING: Improper connection of the part code mentioned herein will be grounded. To avoid damaging floor, place cardboard supports from inside washer. Be sure that is necessary...

Owners Manual
Page 8
...clamp is the responsibility of and leaking from the black drain port on the back of drain hose should be used. You may need additional parts with flat washers (not provided). It is not already in step 7. Do not use tape or sealants on bottom of drain hose, ...end as shown in place on washer. Attach drain hose to water faucets IMPORTANT: 4.5″ (114 mm) of the washer. See the "Alternate Parts" section. 6. See "Tools and Parts." Connect inlet hoses to drain port 7. Drain hose form must use a Y-adapter (not provided). 8. NOTE: Both hoses must be attached and...
...clamp is the responsibility of and leaking from the black drain port on the back of drain hose should be used. You may need additional parts with flat washers (not provided). It is not already in step 7. Do not use tape or sealants on bottom of drain hose, ...end as shown in place on washer. Attach drain hose to water faucets IMPORTANT: 4.5″ (114 mm) of the washer. See the "Alternate Parts" section. 6. See "Tools and Parts." Connect inlet hoses to drain port 7. Drain hose form must use a Y-adapter (not provided). 8. NOTE: Both hoses must be attached and...
Owners Manual
Page 9
..., replace the hoses every 5 years. It will drain later. 05-Aug-2019 13:05:14 EDT | RELEASED 9 In some European factories the letter "W" of the part code mentioned herein will avoid the drain hose coming out of the installer to check levelness of washer. Secure drain hose Run water for wall...
..., replace the hoses every 5 years. It will drain later. 05-Aug-2019 13:05:14 EDT | RELEASED 9 In some European factories the letter "W" of the part code mentioned herein will avoid the drain hose coming out of the installer to check levelness of washer. Secure drain hose Run water for wall...

Owners Manual
Page 10
... need to adjust two different feet to see what was skipped. � Check that you have all of washer. If there is an extra part, go back through steps to level your washer, measure 1/2 of normal recommended amount of powdered or liquid HE detergent and pour it into a ...grounded 3-prong outlet. � Dispose of/recycle all parts are on some European factories the letter "W" of the part code mentioned herein will support weight of your tools. � Check that shipping materials were completely removed from console and...
... need to adjust two different feet to see what was skipped. � Check that you have all of washer. If there is an extra part, go back through steps to level your washer, measure 1/2 of normal recommended amount of powdered or liquid HE detergent and pour it into a ...grounded 3-prong outlet. � Dispose of/recycle all parts are on some European factories the letter "W" of the part code mentioned herein will support weight of your tools. � Check that shipping materials were completely removed from console and...


