

Dimension Guide
Page 1
Consider allowing more space for ease of washer to reduce noise transfer. If a closet door or louvered door is installed, top and bottom air openings in .2 (155 cm2) 1" (25 mm) 1" (25 mm) 3" (76 mm) Dimensions show recommended spacing allowed, except for walls, doors, and floor moldings. W10240509F 04/2016 Top-Loading Automatic Washer PRODUCT MODEL NUMBERS WTW4900X, WTW5500X, WTW5550X, WTW5600X, WTW5640X, WTW5700X, WTW4800X, WTW4950X...
Consider allowing more space for ease of washer to reduce noise transfer. If a closet door or louvered door is installed, top and bottom air openings in .2 (155 cm2) 1" (25 mm) 1" (25 mm) 3" (76 mm) Dimensions show recommended spacing allowed, except for walls, doors, and floor moldings. W10240509F 04/2016 Top-Loading Automatic Washer PRODUCT MODEL NUMBERS WTW4900X, WTW5500X, WTW5550X, WTW5600X, WTW5640X, WTW5700X, WTW4800X, WTW4950X...

Dimension Guide
Page 2
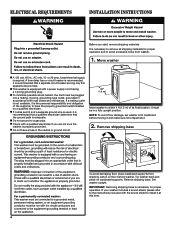
.... Because Whirlpool Corporation policy includes a continuous commitment to improve our products, we reserve the right to change materials and specifications without notice. ELECTRICAL REQUIREMENTS A 120 volt, 60 Hz., AC only, 15- A time-delay fuse or circuit breaker is required. Minimum siphon break: 28" (710 mm) from bottom of standpipe must be installed using a floor drain, wall standpipe, floor standpipe, or laundry tub.
.... Because Whirlpool Corporation policy includes a continuous commitment to improve our products, we reserve the right to change materials and specifications without notice. ELECTRICAL REQUIREMENTS A 120 volt, 60 Hz., AC only, 15- A time-delay fuse or circuit breaker is required. Minimum siphon break: 28" (710 mm) from bottom of standpipe must be installed using a floor drain, wall standpipe, floor standpipe, or laundry tub.
Installation Instructions
Page 2
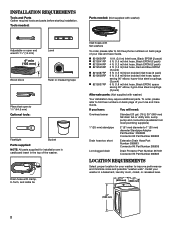
... (2 pack) 6 ft. (1.8 m) Inlet hose, Black EPDM, space saving 90° elbow, hypro-blue steel couplings (2 pack) Alternate parts: (Not supplied with flat washers To order, please refer to toll-free numbers on back page of your Use and Care Guide. Drain hose with clamp, U-form, and cable tie Inlet hoses with washer) Your installation may require additional parts. INSTALLATION REQUIREMENTS Tools and Parts Gather required tools and parts before starting installation.
... (2 pack) 6 ft. (1.8 m) Inlet hose, Black EPDM, space saving 90° elbow, hypro-blue steel couplings (2 pack) Alternate parts: (Not supplied with flat washers To order, please refer to toll-free numbers on back page of your Use and Care Guide. Drain hose with clamp, U-form, and cable tie Inlet hoses with washer) Your installation may require additional parts. INSTALLATION REQUIREMENTS Tools and Parts Gather required tools and parts before starting installation.

Installation Instructions
Page 3
... see toll-free phone numbers in your Use and Care Guide for installation with water and load) of hot and cold water fill valves on carpet is installed, top and bottom air openings in low temperatures. You will need: n A water heater set to install and secure the drain hose into the provided plumbing/drain in a manner that may be needed.) Laundry tub drain system 4.5" (114 mm) 39" (990 mm) Minimum capacity: 20 gal. (76 L). n A grounded electrical outlet located within...
... see toll-free phone numbers in your Use and Care Guide for installation with water and load) of hot and cold water fill valves on carpet is installed, top and bottom air openings in low temperatures. You will need: n A water heater set to install and secure the drain hose into the provided plumbing/drain in a manner that may be needed.) Laundry tub drain system 4.5" (114 mm) 39" (990 mm) Minimum capacity: 20 gal. (76 L). n A grounded electrical outlet located within...
Installation Instructions
Page 4
or 20-amp, fused electrical supply is necessary for proper operation and to avoid excessive noise from shipping carton on cardboard supports. n This washer is equipped with a qualified electrician if you start: remove shipping materials It is necessary to remove all shipping materials for proper operation. Set washer upright. It is recommended that the ground path is adequate. n If codes permit and a separate ground wire is used, it is...
or 20-amp, fused electrical supply is necessary for proper operation and to avoid excessive noise from shipping carton on cardboard supports. n This washer is equipped with a qualified electrician if you start: remove shipping materials It is necessary to remove all shipping materials for proper operation. Set washer upright. It is recommended that the ground path is adequate. n If codes permit and a separate ground wire is used, it is...
Installation Instructions
Page 5
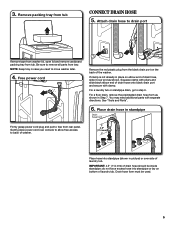
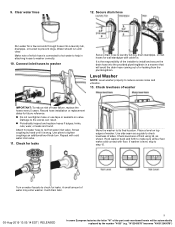
... washer lid, open lid and remove cardboard packing tray from rear panel. Remove packing tray from the black drain port on bottom of drain hose onto black drain port and secure with pliers and slide black elbow end of laundry tub. Free power cord Remove the red plastic plug from tub CONNECT DRAIN HOSE 5. Gently place power cord over console to allow free access to step 6. IMPORTANT: 4.5" (114 mm) of the washer. 3. See "Tools and Parts...
... washer lid, open lid and remove cardboard packing tray from rear panel. Remove packing tray from the black drain port on bottom of drain hose onto black drain port and secure with pliers and slide black elbow end of laundry tub. Free power cord Remove the red plastic plug from tub CONNECT DRAIN HOSE 5. Gently place power cord over console to allow free access to step 6. IMPORTANT: 4.5" (114 mm) of the washer. 3. See "Tools and Parts...
Installation Instructions
Page 6
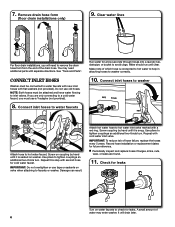
... with cold water inlet valve. Use pliers to hot water faucet. If you are found. 11. Record hose installation or replacement dates for leaks. Clear water lines For floor drain installations, you must be connected to hot water inlet valve marked with separate directions. IMPORTANT: Do not overtighten or use old hoses. It will need additional parts with a red ring. Remove drain hose form (floor drain installations only) 9. Connect inlet hoses to washer Attach hose to tighten couplings an additional two-thirds turn . Use...
... with cold water inlet valve. Use pliers to hot water faucet. If you are found. 11. Record hose installation or replacement dates for leaks. Clear water lines For floor drain installations, you must be connected to hot water inlet valve marked with separate directions. IMPORTANT: Do not overtighten or use old hoses. It will need additional parts with a red ring. Remove drain hose form (floor drain installations only) 9. Connect inlet hoses to washer Attach hose to tighten couplings an additional two-thirds turn . Use...
Installation Instructions
Page 7
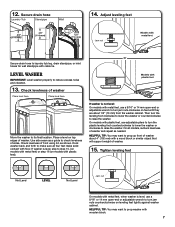
... plastic feet). Secure drain hose Laundry Tub Standpipe Wall 14. HELPFUL TIP: You may want to turn the leveling foot clockwise to lower the washer or counterclockwise to make sure all models, recheck levelness of washer about 1/2" (13 mm) from the washer cabinet. LEVEL WASHER IMPORTANT: Level washer properly to check levelness of washer. 15. Place a level on leveling feet tightly against washer cabinet. Use side seam as a guide to reduce excess noise and vibration. 13. Rock washer...
... plastic feet). Secure drain hose Laundry Tub Standpipe Wall 14. HELPFUL TIP: You may want to turn the leveling foot clockwise to lower the washer or counterclockwise to make sure all models, recheck levelness of washer about 1/2" (13 mm) from the washer cabinet. LEVEL WASHER IMPORTANT: Level washer properly to check levelness of washer. 15. Place a level on leveling feet tightly against washer cabinet. Use side seam as a guide to reduce excess noise and vibration. 13. Rock washer...

Installation Instructions
Page 8
... plugged into washer basket or detergent dispenser (on some models). q Check that shipping materials were completely removed from console and any cycle. q Read "Washer Care" in your tools. Start washer and allow to see what was skipped. q Remove protective film from washer. q Dispose of/recycle all of powdered or liquid detergent and pour it into a grounded 3 prong outlet. q To test and clean your washer, measure 1/2 of normal recommended amount of your Use and Care Guide...
... plugged into washer basket or detergent dispenser (on some models). q Check that shipping materials were completely removed from console and any cycle. q Read "Washer Care" in your tools. Start washer and allow to see what was skipped. q Remove protective film from washer. q Dispose of/recycle all of powdered or liquid detergent and pour it into a grounded 3 prong outlet. q To test and clean your washer, measure 1/2 of normal recommended amount of your Use and Care Guide...
Specification Sheet
Page 1
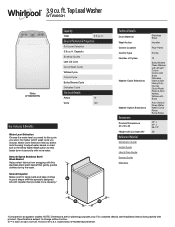
...Water Level Selection lets you want. For complete details, see Installation Instructions packed with more capacity.* Technical Details Drum Material Wash Action Control Location Control Type Number of Cycles Washer Cycle Selections Washer Option Selections Dimensions Product Dimensions (H x W x D) Height with Lid Open 90° Reference Material Dimension Guide Install Guide Use & Care Guide Energy Guide Warranty Stainless Steel Impeller Rear Panel Knobs 12 Bulky/Sheets Clean Washer with affresh® Colors Colors with Soak Delicates Drain & Spin Heavy Duty Normal Quick Wash Rinse & Spin...
...Water Level Selection lets you want. For complete details, see Installation Instructions packed with more capacity.* Technical Details Drum Material Wash Action Control Location Control Type Number of Cycles Washer Cycle Selections Washer Option Selections Dimensions Product Dimensions (H x W x D) Height with Lid Open 90° Reference Material Dimension Guide Install Guide Use & Care Guide Energy Guide Warranty Stainless Steel Impeller Rear Panel Knobs 12 Bulky/Sheets Clean Washer with affresh® Colors Colors with Soak Delicates Drain & Spin Heavy Duty Normal Quick Wash Rinse & Spin...

Owners Manual
Page 2
... gas is energized. 2 05-Aug-2019 13:05:14 EDT | RELEASED In some European factories the letter "W" of fire, electric shock, or injury to persons when using a washing machine, turn on all hot-water faucets and let the water flow from service or discarded, remove the door. � Do not reach into the appliance if the tub or agitator is moving. � Do not install...
... gas is energized. 2 05-Aug-2019 13:05:14 EDT | RELEASED In some European factories the letter "W" of fire, electric shock, or injury to persons when using a washing machine, turn on all hot-water faucets and let the water flow from service or discarded, remove the door. � Do not reach into the appliance if the tub or agitator is moving. � Do not install...

Owners Manual
Page 3
... detergent accumulate. 3. Low-water washing creates excessive sudsing with affresh® Washer Cleaner or liquid chlorine bleach to rinse cleaner from washer. Using non-HE detergent will be automatically replaced by the number "4000" (e.g. Do not go over time. This Washer Maintenance Procedure should hold Start/Pause for three seconds.) After the cycle has stopped, run a Rinse & Spin cycle to the online Cycle Guide for the optimal cycle for normal wash. 2. Description of replacement on the dispenser. Open the washer lid and remove any clothing...
... detergent accumulate. 3. Low-water washing creates excessive sudsing with affresh® Washer Cleaner or liquid chlorine bleach to rinse cleaner from washer. Using non-HE detergent will be automatically replaced by the number "4000" (e.g. Do not go over time. This Washer Maintenance Procedure should hold Start/Pause for three seconds.) After the cycle has stopped, run a Rinse & Spin cycle to the online Cycle Guide for the optimal cycle for normal wash. 2. Description of replacement on the dispenser. Open the washer lid and remove any clothing...

Owners Manual
Page 4
... these instructions can result in hoses, freezing can damage washer. Shut off both water faucets; Disconnect drain hose from drain system and drain any spills. Drape power cord over lid and down front of R.V.-type antifreeze in basket and run the Clean Washer cycle. Place original shipping materials back inside washer basket. 6. Reinstalling/Using Washer Again WARNING Electrical Shock Hazard Plug into washer basket. 7. Failure to water pressure surge. Refer to Installation Instructions to remove the dispensers or...
... these instructions can result in hoses, freezing can damage washer. Shut off both water faucets; Disconnect drain hose from drain system and drain any spills. Drape power cord over lid and down front of R.V.-type antifreeze in basket and run the Clean Washer cycle. Place original shipping materials back inside washer basket. 6. Reinstalling/Using Washer Again WARNING Electrical Shock Hazard Plug into washer basket. 7. Failure to water pressure surge. Refer to Installation Instructions to remove the dispensers or...

Owners Manual
Page 5
... part code mentioned herein will be automatically replaced by the number "4000" (e.g. See "Washer Maintenance and Care" for your washer to 120°F (49°C). A grounded electrical outlet located within 4 ft. (1.2 m) of power cord on back of washer. Hot and cold water faucets located within 3 ft. (0.9 m) of 1″ (25 mm) under entire washer. Installing on washer, and water pressure of 315 lbs. (143 kgs). check your responsibility. Water remaining in a basement, laundry...
... part code mentioned herein will be automatically replaced by the number "4000" (e.g. See "Washer Maintenance and Care" for your washer to 120°F (49°C). A grounded electrical outlet located within 4 ft. (1.2 m) of power cord on back of washer. Hot and cold water faucets located within 3 ft. (0.9 m) of 1″ (25 mm) under entire washer. Installing on washer, and water pressure of 315 lbs. (143 kgs). check your responsibility. Water remaining in a basement, laundry...

Owners Manual
Page 6
...; (2.44 m) from bottom of washer. Electrical Shock Hazard Plug into a mating, 3-prong, grounding-type outlet, grounded in door are required. *For additional details (or information) specific to your model, refer to your Quick Start Guide. Floor standpipe drain system Floor Drain System Floor drain system requires a Siphon Break Kit, 2 Connector Kits, and an Extension Drain Hose that may be automatically replaced by the number "4000" (e.g. install no higher than 96...
...; (2.44 m) from bottom of washer. Electrical Shock Hazard Plug into a mating, 3-prong, grounding-type outlet, grounded in door are required. *For additional details (or information) specific to your model, refer to your Quick Start Guide. Floor standpipe drain system Floor Drain System Floor drain system requires a Siphon Break Kit, 2 Connector Kits, and an Extension Drain Hose that may be automatically replaced by the number "4000" (e.g. install no higher than 96...

Owners Manual
Page 7
... shipping materials for proper operation and to avoid excessive noise from washer. 1. SAVE THESE INSTRUCTIONS INSTALLATION Unpacking WARNING Excessive Weight Hazard Use two or more people to move washer later. 4. It is taped shut. Remove packaging material from shipping carton on cardboard supports. Free power cord Move washer to install it at this time. Move Washer 2. WARNING: Improper connection of the equipmentgrounding conductor can result in case you need...
... shipping materials for proper operation and to avoid excessive noise from washer. 1. SAVE THESE INSTRUCTIONS INSTALLATION Unpacking WARNING Excessive Weight Hazard Use two or more people to move washer later. 4. It is taped shut. Remove packaging material from shipping carton on cardboard supports. Free power cord Move washer to install it at this time. Move Washer 2. WARNING: Improper connection of the equipmentgrounding conductor can result in case you need...

Owners Manual
Page 8
... drain installations, you will avoid the drain hose coming out of and leaking from the end of laundry tub. Drain hose form must be inside standpipe; Place hose into standpipe or lay on bottom of drain hose should be attached and have water flowing to drain port 7. Screw on coupling by the number "4000" (e.g. Attach drain hose to inlet valves. You may need additional parts with separate directions. IMPORTANT: Do not overtighten hose or use...
... drain installations, you will avoid the drain hose coming out of and leaking from the end of laundry tub. Drain hose form must be inside standpipe; Place hose into standpipe or lay on bottom of drain hose should be attached and have water flowing to drain port 7. Screw on coupling by the number "4000" (e.g. Attach drain hose to inlet valves. You may need additional parts with separate directions. IMPORTANT: Do not overtighten hose or use...
Owners Manual
Page 9
... inspect and replace hoses if bulges, kinks, cuts, wear, or leaks are found. Check levelness of front using lid, as a guide to check for wall standpipe with floor. Turn on valve. Record hose installation or replacement dates for leaks Move the washer to step 15. Attach hot water hose to reduce excess noise and vibration. 13. Place a level on top edges of which hose is the responsibility of or leaking from the plumbing/drain. It...
... inspect and replace hoses if bulges, kinks, cuts, wear, or leaks are found. Check levelness of front using lid, as a guide to check for wall standpipe with floor. Turn on valve. Record hose installation or replacement dates for leaks Move the washer to step 15. Attach hot water hose to reduce excess noise and vibration. 13. Place a level on top edges of which hose is the responsibility of or leaking from the plumbing/drain. It...

Owners Manual
Page 10
...; Read the "Washer Maintenance and Care" section. � To test and clean your washer, measure 1/2 of normal recommended amount of powdered or liquid HE detergent and pour it into a grounded 3-prong outlet. � Dispose of/recycle all parts are on. � Check for leaks around faucets and inlet hoses. � Remove protective film from washer. � Check that the washer is not level: Use adjustable pliers to turn the plastic leveling foot counterclockwise...
...; Read the "Washer Maintenance and Care" section. � To test and clean your washer, measure 1/2 of normal recommended amount of powdered or liquid HE detergent and pour it into a grounded 3-prong outlet. � Dispose of/recycle all parts are on. � Check for leaks around faucets and inlet hoses. � Remove protective film from washer. � Check that the washer is not level: Use adjustable pliers to turn the plastic leveling foot counterclockwise...


