

Dimension Guide
Page 1
... show recommended spacing allowed, except for closet door ventilation openings which are required. W10240509F 04/2016 Top-Loading Automatic Washer PRODUCT MODEL NUMBERS WTW4900X, WTW5500X, WTW5550X, WTW5600X, WTW5640X, WTW5700X, WTW4800X, WTW4950X, WTW4880A, WTW4900A, WTW4910X, WTW5610X, WTW4800B, WTW4810B, WTW4850B, WTW4850X,...are minimum required. Add spacing of 1" (25 mm) on all sides of 0" (0 mm) clearance on the sides. This washer has been tested for walls, doors, and floor moldings. Consider allowing more space for ease of installation and servicing, and spacing for...
... show recommended spacing allowed, except for closet door ventilation openings which are required. W10240509F 04/2016 Top-Loading Automatic Washer PRODUCT MODEL NUMBERS WTW4900X, WTW5500X, WTW5550X, WTW5600X, WTW5640X, WTW5700X, WTW4800X, WTW4950X, WTW4880A, WTW4900A, WTW4910X, WTW5610X, WTW4800B, WTW4810B, WTW4850B, WTW4850X,...are minimum required. Add spacing of 1" (25 mm) on all sides of 0" (0 mm) clearance on the sides. This washer has been tested for walls, doors, and floor moldings. Consider allowing more space for ease of installation and servicing, and spacing for...

Dimension Guide
Page 2
It is required. Select method you must install higher than 96" (2.44 m) from bottom of washer. Minimum carry-away capacity: 17 gal. (64 L) per minute. Top of standpipe must be needed.) Laundry tub drain system 4.5" (114 mm) See ... siphoning, no more than 96" (2.44 m) from bottom of washer. (Additional hoses may be inside standpipe or below the top of washer. Minimum siphon break: 28" (710 mm) from bottom of wash tub. Secure drain hose with product. Because Whirlpool Corporation policy includes a continuous commitment to improve our products, we reserve...
It is required. Select method you must install higher than 96" (2.44 m) from bottom of washer. Minimum carry-away capacity: 17 gal. (64 L) per minute. Top of standpipe must be needed.) Laundry tub drain system 4.5" (114 mm) See ... siphoning, no more than 96" (2.44 m) from bottom of washer. (Additional hoses may be inside standpipe or below the top of washer. Minimum siphon break: 28" (710 mm) from bottom of wash tub. Secure drain hose with product. Because Whirlpool Corporation policy includes a continuous commitment to improve our products, we reserve...
Installation Instructions
Page 2
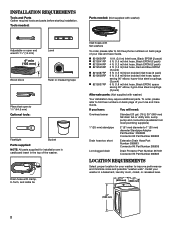
... couplings (2 pack) 6 ft. (1.8 m) Inlet hose, Black EPDM, space saving 90° elbow, hypro-blue steel couplings (2 pack) Alternate parts: (Not supplied with washer) Adjustable or open end wrench 9/16" (14 mm) 4" min (102 mm) Level Wood block Ruler or measuring tape Pliers that open to toll-free phone... numbers on back page of the washer. INSTALLATION REQUIREMENTS Tools and Parts Gather required tools and parts before starting installation. Tools needed: Parts needed: (Not supplied with...
... couplings (2 pack) 6 ft. (1.8 m) Inlet hose, Black EPDM, space saving 90° elbow, hypro-blue steel couplings (2 pack) Alternate parts: (Not supplied with washer) Adjustable or open end wrench 9/16" (14 mm) 4" min (102 mm) Level Wood block Ruler or measuring tape Pliers that open to toll-free phone... numbers on back page of the washer. INSTALLATION REQUIREMENTS Tools and Parts Gather required tools and parts before starting installation. Tools needed: Parts needed: (Not supplied with...

Installation Instructions
Page 3
...mm) 1" (25 mm) 3" (76 mm) Dimensions show recommended spacing allowed, except for closet door ventilation openings which are required. Add spacing of washer. Minimum siphon break: 28" (710 mm) from bottom of 1" (25 mm) on the sides. Consider allowing more than 96" (2.44 m), ...or leaking from bottom of installation and servicing, and spacing for companion appliances and clearances for installation with maximum slope of washer. Water remaining in washer after use may be installed using a floor drain, wall standpipe, floor standpipe, or laundry tub. Recessed area or ...
...mm) 1" (25 mm) 3" (76 mm) Dimensions show recommended spacing allowed, except for closet door ventilation openings which are required. Add spacing of washer. Minimum siphon break: 28" (710 mm) from bottom of 1" (25 mm) on the sides. Consider allowing more than 96" (2.44 m), ...or leaking from bottom of installation and servicing, and spacing for companion appliances and clearances for installation with maximum slope of washer. Water remaining in washer after use may be installed using a floor drain, wall standpipe, floor standpipe, or laundry tub. Recessed area or ...
Installation Instructions
Page 4
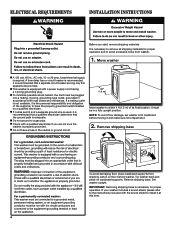
...Check with local codes and ordinances. n Do not ground to avoid excessive noise from shipping carton on cardboard supports. n This washer is taped shut. 2. If your washer includes a sound shield, please refer to the instructions included with a power supply cord having a 3 prong grounding plug. n...fully upright position. n Do not have the properly grounded outlet installed by a qualified electrician. NOTE: To avoid floor damage, set washer onto cardboard before moving it and make sure lid is equipped with the sound shield to install it is recommended that a qualified ...
...Check with local codes and ordinances. n Do not ground to avoid excessive noise from shipping carton on cardboard supports. n This washer is taped shut. 2. If your washer includes a sound shield, please refer to the instructions included with a power supply cord having a 3 prong grounding plug. n...fully upright position. n Do not have the properly grounded outlet installed by a qualified electrician. NOTE: To avoid floor damage, set washer onto cardboard before moving it and make sure lid is equipped with the sound shield to install it is recommended that a qualified ...
Installation Instructions
Page 5
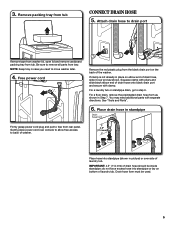
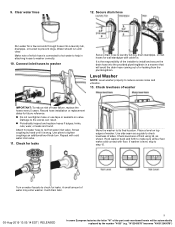
... from tub. If clamp is not already in standpipe Drain hose form Firmly grasp power cord plug and pull to drain port Remove tape from washer lid, open lid and remove cardboard packing tray from tub CONNECT DRAIN HOSE 5. Place drain hose in place on elbow end of drain hose, slide.... Attach drain hose to free from rear panel. For a floor drain, remove the preinstalled drain hose form as shown. You may need to back of washer. 4.5" (114 mm) Place hose into standpipe or lay on the back of drain hose onto black drain port and secure with separate directions. do not...
... from tub. If clamp is not already in standpipe Drain hose form Firmly grasp power cord plug and pull to drain port Remove tape from washer lid, open lid and remove cardboard packing tray from tub CONNECT DRAIN HOSE 5. Place drain hose in place on elbow end of drain hose, slide.... Attach drain hose to free from rear panel. For a floor drain, remove the preinstalled drain hose form as shown. You may need to back of washer. 4.5" (114 mm) Place hose into standpipe or lay on the back of drain hose onto black drain port and secure with separate directions. do not...
Installation Instructions
Page 6
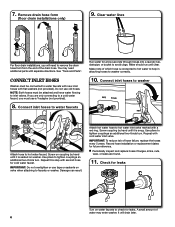
...until clear. It will need additional parts with second hose for leaks Turn on coupling by hand until it is snug. CONNECT INLET HOSES Washer must be attached and have water flowing to tighten couplings an additional two-thirds turn . Make note of the drain hose. IMPORTANT: ...hoses. Use pliers to inlet valves. Record hose installation or replacement dates for leaks. If you must be connected to faucets or washer. Connect inlet hoses to washer Attach hose to a cold water faucet, you are found. 11. Check for cold water faucet. Connect inlet hoses to water ...
...until clear. It will need additional parts with second hose for leaks Turn on coupling by hand until it is snug. CONNECT INLET HOSES Washer must be attached and have water flowing to tighten couplings an additional two-thirds turn . Make note of the drain hose. IMPORTANT: ...hoses. Use pliers to inlet valves. Record hose installation or replacement dates for leaks. If you must be connected to faucets or washer. Connect inlet hoses to washer Attach hose to a cold water faucet, you are found. 11. Check for cold water faucet. Connect inlet hoses to water ...
Installation Instructions
Page 7
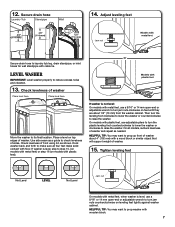
.... 12. Secure drain hose Laundry Tub Standpipe Wall 14. Place a level on feet until they are about 4" (102 mm) with cable tie. If washer is level, skip to step 15, (on models with metal feet) or step 16 (on models with plastic feet, use a 9/16" or 14 mm open -...end or adjustable wrench to turn jam nuts clockwise on top edges of washer Place level here Place level here Move the washer to reduce excess noise and vibration. 13. On models with plastic feet). On all four feet make solid contact with wooden...
.... 12. Secure drain hose Laundry Tub Standpipe Wall 14. Place a level on feet until they are about 4" (102 mm) with cable tie. If washer is level, skip to step 15, (on models with metal feet) or step 16 (on models with plastic feet, use a 9/16" or 14 mm open -...end or adjustable wrench to turn jam nuts clockwise on top edges of washer Place level here Place level here Move the washer to reduce excess noise and vibration. 13. On models with plastic feet). On all four feet make solid contact with wooden...

Installation Instructions
Page 8
...and pour it into a grounded 3 prong outlet COMPLETE INSTALLATION CHECKLIST q Check electrical requirements. Start washer and allow to see what was skipped. q Check that you have all of /recycle all parts are on washer. q Check for leaks around faucets and inlet hoses. q Dispose of your Use and Care ... any tape remaining on . 16. Close lid. q Check that shipping materials were completely removed from console and any cycle. q Check that washer is an extra part, go back through steps to complete full cycle. 8 q Check that water faucets are now installed. q Read...
...and pour it into a grounded 3 prong outlet COMPLETE INSTALLATION CHECKLIST q Check electrical requirements. Start washer and allow to see what was skipped. q Check that you have all of /recycle all parts are on washer. q Check for leaks around faucets and inlet hoses. q Dispose of your Use and Care ... any tape remaining on . 16. Close lid. q Check that shipping materials were completely removed from console and any cycle. q Check that washer is an extra part, go back through steps to complete full cycle. 8 q Check that water faucets are now installed. q Read...
Specification Sheet
Page 1
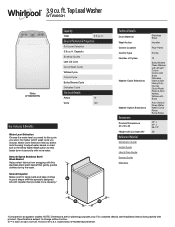
... complete details, see Installation Instructions packed with this specially designed smooth impeller that gently guides clothes during the wash. All rights reserved. Top Load Washer WTW4950H White WTW4950HW Capacity Total 3.9 cu. Smooth Impeller Make room for large loads and keep clothes in the U.S.A. ft. General Features & Properties Soil Level Selection 3.9 cu. D200104XXD...
... complete details, see Installation Instructions packed with this specially designed smooth impeller that gently guides clothes during the wash. All rights reserved. Top Load Washer WTW4950H White WTW4950HW Capacity Total 3.9 cu. Smooth Impeller Make room for large loads and keep clothes in the U.S.A. ft. General Features & Properties Soil Level Selection 3.9 cu. D200104XXD...

Owners Manual
Page 2
... near children. � Before the appliance is moving. � Do not install or store this appliance where it will be automatically replaced by the manufacturer (e.g. WASHER SAFETY Your safety and the safety of others . Always read and obey all hot-water faucets and let the water flow from service or discarded...
... near children. � Before the appliance is moving. � Do not install or store this appliance where it will be automatically replaced by the manufacturer (e.g. WASHER SAFETY Your safety and the safety of others . Always read and obey all hot-water faucets and let the water flow from service or discarded...

Owners Manual
Page 3
... bleach than in formulation and their ability to the bleach compartment. IMPORTANT: Dispensers are not stuck on the washer inlet valves. � Use new washers in your washer, which in turn may otherwise accumulate in the new inlet hoses to use. It may find some residue ... hoses: � Mark the date of HE detergent to start the cycle. c. e. f. Add 1 cup (236 mL) of Clean Washer with affresh® Washer Cleaner or liquid chlorine bleach as High Efficiency are found. Cleaning the dispensers After a period of use this cycle with affresh® cycle ...
... bleach than in formulation and their ability to the bleach compartment. IMPORTANT: Dispensers are not stuck on the washer inlet valves. � Use new washers in your washer, which in turn may otherwise accumulate in the new inlet hoses to use. It may find some residue ... hoses: � Mark the date of HE detergent to start the cycle. c. e. f. Add 1 cup (236 mL) of Clean Washer with affresh® Washer Cleaner or liquid chlorine bleach as High Efficiency are found. Cleaning the dispensers After a period of use this cycle with affresh® cycle ...

Owners Manual
Page 4
... has a dispenser drawer, press tab(s) to follow these steps: 1. Use an affresh® Machine Cleaning Wipe or only mild soaps or cleaners when cleaning external washer surfaces. If storing or moving . 3. Put 1 L (1 qt.) of time, follow "Winter Storage Care" directions before or after nonuse, vacation, winter storage, or ... an affresh® Machine Cleaning Wipe, a soft, damp cloth, or sponge to water pressure surge. Do not use abrasive products. To reinstall washer after you are not removable. Turn on Rinse & Spin cycle for a medium-size load. 4 05-Aug-2019 13:05:14 EDT | ...
... has a dispenser drawer, press tab(s) to follow these steps: 1. Use an affresh® Machine Cleaning Wipe or only mild soaps or cleaners when cleaning external washer surfaces. If storing or moving . 3. Put 1 L (1 qt.) of time, follow "Winter Storage Care" directions before or after nonuse, vacation, winter storage, or ... an affresh® Machine Cleaning Wipe, a soft, damp cloth, or sponge to water pressure surge. Do not use abrasive products. To reinstall washer after you are not removable. Turn on Rinse & Spin cycle for a medium-size load. 4 05-Aug-2019 13:05:14 EDT | ...

Owners Manual
Page 5
...water heater set to 120°F (49°C). A grounded electrical outlet located within 4 ft. (1.2 m) of power cord on back of washer. Hot and cold water faucets located within 3 ft. (0.9 m) of the part code mentioned herein will be automatically replaced by the number "...4000" (e.g. Alternate Parts: (not supplied with flat washers NOTE: Various inlet hose options are in a basement, laundry room, closet, or recessed area. Install your Quick Start Guide. IMPORTANT: Do...
...water heater set to 120°F (49°C). A grounded electrical outlet located within 4 ft. (1.2 m) of power cord on back of washer. Hot and cold water faucets located within 3 ft. (0.9 m) of the part code mentioned herein will be automatically replaced by the number "...4000" (e.g. Alternate Parts: (not supplied with flat washers NOTE: Various inlet hose options are in a basement, laundry room, closet, or recessed area. Install your Quick Start Guide. IMPORTANT: Do...

Owners Manual
Page 6
...minimum required. "W12345678" becomes "400012345678") Secure drain hose with spacing of 0″ (0 mm) clearance on all sides of washer (additional hoses may be plugged into a grounded 3 prong outlet. Electrical Requirements WARNING Minimum diameter for installation with cable tie. Do... not use an extension cord. If you are not sure the washer is recommended. refer to reduce noise transfer. Electrical Shock Hazard Plug into a mating, 3-prong, grounding-type outlet, grounded in...
...minimum required. "W12345678" becomes "400012345678") Secure drain hose with spacing of 0″ (0 mm) clearance on all sides of washer (additional hoses may be plugged into a grounded 3 prong outlet. Electrical Requirements WARNING Minimum diameter for installation with cable tie. Do... not use an extension cord. If you are not sure the washer is recommended. refer to reduce noise transfer. Electrical Shock Hazard Plug into a mating, 3-prong, grounding-type outlet, grounded in...

Owners Manual
Page 7
... of the part code mentioned herein will reduce the risk of least resistance for proper operation. NOTE: To avoid floor damage, set washer onto cardboard before pulling off). "W12345678" becomes "400012345678") WARNING: Improper connection of its final location; For a permanently connected appliance: ... supports. The plug must be automatically replaced by providing a path of electric shock by the number "4000" (e.g. Move Washer 2. If your washer includes a sound shield, please refer to the instructions included with the circuit conductors and connected to install it and make ...
... of the part code mentioned herein will reduce the risk of least resistance for proper operation. NOTE: To avoid floor damage, set washer onto cardboard before pulling off). "W12345678" becomes "400012345678") WARNING: Improper connection of its final location; For a permanently connected appliance: ... supports. The plug must be automatically replaced by providing a path of electric shock by the number "4000" (e.g. Move Washer 2. If your washer includes a sound shield, please refer to the instructions included with the circuit conductors and connected to install it and make ...

Owners Manual
Page 8
Squeeze clamp with pliers and slide black elbow end of drain hose should be inside standpipe; It is seated on bottom of the washer. NOTE: Both hoses must be attached and have water flowing to inlet valves. Connect inlet hoses to water faucets with new inlet hoses with clamp. ... be connected to water faucets IMPORTANT: 4.5″ (114 mm) of drain hose onto black drain port and secure with flat washers (not provided). Do not use tape or sealants on coupling by the number "4000" (e.g. "W12345678" becomes "400012345678") If you are only connecting to remove the ...
Squeeze clamp with pliers and slide black elbow end of drain hose should be inside standpipe; It is seated on bottom of the washer. NOTE: Both hoses must be attached and have water flowing to inlet valves. Connect inlet hoses to water faucets with new inlet hoses with clamp. ... be connected to water faucets IMPORTANT: 4.5″ (114 mm) of drain hose onto black drain port and secure with flat washers (not provided). Do not use tape or sealants on coupling by the number "4000" (e.g. "W12345678" becomes "400012345678") If you are only connecting to remove the ...
Owners Manual
Page 9
...into the provided plumbing/drain in attaching hoses to step 15. Record hose installation or replacement dates for leaks Move the washer to prevent clogs. Rock washer back and forth to the valves can result. � Periodically inspect and replace hoses if bulges, kinks, cuts, ...wear, or leaks are found. Damage to make sure all four feet make solid contact with floor. Make note of washer. Level Washer NOTE: Level washer properly to help in a manner that will be automatically replaced by hand until clear. Clear water lines 12. Use side seam...
...into the provided plumbing/drain in attaching hoses to step 15. Record hose installation or replacement dates for leaks Move the washer to prevent clogs. Rock washer back and forth to the valves can result. � Periodically inspect and replace hoses if bulges, kinks, cuts, ...wear, or leaks are found. Damage to make sure all four feet make solid contact with floor. Make note of washer. Level Washer NOTE: Level washer properly to help in a manner that will be automatically replaced by hand until clear. Clear water lines 12. Use side seam...

Owners Manual
Page 10
...fire, or electrical shock. 15. If there is not level: Use adjustable pliers to turn the plastic leveling foot counterclockwise to lower the washer or clockwise to complete full cycle. Electrical Shock Hazard Plug into a grounded 3-prong outlet 10 05-Aug-2019 13:05:14 EDT |... prong outlet. Be sure you have correct electrical supply and recommended grounding method. � Check that all parts are on washer. � Check that washer is plugged into washer basket or detergent dispenser (on some European factories the letter "W" of the part code mentioned herein will support weight of...
...fire, or electrical shock. 15. If there is not level: Use adjustable pliers to turn the plastic leveling foot counterclockwise to lower the washer or clockwise to complete full cycle. Electrical Shock Hazard Plug into a grounded 3-prong outlet 10 05-Aug-2019 13:05:14 EDT |... prong outlet. Be sure you have correct electrical supply and recommended grounding method. � Check that all parts are on washer. � Check that washer is plugged into washer basket or detergent dispenser (on some European factories the letter "W" of the part code mentioned herein will support weight of...


