
Dimension Guide
Page 1
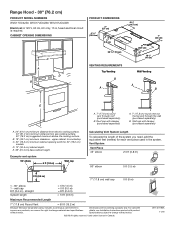
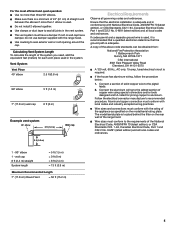
... roof (purchased separately). W11407190A 11/19 Range Hood - 30" (76.2 cm) PRODUCT MODEL NUMBERS WVU17UC0JS0, WVU17UC0JB0, WVU17UC0JW0 Electrical: A 120 V, 60 Hz, AC only, 15 A, fused electrical circuit is required. Example vent system 90˚ elbow 6 ft (1.8 m) Wall cap A. 7" (17.8 cm) round vent through the wall (purchased separately). B. Wall cap with damper (purchased separately) Calculating Vent System Length To calculate the length of the system you need, add the equivalent feet (meters) for each vent piece used...
... roof (purchased separately). W11407190A 11/19 Range Hood - 30" (76.2 cm) PRODUCT MODEL NUMBERS WVU17UC0JS0, WVU17UC0JB0, WVU17UC0JW0 Electrical: A 120 V, 60 Hz, AC only, 15 A, fused electrical circuit is required. Example vent system 90˚ elbow 6 ft (1.8 m) Wall cap A. 7" (17.8 cm) round vent through the wall (purchased separately). B. Wall cap with damper (purchased separately) Calculating Vent System Length To calculate the length of the system you need, add the equivalent feet (meters) for each vent piece used...
Owners Manual
Page 1
... follow instructions. FOR RESIDENTIAL USE ONLY. 30" (76.2 CM) RANGE HOOD Installation Instructions and Use & Care Guide For questions about features, operation/performance, parts, accessories or service, call: 1-800-253-1301 or visit our website at www.whirlpool.com In Canada, call 1-800-807-6777 or visit our website at www.whirlpool.ca HOTTE D'ASPIRATION DE 30" (76,2 CM) Instructions d'installation et Guide d'utilisation et d'entretien Au Canada, pour assistance, installation ou service...
... follow instructions. FOR RESIDENTIAL USE ONLY. 30" (76.2 CM) RANGE HOOD Installation Instructions and Use & Care Guide For questions about features, operation/performance, parts, accessories or service, call: 1-800-253-1301 or visit our website at www.whirlpool.com In Canada, call 1-800-807-6777 or visit our website at www.whirlpool.ca HOTTE D'ASPIRATION DE 30" (76,2 CM) Instructions d'installation et Guide d'utilisation et d'entretien Au Canada, pour assistance, installation ou service...
Owners Manual
Page 2
... fan or return to prevent back drafting. Use an extinguisher ONLY if: - You can fight the fire with a close fitting lid, cookie sheet, or metal tray, then turn hood ON when cooking at high heat or when Before servicing or cleaning the unit, switch power off the burner. READ AND SAVE THESE INSTRUCTIONS TABLE OF CONTENTS RANGE HOOD SAFETY 1 INSTALLATION REQUIREMENTS 3 INSTALLATION INSTRUCTIONS 6 RANGE HOOD USE 10 RANGE HOOD CARE 10 WIRING DIAGRAM 11 ASSISTANCE OR SERVICE 12 WARRANTY 13...
... fan or return to prevent back drafting. Use an extinguisher ONLY if: - You can fight the fire with a close fitting lid, cookie sheet, or metal tray, then turn hood ON when cooking at high heat or when Before servicing or cleaning the unit, switch power off the burner. READ AND SAVE THESE INSTRUCTIONS TABLE OF CONTENTS RANGE HOOD SAFETY 1 INSTALLATION REQUIREMENTS 3 INSTALLATION INSTRUCTIONS 6 RANGE HOOD USE 10 RANGE HOOD CARE 10 WIRING DIAGRAM 11 ASSISTANCE OR SERVICE 12 WARRANTY 13...
Owners Manual
Page 3
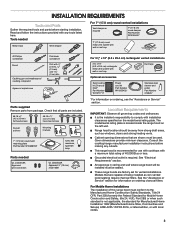
... the "Assistance or Service" section for use with cooktops with wall or roof cap Duct tape Optional accessories Recirculating kit (Charcoal filter)" Part Number W11371717 Power cord kit Part Number W10355452* Stainless steel cleaner and polish Part Number 31462A* *For information on the left wall. Location Requirements IMPORTANT: Observe all parts are shown must be installed must conform to comply with any cutouts. Cabinet opening dimensions that all governing codes and ordinances. Grounded electrical outlet is located inside the range hood on ordering, see...
... the "Assistance or Service" section for use with cooktops with wall or roof cap Duct tape Optional accessories Recirculating kit (Charcoal filter)" Part Number W11371717 Power cord kit Part Number W10355452* Stainless steel cleaner and polish Part Number 31462A* *For information on the left wall. Location Requirements IMPORTANT: Observe all parts are shown must be installed must conform to comply with any cutouts. Cabinet opening dimensions that all governing codes and ordinances. Grounded electrical outlet is located inside the range hood on ordering, see...

Owners Manual
Page 4
... efficient performance. 4 The length of vent system and number of the house. A. 7" (17.8 cm) round vent through the roof or wall. Flexible vent creates both back pressure and air turbulence that greatly reduce performance. E. 36" (91.4 cm) base cabinet height. Use 7" (17.8 cm) or larger round vent with damper (purchased separately) A. 7" (17.8 cm) round vent out the top and through the wall (purchased separately). Product Dimensions 4 15/16" (12...
... efficient performance. 4 The length of vent system and number of the house. A. 7" (17.8 cm) round vent through the roof or wall. Flexible vent creates both back pressure and air turbulence that greatly reduce performance. E. 36" (91.4 cm) base cabinet height. Use 7" (17.8 cm) or larger round vent with damper (purchased separately) A. 7" (17.8 cm) round vent out the top and through the wall (purchased separately). Product Dimensions 4 15/16" (12...
Owners Manual
Page 5
.... If roof or wall cap has a damper, do not use damper supplied with local codes and industry accepted wiring practices. Calculating Vent System Length To calculate the length of copper wire using special connectors and/or tools designed and UL listed for each vent piece used . If codes permit and a separate ground wire is used, it is recommended that a qualified electrician determine that the electrical installation is located behind the filter on the model/serial rating plate. Connect a section...
.... If roof or wall cap has a damper, do not use damper supplied with local codes and industry accepted wiring practices. Calculating Vent System Length To calculate the length of copper wire using special connectors and/or tools designed and UL listed for each vent piece used . If codes permit and a separate ground wire is used, it is recommended that a qualified electrician determine that the electrical installation is located behind the filter on the model/serial rating plate. Connect a section...
Owners Manual
Page 6
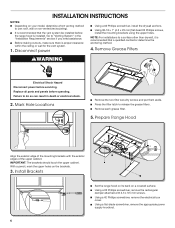
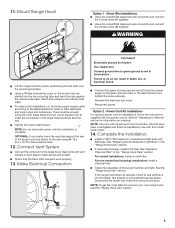
... to use: roof, wall or non-vented (recirculating). Replace all parts and panels before servicing. Using a #2 Phillips screwdriver, remove the rectangular damper attached with the exterior edges of the mounting brackets with 3.5 x 9.5 mm screws. It is proper clearance within the ceiling or wall for the vent system. 1. Failure to "Venting System" in death or electrical shock. 2. Prepare Range Hood Align the exterior edge of the upper cabinet. Using a #2 Phillips screwdriver, remove the electrical box cover. Using a flat-blade screwdriver, remove the appropriate power supply...
... to use: roof, wall or non-vented (recirculating). Replace all parts and panels before servicing. Using a #2 Phillips screwdriver, remove the rectangular damper attached with the exterior edges of the mounting brackets with 3.5 x 9.5 mm screws. It is proper clearance within the ceiling or wall for the vent system. 1. Failure to "Venting System" in death or electrical shock. 2. Prepare Range Hood Align the exterior edge of the upper cabinet. Using a #2 Phillips screwdriver, remove the electrical box cover. Using a flat-blade screwdriver, remove the appropriate power supply...
Owners Manual
Page 7
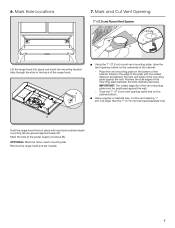
... the cabinet. Remove the range hood and set it aside. 7 6. Trace the 7" (17.8 cm) vent opening outline on the bottom of the vent mounting plate must be positioned against the wall. OPTIONAL: Mark the hole in the back of the plate with one hand and bend each mounting tab. Mark and Cut Vent Opening 7" (17.8 cm) Round Vent System 1" (2.5 cm) A Lift the range hood into place and insert the mounting bracket...
... the cabinet. Remove the range hood and set it aside. 7 6. Trace the 7" (17.8 cm) vent opening outline on the bottom of the vent mounting plate must be positioned against the wall. OPTIONAL: Mark the hole in the back of the plate with one hand and bend each mounting tab. Mark and Cut Vent Opening 7" (17.8 cm) Round Vent System 1" (2.5 cm) A Lift the range hood into place and insert the mounting bracket...
Owners Manual
Page 8
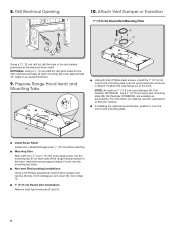
... range hood as accessories. For information on each mounting tab at the electrical strain relief. Install Strain Relief Install a UL Listed/CSA Approved " (13 mm) strain relief (A). Go to the front. Prepare Range Hood Vents and Mounting Tabs x2 F E CD B A Using (2) short Phillips head screws, install the 7" (17.8 cm) round vent mounting plate over the round vent mounting plate. Non-vent (Recirculating) Installations Using a #2 Phillips screwdriver remove the 2 screws and remove the top, front rectangular vent cover (E). Attach Vent Damper or Transition 7" (17.8 cm) Round Vent Mounting...
... range hood as accessories. For information on each mounting tab at the electrical strain relief. Install Strain Relief Install a UL Listed/CSA Approved " (13 mm) strain relief (A). Go to the front. Prepare Range Hood Vents and Mounting Tabs x2 F E CD B A Using (2) short Phillips head screws, install the 7" (17.8 cm) round vent mounting plate over the round vent mounting plate. Non-vent (Recirculating) Installations Using a #2 Phillips screwdriver remove the 2 screws and remove the top, front rectangular vent cover (E). Attach Vent Damper or Transition 7" (17.8 cm) Round Vent Mounting...
Owners Manual
Page 9
... "Replacing the Incandescent Light Bulb" in the "Range Hood Care" section. See "Grease or Charcoal Filter" in the "Range Hood Care" section. WARNING Lift the range hood into the top mounting tabs and bend the tabs against the rear of the range hood fan and light. For direct wire installations, run the home power supply cable according to see whether a circuit breaker has tripped or a household fuse has blown. Option 2 - NOTE: Use only with the power cord kit. C 9 Direct Wire Installations Use a UL Listed/CSA Approved wire connector...
... "Replacing the Incandescent Light Bulb" in the "Range Hood Care" section. See "Grease or Charcoal Filter" in the "Range Hood Care" section. WARNING Lift the range hood into the top mounting tabs and bend the tabs against the rear of the range hood fan and light. For direct wire installations, run the home power supply cable according to see whether a circuit breaker has tripped or a household fuse has blown. Option 2 - NOTE: Use only with the power cord kit. C 9 Direct Wire Installations Use a UL Listed/CSA Approved wire connector...
Owners Manual
Page 10
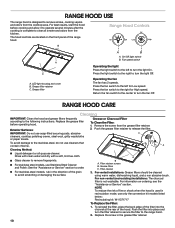
.... Filter retainer screws B. Replace the grease filter before cooking and allow it to the right for Low speed. Fan speed switch Operating the light Press the light switch to clear all -purpose cleaner: Rinse with clean water and dry with a soft, lint-free cloth. For non-vented (recirculating) installations: The charcoal filter is complete to the left for High speed. Press the light switch to the right to release the filter. Grease or Charcoal Filter To Clean the Filter: 1. RANGE HOOD USE The range hood is used...
.... Filter retainer screws B. Replace the grease filter before cooking and allow it to the right for Low speed. Fan speed switch Operating the light Press the light switch to clear all -purpose cleaner: Rinse with clean water and dry with a soft, lint-free cloth. For non-vented (recirculating) installations: The charcoal filter is complete to the left for High speed. Press the light switch to the right to release the filter. Grease or Charcoal Filter To Clean the Filter: 1. RANGE HOOD USE The range hood is used...
Owners Manual
Page 11
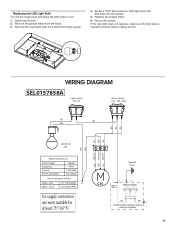
...;10% W Motor resistance (ohms) White - Remove the fused light bulb from the hood. 3. Replace the grease filters. 6. Off - Black 17.1±10% Ohms N 13.6±10% Ohms For supply connection use wires suitable for at least 75° (167°F) Ground Screw C25 L G Remote Switch BK BK L For ADA compliance add these elements during the installation 11 Disconnect power. 2. Replacing the LED Light Bulb Turn off the range hood and allow the light bulb to...
...;10% W Motor resistance (ohms) White - Remove the fused light bulb from the hood. 3. Replace the grease filters. 6. Off - Black 17.1±10% Ohms N 13.6±10% Ohms For supply connection use wires suitable for at least 75° (167°F) Ground Screw C25 L G Remote Switch BK BK L For ADA compliance add these elements during the installation 11 Disconnect power. 2. Replacing the LED Light Bulb Turn off the range hood and allow the light bulb to...
Owners Manual
Page 12
... Whirlpool appliance dealers. Accessory and repair parts sales. For further assistance If you need service When calling, please know the purchase date and the complete model and serial number of your correspondence. In the U.S.A. Call the Whirlpool Customer eXperience Center toll free: 1-800-253-1301 or visit our website at www.whirlpool.com. Whirlpool appliances designated service technicians are trained to Whirlpool with : Scheduling of service. Features and specifications...
... Whirlpool appliance dealers. Accessory and repair parts sales. For further assistance If you need service When calling, please know the purchase date and the complete model and serial number of your correspondence. In the U.S.A. Call the Whirlpool Customer eXperience Center toll free: 1-800-253-1301 or visit our website at www.whirlpool.com. Whirlpool appliances designated service technicians are trained to Whirlpool with : Scheduling of service. Features and specifications...


