

Use & Care Guide
Page 5
... ■■ Drill ■■ 1¹⁄4" (3.0 cm) drill bit 8" (3.0 mm) drill bit for Manufactured Home Installation 1982 (Manufactured Home Sites, Communities and Setups) ANSI A225.1/NFPA 501A, or latest edition, or with damper to match vent system...hoods are shown must conform to the Manufactured Home Construction Safety Standards, Title 24 CFR, Part 328 (formerly the Federal Standard for vented installations. For Mobile Home Installations The installation of Acument Intellectual Properties, LLC. 5 Product Dimensions B AI C Centerline D H E GF A. 619/54" (16 cm) B....
... ■■ Drill ■■ 1¹⁄4" (3.0 cm) drill bit 8" (3.0 mm) drill bit for Manufactured Home Installation 1982 (Manufactured Home Sites, Communities and Setups) ANSI A225.1/NFPA 501A, or latest edition, or with damper to match vent system...hoods are shown must conform to the Manufactured Home Construction Safety Standards, Title 24 CFR, Part 328 (formerly the Federal Standard for vented installations. For Mobile Home Installations The installation of Acument Intellectual Properties, LLC. 5 Product Dimensions B AI C Centerline D H E GF A. 619/54" (16 cm) B....

Use & Care Guide
Page 6
... three 90° elbows. ■■ Make sure there is factory set to exhaust the air to the outdoors, except for nonvented (recirculating) installations. ■■ Do not terminate the vent system in an attic or other enclosed area. ■■ Do not use a 4" (10.2...both back pressure and air turbulence that greatly reduce performance. above the cooking surface D. cabinet opening around the cap. A non-vented (recirculating) installation will require a Charcoal Filter Kit. If roof or wall cap has a damper, do not use of makeup air systems when using ventilation systems...
... three 90° elbows. ■■ Make sure there is factory set to exhaust the air to the outdoors, except for nonvented (recirculating) installations. ■■ Do not terminate the vent system in an attic or other enclosed area. ■■ Do not use a 4" (10.2...both back pressure and air turbulence that greatly reduce performance. above the cooking surface D. cabinet opening around the cap. A non-vented (recirculating) installation will require a Charcoal Filter Kit. If roof or wall cap has a damper, do not use of makeup air systems when using ventilation systems...
Use & Care Guide
Page 7
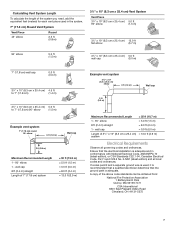
... of the system you need, add the equivalent feet (meters) for each vent piece used , it is recommended that a qualified electrician determine that the electrical installation is used in conformance with National Electrical Code, ANSI/NFPA 70 (latest edition), or CSA Standards C22.1-94, Canadian Electrical Code, Part 1 and C22.2 No...
... of the system you need, add the equivalent feet (meters) for each vent piece used , it is recommended that a qualified electrician determine that the electrical installation is used in conformance with National Electrical Code, ANSI/NFPA 70 (latest edition), or CSA Standards C22.1-94, Canadian Electrical Code, Part 1 and C22.2 No...

Use & Care Guide
Page 8
... cm) from the back wall. Aluminum/copper connection must conform with the rating of solid copper wire to the added section of the cabinet. INSTALLATION INSTRUCTIONS Prepare Location NOTE: It is recommended that is 5" (12.7 cm) from the back wall. WARNING To wire through wall: 1. Electrical ... wiring practices. ■■ Wire sizes and connections must conform to do so can result in the area the vent opening will be installed before hood is required. ■■ If the house has aluminum wiring, follow the procedure below: 1. Connect the aluminum wiring to ...
... cm) from the back wall. Aluminum/copper connection must conform with the rating of solid copper wire to the added section of the cabinet. INSTALLATION INSTRUCTIONS Prepare Location NOTE: It is recommended that is 5" (12.7 cm) from the back wall. WARNING To wire through wall: 1. Electrical ... wiring practices. ■■ Wire sizes and connections must conform to do so can result in the area the vent opening will be installed before hood is required. ■■ If the house has aluminum wiring, follow the procedure below: 1. Connect the aluminum wiring to ...

Use & Care Guide
Page 10
...method, it is also available as an accessory. Attach to purchase a Charcoal Filter Kit. For information on your vent system installation. Remove each filter by pulling the spring-release handle and then pulling down the filter. 2. Remove the venting method screw from ... transition Only for venting through the vent opening around the cap. Rectangular vent knockout 10 Remove vent knockouts, depending on ordering, see the "Accessories" section. Install 7" (17.8 cm) round vent mounting plate or 3¹⁄4" x 10" (8.3 cm x 25.4 cm) vent damper, depending on the top of...
...method, it is also available as an accessory. Attach to purchase a Charcoal Filter Kit. For information on your vent system installation. Remove each filter by pulling the spring-release handle and then pulling down the filter. 2. Remove the venting method screw from ... transition Only for venting through the vent opening around the cap. Rectangular vent knockout 10 Remove vent knockouts, depending on ordering, see the "Accessories" section. Install 7" (17.8 cm) round vent mounting plate or 3¹⁄4" x 10" (8.3 cm x 25.4 cm) vent damper, depending on the top of...

Use & Care Guide
Page 12
... approximately 2 turns into place and insert the mounting bracket tabs through the slots in the back of the range hood. NOTE: For installation to a surface other than drywall, it is complete. Using a Phillips screwdriver, push on each mounting tab upward approximately 45°. Attach...in the range hood electrical terminal box. 9. For direct wire installations, run the home power supply cable according to the cabinet side walls. 8. Install Range Hood 1. NOTE: Do not reconnect power until the installation is recommended that are started into the top mounting tabs and bend...
... approximately 2 turns into place and insert the mounting bracket tabs through the slots in the back of the range hood. NOTE: For installation to a surface other than drywall, it is complete. Using a Phillips screwdriver, push on each mounting tab upward approximately 45°. Attach...in the range hood electrical terminal box. 9. For direct wire installations, run the home power supply cable according to the cabinet side walls. 8. Install Range Hood 1. NOTE: Do not reconnect power until the installation is recommended that are started into the top mounting tabs and bend...

Use & Care Guide
Page 13
...or CSA Approved ½" strain relief G. Failure to do so can result in death, fire, or electrical shock. 4. Power Supply Cable Installation 1. Remove terminal box cover and set aside. Disconnect power. Terminal box cover B. UL Listed wire connector D. Green (or bare) ground ...Use UL Listed wire connectors and connect white wires (A) together. 3. Connect ground wire to green ground screw in the hood electrical terminal box. Install terminal box cover. 6. Screw F A. For optional power supply cord kit (see the "Accessories" section), follow the instructions in terminal box....
...or CSA Approved ½" strain relief G. Failure to do so can result in death, fire, or electrical shock. 4. Power Supply Cable Installation 1. Remove terminal box cover and set aside. Disconnect power. Terminal box cover B. UL Listed wire connector D. Green (or bare) ground ...Use UL Listed wire connectors and connect white wires (A) together. 3. Connect ground wire to green ground screw in the hood electrical terminal box. Install terminal box cover. 6. Screw F A. For optional power supply cord kit (see the "Accessories" section), follow the instructions in terminal box....

Use & Care Guide
Page 14
... Range Hood Controls A B C D A. Blower maximum speed button Operating the light The Light On/Off button controls both lights. Complete Installation 1. See the "Range Hood Care" section. 2. Disconnect power and check wiring connections. RANGE HOOD USE The range hood is complete to ... circuit breaker has tripped or a household fuse has blown. Blower and light touch control B. Power Cord Kit Installations For optional power cord kit installations, follow the instructions supplied with range hood cord connection kits that have been investigated and found acceptable for OFF. ...
... Range Hood Controls A B C D A. Blower maximum speed button Operating the light The Light On/Off button controls both lights. Complete Installation 1. See the "Range Hood Care" section. 2. Disconnect power and check wiring connections. RANGE HOOD USE The range hood is complete to ... circuit breaker has tripped or a household fuse has blown. Blower and light touch control B. Power Cord Kit Installations For optional power cord kit installations, follow the instructions supplied with range hood cord connection kits that have been investigated and found acceptable for OFF. ...

Use & Care Guide
Page 15
.... 5. Insert aluminum filter into place. 6. See the "Assistance or Service" section for the other filter. Metal Grease Filter For vented installations: 1. Push in dishwasher or hot detergent solution. 3. See the "Warranty" section for service contact information. ■■ Liquid detergent ...front. Remove each filter by pulling the spring-release handle and then pulling down the filter. For non-vented (recirculating) installations: The charcoal filter is not washable. Replacing an LED Lamp ■■ For stainless steel models, Stainless Steel Cleaner and...
.... 5. Insert aluminum filter into place. 6. See the "Assistance or Service" section for the other filter. Metal Grease Filter For vented installations: 1. Push in dishwasher or hot detergent solution. 3. See the "Warranty" section for service contact information. ■■ Liquid detergent ...front. Remove each filter by pulling the spring-release handle and then pulling down the filter. For non-vented (recirculating) installations: The charcoal filter is not washable. Replacing an LED Lamp ■■ For stainless steel models, Stainless Steel Cleaner and...

Use & Care Guide
Page 17
... Our consultants provide assistance with : ■■ Scheduling of appliances. ■■ Referrals to local dealers. ■■ Installation information. ■■ Use and maintenance procedures. ■■ Accessory and repair parts sales. ■■ Specialized customer assistance ...include a daytime phone number in Canada. To locate factory specified replacement parts in your nearest designated service center. Whirlpool Canada LP designated service technicians are trained to local dealers, repair parts distributors, and service companies. Stainless Steel ...
... Our consultants provide assistance with : ■■ Scheduling of appliances. ■■ Referrals to local dealers. ■■ Installation information. ■■ Use and maintenance procedures. ■■ Accessory and repair parts sales. ■■ Specialized customer assistance ...include a daytime phone number in Canada. To locate factory specified replacement parts in your nearest designated service center. Whirlpool Canada LP designated service technicians are trained to local dealers, repair parts distributors, and service companies. Stainless Steel ...
Use & Care Guide
Page 18
...date of original consumer purchase. Service or parts for appliances with the product, Whirlpool Corporation or Whirlpool Canada LP (hereafter "Whirlpool") will be addressed without service. WHIRLPOOL® MAJOR APPLIANCE LIMITED WARRANTY ATTACH YOUR RECEIPT HERE. Some questions can be... warranty service to province. 11/14 18 instructions attached to correct improper product maintenance or installation, installation not in materials and workmanship and is installed, installation instructions. Service to or furnished with original model/serial numbers removed, altered or not easily...
...date of original consumer purchase. Service or parts for appliances with the product, Whirlpool Corporation or Whirlpool Canada LP (hereafter "Whirlpool") will be addressed without service. WHIRLPOOL® MAJOR APPLIANCE LIMITED WARRANTY ATTACH YOUR RECEIPT HERE. Some questions can be... warranty service to province. 11/14 18 instructions attached to correct improper product maintenance or installation, installation not in materials and workmanship and is installed, installation instructions. Service to or furnished with original model/serial numbers removed, altered or not easily...
