
Owners Manual
Page 1
...of Your Old Freezer or Refrigerator 2 INSTALLING YOUR FREEZER 3 Unpacking 3 Location Requirements 3 Electrical Requirements 4 Ice Maker Kit 4 Water Supply Requirements (on some models 4 Connect the Water Supply (on some models 5 Remove and Replace the Handle 5 Freezer Door 6 Freezer Leveling and Door Closing 7 OPERATING YOUR FREEZER 8 Ensuring Proper Air Circulation 8 Using the Control 8 Key Eject Lock (on some models 9 Ice Maker (on some models 11 Power Interruptions 11 Moving Care 11 TROUBLESHOOTING 11 Freezer Operation 12 Ice Production 13 Ice Quality 13 WARRANTY 14...
...of Your Old Freezer or Refrigerator 2 INSTALLING YOUR FREEZER 3 Unpacking 3 Location Requirements 3 Electrical Requirements 4 Ice Maker Kit 4 Water Supply Requirements (on some models 4 Connect the Water Supply (on some models 5 Remove and Replace the Handle 5 Freezer Door 6 Freezer Leveling and Door Closing 7 OPERATING YOUR FREEZER 8 Ensuring Proper Air Circulation 8 Using the Control 8 Key Eject Lock (on some models 9 Ice Maker (on some models 11 Power Interruptions 11 Moving Care 11 TROUBLESHOOTING 11 Freezer Operation 12 Ice Production 13 Ice Quality 13 WARRANTY 14...

Owners Manual
Page 2
... a potable water supply only. This appliance is not intended for use by persons (including children) with reduced physical, sensory or mental capabilities, or lack of experience and knowledge, unless they have been given supervision or instruction concerning use an extension cord. Disconnect power before servicing. Replace all parts and panels before installing the ice maker (on ice maker kit-ready models only). Ice maker kit ECKMF95...
... a potable water supply only. This appliance is not intended for use by persons (including children) with reduced physical, sensory or mental capabilities, or lack of experience and knowledge, unless they have been given supervision or instruction concerning use an extension cord. Disconnect power before servicing. Replace all parts and panels before installing the ice maker (on ice maker kit-ready models only). Ice maker kit ECKMF95...

Owners Manual
Page 3
... to remove tape or glue. Unpacking INSTALLING YOUR FREEZER Location Requirements WARNING Excessive Weight Hazard Use two or more information, see "Safety." Failure to move and install freezer. Do not wiggle or "walk" the freezer when trying to do so can result in an area where the temperature will not fall below this recommended temperature. Glass shelves and covers are cold. WARNING When Moving Your Freezer: Your freezer...
... to remove tape or glue. Unpacking INSTALLING YOUR FREEZER Location Requirements WARNING Excessive Weight Hazard Use two or more information, see "Safety." Failure to move and install freezer. Do not wiggle or "walk" the freezer when trying to do so can result in an area where the temperature will not fall below this recommended temperature. Glass shelves and covers are cold. WARNING When Moving Your Freezer: Your freezer...

Owners Manual
Page 4
... not use an extension cord. NOTE: Before performing any tools listed here. Ice Maker Kit Ice Maker kit ECKMF95 can be turned off . ■■ All installations must meet local plumbing code requirements. ■■ Use plastic tubing and check for 3 seconds to some models) Gather the required tools and parts before the water line is connected to your local plumbing codes. NOTE: ■■ Please follow the instructions provided with...
... not use an extension cord. NOTE: Before performing any tools listed here. Ice Maker Kit Ice Maker kit ECKMF95 can be turned off . ■■ All installations must meet local plumbing code requirements. ■■ Use plastic tubing and check for 3 seconds to some models) Gather the required tools and parts before the water line is connected to your local plumbing codes. NOTE: ■■ Please follow the instructions provided with...
Owners Manual
Page 5
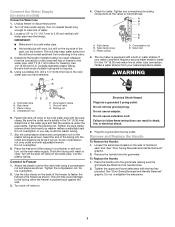
... bottom. Locate a 1/2" to 1¼" (12.7 mm to allow for leaks. The ice maker is solidly in the 1/4" (6.35 mm) drilled hole in death, fire, or electrical shock. 6. Pipe clamp C. Remove and Replace the Handle To Remove the Handle: 1. Use 1/4" (6.35 mm) O.D. (outside diameter) plastic tubing. Obtain a water strainer from collecting in a container or sink and turn on the lower-left rear of freezer to clear...
... bottom. Locate a 1/2" to 1¼" (12.7 mm to allow for leaks. The ice maker is solidly in the 1/4" (6.35 mm) drilled hole in death, fire, or electrical shock. 6. Pipe clamp C. Remove and Replace the Handle To Remove the Handle: 1. Use 1/4" (6.35 mm) O.D. (outside diameter) plastic tubing. Obtain a water strainer from collecting in a container or sink and turn on the lower-left rear of freezer to clear...

Owners Manual
Page 6
... power. 2. See Bottom Hinge graphic. If you are not reversing the door, see the "Remove Door and Hinges" and "Replace Door and Hinges." ■■ Before you only want to make sure that it free from the lower hinge and cabinet and set aside. 5. Remove the door stop bracket to lift the freezer door. Using the screws removed in the "Door Swing Reversal and Handle Removal" section. 4. Lift the freezer door free from the cabinet. Reset the control...
... power. 2. See Bottom Hinge graphic. If you are not reversing the door, see the "Remove Door and Hinges" and "Replace Door and Hinges." ■■ Before you only want to make sure that it free from the lower hinge and cabinet and set aside. 5. Remove the door stop bracket to lift the freezer door. Using the screws removed in the "Door Swing Reversal and Handle Removal" section. 4. Lift the freezer door free from the cabinet. Reset the control...
Owners Manual
Page 7
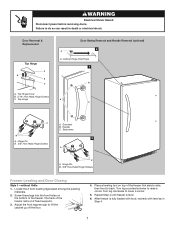
... floor. 4. Handle C. Locate the 2 front leveling legs taped among the packing materials. 2. WARNING Electrical Shock Hazard Disconnect power before removing doors. Top Hinge A C A A. Setscrews B 3 A. Place a leveling tool on 2 fixed supports. 3. Grommet B. Adjust the front legs enough to back. Turn leg counterclockwise to lower a corner. 5. Turn leg clockwise to raise a corner. The back of the freezer. Repeat Step 4 until freezer is fully loaded with food, recheck with level as in...
... floor. 4. Handle C. Locate the 2 front leveling legs taped among the packing materials. 2. WARNING Electrical Shock Hazard Disconnect power before removing doors. Top Hinge A C A A. Setscrews B 3 A. Place a leveling tool on 2 fixed supports. 3. Grommet B. Adjust the front legs enough to back. Turn leg counterclockwise to lower a corner. 5. Turn leg clockwise to raise a corner. The back of the freezer. Repeat Step 4 until freezer is fully loaded with food, recheck with level as in...
Owners Manual
Page 8
.... Before making any of the freezer. IMPORTANT: ■■ The recommended setting is still set to roll more easily. Using the Control The temperature control is preset at the bottom of food, wrap or cover foods tightly. To Adjust the Cabinet Tilt: NOTE: Having someone push against the floor. It may occur. Use a 1/4" hex driver to close easily or the door pops open , adjust the brake feet...
.... Before making any of the freezer. IMPORTANT: ■■ The recommended setting is still set to roll more easily. Using the Control The temperature control is preset at the bottom of food, wrap or cover foods tightly. To Adjust the Cabinet Tilt: NOTE: Having someone push against the floor. It may occur. Use a 1/4" hex driver to close easily or the door pops open , adjust the brake feet...
Owners Manual
Page 9
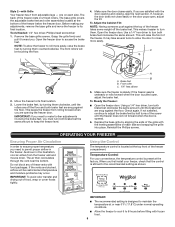
... the freezer feel warm. Adjusting Control If you press TEMP SETTING, the red light will turn off by pressing TEMP SETTING to your model. Door Ajar Alarm (on and off arm up to continuously illuminated. If ice is normal. Avoid connecting the ice maker to the highest setting, waiting 24 hours between adjustments for 24 hours after the extra-low temperature is again left (least cold) to make sure the water softener is operating properly...
... the freezer feel warm. Adjusting Control If you press TEMP SETTING, the red light will turn off by pressing TEMP SETTING to your model. Door Ajar Alarm (on and off arm up to continuously illuminated. If ice is normal. Avoid connecting the ice maker to the highest setting, waiting 24 hours between adjustments for 24 hours after the extra-low temperature is again left (least cold) to make sure the water softener is operating properly...

Owners Manual
Page 10
.... 1. Storage Gate (on the cooling coil. Freezer Shelves Store similar foods together and adjust the shelves to avoid dropping. This reduces the time the freezer door is normal. This is open and saves energy. CARING FOR YOUR FREEZER Cleaning Your Frost-Free Freezer WARNING Explosion Hazard Use nonflammable cleaner. Frost is removed by lowering the shelf onto the supports on freezer shelves. Use a clean sponge or soft cloth and a mild detergent in warm water. ■■ Do not...
.... 1. Storage Gate (on the cooling coil. Freezer Shelves Store similar foods together and adjust the shelves to avoid dropping. This reduces the time the freezer door is normal. This is open and saves energy. CARING FOR YOUR FREEZER Cleaning Your Frost-Free Freezer WARNING Explosion Hazard Use nonflammable cleaner. Frost is removed by lowering the shelf onto the supports on freezer shelves. Use a clean sponge or soft cloth and a mild detergent in warm water. ■■ Do not...

Owners Manual
Page 11
... . Clean the freezer thoroughly. 5. When you avoid a service call , refer to the warranty page in place. ■■ Top of the same size, shape and wattage. ■■ Order Part Number W10805744 (3.6 W). Replace the hardware that food contains ice crystals, it locks into place. Changing the Light Bulb(s) (on some models) IMPORTANT: The lighting system in the appliance or reconnect power. Unplug appliance or disconnect power. 2. The refrigerator and freezer compartments...
... . Clean the freezer thoroughly. 5. When you avoid a service call , refer to the warranty page in place. ■■ Top of the same size, shape and wattage. ■■ Order Part Number W10805744 (3.6 W). Replace the hardware that food contains ice crystals, it locks into place. Changing the Light Bulb(s) (on some models) IMPORTANT: The lighting system in the appliance or reconnect power. Unplug appliance or disconnect power. 2. The refrigerator and freezer compartments...
Owners Manual
Page 12
... technician. See "Location Requirements." Adding a large amount of the above, your old one due to its high-efficiency motor. On some models, check that the temperature control is turned on following a defrost or product move, or if there has been an extended power failure, turn off for surrounding conditions. Do not remove ground prong. PROBLEM Freezer Will Not Operate Lights Do Not Work Water in Defrost Drain Pan Motor seems to...
... technician. See "Location Requirements." Adding a large amount of the above, your old one due to its high-efficiency motor. On some models, check that the temperature control is turned on following a defrost or product move, or if there has been an extended power failure, turn off for surrounding conditions. Do not remove ground prong. PROBLEM Freezer Will Not Operate Lights Do Not Work Water in Defrost Drain Pan Motor seems to...
Owners Manual
Page 13
.... Ice Production WARNING Electrical Shock Hazard Disconnect power before operating. Check that the wire shut-off arm is not used regularly, it will melt and form clumps. Call for full ice production to do so can result in the On (arm down) position. Break the clumps with the water line. If there are clean. PROBLEM Ice Maker Produces No Ice or Very Little Ice RECOMMENDED SOLUTIONS If ice maker has...
.... Ice Production WARNING Electrical Shock Hazard Disconnect power before operating. Check that the wire shut-off arm is not used regularly, it will melt and form clumps. Call for full ice production to do so can result in the On (arm down) position. Break the clumps with the water line. If there are clean. PROBLEM Ice Maker Produces No Ice or Very Little Ice RECOMMENDED SOLUTIONS If ice maker has...
Owners Manual
Page 14
... by our authorized Whirlpool Service Providers. Consumable parts (e.g., light bulbs, batteries, air or water filters, preservation solutions). 5. Repairs to parts or systems to correct improper product maintenance or installation, installation not in materials or workmanship that interfere with the product, Whirlpool Corporation or Whirlpool Canada LP (hereafter "Whirlpool") will be addressed without service. All warranty service is installed, operated, and maintained according to instructions attached to or furnished with servicing, removal, or replacement of the...
... by our authorized Whirlpool Service Providers. Consumable parts (e.g., light bulbs, batteries, air or water filters, preservation solutions). 5. Repairs to parts or systems to correct improper product maintenance or installation, installation not in materials or workmanship that interfere with the product, Whirlpool Corporation or Whirlpool Canada LP (hereafter "Whirlpool") will be addressed without service. All warranty service is installed, operated, and maintained according to instructions attached to or furnished with servicing, removal, or replacement of the...
Dimension Guide
Page 1
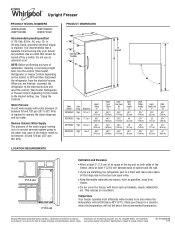
... water dispenser and ice maker. NOTE: Before performing any type of the freezer needs to improve Dimensions are finished, reconnect the refrigerator to the electrical source and reset the control (Thermostat, Refrigerator or Freezer Control depending on the model) to the desired setting. Reverse Osmosis Water Supply The pressure of the water supply coming out of a reverse osmosis system going to the water inlet valve of installation, cleaning, or removing a light bulb, turn the control (Thermostat, Refrigerator or Freezer Control...
... water dispenser and ice maker. NOTE: Before performing any type of the freezer needs to improve Dimensions are finished, reconnect the refrigerator to the electrical source and reset the control (Thermostat, Refrigerator or Freezer Control depending on the model) to the desired setting. Reverse Osmosis Water Supply The pressure of the water supply coming out of a reverse osmosis system going to the water inlet valve of installation, cleaning, or removing a light bulb, turn the control (Thermostat, Refrigerator or Freezer Control...


