
IPv6 Supplement
Page 3
...following options: • [Use DHCP as directed by a router] - If it is used for your Xerox product supports IPv6. Select one of automatic and manual configuration. 8. The DHCPv6 Address will be obtained and displayed on the local IPv6 subnet. Configure IP Settings and...resolution on the screen. • [Always Enable DHCP] - Click on your Xerox product to enable and configure IPv6 and IPv6 Filtering on some Xerox WorkCentre/Phaser mono printers and Xerox WorkCentre/Phaser mono MFP products via CentreWare Internet Services (CWIS). IPv6 Supplement 1 Configure IP ...
...following options: • [Use DHCP as directed by a router] - If it is used for your Xerox product supports IPv6. Select one of automatic and manual configuration. 8. The DHCPv6 Address will be obtained and displayed on the local IPv6 subnet. Configure IP Settings and...resolution on the screen. • [Always Enable DHCP] - Click on your Xerox product to enable and configure IPv6 and IPv6 Filtering on some Xerox WorkCentre/Phaser mono printers and Xerox WorkCentre/Phaser mono MFP products via CentreWare Internet Services (CWIS). IPv6 Supplement 1 Configure IP ...

IPv6 Supplement
Page 4
...by the Internet address of the following format. Note: If your DNS Server does not support dynamic updates there is selected, then skip the Manual Address Options section below and proceed to specify the machine, use the following formats depending on the keyboard. Test Access 1. Domain name: http... IPv6: http://[xxxx:xxxx:xxxx:xxxx:xxxx:xxxx:xxxx:xxxx]:8080 2. IPv6 Supplement • [Never use the domain name to populate the prefix for manual entry address. 11. Click [Add] to specify the machine, use one of the machine. If prompted, enter the Administrator's User ID [admin] and...
...by the Internet address of the following format. Note: If your DNS Server does not support dynamic updates there is selected, then skip the Manual Address Options section below and proceed to specify the machine, use the following formats depending on the keyboard. Test Access 1. Domain name: http... IPv6: http://[xxxx:xxxx:xxxx:xxxx:xxxx:xxxx:xxxx:xxxx]:8080 2. IPv6 Supplement • [Never use the domain name to populate the prefix for manual entry address. 11. Click [Add] to specify the machine, use one of the machine. If prompted, enter the Administrator's User ID [admin] and...

User Guide
Page 2
...; PostScript 3 is not responsible for information purposes only. All rights reserved. • Phaser 3250D and Phaser 3250DN are model names of Xerox Corporation. • Xerox and Xerox logo are trademarks of Xerox Corporation. • IBM and IBM PC are trademarks of International Business Machines Corporation. •...Windows and Windows Vista are trademarks of this manual. © 2008 Xerox Corporation. All information included herein is provided for any direct or indirect damages, arising from or related to change without notice. This manual is subject to the use of their ...
...; PostScript 3 is not responsible for information purposes only. All rights reserved. • Phaser 3250D and Phaser 3250DN are model names of Xerox Corporation. • Xerox and Xerox logo are trademarks of Xerox Corporation. • IBM and IBM PC are trademarks of International Business Machines Corporation. •...Windows and Windows Vista are trademarks of this manual. © 2008 Xerox Corporation. All information included herein is provided for any direct or indirect damages, arising from or related to change without notice. This manual is subject to the use of their ...

User Guide
Page 3
...size of the paper in tray 1 ...5.5 Using the manual feeder ...5.6 Output tray information ...5.7 Contents Safety Safety Introduction ...1.i Marks and Labels ...1.i Radio Frequency Emissions ...1.i Laser Safety Introduction ...1.i Operational Safety Information ...1.i Maintenance Information ...1.iii...Information ...1.iv 1. Network setup (Phaser 3250DN only) Introduction ...4.1 Supported operating systems ...4.1 Using SetIP program ...4.1 5. Basic setup Printing a demo page ...2.1 Using toner save mode ...2.1 3. Introduction Special features ...1.1 Printer overview ...1.2 Front view ...1.2 Rear...
...size of the paper in tray 1 ...5.5 Using the manual feeder ...5.6 Output tray information ...5.7 Contents Safety Safety Introduction ...1.i Marks and Labels ...1.i Radio Frequency Emissions ...1.i Laser Safety Introduction ...1.i Operational Safety Information ...1.i Maintenance Information ...1.iii...Information ...1.iv 1. Network setup (Phaser 3250DN only) Introduction ...4.1 Supported operating systems ...4.1 Using SetIP program ...4.1 5. Basic setup Printing a demo page ...2.1 Using toner save mode ...2.1 3. Introduction Special features ...1.1 Printer overview ...1.2 Front view ...1.2 Rear...

User Guide
Page 7
...the package or container. 2 Keep all consumables in a well-ventilated room. Consumables Information 1 Store all consumables away from your local Xerox representative. Intertek ETL Semko UL60950-1 1st (2003) First Edition (USA/ Canada) IEC60950-1: 2001 First Edition Regulatory Information Certification in Europe... could cause a dangerous condition. 4 Use supplies and cleaning materials only as directed in this product which is dependent on this manual. 5 Do not remove covers or guards that the concentration levels meet safe limits. There are fastened with the product. 2 Do...
...the package or container. 2 Keep all consumables in a well-ventilated room. Consumables Information 1 Store all consumables away from your local Xerox representative. Intertek ETL Semko UL60950-1 1st (2003) First Edition (USA/ Canada) IEC60950-1: 2001 First Edition Regulatory Information Certification in Europe... could cause a dangerous condition. 4 Use supplies and cleaning materials only as directed in this product which is dependent on this manual. 5 Do not remove covers or guards that the concentration levels meet safe limits. There are fastened with the product. 2 Do...

User Guide
Page 9
...; You can then be expanded to do is compatible with Linux and Macintosh. • Your printer comes with PostScript 3 •© Copyright 1995-2005, Zoran Corporation. Handle paper flexibly • Manual tray supports one sheet of your printer! Once printed, all you to easily print a document to 1200 x 1200 dpi effective output. All...
...; You can then be expanded to do is compatible with Linux and Macintosh. • Your printer comes with PostScript 3 •© Copyright 1995-2005, Zoran Corporation. Handle paper flexibly • Manual tray supports one sheet of your printer! Once printed, all you to easily print a document to 1200 x 1200 dpi effective output. All...

User Guide
Page 10
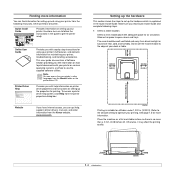
..., NA: Not Available) Features Phaser 3250D USB 2.0 I (USB 2.0: Hi-Speed USB 2.0) Network Interface NA (Ethernet 10/100 Base TX) PCL Emulation I PostScript Emulation I Duplex printinga I Front view Printer overview 1 2 5 3 6 4 7 8 3250-037 9 3250-040 10 3250-039 * The figure above shows a Phaser 3250DN. 1 output tray 2 control panel 3 expansion memory cover 4 front cover 5 manual tray 6 tray 1 7 optional...
..., NA: Not Available) Features Phaser 3250D USB 2.0 I (USB 2.0: Hi-Speed USB 2.0) Network Interface NA (Ethernet 10/100 Base TX) PCL Emulation I PostScript Emulation I Duplex printinga I Front view Printer overview 1 2 5 3 6 4 7 8 3250-037 9 3250-040 10 3250-039 * The figure above shows a Phaser 3250DN. 1 output tray 2 control panel 3 expansion memory cover 4 front cover 5 manual tray 6 tray 1 7 optional...
User Guide
Page 12
...You can find information for setting up your printer, therefore, be sure to follow the instructions in the guide to get help, support, printer drivers, manuals, and order information from the Manual folder on various operating systems, and how to... use the supplied software utilities. Quick Install Guide quick install guide 1 3 1 2 Item(s) with adequate space for more information. Note You can access the user guides in other languages from the Xerox website, www.xerox...
...You can find information for setting up your printer, therefore, be sure to follow the instructions in the guide to get help, support, printer drivers, manuals, and order information from the Manual folder on various operating systems, and how to... use the supplied software utilities. Quick Install Guide quick install guide 1 3 1 2 Item(s) with adequate space for more information. Note You can access the user guides in other languages from the Xerox website, www.xerox...

User Guide
Page 18
...systems The following programs: • CWIS (CentreWare Internet Service): A web-based printer management solution for network administrators. Protocols can download this program. 6 From the Windows Start menu, select Programs > Xerox Phaser 3250 > SetIP > SetIP. 7 Select the name of your computer operating ... Note If you remotely monitor and troubleshoot network printers from www.xerox.com. • CWIS (CentreWare Internet Service): A web server embedded to your printer name click " list. " to select a network interface and manually configure the addresses for use it , will ...
...systems The following programs: • CWIS (CentreWare Internet Service): A web-based printer management solution for network administrators. Protocols can download this program. 6 From the Windows Start menu, select Programs > Xerox Phaser 3250 > SetIP > SetIP. 7 Select the name of your computer operating ... Note If you remotely monitor and troubleshoot network printers from www.xerox.com. • CWIS (CentreWare Internet Service): A web server embedded to your printer name click " list. " to select a network interface and manually configure the addresses for use it , will ...

User Guide
Page 21
... lb bond) a. Supported sizes of 75 g/m2 (20 lb bond) paper for the tray • 1 sheet for manual feeding 1 sheet for manual feeding 1 sheet for manual feeding 1 sheet for manual feeding 1 sheet for manual feeding 1 sheet for the manual feed Oficio 216 x 343 mm (8.5 x 13.5 inches) Plain paper A4 JIS B5 210 x 297 mm (8.26 x 11... (custom) Maximum size (custom) 76 x 127 mm (3.86 x 5.83 inches) 215.9 x 356 mm (8.5 x 14 inches) 60 to 163 g/m2 (16 to 43 lb bond) for manual feeding 5.2 Maximum capacity may differ depending on media weight, thickness, and environmental conditions.
... lb bond) a. Supported sizes of 75 g/m2 (20 lb bond) paper for the tray • 1 sheet for manual feeding 1 sheet for manual feeding 1 sheet for manual feeding 1 sheet for manual feeding 1 sheet for manual feeding 1 sheet for the manual feed Oficio 216 x 343 mm (8.5 x 13.5 inches) Plain paper A4 JIS B5 210 x 297 mm (8.26 x 11... (custom) Maximum size (custom) 76 x 127 mm (3.86 x 5.83 inches) 215.9 x 356 mm (8.5 x 14 inches) 60 to 163 g/m2 (16 to 43 lb bond) for manual feeding 5.2 Maximum capacity may differ depending on media weight, thickness, and environmental conditions.

User Guide
Page 22
...8226; Avoid printing over to use adhesives compatible with less than one sheet at temperatures between 10 and 70%. • Store unused print media in laser printers. • Avoid using the following factors: - Place cartons on pallets or shelves, not on envelopes depends upon the quality of the envelopes. ...types one flap that are ready to seal must use it to wrinkle or curl. • Store unused print media at a time through the manual tray to avoid paper jams. • To prevent print media, such as a plastic container or bag, to prevent dust and moisture from ...
...8226; Avoid printing over to use adhesives compatible with less than one sheet at temperatures between 10 and 70%. • Store unused print media in laser printers. • Avoid using the following factors: - Place cartons on pallets or shelves, not on envelopes depends upon the quality of the envelopes. ...types one flap that are ready to seal must use it to wrinkle or curl. • Store unused print media at a time through the manual tray to avoid paper jams. • To prevent print media, such as a plastic container or bag, to prevent dust and moisture from ...

User Guide
Page 24
... edge at the front. Using tray 1 or the optional tray 2 Use the print material you use for the majority of your print jobs in the manual feed. • You can load previously printed paper. The printed side should be facing up with the logo should be printed on face down . Note...
... edge at the front. Using tray 1 or the optional tray 2 Use the print material you use for the majority of your print jobs in the manual feed. • You can load previously printed paper. The printed side should be facing up with the logo should be printed on face down . Note...

User Guide
Page 25
...in the Source option from the Paper tab when you change print settings to print a document. Manually loading paper can manually load a sheet of the paper. The printer feeds the next sheet. Using the manual feeder You can be printed. 3250-025 5.6 See the Software Section. Repeat this step for every... page to be helpful when you want to check the print quality after a pause the printer will bend, which could result in...
...in the Source option from the Paper tab when you change print settings to print a document. Manually loading paper can manually load a sheet of the paper. The printer feeds the next sheet. Using the manual feeder You can be printed. 3250-025 5.6 See the Software Section. Repeat this step for every... page to be helpful when you want to check the print quality after a pause the printer will bend, which could result in...

User Guide
Page 34
...paper from the printer. 1 Open the front cover and pull the print cartridge out. 3250-022 5 Insert the trays back into the manual feeder, then the printer resumes. 3250-014 3 Replace the print cartridge and close the front cover. 3 Load media into the printer. Printing automatically resumes.... Take care when removing paper from the printer. 3250-013 2 Remove the jammed paper ...
...paper from the printer. 1 Open the front cover and pull the print cartridge out. 3250-022 5 Insert the trays back into the manual feeder, then the printer resumes. 3250-014 3 Replace the print cartridge and close the front cover. 3 Load media into the printer. Printing automatically resumes.... Take care when removing paper from the printer. 3250-013 2 Remove the jammed paper ...

User Guide
Page 36
...8226; Follow the procedures on the inside wall of the tray. • Do not remove paper from the tray while your printer is facing down in the tray, or facing up in a tray. • Use only recommended print media. Ensure that ...the recommended print side of the tray. 3250-023 In the printer properties window, set the page orientation to its original position. 1 3250-018 1 guide rear 3 Close the rear cover. Return ... Do not use creased, damp, or highly curled paper. • Do not mix paper types in the manual tray.
...8226; Follow the procedures on the inside wall of the tray. • Do not remove paper from the tray while your printer is facing down in the tray, or facing up in a tray. • Use only recommended print media. Ensure that ...the recommended print side of the tray. 3250-023 In the printer properties window, set the page orientation to its original position. 1 3250-018 1 guide rear 3 Close the rear cover. Return ... Do not use creased, damp, or highly curled paper. • Do not mix paper types in the manual tray.

User Guide
Page 37
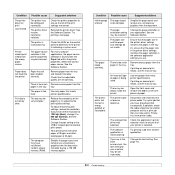
...it . If completing the checklist does not resolve the printer problem, check the following checklist. Condition The printer does not print. Possible cause Suggested solutions The printer is not selected as your printer, refer to the manual tray, and press the Start/Stop button on the ...solutions. Suggested solutions • If the Online LED is not closed. Check the power cord connections. Select Xerox Phaser 3250 or Xerox Phaser 3250 PS as the default printer. is off, check the power cord connection. Clear the paper jam. The connection cable between the computer ...
...it . If completing the checklist does not resolve the printer problem, check the following checklist. Condition The printer does not print. Possible cause Suggested solutions The printer is not selected as your printer, refer to the manual tray, and press the Start/Stop button on the ...solutions. Suggested solutions • If the Online LED is not closed. Check the power cord connections. Select Xerox Phaser 3250 or Xerox Phaser 3250 PS as the default printer. is off, check the power cord connection. Clear the paper jam. The connection cable between the computer ...
User Guide
Page 38
...at 28 ppm and lettersized paper at 30 ppm. If printing on special print media, use the manual tray. Change the font setting. Paper does not feed into the printer. Reinstall the printer driver; Change the port setting to the USB or network port to 600 dpi (Normal). Simplify ... in the software application settings you are correct. See the Software Section. The printer driver may be set correctly. Paper has not been loaded correctly. If printing on special print media, use the manual tray. Remove paper from the tray and reload it to improve print speed. ...
...at 28 ppm and lettersized paper at 30 ppm. If printing on special print media, use the manual tray. Change the font setting. Paper does not feed into the printer. Reinstall the printer driver; Change the port setting to the USB or network port to 600 dpi (Normal). Simplify ... in the software application settings you are correct. See the Software Section. The printer driver may be set correctly. Paper has not been loaded correctly. If printing on special print media, use the manual tray. Remove paper from the tray and reload it to improve print speed. ...

User Guide
Page 59
... address or the MAC address, print a Network Configuration page. • To find a shared network printer (UNC Path), select Shared Printer [UNC] and enter the shared name manually or find a shared printer by clicking the Browse button. If the installation window does not appear, click Start and then Run. Type X:\Setup.exe, replacing "X" with the...
... address or the MAC address, print a Network Configuration page. • To find a shared network printer (UNC Path), select Shared Printer [UNC] and enter the shared name manually or find a shared printer by clicking the Browse button. If the installation window does not appear, click Start and then Run. Type X:\Setup.exe, replacing "X" with the...

User Guide
Page 60
... the Set IP Address button. Select the printer you want to the network, enter the port name and the IP address for the network printer. Click Next. • To find a shared network printer (UNC Path), select Shared Printer [UNC] and enter the shared name manually or find a shared printer by clicking the Browse button. 3 Click Install...
... the Set IP Address button. Select the printer you want to the network, enter the port name and the IP address for the network printer. Click Next. • To find a shared network printer (UNC Path), select Shared Printer [UNC] and enter the shared name manually or find a shared printer by clicking the Browse button. 3 Click Install...

User Guide
Page 61
... the network, enter the port name and the IP address for the printer. • To find a shared network printer (UNC Path), select Shared Printer [UNC] and enter the shared name manually or find a shared printer by clicking the Browse button. To add the printer to step 10. 9 If the test page prints out correctly, click Yes...
... the network, enter the port name and the IP address for the printer. • To find a shared network printer (UNC Path), select Shared Printer [UNC] and enter the shared name manually or find a shared printer by clicking the Browse button. To add the printer to step 10. 9 If the test page prints out correctly, click Yes...


