
Quick Reference Poster
Page 1
...Optional on the Status Map. 2. Press Paper Supply until the tray required is lit on 4118P) Control Panel Output Tray Paper Tray 1 Paper Tray 2 (Optional) Stop Start Document ..., enter the 2. Confirmation Page 1. Select MSG Confirm and press Enter. 4. Manual Dial ¾ Press Manual Dial. Load originals using the Document Glass or Document Feeder (optional). 3. Printing...fm Page 1 Thursday, May 18, 2006 6:08 PM WorkCentre 4118 Quick Reference OVERVIEW Display Copy/Fax keys Navigation keys WORKCENTRE 4118X (4-IN-1) CONTROL PANEL Status keys Numeric Keypad Fax ...
...Optional on the Status Map. 2. Press Paper Supply until the tray required is lit on 4118P) Control Panel Output Tray Paper Tray 1 Paper Tray 2 (Optional) Stop Start Document ..., enter the 2. Confirmation Page 1. Select MSG Confirm and press Enter. 4. Manual Dial ¾ Press Manual Dial. Load originals using the Document Glass or Document Feeder (optional). 3. Printing...fm Page 1 Thursday, May 18, 2006 6:08 PM WorkCentre 4118 Quick Reference OVERVIEW Display Copy/Fax keys Navigation keys WORKCENTRE 4118X (4-IN-1) CONTROL PANEL Status keys Numeric Keypad Fax ...

Quick Reference Poster
Page 1
... Dial numbers to select the number required and press Enter. 4. Press Enter. Manual Dial ¾ Press Manual Dial. Using Redial 1. Use the navigation keys to the group, then press Menu....book Page 1 Thursday, March 2, 2006 11:42 AM WorkCentre 4118 Quick Reference OVERVIEW Display Copy/Fax keys Navigation keys WORKCENTRE 4118X (4-IN-1) CONTROL PANEL Status keys Numeric Keypad Fax Function... 1. Enter the passcode and press Enter. Printing or Deleting Documents 1. tray is lit on 4118P) Control Panel Output Tray Paper Tray 1 Paper Tray 2 (Optional) Stop Start Document Input ...
... Dial numbers to select the number required and press Enter. 4. Press Enter. Manual Dial ¾ Press Manual Dial. Using Redial 1. Use the navigation keys to the group, then press Menu....book Page 1 Thursday, March 2, 2006 11:42 AM WorkCentre 4118 Quick Reference OVERVIEW Display Copy/Fax keys Navigation keys WORKCENTRE 4118X (4-IN-1) CONTROL PANEL Status keys Numeric Keypad Fax Function... 1. Enter the passcode and press Enter. Printing or Deleting Documents 1. tray is lit on 4118P) Control Panel Output Tray Paper Tray 1 Paper Tray 2 (Optional) Stop Start Document Input ...

Quick Use Guide
Page 26
... and numbers until the Fax operation has been verified. ¾ Press the [Fax] key. ¾ Test the connection by pressing the [Manual Dial] key and listen for the key continually. Pressing the appropriate key on the pad cycles through each letter and the number for a dial... display is a problem with the telephone line cord, wall connection or an internal function on the WorkCentre 4118. 2 Setting the Machine ID (if applicable) ¾ Press [Machine Status] on the back of the WorkCentre 4118, and the other device, such as an answering machine until the ID displays. ¾ Press...
... and numbers until the Fax operation has been verified. ¾ Press the [Fax] key. ¾ Test the connection by pressing the [Manual Dial] key and listen for the key continually. Pressing the appropriate key on the pad cycles through each letter and the number for a dial... display is a problem with the telephone line cord, wall connection or an internal function on the WorkCentre 4118. 2 Setting the Machine ID (if applicable) ¾ Press [Machine Status] on the back of the WorkCentre 4118, and the other device, such as an answering machine until the ID displays. ¾ Press...

System Administration Guide
Page 14
... network utilizing TCP/IP is installed fully and functioning Customer correctly. Page 2-2 Xerox WorkCentre 4118 System Administration Guide Customer If you are going to configure TCP/IP manually, you need to obtain and record the following items are encountered during the WorkCentre 4118 installation, refer to the Glossary for assistance. Basic Network Installation Information Checklist Before...
... network utilizing TCP/IP is installed fully and functioning Customer correctly. Page 2-2 Xerox WorkCentre 4118 System Administration Guide Customer If you are going to configure TCP/IP manually, you need to obtain and record the following items are encountered during the WorkCentre 4118 installation, refer to the Glossary for assistance. Basic Network Installation Information Checklist Before...
System Administration Guide
Page 17
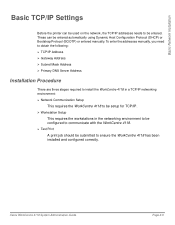
.../IP Settings Before the printer can be entered automatically using Dynamic Host Configuration Protocol (DHCP) or Bootstrap Protocol (BOOTP) or entered manually. Xerox WorkCentre 4118 System Administration Guide Page 2-5 To enter the addresses manually, you need to obtain the following: ¾ TCP/IP Address ¾ Gateway Address ¾ Subnet Mask Address ¾ Primary DNS Server...
.../IP Settings Before the printer can be entered automatically using Dynamic Host Configuration Protocol (DHCP) or Bootstrap Protocol (BOOTP) or entered manually. Xerox WorkCentre 4118 System Administration Guide Page 2-5 To enter the addresses manually, you need to obtain the following: ¾ TCP/IP Address ¾ Gateway Address ¾ Subnet Mask Address ¾ Primary DNS Server...

System Administration Guide
Page 21
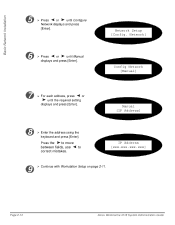
.../IP settings, you will need to the Internet Services chapter for instructions. Basic Network Installation Manually setting TCP/IP Addresses At the WorkCentre 4118, perform these steps: HINT: Xerox CentreWare Internet Services can also be used to configure the WorkCentre 4118, refer to know the following information: ¾ The IP address. ¾ The subnet mask, if...
.../IP settings, you will need to the Internet Services chapter for instructions. Basic Network Installation Manually setting TCP/IP Addresses At the WorkCentre 4118, perform these steps: HINT: Xerox CentreWare Internet Services can also be used to configure the WorkCentre 4118, refer to know the following information: ¾ The IP address. ¾ The subnet mask, if...
System Administration Guide
Page 22
... correct mistakes. Manual [IP Address] 8 ¾ Enter the address using the keyboard and press [Enter]. Network] Config Network [Manual] 7 ¾ For each address, press or until Manual displays and press [Enter]. IP Address [xxx.xxx.xxx.xxx] 9 ¾ Continue with Workstation Setup on page 2-11. Network Setup [Config. Page 2-10 Xerox WorkCentre 4118 System Administration Guide...
... correct mistakes. Manual [IP Address] 8 ¾ Enter the address using the keyboard and press [Enter]. Network] Config Network [Manual] 7 ¾ For each address, press or until Manual displays and press [Enter]. IP Address [xxx.xxx.xxx.xxx] 9 ¾ Continue with Workstation Setup on page 2-11. Network Setup [Config. Page 2-10 Xerox WorkCentre 4118 System Administration Guide...
System Administration Guide
Page 56
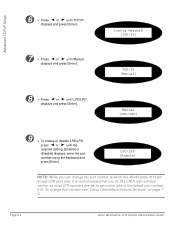
...press or until Manual displays and press [Enter]. LPD/LPD [Enable] NOTE: While you do this ONLY with extreme caution as most LPR spoolers are set to send print jobs to the default port number, 515. To change the port number at which the WorkCentre 4118 will accept LPR... print jobs, it is recommended that you can change Port number see "Using CentreWare Internet Services" on page 73. Page 6-4 Xerox WorkCentre 4118 System Administration Guide Config Network [TCP/IP] TCP/IP [Manual] 8 ¾ Press or until LPD/LPD...
...press or until Manual displays and press [Enter]. LPD/LPD [Enable] NOTE: While you do this ONLY with extreme caution as most LPR spoolers are set to send print jobs to the default port number, 515. To change the port number at which the WorkCentre 4118 will accept LPR... print jobs, it is recommended that you can change Port number see "Using CentreWare Internet Services" on page 73. Page 6-4 Xerox WorkCentre 4118 System Administration Guide Config Network [TCP/IP] TCP/IP [Manual] 8 ¾ Press or until LPD/LPD...
System Administration Guide
Page 61
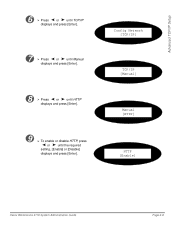
Advanced TCP/IP Setup 6 ¾ Press or until TCP/IP displays and press [Enter]. 7 ¾ Press or until Manual displays and press [Enter]. 8 ¾ Press or until HTTP displays and press [Enter]. 9 ¾ To enable or disable HTTP, press or until the required setting, [Enable] or [Disable] displays and press [Enter]. Config Network [TCP/IP] TCP/IP [Manual] Manual [HTTP] HTTP [Enable] Xerox WorkCentre 4118 System Administration Guide Page 6-9
Advanced TCP/IP Setup 6 ¾ Press or until TCP/IP displays and press [Enter]. 7 ¾ Press or until Manual displays and press [Enter]. 8 ¾ Press or until HTTP displays and press [Enter]. 9 ¾ To enable or disable HTTP, press or until the required setting, [Enable] or [Disable] displays and press [Enter]. Config Network [TCP/IP] TCP/IP [Manual] Manual [HTTP] HTTP [Enable] Xerox WorkCentre 4118 System Administration Guide Page 6-9
System Administration Guide
Page 98
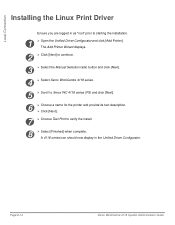
... Add Printer Wizard displays. 2 ¾ Click [Next] to continue. 3 ¾ Select the Manual Selection radio button and click [Next]. 4 ¾ Select Xerox WorkCentre 4118 series. 5 ¾ Scroll to Xerox WC 4118 series (PS) and click [Next]. 6 ¾ Choose a name for the printer and provide its...Test Print to starting the installation. 1 ¾ Open the Unified Driver Configurator and click [Add Printer]. Page 8-12 Xerox WorkCentre 4118 System Administration Guide A 4118 series icon should now display in as "root" prior to verify the install. 8 ¾ Select [Finished] when complete...
... Add Printer Wizard displays. 2 ¾ Click [Next] to continue. 3 ¾ Select the Manual Selection radio button and click [Next]. 4 ¾ Select Xerox WorkCentre 4118 series. 5 ¾ Scroll to Xerox WC 4118 series (PS) and click [Next]. 6 ¾ Choose a name for the printer and provide its...Test Print to starting the installation. 1 ¾ Open the Unified Driver Configurator and click [Add Printer]. Page 8-12 Xerox WorkCentre 4118 System Administration Guide A 4118 series icon should now display in as "root" prior to verify the install. 8 ¾ Select [Finished] when complete...
System Administration Guide
Page 121
...TCP/IP Addresses 2-7 B Basic Network Installation 2-1 Automatically setting TCP/IP Addresses 2-7 Basic TCP/IP Settings 2-5 Ethernet Port Setup 2-3 Information Checklist 2-2 Manually setting TCP/IP Addresses 2-9 Network Communication Setup 2-7 TCP/IP Enabling or Disabling 2-6 Test Print 2-11 Workstation Setup 2-11 Basic TCP/IP Settings ...9-2 Setup using Internet Services 9-3 Testing 9-5 G Glossary 12-1 H HTTP Configuration 7-22 HTTP Enabling/Disabling 6-8 I Information Sources 1-4 Internet Services 7-1 AppleTalk Configuration 7-8 Xerox WorkCentre 4118 System Administration Guide Index-1
...TCP/IP Addresses 2-7 B Basic Network Installation 2-1 Automatically setting TCP/IP Addresses 2-7 Basic TCP/IP Settings 2-5 Ethernet Port Setup 2-3 Information Checklist 2-2 Manually setting TCP/IP Addresses 2-9 Network Communication Setup 2-7 TCP/IP Enabling or Disabling 2-6 Test Print 2-11 Workstation Setup 2-11 Basic TCP/IP Settings ...9-2 Setup using Internet Services 9-3 Testing 9-5 G Glossary 12-1 H HTTP Configuration 7-22 HTTP Enabling/Disabling 6-8 I Information Sources 1-4 Internet Services 7-1 AppleTalk Configuration 7-8 Xerox WorkCentre 4118 System Administration Guide Index-1
System Administration Guide
Page 122
... 8-12 Macintosh Driver Installation 8-4 Test Print 8-11 Test Scan 8-11 Windows Driver Installation 8-6 Workstation Setup 8-8 LPR/LPD Configuration 7-16 LPR/LPD Enabling/Disabling 6-3 M Manually setting TCP/IP Addresses 2-9 N NetWare 3-1 Information Checklist 3-2 IP NDPS Printing 3-4 NetWare Environments 3-3 Test Print 3-5 Network Tools Reset NIC 10-2 Set Factory Defaults 10...Information Sources 1-4 Reset NIC 10-2 S Serial number 1-5 Set Factory Defaults 10-3 SNMP Configuration 7-13 SSDP Configuration 7-15 T TCP/IP Configuration 7-10 Index-2 Xerox WorkCentre 4118 System Administration Guide
... 8-12 Macintosh Driver Installation 8-4 Test Print 8-11 Test Scan 8-11 Windows Driver Installation 8-6 Workstation Setup 8-8 LPR/LPD Configuration 7-16 LPR/LPD Enabling/Disabling 6-3 M Manually setting TCP/IP Addresses 2-9 N NetWare 3-1 Information Checklist 3-2 IP NDPS Printing 3-4 NetWare Environments 3-3 Test Print 3-5 Network Tools Reset NIC 10-2 Set Factory Defaults 10...Information Sources 1-4 Reset NIC 10-2 S Serial number 1-5 Set Factory Defaults 10-3 SNMP Configuration 7-13 SSDP Configuration 7-15 T TCP/IP Configuration 7-10 Index-2 Xerox WorkCentre 4118 System Administration Guide

User Guide
Page 17
... any maintenance procedures unless you notice unusual noises or odors. Providing the correct environmental parameters as directed in the user manuals. There are fastened with screws. Xerox WorkCentre 4118 User Guide Page 1-9 Welcome Do Not Do These: ¾ Never use aerosol cleaners. The use of cleaners that...authorized local dealer or unless a procedure is provided. The ozone produced is heavier than air and is not specifically described in this manual. There are fastened with screws. Keep all of these materials out of the reach of children. ¾ Do not remove ...
... any maintenance procedures unless you notice unusual noises or odors. Providing the correct environmental parameters as directed in the user manuals. There are fastened with screws. Xerox WorkCentre 4118 User Guide Page 1-9 Welcome Do Not Do These: ¾ Never use aerosol cleaners. The use of cleaners that...authorized local dealer or unless a procedure is provided. The ozone produced is heavier than air and is not specifically described in this manual. There are fastened with screws. Keep all of these materials out of the reach of children. ¾ Do not remove ...

User Guide
Page 18
... accordance with the instruction manual, may result in the United States and Canada. It does not emit hazardous light, as a Class 1 laser product. Laser Safety Information CAUTION: Use of controls, adjustments or performance of children. ¾ Never throw toner, toner cartridges or toner containers into an open flame. Page 1-10 Xerox WorkCentre 4118 User Guide Welcome...
... accordance with the instruction manual, may result in the United States and Canada. It does not emit hazardous light, as a Class 1 laser product. Laser Safety Information CAUTION: Use of controls, adjustments or performance of children. ¾ Never throw toner, toner cartridges or toner containers into an open flame. Page 1-10 Xerox WorkCentre 4118 User Guide Welcome...

User Guide
Page 41
...Use to clear all programmed settings, the display requests confirmation. Press twice to activate a job. Xerox WorkCentre 4118 User Guide Page 2-11 Use to access setup menus and customize the machine. Use to manually enter multiple destinations for a fax job (4 in 1 only). Stop Use to clear a ... machine's Dial Directory (4 in 1 only). Use to enter alphanumeric characters. Getting Started Display Job Status Machine Status Manual Group Manual Dial Speed Dial Pause/Redial Numeric Keypad Start Displays the current status and the menu prompts and selections. Use to dial...
...Use to clear all programmed settings, the display requests confirmation. Press twice to activate a job. Xerox WorkCentre 4118 User Guide Page 2-11 Use to access setup menus and customize the machine. Use to manually enter multiple destinations for a fax job (4 in 1 only). Stop Use to clear a ... machine's Dial Directory (4 in 1 only). Use to enter alphanumeric characters. Getting Started Display Job Status Machine Status Manual Group Manual Dial Speed Dial Pause/Redial Numeric Keypad Start Displays the current status and the menu prompts and selections. Use to dial...

User Guide
Page 95
...When the fax tone is automatically dialled and the originals are scanned and faxed to manually program a broadcast ¾ Press [Manual Group]. Xerox WorkCentre 4118 User Guide Page 5-7 The Redial Memory in 1 only) Manual group dialing ¾ Load the originals and select [Fax]. The dial tone is...; Dial the fax number. Then select [No] and press [Enter]. Select [Yes] to dial the fax number with the ¾ Press [Manual Dial]. The originals are scanned and faxed. ¾ Load the originals and select [Fax]. ¾ Press [Pause/Redial] for approximately 2 seconds...
...When the fax tone is automatically dialled and the originals are scanned and faxed to manually program a broadcast ¾ Press [Manual Group]. Xerox WorkCentre 4118 User Guide Page 5-7 The Redial Memory in 1 only) Manual group dialing ¾ Load the originals and select [Fax]. The dial tone is...; Dial the fax number. Then select [No] and press [Enter]. Select [Yes] to dial the fax number with the ¾ Press [Manual Dial]. The originals are scanned and faxed. ¾ Load the originals and select [Fax]. ¾ Press [Pause/Redial] for approximately 2 seconds...

User Guide
Page 111
... This option is received pick up the external phone handset or press [Manual Dial]. Use to operate in 1 only) Fax Setup Options The following table lists all the Fax Setup options available and provides a instructions for customizing each setting. Xerox WorkCentre 4118 User Guide Page 5-23 Use to Fax mode automatically. If a fax... to print 2 sided, with the binding edge on the short edge. Use to set fax jobs to de-activate Fax Duplex. Fax (4 in manual mode. Use to set fax jobs to fax receive mode. Use to print 2 sided, with the binding edge on the long edge.
... This option is received pick up the external phone handset or press [Manual Dial]. Use to operate in 1 only) Fax Setup Options The following table lists all the Fax Setup options available and provides a instructions for customizing each setting. Xerox WorkCentre 4118 User Guide Page 5-23 Use to Fax mode automatically. If a fax... to print 2 sided, with the binding edge on the short edge. Use to set fax jobs to de-activate Fax Duplex. Fax (4 in manual mode. Use to set fax jobs to fax receive mode. Use to print 2 sided, with the binding edge on the long edge.

User Guide
Page 160
The machine returns to the "Maintenance Tools" on page 8-10. Page 9-10 Xerox WorkCentre 4118 User Guide To reset the counter manually refer to Standby mode. ) If the counter is not reset, 'Drum Warning' may appear before the new drum reaches its maximum life. Select [Yes] and press [Enter]. Maintenance 6 ¾ Reinstall the toner cartridge, then lock the lever. ¾ Close the front cover and the side cover. ¾ The display shows [New Drum Unit?].
The machine returns to the "Maintenance Tools" on page 8-10. Page 9-10 Xerox WorkCentre 4118 User Guide To reset the counter manually refer to Standby mode. ) If the counter is not reset, 'Drum Warning' may appear before the new drum reaches its maximum life. Select [Yes] and press [Enter]. Maintenance 6 ¾ Reinstall the toner cartridge, then lock the lever. ¾ Close the front cover and the side cover. ¾ The display shows [New Drum Unit?].

User Guide
Page 188
... 3-2 Covers copy 3-11 Create Booklet copy 3-12 Customer Replaceable Units 9-5 Drum Cartridge 9-8 Toner Cartridge 9-5 Customer Support 1-5 D Delay Fax 5-11 Dialing Methods Keypad Dialing 5-6 Manual Dialing 5-7 Manual Group Dialing 5-7 Redial 5-7 Document Feeder 3-3, 5-2, 7-3 Document Glass 3-4, 5-3, 7-4 Cleaning 9-2 Drum Cartridge 9-8 Replacing the Drum Cartridge 9-8 Drum Cartridge, installing 2-12 Drum Cleaning...Fax 5-8 Firmware Update Tab 8-5 G General Problems 10-2 General Specification 11-6 Getting Started Copying Procedure 3-2 Loading Paper 4-2 I ID Card Copy Xerox WorkCentre 4118 User Guide
... 3-2 Covers copy 3-11 Create Booklet copy 3-12 Customer Replaceable Units 9-5 Drum Cartridge 9-8 Toner Cartridge 9-5 Customer Support 1-5 D Delay Fax 5-11 Dialing Methods Keypad Dialing 5-6 Manual Dialing 5-7 Manual Group Dialing 5-7 Redial 5-7 Document Feeder 3-3, 5-2, 7-3 Document Glass 3-4, 5-3, 7-4 Cleaning 9-2 Drum Cartridge 9-8 Replacing the Drum Cartridge 9-8 Drum Cartridge, installing 2-12 Drum Cleaning...Fax 5-8 Firmware Update Tab 8-5 G General Problems 10-2 General Specification 11-6 Getting Started Copying Procedure 3-2 Loading Paper 4-2 I ID Card Copy Xerox WorkCentre 4118 User Guide

User Guide
Page 189
... Mailbox Setup 5-15 Maintenance Tools Billing Counters 8-12 Check Serial Number 8-10 Clean Drum 8-12 New Drum 8-11 Notify Toner Low 8-11 Making Connections 2-14 Manual Dialing 5-7 N Up copy 3-12 O Options 2-6 Ordering Supplies 9-4 Original Type copy 3-8 fax 5-8 Overview Control Panel 2-9 P Paper Specification 11-7 Paper Supply Auto Tray Switching 2-10, 3-2, 3-8, 4-5 ... Passcode 8-8 Enable 8-7 PCL Button 8-6 Phonebook Tab 8-5 Polling 5-12 Power Off 2-16 Power On 2-16 Preparing paper for loading 4-2 Print 6-2 Printer Specification 11-3 Printer Tab 8-6 Xerox WorkCentre 4118 User Guide Index - 3
... Mailbox Setup 5-15 Maintenance Tools Billing Counters 8-12 Check Serial Number 8-10 Clean Drum 8-12 New Drum 8-11 Notify Toner Low 8-11 Making Connections 2-14 Manual Dialing 5-7 N Up copy 3-12 O Options 2-6 Ordering Supplies 9-4 Original Type copy 3-8 fax 5-8 Overview Control Panel 2-9 P Paper Specification 11-7 Paper Supply Auto Tray Switching 2-10, 3-2, 3-8, 4-5 ... Passcode 8-8 Enable 8-7 PCL Button 8-6 Phonebook Tab 8-5 Polling 5-12 Power Off 2-16 Power On 2-16 Preparing paper for loading 4-2 Print 6-2 Printer Specification 11-3 Printer Tab 8-6 Xerox WorkCentre 4118 User Guide Index - 3


