
System Administration Guide
Page 15
... press [Enter]. Basic Network Installation Ethernet Port The Ethernet port is the default interface used on the WorkCentre 4118. Ethernet Port Setup If the speed setting of the Ethernet port needs to be disabled. Network [Ethernet] Xerox WorkCentre 4118 System Administration Guide Page 2-3 System Admin Tools [Passcode Protect] 4 ¾ Press or until Ethernet displays and...] button. 3 ¾ Press or until System Admin Tools displays and press [Enter]. ¾ If the System Admin Tools have been passcode protected, type in the password and press [Enter].
... press [Enter]. Basic Network Installation Ethernet Port The Ethernet port is the default interface used on the WorkCentre 4118. Ethernet Port Setup If the speed setting of the Ethernet port needs to be disabled. Network [Ethernet] Xerox WorkCentre 4118 System Administration Guide Page 2-3 System Admin Tools [Passcode Protect] 4 ¾ Press or until Ethernet displays and...] button. 3 ¾ Press or until System Admin Tools displays and press [Enter]. ¾ If the System Admin Tools have been passcode protected, type in the password and press [Enter].
System Administration Guide
Page 18
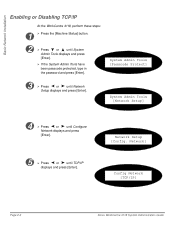
Network Setup [Config. Basic Network Installation Enabling or Disabling TCP/IP At the WorkCentre 4118, perform these steps: 1 ¾ Press the [Machine Status] button. 2 ¾ Press or until TCP/IP displays and press [Enter]. System Admin ... Tools displays and press [Enter]. ¾ If the System Admin Tools have been passcode protected, type in the password and press [Enter]. Network] Config Network [TCP/IP] Page 2-6 Xerox WorkCentre 4118 System Administration Guide System Admin Tools [Passcode Protect] 3 ¾ Press or until Network Setup displays and press [Enter...
Network Setup [Config. Basic Network Installation Enabling or Disabling TCP/IP At the WorkCentre 4118, perform these steps: 1 ¾ Press the [Machine Status] button. 2 ¾ Press or until TCP/IP displays and press [Enter]. System Admin ... Tools displays and press [Enter]. ¾ If the System Admin Tools have been passcode protected, type in the password and press [Enter]. Network] Config Network [TCP/IP] Page 2-6 Xerox WorkCentre 4118 System Administration Guide System Admin Tools [Passcode Protect] 3 ¾ Press or until Network Setup displays and press [Enter...

System Administration Guide
Page 19
System Admin Tools [Network Setup] Xerox WorkCentre 4118 System Administration Guide Page 2-7 System Admin Tools [Passcode Protect] 4 ¾ Press or until Enable displays and press [Enter]. Otherwise select Disable and press [Enter].... enable TCP/IP, press or until Network Setup displays and press [Enter]. TCP/IP [Setup] Network Communication Setup Automatically setting TCP/IP Addresses At the WorkCentre 4118, perform these steps: 1 ¾ Ensure the Ethernet Port has been configured (see "Ethernet Port" on page 2-3). 2 ¾ Press the [Machine Status] button. 3 ¾ ...
System Admin Tools [Network Setup] Xerox WorkCentre 4118 System Administration Guide Page 2-7 System Admin Tools [Passcode Protect] 4 ¾ Press or until Enable displays and press [Enter]. Otherwise select Disable and press [Enter].... enable TCP/IP, press or until Network Setup displays and press [Enter]. TCP/IP [Setup] Network Communication Setup Automatically setting TCP/IP Addresses At the WorkCentre 4118, perform these steps: 1 ¾ Ensure the Ethernet Port has been configured (see "Ethernet Port" on page 2-3). 2 ¾ Press the [Machine Status] button. 3 ¾ ...

System Administration Guide
Page 21
... have been passcode protected, type in the password and press [Enter]. System Admin Tools [Network Setup] Xerox WorkCentre 4118 System Administration Guide Page 2-9 Basic Network Installation Manually setting TCP/IP Addresses At the WorkCentre 4118, perform these steps: HINT: Xerox CentreWare Internet Services can also be used to configure the WorkCentre 4118, refer to know the following information: ¾...
... have been passcode protected, type in the password and press [Enter]. System Admin Tools [Network Setup] Xerox WorkCentre 4118 System Administration Guide Page 2-9 Basic Network Installation Manually setting TCP/IP Addresses At the WorkCentre 4118, perform these steps: HINT: Xerox CentreWare Internet Services can also be used to configure the WorkCentre 4118, refer to know the following information: ¾...

System Administration Guide
Page 47
... for instructions. 1 ¾ Connect the device to setup the network communication parameters of the WorkCentre 4118. At the WorkCentre 4118, perform these steps: HINT: Xerox CentreWare Internet Services can also be used to the network outlet or cable. 2 ¾ ...Press the [Machine Status] button. 3 ¾ Press or until System Admin Tools displays and press [Enter]. ¾ If the System Admin Tools have been passcode protected, type in the password...
... for instructions. 1 ¾ Connect the device to setup the network communication parameters of the WorkCentre 4118. At the WorkCentre 4118, perform these steps: HINT: Xerox CentreWare Internet Services can also be used to the network outlet or cable. 2 ¾ ...Press the [Machine Status] button. 3 ¾ Press or until System Admin Tools displays and press [Enter]. ¾ If the System Admin Tools have been passcode protected, type in the password...
System Administration Guide
Page 55
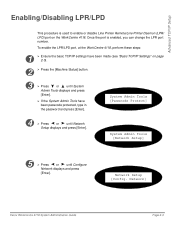
... these steps: 1 ¾ Ensure the basic TCP/IP settings have been passcode protected, type in the password and press [Enter]. Network] Xerox WorkCentre 4118 System Administration Guide Page 6-3 Once the port is used to enable or disable Line Printer Remote/Line Printer Daemon (LPR/ LPD) ... System Admin Tools displays and press [Enter]. ¾ If the System Admin Tools have been made (see "Basic TCP/IP Settings" on the WorkCentre 4118. System Admin Tools [Passcode Protect] 4 ¾ Press or until Configure Network displays and press [Enter]. System Admin Tools [Network Setup] 5 ...
... these steps: 1 ¾ Ensure the basic TCP/IP settings have been passcode protected, type in the password and press [Enter]. Network] Xerox WorkCentre 4118 System Administration Guide Page 6-3 Once the port is used to enable or disable Line Printer Remote/Line Printer Daemon (LPR/ LPD) ... System Admin Tools displays and press [Enter]. ¾ If the System Admin Tools have been made (see "Basic TCP/IP Settings" on the WorkCentre 4118. System Admin Tools [Passcode Protect] 4 ¾ Press or until Configure Network displays and press [Enter]. System Admin Tools [Network Setup] 5 ...
System Administration Guide
Page 57
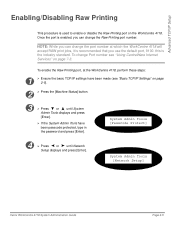
... until System Admin Tools displays and press [Enter]. ¾ If the System Admin Tools have been passcode protected, type in the password and press [Enter]. System Admin Tools [Network Setup] Xerox WorkCentre 4118 System Administration Guide Page 6-5 Advanced TCP/IP Setup Enabling/Disabling Raw Printing This procedure is the industry standard. NOTE: While you...
... until System Admin Tools displays and press [Enter]. ¾ If the System Admin Tools have been passcode protected, type in the password and press [Enter]. System Admin Tools [Network Setup] Xerox WorkCentre 4118 System Administration Guide Page 6-5 Advanced TCP/IP Setup Enabling/Disabling Raw Printing This procedure is the industry standard. NOTE: While you...

System Administration Guide
Page 60
... these steps: 1 ¾ Ensure the basic TCP/IP settings have been passcode protected, type in the password and press [Enter]. Network] Page 6-8 Xerox WorkCentre 4118 System Administration Guide System Admin Tools [Passcode Protect] 4 ¾ Press or until System Admin Tools displays and press [Enter]. ¾ If the System Admin Tools ...
... these steps: 1 ¾ Ensure the basic TCP/IP settings have been passcode protected, type in the password and press [Enter]. Network] Page 6-8 Xerox WorkCentre 4118 System Administration Guide System Admin Tools [Passcode Protect] 4 ¾ Press or until System Admin Tools displays and press [Enter]. ¾ If the System Admin Tools ...
System Administration Guide
Page 65
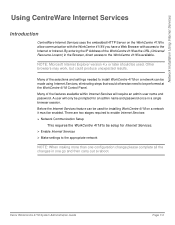
... out a reboot. A user will require an admin user name and password. NOTE: Microsoft Internet Explorer version 4.x or later should be performed at the WorkCentre 4118 Control Panel. Many of the WorkCentre 4118 as the URL (Universal Resource Locator) in the Browser, direct access .... Other browsers may work, but could produce unexpected results. Xerox WorkCentre 4118 System Administration Guide Page 7-3 There are two stages required to enable Internet Services: ¾ Network Communication Setup This requires the WorkCentre 4118 to be setup for Internet Services. ¾ Enable Internet ...
... out a reboot. A user will require an admin user name and password. NOTE: Microsoft Internet Explorer version 4.x or later should be performed at the WorkCentre 4118 Control Panel. Many of the WorkCentre 4118 as the URL (Universal Resource Locator) in the Browser, direct access .... Other browsers may work, but could produce unexpected results. Xerox WorkCentre 4118 System Administration Guide Page 7-3 There are two stages required to enable Internet Services: ¾ Network Communication Setup This requires the WorkCentre 4118 to be setup for Internet Services. ¾ Enable Internet ...
System Administration Guide
Page 91
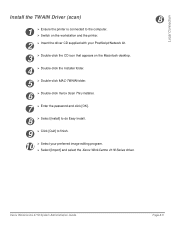
.... 5 ¾ Double-click MAC-TWAIN folder. 6 ¾ Double-click Xerox Scan Thru installer. 7 ¾ Enter the password and click [OK]. 8 ¾ Select [install] to do Easy Install. 9 ¾ Click [Quit] to finish. 10 ¾ Select your preferred image editing program. ¾ Select [Import] and select the Xerox WorkCentre 4118 Series driver. Xerox WorkCentre 4118 System Administration Guide Page 8-5
.... 5 ¾ Double-click MAC-TWAIN folder. 6 ¾ Double-click Xerox Scan Thru installer. 7 ¾ Enter the password and click [OK]. 8 ¾ Select [install] to do Easy Install. 9 ¾ Click [Quit] to finish. 10 ¾ Select your preferred image editing program. ¾ Select [Import] and select the Xerox WorkCentre 4118 Series driver. Xerox WorkCentre 4118 System Administration Guide Page 8-5

System Administration Guide
Page 106
...; Press or until System Admin Tools displays and press [Enter]. ¾ If the System Admin Tools has already been passcode protected, type in the password and press [Enter]. Network Setup [Reset NIC] Page 10-2 Xerox WorkCentre 4118 System Administration Guide Administration Tools Network Tools Three tools are provided for the network: ¾ Reset NIC -
...; Press or until System Admin Tools displays and press [Enter]. ¾ If the System Admin Tools has already been passcode protected, type in the password and press [Enter]. Network Setup [Reset NIC] Page 10-2 Xerox WorkCentre 4118 System Administration Guide Administration Tools Network Tools Three tools are provided for the network: ¾ Reset NIC -

System Administration Guide
Page 107
... has already been passcode protected, type in the password and press [Enter]. 3 ¾ Press or until Network Setup displays and press [Enter]. 4 ¾ Press or until Factory Default displays and press [Enter]. System Admin Tools [Passcode Protect] System Admin Tools [Network Setup] Network Setup [Factory Defaults] Xerox WorkCentre 4118 System Administration Guide Page 10-3
... has already been passcode protected, type in the password and press [Enter]. 3 ¾ Press or until Network Setup displays and press [Enter]. 4 ¾ Press or until Factory Default displays and press [Enter]. System Admin Tools [Passcode Protect] System Admin Tools [Network Setup] Network Setup [Factory Defaults] Xerox WorkCentre 4118 System Administration Guide Page 10-3
System Administration Guide
Page 111
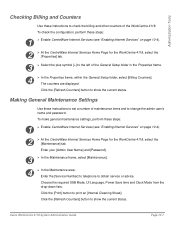
... the Properties frame, within the General Setup folder, select [Billing Counters]. The counters are displayed. Xerox WorkCentre 4118 System Administration Guide Page 10-7 Enter your [Admin User Name] and [Password]. 3 ¾ In the Maintenance frame, select [Maintenance]. 4 ¾ In the Maintenance area...Internet Services (see "Enabling Internet Services" on page 10-4). 2 ¾ At the CentreWare Internet Services Home Page for the WorkCentre 4118, select the [Maintenance] tab. Click the [Refresh Counters] button to show the current status. Click the [Print] button to...
... the Properties frame, within the General Setup folder, select [Billing Counters]. The counters are displayed. Xerox WorkCentre 4118 System Administration Guide Page 10-7 Enter your [Admin User Name] and [Password]. 3 ¾ In the Maintenance frame, select [Maintenance]. 4 ¾ In the Maintenance area...Internet Services (see "Enabling Internet Services" on page 10-4). 2 ¾ At the CentreWare Internet Services Home Page for the WorkCentre 4118, select the [Maintenance] tab. Click the [Refresh Counters] button to show the current status. Click the [Print] button to...

System Administration Guide
Page 112
Administration Tools 5 ¾ To change the Admin User Password, in the WorkCentre 4118. To upgrade the firmware, perform these instructions to the location and select the file. 7 ¾ Click the [Upgrade] button. Use these steps... to implement any changes. Page 10-8 Xerox WorkCentre 4118 System Administration Guide Upgrading Firmware Firmware upgrades my be supplied on page 10-4). 2 ¾ At the CentreWare Internet Services Home Page for the WorkCentre 4118, select the [Maintenance] tab. Enter the [New User Password] and [Old User Password]. 6 ¾ Click the [Apply]...
Administration Tools 5 ¾ To change the Admin User Password, in the WorkCentre 4118. To upgrade the firmware, perform these instructions to the location and select the file. 7 ¾ Click the [Upgrade] button. Use these steps... to implement any changes. Page 10-8 Xerox WorkCentre 4118 System Administration Guide Upgrading Firmware Firmware upgrades my be supplied on page 10-4). 2 ¾ At the CentreWare Internet Services Home Page for the WorkCentre 4118, select the [Maintenance] tab. Enter the [New User Password] and [Old User Password]. 6 ¾ Click the [Apply]...
User Guide
Page 102
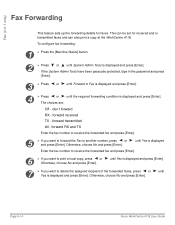
...) Fax Forwarding This feature sets up the forwarding details for received and or transmitted faxes and can also print a copy at the WorkCentre 4118. forward transmitted All - forward RX and TX Enter the fax number to receive the forwarded fax and press [Enter]. 5 ¾...the required forwarding condition is displayed and press [Enter]. Fax (4 in the password and press [Enter]. 3 ¾ Press or until Forward to another number, press or and press [Enter]. until Page 5-14 Xerox WorkCentre 4118 User Guide don't forward RX - Otherwise, choose No and press [Enter...
...) Fax Forwarding This feature sets up the forwarding details for received and or transmitted faxes and can also print a copy at the WorkCentre 4118. forward transmitted All - forward RX and TX Enter the fax number to receive the forwarded fax and press [Enter]. 5 ¾...the required forwarding condition is displayed and press [Enter]. Fax (4 in the password and press [Enter]. 3 ¾ Press or until Forward to another number, press or and press [Enter]. until Page 5-14 Xerox WorkCentre 4118 User Guide don't forward RX - Otherwise, choose No and press [Enter...
User Guide
Page 103
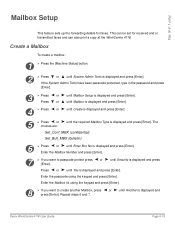
...) Set_Bull_MBX (bulletin) 6 ¾ Press or until Yes is displayed and press [Enter]. or until Mailbox Setup is displayed and Xerox WorkCentre 4118 User Guide Page 5-15 If the System Admin Tools have been passcode protected, type in 1 only) Mailbox Setup This feature sets ... Mailbox, press press [Enter]. Fax (4 in the password and press [Enter]. 3 ¾ Press or until Another is displayed and press [Enter]. using the keypad and press [Enter]. This can also print a copy at the WorkCentre 4118. Enter the passcode using the keypad and press [Enter...
...) Set_Bull_MBX (bulletin) 6 ¾ Press or until Yes is displayed and press [Enter]. or until Mailbox Setup is displayed and Xerox WorkCentre 4118 User Guide Page 5-15 If the System Admin Tools have been passcode protected, type in 1 only) Mailbox Setup This feature sets ... Mailbox, press press [Enter]. Fax (4 in the password and press [Enter]. 3 ¾ Press or until Another is displayed and press [Enter]. using the keypad and press [Enter]. This can also print a copy at the WorkCentre 4118. Enter the passcode using the keypad and press [Enter...
User Guide
Page 104
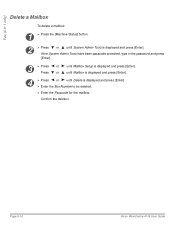
until Mailbox is displayed and press [Enter]. 4 ¾ Press or until Delete is displayed and press [Enter]. Confirm the deletion. Page 5-16 Xerox WorkCentre 4118 User Guide Fax (4 in the password and press [Enter]. 3 ¾ Press Press or or until Mailbox Setup is displayed and press [Enter]. If the System Admin Tools have been passcode...
until Mailbox is displayed and press [Enter]. 4 ¾ Press or until Delete is displayed and press [Enter]. Confirm the deletion. Page 5-16 Xerox WorkCentre 4118 User Guide Fax (4 in the password and press [Enter]. 3 ¾ Press Press or or until Mailbox Setup is displayed and press [Enter]. If the System Admin Tools have been passcode...
User Guide
Page 143
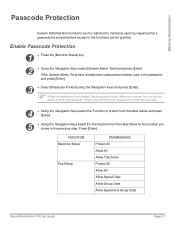
...granted. If the System Admin Tools have already been passcode protected, type in the previous step. When you choose Yes, you chose in the password and press [Enter]. 3 ¾ Select [Passcode Protect] using the Navigation Keys and press [Enter]. ) When the machine is first ... Fax Setup PERMISSIONS Protect All Allow All Allow Tray Sizes Protect All Allow All Allow Speed Dials Allow Group Dials Allow Speed and Group Dials Xerox WorkCentre 4118 User Guide Page 8-7 Enable Passcode Protection 1 ¾ Press the [Machine Status] key. 2 ¾ Using the Navigation Keys select [System...
...granted. If the System Admin Tools have already been passcode protected, type in the previous step. When you choose Yes, you chose in the password and press [Enter]. 3 ¾ Select [Passcode Protect] using the Navigation Keys and press [Enter]. ) When the machine is first ... Fax Setup PERMISSIONS Protect All Allow All Allow Tray Sizes Protect All Allow All Allow Speed Dials Allow Group Dials Allow Speed and Group Dials Xerox WorkCentre 4118 User Guide Page 8-7 Enable Passcode Protection 1 ¾ Press the [Machine Status] key. 2 ¾ Using the Navigation Keys select [System...
User Guide
Page 144
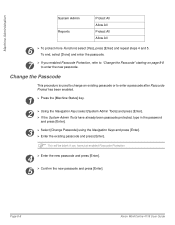
... All Protect All Allow All 6 ¾ To protect more Functions select [Yes], press [Enter] and repeat steps 4 and 5. Page 8-8 Xerox WorkCentre 4118 User Guide Change the Passcode This procedure is used to change an existing passcode or to enter the new passcode. To end, select [Done] ... the Navigation Keys select [System Admin Tools] and press [Enter]. ¾ If the System Admin Tools have already been passcode protected, type in the password and press [Enter]. 3 ¾ Select [Change Passcode] using the Navigation Keys and press [Enter]. ¾ Enter the existing passcode and press [...
... All Protect All Allow All 6 ¾ To protect more Functions select [Yes], press [Enter] and repeat steps 4 and 5. Page 8-8 Xerox WorkCentre 4118 User Guide Change the Passcode This procedure is used to change an existing passcode or to enter the new passcode. To end, select [Done] ... the Navigation Keys select [System Admin Tools] and press [Enter]. ¾ If the System Admin Tools have already been passcode protected, type in the password and press [Enter]. 3 ¾ Select [Change Passcode] using the Navigation Keys and press [Enter]. ¾ Enter the existing passcode and press [...
User Guide
Page 145
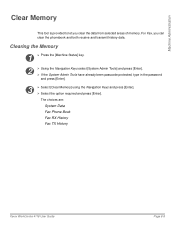
...; Using the Navigation Keys select [System Admin Tools] and press [Enter]. ¾ If the System Admin Tools have already been passcode protected, type in the password and press [Enter]. 3 ¾ Select [Clear Memory] using the Navigation Keys and press [Enter]. ¾ Select the option required and press [Enter]. Machine Administration Clear... can clear the phonebook and both receive and transmit history data. The choices are: System Data Fax Phone Book Fax RX History Fax TX History Xerox WorkCentre 4118 User Guide Page 8-9
...; Using the Navigation Keys select [System Admin Tools] and press [Enter]. ¾ If the System Admin Tools have already been passcode protected, type in the password and press [Enter]. 3 ¾ Select [Clear Memory] using the Navigation Keys and press [Enter]. ¾ Select the option required and press [Enter]. Machine Administration Clear... can clear the phonebook and both receive and transmit history data. The choices are: System Data Fax Phone Book Fax RX History Fax TX History Xerox WorkCentre 4118 User Guide Page 8-9


