Statement of Volatility - WorkCentre 4150
Page 1
... Non-volatile Yes Non-Volatile No for a minimum of an MSOK (Master System Operation Key). The WorkCentre 4150 contains non-volatile memory in the form of printing. The WorkCentre 4150 does not retain any latent image in the print controller (raster image processor) or associated RAM...will remove the image. Date: 4/10/2007 Subject: Volatility statement for the WorkCentre 4150 multifunction printer The WorkCentre 4150 does not retain any latent user image in the mechanical system of power. The WorkCentre 4150 contains non-volatile flash memory contained on the controller. This key can...
... Non-volatile Yes Non-Volatile No for a minimum of an MSOK (Master System Operation Key). The WorkCentre 4150 contains non-volatile memory in the form of printing. The WorkCentre 4150 does not retain any latent image in the print controller (raster image processor) or associated RAM...will remove the image. Date: 4/10/2007 Subject: Volatility statement for the WorkCentre 4150 multifunction printer The WorkCentre 4150 does not retain any latent user image in the mechanical system of power. The WorkCentre 4150 contains non-volatile flash memory contained on the controller. This key can...
Getting Started Guide
Page 5
... this book in the order they are presented you for choosing the WorkCentre 4150. Xerox WorkCentre 4150 Getting Started Guide Thank you will successfully: Connect the WorkCentre Set-up the WorkCentre Install optional features Operate the WorkCentre Contents Install the WorkCentre 3 Switch On the WorkCentre 4 Your WorkCentre 6 Connecting to the Network 9 Install Print Drivers 11 E-mail Setup 12 Fax...
... this book in the order they are presented you for choosing the WorkCentre 4150. Xerox WorkCentre 4150 Getting Started Guide Thank you will successfully: Connect the WorkCentre Set-up the WorkCentre Install optional features Operate the WorkCentre Contents Install the WorkCentre 3 Switch On the WorkCentre 4 Your WorkCentre 6 Connecting to the Network 9 Install Print Drivers 11 E-mail Setup 12 Fax...

Getting Started Guide
Page 6
...features available on the screen, such as icons, screen displays, looks etc. For the latest information go to the Xerox website www.xerox.com/support. The information in subsequent editions of other companies are hereby acknowledged. Changes and technical updates will be added...the information without limitations, material generated from the software programs which are displayed on your WorkCentre, please refer to www.xerox.com/support. 2 getting started guide Prepared by: Xerox GKLS European Operations Bessemer Road Welwyn Garden City Hertfordshire AL7 1BU ENGLAND ©2006 by ...
...features available on the screen, such as icons, screen displays, looks etc. For the latest information go to the Xerox website www.xerox.com/support. The information in subsequent editions of other companies are hereby acknowledged. Changes and technical updates will be added...the information without limitations, material generated from the software programs which are displayed on your WorkCentre, please refer to www.xerox.com/support. 2 getting started guide Prepared by: Xerox GKLS European Operations Bessemer Road Welwyn Garden City Hertfordshire AL7 1BU ENGLAND ©2006 by ...

Getting Started Guide
Page 7
... any hardware options and locate the Installation Instructions. 2 Follow the Installation Instructions to assemble the WorkCentre and hardware options. Standard Features WorkCentre 4150 WorkCentre 4150s WorkCentre 4150x WorkCentre 4150xf Copy Tray 1 and Bypass Tray Optional Hardware Copy, Print and E-mail Tray 1 and Bypass Tray Copy, Print, E-... of these four configurations. The result will have: Power Cord, User Documentation CD, Print Driver CD (WorkCentre 4150s, 4150x and 4150 xf configurations only), Getting Started Guide (this book) and a Telephone Cable (Fax Option only).
... any hardware options and locate the Installation Instructions. 2 Follow the Installation Instructions to assemble the WorkCentre and hardware options. Standard Features WorkCentre 4150 WorkCentre 4150s WorkCentre 4150x WorkCentre 4150xf Copy Tray 1 and Bypass Tray Optional Hardware Copy, Print and E-mail Tray 1 and Bypass Tray Copy, Print, E-... of these four configurations. The result will have: Power Cord, User Documentation CD, Print Driver CD (WorkCentre 4150s, 4150x and 4150 xf configurations only), Getting Started Guide (this book) and a Telephone Cable (Fax Option only).
Getting Started Guide
Page 8
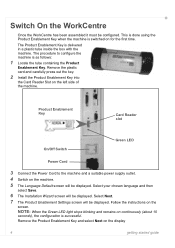
... carefully press out the key. 2 Install the Product Enablement Key into the Card Reader Slot on the display 4 getting started guide Switch On the WorkCentre Once the WorkCentre has been assembled it must be displayed. This is done using the Product Enablement Key when the machine is delivered in a plastic tube inside...
... carefully press out the key. 2 Install the Product Enablement Key into the Card Reader Slot on the display 4 getting started guide Switch On the WorkCentre Once the WorkCentre has been assembled it must be displayed. This is done using the Product Enablement Key when the machine is delivered in a plastic tube inside...
Getting Started Guide
Page 9
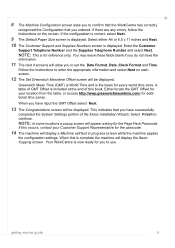
... configuration is correct, select Next. 9 The Default Paper Size screen is included at the end of this book. A table of the Xerox Installation Wizard. When this occurs, contact your location from the table, or access http://wwp.greenwichmeantime.com/ for you to use. Enter the...the passcode. 14 The machine will display the Basic Copying screen. 8 The Machine Configuration screen asks you to confirm that the WorkCentre has correctly recognized the Configuration that you have successfully completed the System Settings portion of GMT Offset is displayed. When you have input...
... configuration is correct, select Next. 9 The Default Paper Size screen is included at the end of this book. A table of the Xerox Installation Wizard. When this occurs, contact your location from the table, or access http://wwp.greenwichmeantime.com/ for you to use. Enter the...the passcode. 14 The machine will display the Basic Copying screen. 8 The Machine Configuration screen asks you to confirm that the WorkCentre has correctly recognized the Configuration that you have successfully completed the System Settings portion of GMT Offset is displayed. When you have input...
Getting Started Guide
Page 10
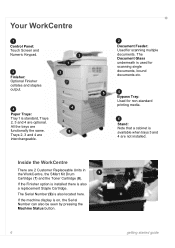
... 6 getting started guide If the machine display is also a replacement Staple Cartridge. Inside the WorkCentre There are not installed. All the trays are optional. Your WorkCentre 1 Control Panel: Touch Screen and Numeric Keypad. 3 Finisher: Optional Finisher collates and staples... 1 is standard, Trays 2, 3 and 4 are functionally the same. The Serial Number (9) is available when trays 3 and 4 are 2 Customer Replaceable Units in the WorkCentre, the SMart Kit Drum 9 Cartridge (7) and the Toner Cartridge (8). Trays 2, 3 and 4 are interchangeable. 2 1 3 1 2 4 3 4 6 2 Document ...
... 6 getting started guide If the machine display is also a replacement Staple Cartridge. Inside the WorkCentre There are not installed. All the trays are optional. Your WorkCentre 1 Control Panel: Touch Screen and Numeric Keypad. 3 Finisher: Optional Finisher collates and staples... 1 is standard, Trays 2, 3 and 4 are functionally the same. The Serial Number (9) is available when trays 3 and 4 are 2 Customer Replaceable Units in the WorkCentre, the SMart Kit Drum 9 Cartridge (7) and the Toner Cartridge (8). Trays 2, 3 and 4 are interchangeable. 2 1 3 1 2 4 3 4 6 2 Document ...
Getting Started Guide
Page 11
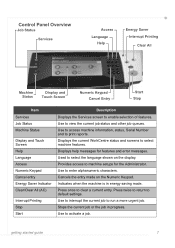
... once to print reports. Use to access machine information, status, Serial Number and to clear a current entry. Use to select machine features. Displays the current WorkCentre status and screens to enter alphanumeric characters. Use to interrupt the current job to default settings. Press twice to return to run a more urgent job...
... once to print reports. Use to access machine information, status, Serial Number and to clear a current entry. Use to select machine features. Displays the current WorkCentre status and screens to enter alphanumeric characters. Use to interrupt the current job to default settings. Press twice to return to run a more urgent job...

Getting Started Guide
Page 13
When the WorkCentre is powered on ... to set up the TCP/IP network connection using DHCP. Test the WorkCentre Before connecting the WorkCentre to your WorkCentre to a different type of the following methods: • DHCP: Use...Ethernet cable to manually assign an IP address provided by Xerox. 2 Continue on to the next step to Troubleshooting on the WorkCentre. If copying is not successful, refer to setup the...configuration. RJ45 Network Connector Network Setup Using DHCP 1 After the WorkCentre starts, it is operating correctly as a copier. 1 Place a document in the next steps....
When the WorkCentre is powered on ... to set up the TCP/IP network connection using DHCP. Test the WorkCentre Before connecting the WorkCentre to your WorkCentre to a different type of the following methods: • DHCP: Use...Ethernet cable to manually assign an IP address provided by Xerox. 2 Continue on to the next step to Troubleshooting on the WorkCentre. If copying is not successful, refer to setup the...configuration. RJ45 Network Connector Network Setup Using DHCP 1 After the WorkCentre starts, it is operating correctly as a copier. 1 Place a document in the next steps....

Getting Started Guide
Page 15
...print operation failed, refer to Troubleshooting on to install different print drivers or are on the Print Driver CD that accompanied your WorkCentre. For a full explanation refer to install Print Drivers using a different operating system refer to the CD drive. NOTE: CentreWare... is a group of applications, internet services and printer drivers which provide assistance to the WorkCentre. 11 If the printing operation is displayed. 4 Select Install Drivers. 5 Select Install Print Drivers. NOTE: The Adobe® PostScript®...
...print operation failed, refer to Troubleshooting on to install different print drivers or are on the Print Driver CD that accompanied your WorkCentre. For a full explanation refer to install Print Drivers using a different operating system refer to the CD drive. NOTE: CentreWare... is a group of applications, internet services and printer drivers which provide assistance to the WorkCentre. 11 If the printing operation is displayed. 4 Select Install Drivers. 5 Select Install Print Drivers. NOTE: The Adobe® PostScript®...

Getting Started Guide
Page 16
... or BootP) the Domain Name will use as the default From address. • Test the E-mail account by sending an E-mail to the Xerox device account. Press Enter. 2 Select Properties > Connectivity > Protocols > TCP/IP. 3 Enter the domain name in the Tools Pathway. (Select Access > Passcode...Optional Services > E-mail.) Before starting the setup procedure, please ensure the following items are available or have been performed. • Ensure the WorkCentre is fully functioning on the network and that the E-mail service is accessed through your web browser. 1 Open your Web browser and enter ...
... or BootP) the Domain Name will use as the default From address. • Test the E-mail account by sending an E-mail to the Xerox device account. Press Enter. 2 Select Properties > Connectivity > Protocols > TCP/IP. 3 Enter the domain name in the Tools Pathway. (Select Access > Passcode...Optional Services > E-mail.) Before starting the setup procedure, please ensure the following items are available or have been performed. • Ensure the WorkCentre is fully functioning on the network and that the E-mail service is accessed through your web browser. 1 Open your Web browser and enter ...
Getting Started Guide
Page 18
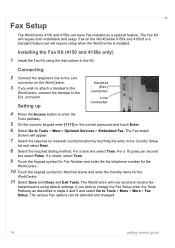
... in the Kit. If you wish to attach a handset to the WorkCentre, connect the handset to Tools > More > More > Fax Setup. Connecting 2 Connect the telephone line to the Line connector on the WorkCentre 4150x and 4150xf is a standard feature but will require both installation and setup.... For a tone line select Tone. The Fax Kit will require setup when the WorkCentre is installed. Setting up Handset (Ext.) connector Line connector...
... in the Kit. If you wish to attach a handset to the WorkCentre, connect the handset to Tools > More > More > Fax Setup. Connecting 2 Connect the telephone line to the Line connector on the WorkCentre 4150x and 4150xf is a standard feature but will require both installation and setup.... For a tone line select Tone. The Fax Kit will require setup when the WorkCentre is installed. Setting up Handset (Ext.) connector Line connector...
Getting Started Guide
Page 19
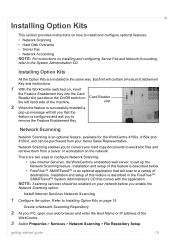
... message will contain a Feature Enablement Key and instructions. 1 With the WorkCentre switched on, insert the Feature Enablement Key into the Card Reader slot just above the On/Off switch on your Xerox Sales Representative. getting started guide 15 Install Internet Services Network Scanning 1 ...the Feature Enablement Key. Installation and setup of the machine. slot 2 When the feature is an optional feature, available for the WorkCentre 4150s, 4150x and 4150xf, and can be enabled on Card Reader the left hand side of this feature is described below. • FreeFlow&#...
... message will contain a Feature Enablement Key and instructions. 1 With the WorkCentre switched on, insert the Feature Enablement Key into the Card Reader slot just above the On/Off switch on your Xerox Sales Representative. getting started guide 15 Install Internet Services Network Scanning 1 ...the Feature Enablement Key. Installation and setup of the machine. slot 2 When the feature is an optional feature, available for the WorkCentre 4150s, 4150x and 4150xf, and can be enabled on Card Reader the left hand side of this feature is described below. • FreeFlow&#...
Getting Started Guide
Page 20
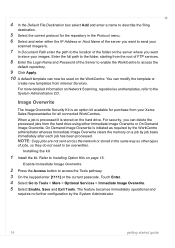
... enter a name to describe the filing destination. 5 Select the correct protocol for the repository in the same way as required by the WorkCentre administrator whereas Immediate Image Overwrite clears the memory on Network Scanning, repositories and templates, refer to access the Tools pathway. 3 On the ...keypad enter [1111] or the current passcode. For security, you can delete the processed jobs from your Xerox Sales Representative for all connected WorkCentres. Refer to store your scanned images to. 7 In Document Path enter the path to the location of the Server to enable...
... enter a name to describe the filing destination. 5 Select the correct protocol for the repository in the same way as required by the WorkCentre administrator whereas Immediate Image Overwrite clears the memory on Network Scanning, repositories and templates, refer to access the Tools pathway. 3 On the ...keypad enter [1111] or the current passcode. For security, you can delete the processed jobs from your Xerox Sales Representative for all connected WorkCentres. Refer to store your scanned images to. 7 In Document Path enter the path to the location of the Server to enable...
Getting Started Guide
Page 22
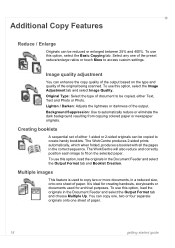
...Multiple images This feature is ideal for archival purposes. You can copy one, two or four separate originals onto one of paper. The WorkCentre will also reduce and correctly position each image to fit on the type and quality of either Text, Text and Photo or Photo. It...scanned. Additional Copy Features Reduce / Enlarge Originals can be copied to create handy booklets. Original Type: Select the type of the output. The WorkCentre produces 2-sided prints automatically, which when folded, produces a booklet with all the pages in the Document Feeder and select the Output Format tab and...
...Multiple images This feature is ideal for archival purposes. You can copy one, two or four separate originals onto one of paper. The WorkCentre will also reduce and correctly position each image to fit on the type and quality of either Text, Text and Photo or Photo. It...scanned. Additional Copy Features Reduce / Enlarge Originals can be copied to create handy booklets. Original Type: Select the type of the output. The WorkCentre produces 2-sided prints automatically, which when folded, produces a booklet with all the pages in the Document Feeder and select the Output Format tab and...
Getting Started Guide
Page 23
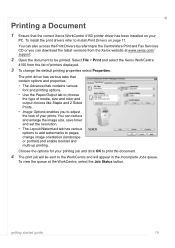
...to print the document. 4 The print job will appear in the Incomplete Jobs queue. Select File > Print and select the Xerox WorkCentre 4150 from the Xerox website at the WorkCentre, select the Job Status button. getting started guide 19 You can reduce and enlarge the image size, save toner and set...) and enable booklet and multi-up printing. The print driver has various tabs that the correct Xerox WorkCentre 4150 printer driver has been installed on page 11. To view the queue at www.xerox.com/ support. 2 Open the document to be sent to pages, change the default printing properties...
...to print the document. 4 The print job will appear in the Incomplete Jobs queue. Select File > Print and select the Xerox WorkCentre 4150 from the Xerox website at the WorkCentre, select the Job Status button. getting started guide 19 You can reduce and enlarge the image size, save toner and set...) and enable booklet and multi-up printing. The print driver has various tabs that the correct Xerox WorkCentre 4150 printer driver has been installed on page 11. To view the queue at www.xerox.com/ support. 2 Open the document to be sent to pages, change the default printing properties...

Getting Started Guide
Page 25
enter the number on the Control Panel. adjust settings to the WorkCentre, select Manual Dial and dial the number on the handset. • Speed Dial - set speed dial number. • Send List - getting started guide 21 This ...
enter the number on the Control Panel. adjust settings to the WorkCentre, select Manual Dial and dial the number on the handset. • Speed Dial - set speed dial number. • Send List - getting started guide 21 This ...
Getting Started Guide
Page 26
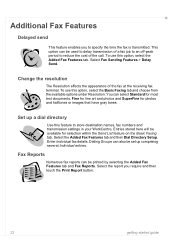
... by selecting the Added Fax Features tab and Fax Reports. Select the report you to store destination names, fax numbers and transmission settings in your WorkCentre. Change the resolution The Resolution effects the appearance of the call. Select Fax Sending Features > Delay Send. Fax Reports Numerous fax reports can select Standard...
... by selecting the Added Fax Features tab and Fax Reports. Select the report you to store destination names, fax numbers and transmission settings in your WorkCentre. Change the resolution The Resolution effects the appearance of the call. Select Fax Sending Features > Delay Send. Fax Reports Numerous fax reports can select Standard...
Getting Started Guide
Page 28
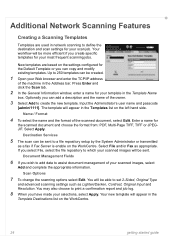
...for the Default Template or you can copy and modify existing templates. Your new template will appear in the Template Destinations list on the WorkCentre. 24 getting started guide The template will appear in the Templates list on the left hand side. Additional Network Scanning Features Creating a ...in network scanning to create the new template. Select Apply. Select File and/or Fax as a fax if Fax Server is enable on the WorkCentre. Press Enter and click the Scan tab. 2 In the General Information window, enter a name for the scanned document and choose the format from...
...for the Default Template or you can copy and modify existing templates. Your new template will appear in the Template Destinations list on the WorkCentre. 24 getting started guide The template will appear in the Templates list on the left hand side. Additional Network Scanning Features Creating a ...in network scanning to create the new template. Select Apply. Select File and/or Fax as a fax if Fax Server is enable on the WorkCentre. Press Enter and click the Scan tab. 2 In the General Information window, enter a name for the scanned document and choose the format from...
Getting Started Guide
Page 30
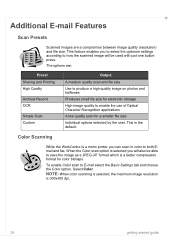
... selected, the maximum image resolution is the default. This feature enables you can scan in color to both Email and fax. Color Scanning While the WorkCentre is a mono printer you to select the optimum settings according to how the scanned image will also be able to save the image as a JPEG...
... selected, the maximum image resolution is the default. This feature enables you can scan in color to both Email and fax. Color Scanning While the WorkCentre is a mono printer you to select the optimum settings according to how the scanned image will also be able to save the image as a JPEG...


