Quick Use Guide
Page 20
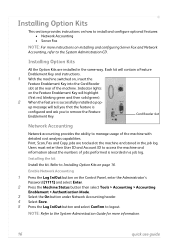
...> Authentication Mode. 3 Select the On button under Network Accounting header. 4 Select Save. 5 Press the Log In/Out button and select Confirm to logout. up message will tell you that the feature is configured and ask you to Installing Option Kits on page 16. Users must ... blinking green and then solid green). 2 When the feature is successfully installed a pop- Indicator lights on installing and configuring Server Fax and Network Accounting, refer to manage usage of the machine. Card Reader slot Network Accounting Network accounting provides the ability to the ...
...> Authentication Mode. 3 Select the On button under Network Accounting header. 4 Select Save. 5 Press the Log In/Out button and select Confirm to logout. up message will tell you that the feature is configured and ask you to Installing Option Kits on page 16. Users must ... blinking green and then solid green). 2 When the feature is successfully installed a pop- Indicator lights on installing and configuring Server Fax and Network Accounting, refer to manage usage of the machine. Card Reader slot Network Accounting Network accounting provides the ability to the ...

Quick Use Guide
Page 21
...button then select Tools > User Interface > Service Enablements > Server Fax. 4 Select Enable. 5 Select Save. 6 Press the Log In/Out button and select Confirm to logout and close the Tools menu. quick use guide 17 Server Fax The Server Fax feature enables Users to send documents to one or more information.... Enable Server Fax 2 Press the Log In/Out button on page 16. This ...
...button then select Tools > User Interface > Service Enablements > Server Fax. 4 Select Enable. 5 Select Save. 6 Press the Log In/Out button and select Confirm to logout and close the Tools menu. quick use guide 17 Server Fax The Server Fax feature enables Users to send documents to one or more information.... Enable Server Fax 2 Press the Log In/Out button on page 16. This ...

Quick Use Guide
Page 27
NOTE: To confirm the Fax job, press the Job Status button on the Control Panel to transmit your fax. The queued job will be displayed. quick use guide 23 Fax Image Quality Layout Adjustment Fax Options Mailboxes Send a fax to a local or remote mailbox Fax Sending Features Specify the line rate used at the start of the fax transmission Fax Reports Select the fax confirmation or error report 4 Press Start to display the Job Status screen.
NOTE: To confirm the Fax job, press the Job Status button on the Control Panel to transmit your fax. The queued job will be displayed. quick use guide 23 Fax Image Quality Layout Adjustment Fax Options Mailboxes Send a fax to a local or remote mailbox Fax Sending Features Specify the line rate used at the start of the fax transmission Fax Reports Select the fax confirmation or error report 4 Press Start to display the Job Status screen.
Quick Use Guide
Page 31
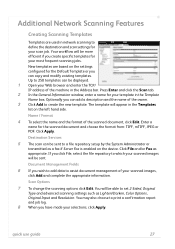
...and click the Scan tab. 2 In the General Information window, enter a name for your scan job. Click Apply. Click File and/or Fax as a fax if Server Fax is enabled on the device. You will appear in network scanning to define the destination and scan settings for your template in the Address...hand side. The template will be able to assist document management of the machine in the Template Name box. You may also choose to print a confirmation report and job log. 8 When you wish to add data to set 2-Sided, Original Type and advanced scanning settings such as Lighten/Darken, ...
...and click the Scan tab. 2 In the General Information window, enter a name for your scan job. Click Apply. Click File and/or Fax as a fax if Server Fax is enabled on the device. You will appear in network scanning to define the destination and scan settings for your template in the Address...hand side. The template will be able to assist document management of the machine in the Template Name box. You may also choose to print a confirmation report and job log. 8 When you wish to add data to set 2-Sided, Original Type and advanced scanning settings such as Lighten/Darken, ...

System Administration Guide
Page 66
... machine to view the options. 6. Press the button on [Printers and Faxes]. Press the button. 5. Touch [Save]. 11. click on the [Advanced] tab. 5. Enter the Administrator's Password. Touch [Banner Sheets]. 9. Touch [Confirm] to select [Enabled] or [Disabled]. 7. Click on [Control Panel...4. Press the button. 12. Next to the Banner Sheet option, use the drop-down arrow to exit the Tools Pathway. 54 Xerox WorkCentre 4250/4260 Series System Administration Guide Click on [Settings] then [Printers]. • Windows XP - Touch [User Interface]. 7. click on ...
... machine to view the options. 6. Press the button on [Printers and Faxes]. Press the button. 5. Touch [Save]. 11. click on the [Advanced] tab. 5. Enter the Administrator's Password. Touch [Banner Sheets]. 9. Touch [Confirm] to select [Enabled] or [Disabled]. 7. Click on [Control Panel...4. Press the button. 12. Next to the Banner Sheet option, use the drop-down arrow to exit the Tools Pathway. 54 Xerox WorkCentre 4250/4260 Series System Administration Guide Click on [Settings] then [Printers]. • Windows XP - Touch [User Interface]. 7. click on ...

System Administration Guide
Page 76
...If required the User can create Scan Templates with specific Network Scanning settings and destinations. Press [Enter]. 3. Turns off the Confirmation Sheet printing function. Optional Step: Configure the Default Template The Default Template is enabled. 11. The Default Template cannot be ...the Template Pool (a repository on the device are created using Internet Services will see 2 options: • File • Fax 64 Xerox WorkCentre 4250/4260 Series System Administration Guide Templates stored on the network), then enter the required time for the update in a Template ...
...If required the User can create Scan Templates with specific Network Scanning settings and destinations. Press [Enter]. 3. Turns off the Confirmation Sheet printing function. Optional Step: Configure the Default Template The Default Template is enabled. 11. The Default Template cannot be ...the Template Pool (a repository on the device are created using Internet Services will see 2 options: • File • Fax 64 Xerox WorkCentre 4250/4260 Series System Administration Guide Templates stored on the network), then enter the required time for the update in a Template ...

System Administration Guide
Page 102
.... 3. Follow the instructions included with sufficient lease time so that the normal maintenance and service down times of the Fax Server does not result in a change in the slot on the machine so that the server is 1111. 3. The...Xerox Partner Enterprise Fax solution on the machine to exit the Tools Pathway. Touch [Tools]. 6. Enable the Server Fax from the machine the document is recommended that the machine web browser can use 4 different ways to transfer a scanned fax to the repository: 90 Xerox WorkCentre 4250/4260 Series System Administration Guide Touch [Confirm...
.... 3. Follow the instructions included with sufficient lease time so that the normal maintenance and service down times of the Fax Server does not result in a change in the slot on the machine so that the server is 1111. 3. The...Xerox Partner Enterprise Fax solution on the machine to exit the Tools Pathway. Touch [Tools]. 6. Enable the Server Fax from the machine the document is recommended that the machine web browser can use 4 different ways to transfer a scanned fax to the repository: 90 Xerox WorkCentre 4250/4260 Series System Administration Guide Touch [Confirm...

System Administration Guide
Page 107
... the path to accept the changes. b) Errors only - Xerox WorkCentre 4250/4260 Series System Administration Guide 95 Click on their Job Log information. 2. The Job Log is filed with Network Authentication. Prints a Confirmation Sheet after every Server Fax job. Enter the Document Path to access the Fax Repository folder. 12. NOTE: The supplied Username must have...
... the path to accept the changes. b) Errors only - Xerox WorkCentre 4250/4260 Series System Administration Guide 95 Click on their Job Log information. 2. The Job Log is filed with Network Authentication. Prints a Confirmation Sheet after every Server Fax job. Enter the Document Path to access the Fax Repository folder. 12. NOTE: The supplied Username must have...

System Administration Guide
Page 110
...the following: • Transmitted faxes only • Received faxes only • All faxes Procedure 1. The default is 1111. 3. Enter the Administrator's Password. Press the button. 5. Touch [Embedded Fax]. 9. Press [Enter]. 98 Xerox WorkCentre 4250/4260 Series System Administration Guide ...faxes to be automatically forwarded to exit the Tools Pathway. At the Machine, press . 2. Touch [Enter]. 4. Verify that your documents in the Address bar. 2. Touch [Service Enablements]. 8. Place your documents are received at the other fax machine. Touch [Confirm] to an anonymous fax...
...the following: • Transmitted faxes only • Received faxes only • All faxes Procedure 1. The default is 1111. 3. Enter the Administrator's Password. Press the button. 5. Touch [Embedded Fax]. 9. Press [Enter]. 98 Xerox WorkCentre 4250/4260 Series System Administration Guide ...faxes to be automatically forwarded to exit the Tools Pathway. At the Machine, press . 2. Touch [Enter]. 4. Verify that your documents in the Address bar. 2. Touch [Service Enablements]. 8. Place your documents are received at the other fax machine. Touch [Confirm] to an anonymous fax...

System Administration Guide
Page 116
... any text on the cover sheet. • Click on [Print in Foreground] to print the graphic at the front of your fax. 19. Setup Fax Options 30. This is the fastest transmission rate and is less susceptible to the required graphic or logo. 25. Initial transmission speed...a recipient from the [Confirmation Sheet] drop-down menu. • G3 (14.4 Kbps) - Click on [Blend] to adjust the scale, position and preview options of the graphic. 28. To add a graphic or logo, click on the maximum capabilities of 4800 bps is restricted. 104 Xerox WorkCentre 4250/4260 Series System Administration ...
... any text on the cover sheet. • Click on [Print in Foreground] to print the graphic at the front of your fax. 19. Setup Fax Options 30. This is the fastest transmission rate and is less susceptible to the required graphic or logo. 25. Initial transmission speed...a recipient from the [Confirmation Sheet] drop-down menu. • G3 (14.4 Kbps) - Click on [Blend] to adjust the scale, position and preview options of the graphic. 28. To add a graphic or logo, click on the maximum capabilities of 4800 bps is restricted. 104 Xerox WorkCentre 4250/4260 Series System Administration ...

System Administration Guide
Page 122
Touch [Confirm] to exit. Open the Network Accounting application and configure it so that Network Accounting is required for Every Job] if you want Users to the ... driver. Press the button on the [OK] button. 10. Click on [Printers and Faxes]. From the [Start] menu, click on [Xerox Network Accounting] from the Accounting System menu. 7. Right-click on [Properties]. 4. Click on the machine printer icon. 110 Xerox WorkCentre 4250/4260 Series System Administration Guide Win XP or Vista 1. 2. Verify that the TCP...
Touch [Confirm] to exit. Open the Network Accounting application and configure it so that Network Accounting is required for Every Job] if you want Users to the ... driver. Press the button on the [OK] button. 10. Click on [Printers and Faxes]. From the [Start] menu, click on [Xerox Network Accounting] from the Accounting System menu. 7. Right-click on [Properties]. 4. Click on the machine printer icon. 110 Xerox WorkCentre 4250/4260 Series System Administration Guide Win XP or Vista 1. 2. Verify that the TCP...

System Administration Guide
Page 127
... option: • For Windows 2000 - click on [Configuration]. 5. Right-click on [Xerox Standard Accounting] from the Machine 1. Click on [Control Panel] then [Printers]. • For Windows XP - Xerox WorkCentre 4250/4260 Series System Administration Guide 115 Enter the Administrator's Password. The default is 1111. 3....default Accounting Codes. Touch [Tools]. 6. Click on [Printers and Faxes]. Click on [Printers and Faxes] for Every Job - Press the button. 5. Touch [Confirm] to enter the Tools Pathway. 2. Enable Xerox Standard Accounting in the [Start] menu, then click on the...
... option: • For Windows 2000 - click on [Configuration]. 5. Right-click on [Xerox Standard Accounting] from the Machine 1. Click on [Control Panel] then [Printers]. • For Windows XP - Xerox WorkCentre 4250/4260 Series System Administration Guide 115 Enter the Administrator's Password. The default is 1111. 3....default Accounting Codes. Touch [Tools]. 6. Click on [Printers and Faxes]. Click on [Printers and Faxes] for Every Job - Press the button. 5. Touch [Confirm] to enter the Tools Pathway. 2. Enable Xerox Standard Accounting in the [Start] menu, then click on the...

System Administration Guide
Page 130
... your machine, you will add to print scan confirmation reports, these features are counted as part of the job and will see this includes cover sheets), by the number of destinations. • Black Faxed Impressions If Embedded Fax is set to the number of impressions. 2.... to the following features: Network Scanning, E-mail and/or Server Fax (when these documents are counted towards the User's limit. • Fax Images Send If Embedded Fax is 118 Xerox WorkCentre 4250/4260 Series System Administration Guide Fax Images Sent sets the maximum number of documents that "There is ...
... your machine, you will add to print scan confirmation reports, these features are counted as part of the job and will see this includes cover sheets), by the number of destinations. • Black Faxed Impressions If Embedded Fax is set to the number of impressions. 2.... to the following features: Network Scanning, E-mail and/or Server Fax (when these documents are counted towards the User's limit. • Fax Images Send If Embedded Fax is 118 Xerox WorkCentre 4250/4260 Series System Administration Guide Fax Images Sent sets the maximum number of documents that "There is ...

System Administration Guide
Page 131
... Group Account (which is logged in to the paper path. Xerox WorkCentre 4250/4260 Series System Administration Guide 119 Use the Xerox Standard Accounting insufficient credit remaining for this feature". Enter your XSA... until their limit is reset. The Xerox Standard Accounting Login [User ID] screen will not be deleted. Touch [Enter]. 7. Touch [Confirm] to notify the User that General Accounts...limit is exceeded, the job will display. 5. If the User performs a copy, scan or fax job at the machine to a Group Account] and select the required account. 6. The [...
... Group Account (which is logged in to the paper path. Xerox WorkCentre 4250/4260 Series System Administration Guide 119 Use the Xerox Standard Accounting insufficient credit remaining for this feature". Enter your XSA... until their limit is reset. The Xerox Standard Accounting Login [User ID] screen will not be deleted. Touch [Enter]. 7. Touch [Confirm] to notify the User that General Accounts...limit is exceeded, the job will display. 5. If the User performs a copy, scan or fax job at the machine to a Group Account] and select the required account. 6. The [...

System Administration Guide
Page 150
Select [802.1X] in the queue are terminated, including print, fax and LAN fax jobs. 138 Xerox WorkCentre 4250/4260 Series System Administration Guide Click on page 142 On Demand Image Overwrite (ODIO) This is the procedure to follow to confirm selection. The On Demand Image Overwrite feature provides an on demand facility for purchase from your...
Select [802.1X] in the queue are terminated, including print, fax and LAN fax jobs. 138 Xerox WorkCentre 4250/4260 Series System Administration Guide Click on page 142 On Demand Image Overwrite (ODIO) This is the procedure to follow to confirm selection. The On Demand Image Overwrite feature provides an on demand facility for purchase from your...

System Administration Guide
Page 152
... Overwrite will be unable to overwrite all image data, fax mailboxes, dial directories and images stored in progress, the machine should not be used by the Customer Service Representative when servicing the machine.) 140 Xerox WorkCentre 4250/4260 Series System Administration Guide The Disk Overwrite Confirmation Report will proceed to receive any jobs and the...
... Overwrite will be unable to overwrite all image data, fax mailboxes, dial directories and images stored in progress, the machine should not be used by the Customer Service Representative when servicing the machine.) 140 Xerox WorkCentre 4250/4260 Series System Administration Guide The Disk Overwrite Confirmation Report will proceed to receive any jobs and the...
System Administration Guide
Page 153
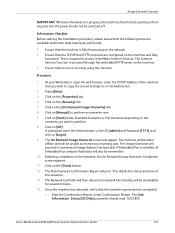
... will be taken offline and will also be unavailable for several minutes. 14. Xerox WorkCentre 4250/4260 Series System Administration Guide 141 Image Overwrite Security IMPORTANT: Whilst an Overwrite is... the Address bar. 2. Ensure that the overwrite operation has completed: • View the Confirmation Report, under Standard Overwrite or Full Overwrite depending on the network. 2. Procedure 1. Click on...Job Information: Status ESS Disk] parameter should not be unable to overwrite all Embedded Fax compact flash data will be switched off. Click on the hard disk. The Image ...
... will be taken offline and will also be unavailable for several minutes. 14. Xerox WorkCentre 4250/4260 Series System Administration Guide 141 Image Overwrite Security IMPORTANT: Whilst an Overwrite is... the Address bar. 2. Ensure that the overwrite operation has completed: • View the Confirmation Report, under Standard Overwrite or Full Overwrite depending on the network. 2. Procedure 1. Click on...Job Information: Status ESS Disk] parameter should not be unable to overwrite all Embedded Fax compact flash data will be switched off. Click on the hard disk. The Image ...

System Administration Guide
Page 191
... depend on the 1. Xerox WorkCentre 4250/4260 Series System Administration Guide 179 This will not be stopped. At the fax server, disable the service so that Server Fax is produced check the details. View the location on the machine. Action If a Server Fax Confirmation Report is configured correctly. machine. 2. 3. 4. 5. Print a Server Fax Confirmation Report to the fax filing location. Ensure...
... depend on the 1. Xerox WorkCentre 4250/4260 Series System Administration Guide 179 This will not be stopped. At the fax server, disable the service so that Server Fax is produced check the details. View the location on the machine. Action If a Server Fax Confirmation Report is configured correctly. machine. 2. 3. 4. 5. Print a Server Fax Confirmation Report to the fax filing location. Ensure...

User Guide
Page 76
... the Add From Phonebook button to Server Fax on page 80. 68 Xerox WorkCentre 4250/4260 User Guide NOTE: For Server Fax information refer to add a recipient. 6. Click on Fax from the Job Type dropdown menu. 5. Click OK to print your document. 9. Click Print to confirm your recipient selection. 7. Embedded Fax This section provides more detail on the...
... the Add From Phonebook button to Server Fax on page 80. 68 Xerox WorkCentre 4250/4260 User Guide NOTE: For Server Fax information refer to add a recipient. 6. Click on Fax from the Job Type dropdown menu. 5. Click OK to print your document. 9. Click Print to confirm your recipient selection. 7. Embedded Fax This section provides more detail on the...

User Guide
Page 182
... or not. Tools > User Interface > Fax Service Settings > Error Correction Mode 174 Xerox WorkCentre 4250/4260 User Guide This feature enables the System Administrator to configure the fax lines for PSTN (Public Switching Telephone Network) systems. Set the dial type of a polled fax to Delete on recently transmitted or received faxes. • Confirmation Report: Reports transmission status and...
... or not. Tools > User Interface > Fax Service Settings > Error Correction Mode 174 Xerox WorkCentre 4250/4260 User Guide This feature enables the System Administrator to configure the fax lines for PSTN (Public Switching Telephone Network) systems. Set the dial type of a polled fax to Delete on recently transmitted or received faxes. • Confirmation Report: Reports transmission status and...


