Quick Use Guide
Page 11
...printing media Inside the Device There are optional on other configurations. 2 Document Feeder: Used for scanning multiple documents. Your WorkCentre 4250/4260 1 Control Panel: Touch Screen and Numeric Keypad 2 3 1 3 Output Tray: Collects output 5 5 Paper Trays: Tray 2 and HCF... are standard on the WorkCentre 4250/4260XF and are Customer Replaceable Units in the device, the Toner Cartridge (6) and the Drum Cartridge (7). The Document Glass underneath is on the inside of the front cover. 7 6 quick use guide 7
...printing media Inside the Device There are optional on other configurations. 2 Document Feeder: Used for scanning multiple documents. Your WorkCentre 4250/4260 1 Control Panel: Touch Screen and Numeric Keypad 2 3 1 3 Output Tray: Collects output 5 5 Paper Trays: Tray 2 and HCF... are standard on the WorkCentre 4250/4260XF and are Customer Replaceable Units in the device, the Toner Cartridge (6) and the Drum Cartridge (7). The Document Glass underneath is on the inside of the front cover. 7 6 quick use guide 7

Quick Use Guide
Page 22
... Automatically print document as a booklet Paper Supply Select the tray/ size of paper Lighten / Darken Lighten or darken the output Book Copying Copy bound documents Covers Insert covers 2-Sided Copying 1 or 2 sided copy options Background Suppression Automatically reduce or eliminate a dark background Image Shift Move the image on the page Transparency Separators...
... Automatically print document as a booklet Paper Supply Select the tray/ size of paper Lighten / Darken Lighten or darken the output Book Copying Copy bound documents Covers Insert covers 2-Sided Copying 1 or 2 sided copy options Background Suppression Automatically reduce or eliminate a dark background Image Shift Move the image on the page Transparency Separators...

Quick Use Guide
Page 38
...document glass as at the start of the jam. Paper jams Side Cover Area Jam The screen will indicate the location of the job and reload into the document feeder. Lift the Document Lift the Feed Assembly cover Feeder cover • When instructed to recover the job integrity. Paper Jam Area... • Ensure that all the documents from the paper path. Lower Jam Clearance Cover handle 34 quick use guide Finisher Area Jam Fuser Area Document jams 1b 1a 1c The display will be recycled automatically to do so,...
...document glass as at the start of the jam. Paper jams Side Cover Area Jam The screen will indicate the location of the job and reload into the document feeder. Lift the Document Lift the Feed Assembly cover Feeder cover • When instructed to recover the job integrity. Paper Jam Area... • Ensure that all the documents from the paper path. Lower Jam Clearance Cover handle 34 quick use guide Finisher Area Jam Fuser Area Document jams 1b 1a 1c The display will be recycled automatically to do so,...
System Administration Guide
Page 7
... Fax 96 10 Embedded Fax ...97 Overview 97 Server Fax and Embedded Fax 97 Information Checklist 97 Enable Embedded Fax from Phonebook 103 Setting up a Cover Sheet 104 Setup Fax Options 104 Setup Phonebook Preferences 105 User Preferences 105 Xerox WorkCentre 4250/4260 Series System Administration Guide vii
... Fax 96 10 Embedded Fax ...97 Overview 97 Server Fax and Embedded Fax 97 Information Checklist 97 Enable Embedded Fax from Phonebook 103 Setting up a Cover Sheet 104 Setup Fax Options 104 Setup Phonebook Preferences 105 User Preferences 105 Xerox WorkCentre 4250/4260 Series System Administration Guide vii

System Administration Guide
Page 47
.../Disable the Banner Sheet on page 54 Windows Printing LPR Printing Ensure Print Services for Unix is enabled Follow the relevant steps below that are covered: • LPR Printing on page 35 • Internet Printing Protocol (IPP) Port on page 38 • Raw TCP/IP Printing (Port 9100) on page 40... the CentreWare Print and Fax Drivers CD into your computer. Click on [Add/Remove Windows Components] in the left hand column. Click on [Control Panel]. 5. Xerox WorkCentre 4250/4260 Series System Administration Guide 35 Double-click on [Add or Remove Programs]. 6.
.../Disable the Banner Sheet on page 54 Windows Printing LPR Printing Ensure Print Services for Unix is enabled Follow the relevant steps below that are covered: • LPR Printing on page 35 • Internet Printing Protocol (IPP) Port on page 38 • Raw TCP/IP Printing (Port 9100) on page 40... the CentreWare Print and Fax Drivers CD into your computer. Click on [Add/Remove Windows Components] in the left hand column. Click on [Control Panel]. 5. Xerox WorkCentre 4250/4260 Series System Administration Guide 35 Double-click on [Add or Remove Programs]. 6.

System Administration Guide
Page 59
...Click on the [Paper/Output] tab. 3. c) Configure the paper size settings as required, then click the [OK] button. 5. b) In [Cover Options], select the cover options you require, or set up a custom paper: a) in the [Advanced Paper Selection] as require, then click the [OK] button. In ...Select the paper supply you require. d) If you want to print images from your Printers folder, right-click on the covers, select [Printed]. Xerox WorkCentre 4250/4260 Series System Administration Guide 47 Paper/Output 2. You can specify the original document size, the output paper size, and...
...Click on the [Paper/Output] tab. 3. c) Configure the paper size settings as required, then click the [OK] button. 5. b) In [Cover Options], select the cover options you require, or set up a custom paper: a) in the [Advanced Paper Selection] as require, then click the [OK] button. In ...Select the paper supply you require. d) If you want to print images from your Printers folder, right-click on the covers, select [Printed]. Xerox WorkCentre 4250/4260 Series System Administration Guide 47 Paper/Output 2. You can specify the original document size, the output paper size, and...
System Administration Guide
Page 65
... the relevant Accounting feature in the driver. Xerox WorkCentre 4250/4260 Series System Administration Guide 53 Reverse the page order. • Color Sync - For further information refer to print, page borders, pages per sheet (N-up). • Output Options - Printed before or after the job, or no Cover Page. • Error Handling - Specify which trays...
... the relevant Accounting feature in the driver. Xerox WorkCentre 4250/4260 Series System Administration Guide 53 Reverse the page order. • Color Sync - For further information refer to print, page borders, pages per sheet (N-up). • Output Options - Printed before or after the job, or no Cover Page. • Error Handling - Specify which trays...

System Administration Guide
Page 93
Information Checklist on page 81 2. The Internet Services LDAP page enables you to install and setup Address Books. Xerox WorkCentre 4250/4260 Series System Administration Guide 81 Obtain the IP Address or Host Name of your network supports LDAP services. 2. Information Checklist 1. 8 LDAP...with many of addresses saved in a .CSV file (Comma Separated by Values) file format stored locally on page 84 4. The following topics are covered: 1. NOTE: When referred to Machine User Interface it is not configured to allow NULL names and passwords. LDAP is used to access the ...
Information Checklist on page 81 2. The Internet Services LDAP page enables you to install and setup Address Books. Xerox WorkCentre 4250/4260 Series System Administration Guide 81 Obtain the IP Address or Host Name of your network supports LDAP services. 2. Information Checklist 1. 8 LDAP...with many of addresses saved in a .CSV file (Comma Separated by Values) file format stored locally on page 84 4. The following topics are covered: 1. NOTE: When referred to Machine User Interface it is not configured to allow NULL names and passwords. LDAP is used to access the ...

System Administration Guide
Page 116
... click the name and then click the [Remove] button. 18. This is the fastest transmission rate and is restricted. 104 Xerox WorkCentre 4250/4260 Series System Administration Guide This rate minimises transmission errors by using Error Correction Mode (ECM). Click on [OK]. 27. Click on ... G3 (33.6 Kbps) - 11 LAN Fax 17. To remove a recipient from another phonebook, click the [Add] button. To add a recipient to the cover sheet (a .BMP, .GIF or .JPEG), click on the required option from the phonebook and click [OK]. Select the phonebook, select the required name from...
... click the name and then click the [Remove] button. 18. This is the fastest transmission rate and is restricted. 104 Xerox WorkCentre 4250/4260 Series System Administration Guide This rate minimises transmission errors by using Error Correction Mode (ECM). Click on [OK]. 27. Click on ... G3 (33.6 Kbps) - 11 LAN Fax 17. To remove a recipient from another phonebook, click the [Add] button. To add a recipient to the cover sheet (a .BMP, .GIF or .JPEG), click on the required option from the phonebook and click [OK]. Select the phonebook, select the required name from...

System Administration Guide
Page 117
...] next to Shared Phonebook to send your call requires a Charge Code number for billing purposes, click on the [Always Use Current Cover Sheet Notes]. 43. If you add fax numbers on the Preferences tab. The Personal Phonebook is created when you want the machine to...[Open] next to your network. Use the Feature 33. b) Select and open the [default.pb] file. If your fax. 35. Xerox WorkCentre 4250/4260 Series System Administration Guide 105 Personal Phonebook The Personal Phonebook is automatically saved to Personal Phonebook on the [Fax Recipients] tab.
...] next to Shared Phonebook to send your call requires a Charge Code number for billing purposes, click on the [Always Use Current Cover Sheet Notes]. 43. If you add fax numbers on the Preferences tab. The Personal Phonebook is created when you want the machine to...[Open] next to your network. Use the Feature 33. b) Select and open the [default.pb] file. If your fax. 35. Xerox WorkCentre 4250/4260 Series System Administration Guide 105 Personal Phonebook The Personal Phonebook is automatically saved to Personal Phonebook on the [Fax Recipients] tab.

System Administration Guide
Page 130
... a User with your machine, you will add to restrict the maximum number of prints this option. Cover sheets and banner sheets are counted towards the User's limit. • Fax Images Send If Embedded Fax is 118 Xerox WorkCentre 4250/4260 Series System Administration Guide Exceeding Usage Limits Each time a User logs in the [Black...
... a User with your machine, you will add to restrict the maximum number of prints this option. Cover sheets and banner sheets are counted towards the User's limit. • Fax Images Send If Embedded Fax is 118 Xerox WorkCentre 4250/4260 Series System Administration Guide Exceeding Usage Limits Each time a User logs in the [Black...

System Administration Guide
Page 171
... settings as the URL (Universal Resource Locator) in Control Panel, but also allows you to the Internet or intranet. The following areas are covered: 1. Trays on page 164 11. Active Jobs on page 162 8. Information Checklist on page 164 12. Print on page 160 3. Alert...Consumables on page 167 15. General on page 163 10. Billing and Counters on page 161 6. Job Management on page 161 7. Xerox WorkCentre 4250/4260 Series System Administration Guide 159 Alerts on page 166 14. The CentreWare Internet Services Support page provides easy access to enable and use...
... settings as the URL (Universal Resource Locator) in Control Panel, but also allows you to the Internet or intranet. The following areas are covered: 1. Trays on page 164 11. Active Jobs on page 162 8. Information Checklist on page 164 12. Print on page 160 3. Alert...Consumables on page 167 15. General on page 163 10. Billing and Counters on page 161 6. Job Management on page 161 7. Xerox WorkCentre 4250/4260 Series System Administration Guide 159 Alerts on page 166 14. The CentreWare Internet Services Support page provides easy access to enable and use...
System Administration Guide
Page 199
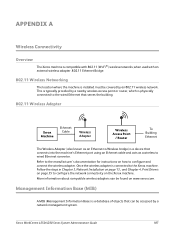
...Ethernet port using an Ethernet cable and acts as an Ethernet-to-Wireless bridge) is installed must be covered by an 802.11 wireless network. Xerox WorkCentre 4250/4260 Series System Administration Guide 187 This is typically provided by a nearby wireless access point or router, ...which is physically connected to the wired Ethernet that serves the building. 802.11 Wireless Adapter Xerox Machine Ethernet Cable Wireless ...
...Ethernet port using an Ethernet cable and acts as an Ethernet-to-Wireless bridge) is installed must be covered by an 802.11 wireless network. Xerox WorkCentre 4250/4260 Series System Administration Guide 187 This is typically provided by a nearby wireless access point or router, ...which is physically connected to the wired Ethernet that serves the building. 802.11 Wireless Adapter Xerox Machine Ethernet Cable Wireless ...

System Administration Guide
Page 205
... settings 8 Ethernet Cable 8 Ethernet Settings 8 Event Description 147 Event ID 146 Export local address book 85 EXT 7 F Fax add from phonebook 103 add recipient 103 cover sheet 104 use LAN 102 Fax Destinations 65 Fax Images Send 118 Fax Options 104 FDI 7, 130 Feature Enablement Key 7, 107, 108 card reader 7 File... 139 use over the network 140 Image overwrite immediate error 143 Image Overwrite Security 138 overview 138 Image Settings 165 portable document format (PDF) 166 Xerox WorkCentre 4250/4260 Series System Administration Guide 193
... settings 8 Ethernet Cable 8 Ethernet Settings 8 Event Description 147 Event ID 146 Export local address book 85 EXT 7 F Fax add from phonebook 103 add recipient 103 cover sheet 104 use LAN 102 Fax Destinations 65 Fax Images Send 118 Fax Options 104 FDI 7, 130 Feature Enablement Key 7, 107, 108 card reader 7 File... 139 use over the network 140 Image overwrite immediate error 143 Image Overwrite Security 138 overview 138 Image Settings 165 portable document format (PDF) 166 Xerox WorkCentre 4250/4260 Series System Administration Guide 193
User Guide
Page 14
... serial number open the side cover using the release latch and then open the front door. The Xerox Welcome Center or local representative telephone number is provided when the machine is located on a panel above the toner cartridge. Use the space below : Xerox Welcome Center or local representative telephone number 6 Xerox WorkCentre 4250/4260 User Guide
... serial number open the side cover using the release latch and then open the front door. The Xerox Welcome Center or local representative telephone number is provided when the machine is located on a panel above the toner cartridge. Use the space below : Xerox Welcome Center or local representative telephone number 6 Xerox WorkCentre 4250/4260 User Guide

User Guide
Page 15
Safety 1 Welcome Read these covers or guards. Your Xerox product and supplies have been verified using XEROX materials only. Please read the following instructions carefully before using covers or guards, which require a tool to enable removal. This WARNING mark alerts users to ensure ... the user documentation supplied with the product. Do not carry out any maintenance on , or supplied with the product. 2. Xerox WorkCentre 4250/4260 User Guide 7 Follow all warnings and instructions marked on this manual. Maintenance Information 1. Any operator product maintenance procedures will...
Safety 1 Welcome Read these covers or guards. Your Xerox product and supplies have been verified using XEROX materials only. Please read the following instructions carefully before using covers or guards, which require a tool to enable removal. This WARNING mark alerts users to ensure ... the user documentation supplied with the product. Do not carry out any maintenance on , or supplied with the product. 2. Xerox WorkCentre 4250/4260 User Guide 7 Follow all warnings and instructions marked on this manual. Maintenance Information 1. Any operator product maintenance procedures will...

User Guide
Page 16
... Department to arrange relocation of the copier to a location outside of your Xerox equipment, follow all warnings and instructions that you can be left on plush carpet) that has adequate strength to support the weight of ...overheating. 8 Xerox WorkCentre 4250/4260 User Guide WARNING: Do not use materials specifically designated for servicing. • Always unplug this product, unplug the product from the electrical outlet before cleaning. 1 Welcome 4. There are no parts behind these safety guidelines at all times: Do These • Always follow these covers that are ...
... Department to arrange relocation of the copier to a location outside of your Xerox equipment, follow all warnings and instructions that you can be left on plush carpet) that has adequate strength to support the weight of ...overheating. 8 Xerox WorkCentre 4250/4260 User Guide WARNING: Do not use materials specifically designated for servicing. • Always unplug this product, unplug the product from the electrical outlet before cleaning. 1 Welcome 4. There are no parts behind these safety guidelines at all times: Do These • Always follow these covers that are ...

User Guide
Page 17
...directly into slots or openings on the power cable. 7. Electrical shock or fire may result. 10. If you are no operator serviceable areas within these covers. • Never locate the machine near the equipment and shall be easily accessible. 3. The socket outlet shall be placed in a room unless proper ventilation... to an electrical outlet that your machine. There are not sure that has a protective earth pin. This plug Xerox WorkCentre 4250/4260 User Guide 9 Please contact your local power company or an electrician for advice. Do not use an extension cord or remove or modify ...
...directly into slots or openings on the power cable. 7. Electrical shock or fire may result. 10. If you are no operator serviceable areas within these covers. • Never locate the machine near the equipment and shall be easily accessible. 3. The socket outlet shall be placed in a room unless proper ventilation... to an electrical outlet that your machine. There are not sure that has a protective earth pin. This plug Xerox WorkCentre 4250/4260 User Guide 9 Please contact your local power company or an electrician for advice. Do not use an extension cord or remove or modify ...
User Guide
Page 19
... Cartridges: When handling cartridges, for Canada. If you need additional information about ozone, please request the Xerox publication Ozone by calling 1-800-828-6571 in the up position. For Consumables • Store all ...cover is in the United States and Canada. In other than air and is totally enclosed during normal operation. 1 Welcome Standard: UL60950-1, 2003 Edition. With specific regard to disassemble the cartridge. Agency Standard Underwriters Laboratories Inc Intertek ETL SEMKO UL60950-1 1st (2003) (USA/Canada) IEC60950-1 Edition 1 (2001) Xerox WorkCentre 4250...
... Cartridges: When handling cartridges, for Canada. If you need additional information about ozone, please request the Xerox publication Ozone by calling 1-800-828-6571 in the up position. For Consumables • Store all ...cover is in the United States and Canada. In other than air and is totally enclosed during normal operation. 1 Welcome Standard: UL60950-1, 2003 Edition. With specific regard to disassemble the cartridge. Agency Standard Underwriters Laboratories Inc Intertek ETL SEMKO UL60950-1 1st (2003) (USA/Canada) IEC60950-1 Edition 1 (2001) Xerox WorkCentre 4250...

User Guide
Page 48
...panel to adjust the appearance of the copy output, e.g. Output Format Use this tab to adjust the layout of the screen. 40 Xerox WorkCentre 4250/4260 User Guide page 45 Image Quality - The control panel returns to enter the number of the tabs and configure the copy settings....is displayed in the upper right-hand corner of the copy output, e.g. page 48 Layout Adjustment - The number entered is 999. booklet creation, covers, etc. 3 Copy 2. Select the button for the feature required. Select Copy on the control panel to the default entry screen. 4. Ensure ...
...panel to adjust the appearance of the copy output, e.g. Output Format Use this tab to adjust the layout of the screen. 40 Xerox WorkCentre 4250/4260 User Guide page 45 Image Quality - The control panel returns to enter the number of the tabs and configure the copy settings....is displayed in the upper right-hand corner of the copy output, e.g. page 48 Layout Adjustment - The number entered is 999. booklet creation, covers, etc. 3 Copy 2. Select the button for the feature required. Select Copy on the control panel to the default entry screen. 4. Ensure ...
